| Workshop:
Airbrushing tight camouflage colors (by Eduardo Blanco) |
Obs.: The movies below had their size and resolution heavily reduced by YouTube. If you are in the area and are interested in the original videos, please drop me a line.

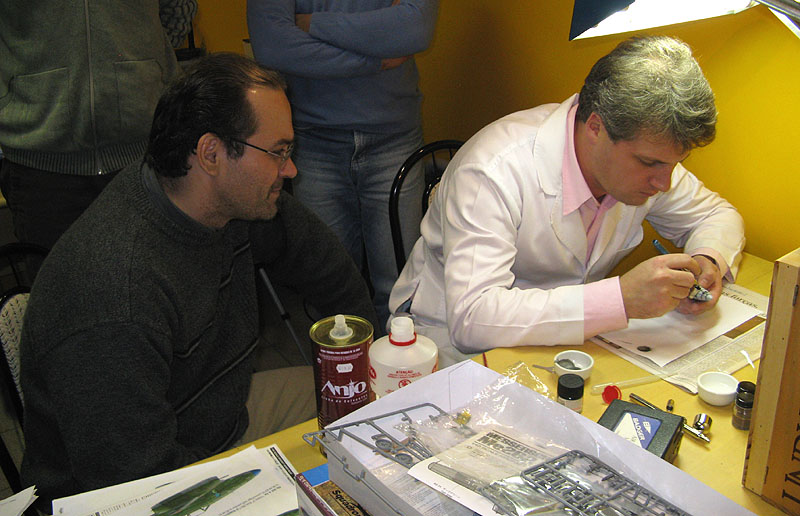
In a recent meeting
of our modeling club, our friend Eduardo Blanco made an airbrushing
demo to show us his method for achieving tight camouflage colors.
Blanco is a practicing dentist, and known in our area for his hand for
airbrushing color demarcations with almost no overspray, something
heavy fist modelers (like your editor here) always find
difficulties to achieve. Here are some shots of a few works by Blanco
to prove that he is really nailing the method (all 1/48 scale):
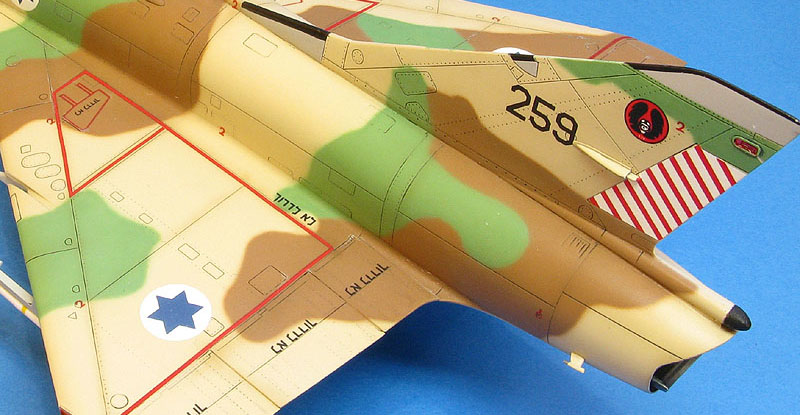
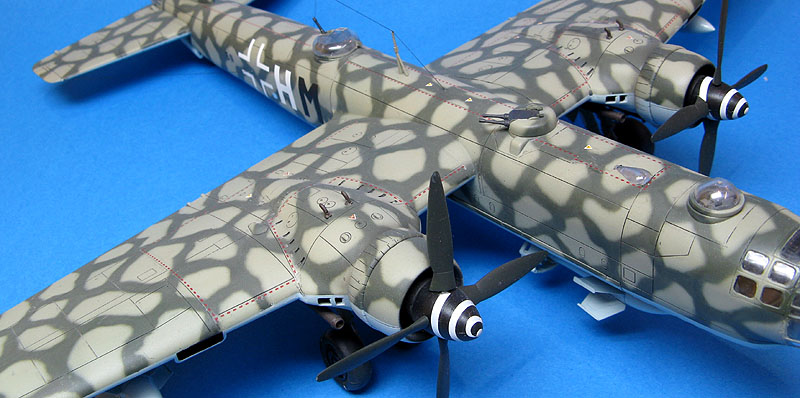
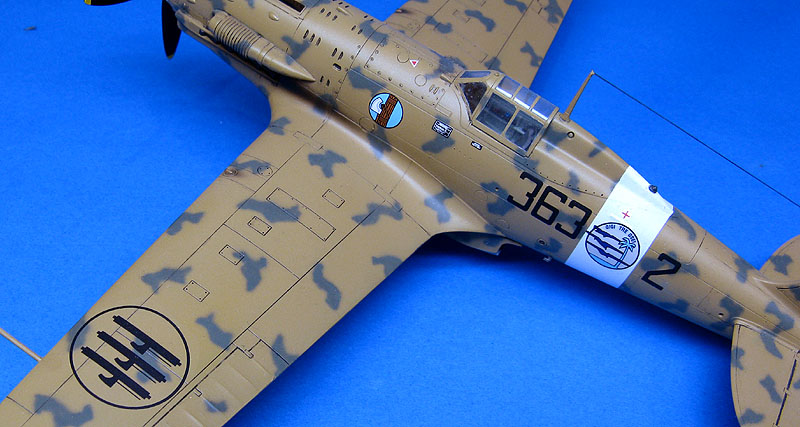
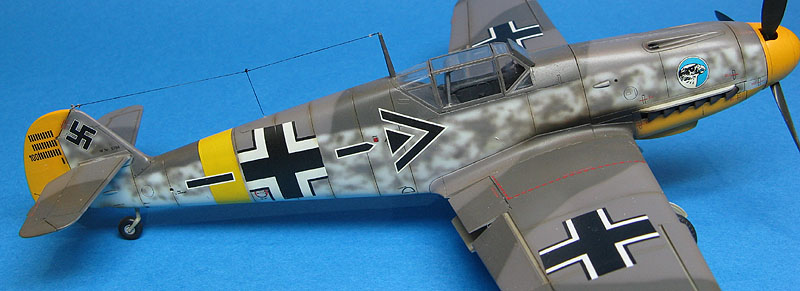
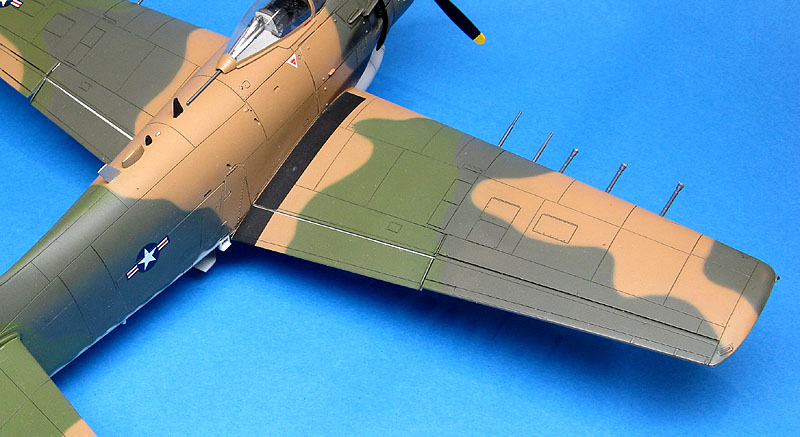
In our club, the
joke is that his airbrushed camouflages are so tight that they look
like if
the ground crewmen have used mask on the real thing... Anyway, the
photos above dismiss any credentials to our guest in this report. In
this workshop, he painted the fuselage of his Tamiya 1/48 scale Me-262
in the course of about one hour. We took the opportunity to make a few
movies showing his technique, but unfortunately YouTube reduces
significantly the quality of the videos.
1. Pre-shading
Blanco started pre-shading the panel lines using Tamiya XF-1 thinned with Alcohol. Using his Badger 100 @ about 15 psi, he finished this step in a matter of minutes. Here is Blanco during the workshop (and a rare chance to see your editor on his right):
It was interesting to note that Blanco doesn't overthin the paint, as we initially thought, and don't use very low pressures on his airbrush neither. He does use very little needle aperture and airbrush very close to the model's surface.
2. Base color
Next, Blanco applied his own mix of RLM 76, made with Tamiya acrylics. His first passes are mists just to provide an initial coverage of the fuselage, airbrushed from about 10 cm off the surface.
On the second pass, he reduces the distance from the model, and fills the uncovered areas, yet subtly preserving the pre-shaded panel lines:
He finishes looking for spots which need another pass and wait a few minutes to let the paint dry to the touch.
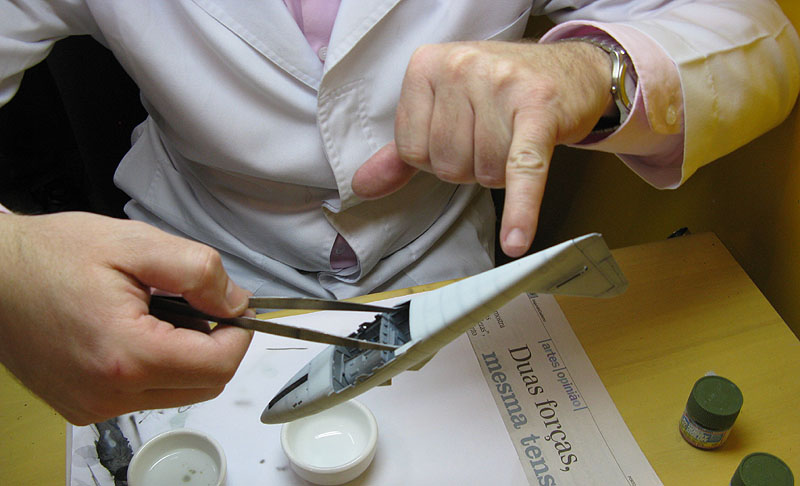
3. RLM 82
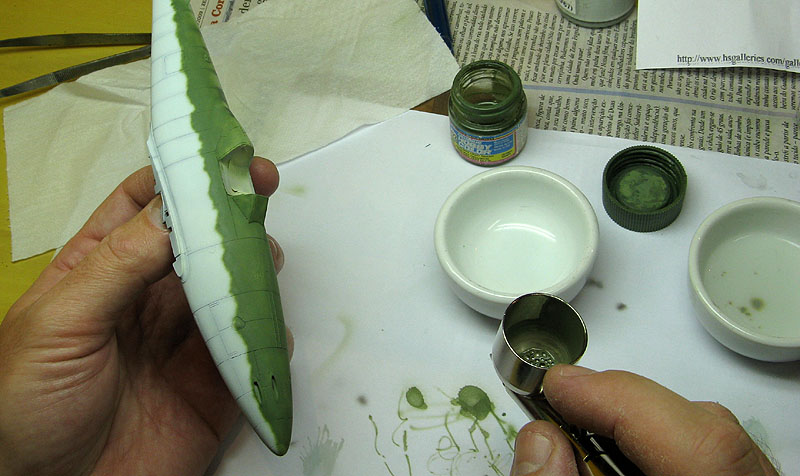
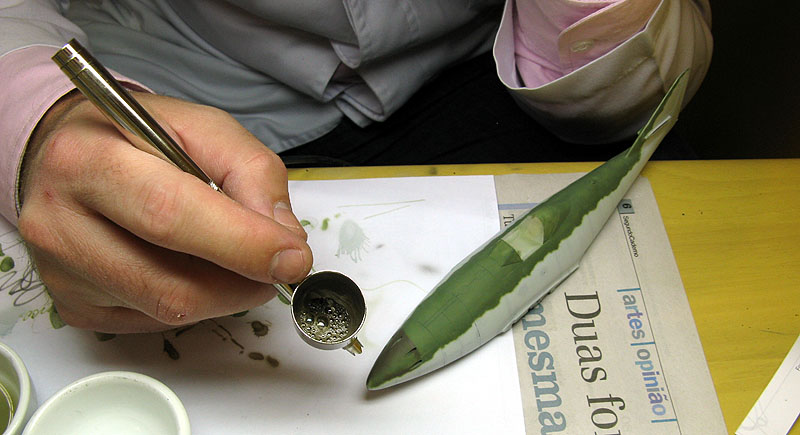
Then, with the model ready to receive the first camouflage color (the objective of this article), Blanco starts to prepare the paint. As you can see in the video below, there is no secret recipe in the preparation of the color (except for him holding the brush with his mouth!). Here he is using Gunze acrylic paints (H-422, now out of production).
Next, he loads the airbrush and starts to cover the upper fuselage. No type of masking is used. He marks the limits of the area to be covered with somewhat random moves, avoiding to obliterate the pre-shading. It is worth to note that most of the time he is holding the airbrush at about 45 degrees upwards to the fuselage surface. This is an important factor to minimize the overspray on the RLM 76:
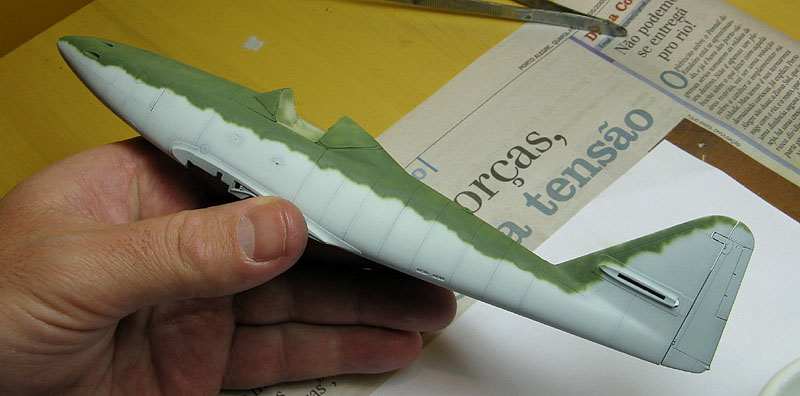
He now finishes the job by filling the remaining areas with the green color. Again, random moves are the golden rule, always trying to preserve the pre-shading as mush as possible. Another thing we have learned is to do vertical movements to the fuselage center line, instead of longitutinal ones. This is essentially what allows Blanco to achieve the characteristic "ripped paper" effect along the demarcation line, so common in Luftwaffe subjects:
The final step is to airbrush the fin. Incidentally, the movie shows the common problem with acrylics - paint drying on the needle. Nice catch of me!! Blanco also retouches here and there, but he told us that in many cases he comes back a few days later to retouch something that he dislikes.
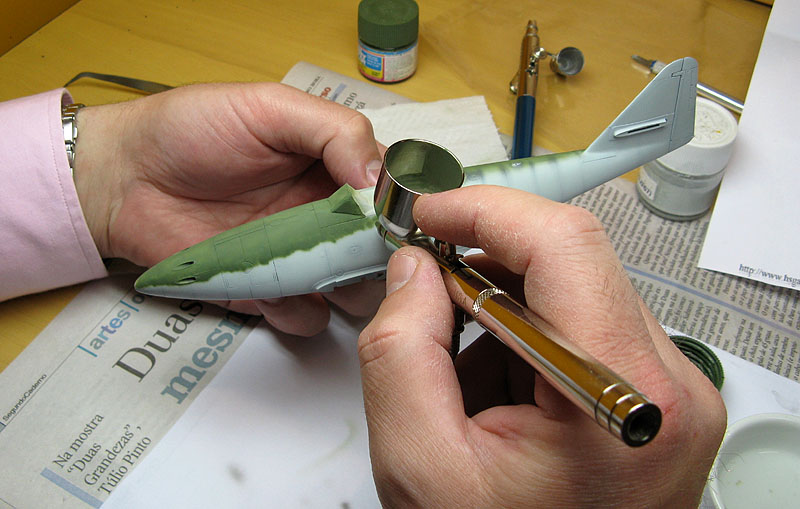
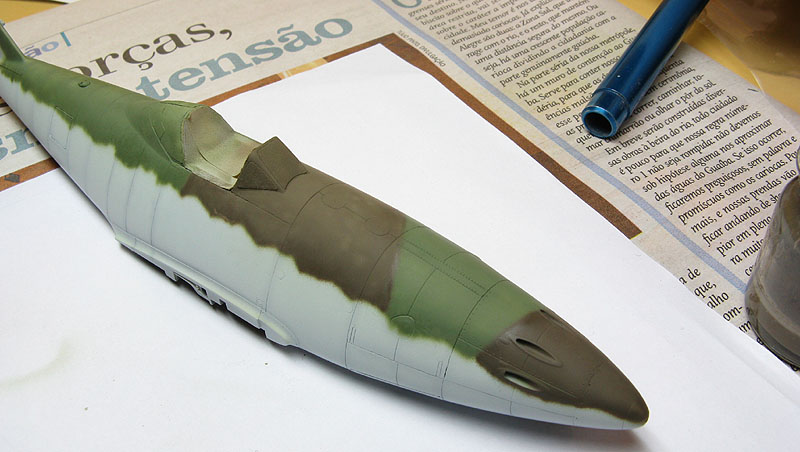
4. RLM 81
The next color is the RLM 81 brownviolet. The demarcation between the RLM 81 and the RLM 82 should be a straight, soft edge line. In order to achieve this result, Blanco simply laid a piece of card over the line and aribrushed very lightly the RLM 81. That almost transparent line would serve as a guide to proceed by freehand:
The interior of the area is filled with the brown, down to the RLM 76 border:
Conclusions
As you can see, there is nothing really fancy, but when you go back to your home, follow this very same steps and the result is not so good, you can only conclude that Blanco is a gifted modeler. You want his advise? Practice, practice, and practice. What you expected? Of course each modeler has his/her own preferences concerning paint brand/type, pressure, thinning ratio, airbrush type, or even technique.
Our sincere thanks to Eduardo Blanco for offering us the unique opportunity, and the chance to share it with you. I hope this workshop can help, or at least inspire you in your next project.
If you care, here is the result of this workshop. Please don't touch it, the paint is still wet:
Rato
Marczak
© 20091. Pre-shading
Blanco started pre-shading the panel lines using Tamiya XF-1 thinned with Alcohol. Using his Badger 100 @ about 15 psi, he finished this step in a matter of minutes. Here is Blanco during the workshop (and a rare chance to see your editor on his right):
It was interesting to note that Blanco doesn't overthin the paint, as we initially thought, and don't use very low pressures on his airbrush neither. He does use very little needle aperture and airbrush very close to the model's surface.
2. Base color
Next, Blanco applied his own mix of RLM 76, made with Tamiya acrylics. His first passes are mists just to provide an initial coverage of the fuselage, airbrushed from about 10 cm off the surface.
On the second pass, he reduces the distance from the model, and fills the uncovered areas, yet subtly preserving the pre-shaded panel lines:
He finishes looking for spots which need another pass and wait a few minutes to let the paint dry to the touch.
3. RLM 82
Then, with the model ready to receive the first camouflage color (the objective of this article), Blanco starts to prepare the paint. As you can see in the video below, there is no secret recipe in the preparation of the color (except for him holding the brush with his mouth!). Here he is using Gunze acrylic paints (H-422, now out of production).
Next, he loads the airbrush and starts to cover the upper fuselage. No type of masking is used. He marks the limits of the area to be covered with somewhat random moves, avoiding to obliterate the pre-shading. It is worth to note that most of the time he is holding the airbrush at about 45 degrees upwards to the fuselage surface. This is an important factor to minimize the overspray on the RLM 76:
He now finishes the job by filling the remaining areas with the green color. Again, random moves are the golden rule, always trying to preserve the pre-shading as mush as possible. Another thing we have learned is to do vertical movements to the fuselage center line, instead of longitutinal ones. This is essentially what allows Blanco to achieve the characteristic "ripped paper" effect along the demarcation line, so common in Luftwaffe subjects:
The final step is to airbrush the fin. Incidentally, the movie shows the common problem with acrylics - paint drying on the needle. Nice catch of me!! Blanco also retouches here and there, but he told us that in many cases he comes back a few days later to retouch something that he dislikes.
4. RLM 81
The next color is the RLM 81 brownviolet. The demarcation between the RLM 81 and the RLM 82 should be a straight, soft edge line. In order to achieve this result, Blanco simply laid a piece of card over the line and aribrushed very lightly the RLM 81. That almost transparent line would serve as a guide to proceed by freehand:
The interior of the area is filled with the brown, down to the RLM 76 border:
Conclusions
As you can see, there is nothing really fancy, but when you go back to your home, follow this very same steps and the result is not so good, you can only conclude that Blanco is a gifted modeler. You want his advise? Practice, practice, and practice. What you expected? Of course each modeler has his/her own preferences concerning paint brand/type, pressure, thinning ratio, airbrush type, or even technique.
Our sincere thanks to Eduardo Blanco for offering us the unique opportunity, and the chance to share it with you. I hope this workshop can help, or at least inspire you in your next project.
If you care, here is the result of this workshop. Please don't touch it, the paint is still wet:
