| Tips on making
aircraft and vehicle lights - Part I |
Every modeler has
his/her own methods to simulate lights in plastic models. Some of them
are rather common among modelers, but there are times when you need
something more elaborated to bring that additional touch or realism to
the model.
In this article I'll cover the two most simple cases, related to single bulbs covered with transparent lens. They can be found in many aircraft wingtips and landing lights. More than for completeness' sake, I think that revisiting them here may be useful for the young modeler. Part II will cover aircraft and vehicle lights with reflecting dishes and texturized lenses. Let me add that these methods suit better for small scale aircraft and vehicles. Large scales allow the reproduction of more faithful details, and will be treated in another report.
1. Wingtip lights
This is old news for most of you. All you need is a piece of clear styrene roughly cut to fit the internal shape of the light cover. I like to use left over sprues from clear parts. Cut a thick disk out of the sprue and saw the faces which will be glued to the wingtip. In most cases all you have is a squared angle, but some aircraft have curved shapes. If your kit brings separate clear parts for the lights, check if they can be used, but an oversized chunck of clear plastic will give you more freedom to glue and shape it later. If not, cut off the area where the clear cover will be installed. It is better to do it after glueing the wing halves.
After test-fitting the clear part, drill a hole of suitable size where the bulb goes in the actual machine. Clean throughly any residue from the hole. Now, using a clear paint (the transparent type), fill the hole with the correct color (green, red, amber...). Some modelers use ordinary paint, but I think the transparent type reproduces better the bulb color.
Then glue the clear cover to the wing. The area will be shaped and polished later, so a strong bond is important. I prefer to use liquid glue and actually melt the parts together. Remeber to paint the wingtip with the correct color before. The liquid glue will dissolve the paint a bit, but this will not be discernible unless you really mess up with the liquid glue. Here is the Revell Hawker Hurricane in 1/72 with the clear covers glued on:

Of course, some aircraft have the wingtip light cover made in colored transparent plastic. In that case, a piece of colored clear plastic (toothbrush handle) will to the trick, as the bulb will not be really visible. Allow the glue to dry completely and start shaping the light cover. A coarse sanding pad can be used to remove much of the clear material, but avoid to sand until the pad reaches the wing parts. That will requise additional work afterwards. Then switch to progressively thinner sanding sticks, rifining the sape until it follows smoothly the contour of the wing. At this point, you can polish the tips using a piece of cloth or polishing sticks.
Here is my Hurricane wingtip right before the final polishing:
2. Aircraft landing lights and vehicles headlights
This variation can be applied to landing lights or headlights where the clear cover does not have any kind of texture. Our focus here is to make something bright inside the light to simulate the buld. If you look at actual photos, the bulbs are quite visible, and a plain transparent part which comes in the kit does not quite do the job. I will use my Heller Storch in 1/72 scale as an example. It had a landing light mounted in a tear drop shaped gondola under the port wing which is big enough to be reworked. The kit, however, brings a simple clear part so that you can mask the lens and paint the rest of the part with the underside color... not really convincing.
This is what I like to do in such cases. First, the emptiness behind the bulb must be eliminated. Since this kind of light generally has a reflective dish behind the bulb, a spherical drill bit can be used to carve a convex cavity (the lens will be added later). Try to make the surface of the cavity as smooth as you can. This is painted with a bright silver color. Next, we need a bulb. I like to use those small solder balls which invariably spill when soldering something (at least with me). If you prefer, take a small length of solder and melt it on the tip of your solder, with a cup under it. You will collect dozens of these balls. You can use anything spherical enough (stretched sprue put close to a candle flame will make nice bulbs, too), but I like the solder balls because they are already 'chrome plated' (a coat of Future Floor Wax will avoid oxidation). Here is our sample:
The bulb is glued on the center of the dish - now we have a bulb:
After masking the worked area and painting the remaing of the gondola, a transparent spherical cap is glued in place:
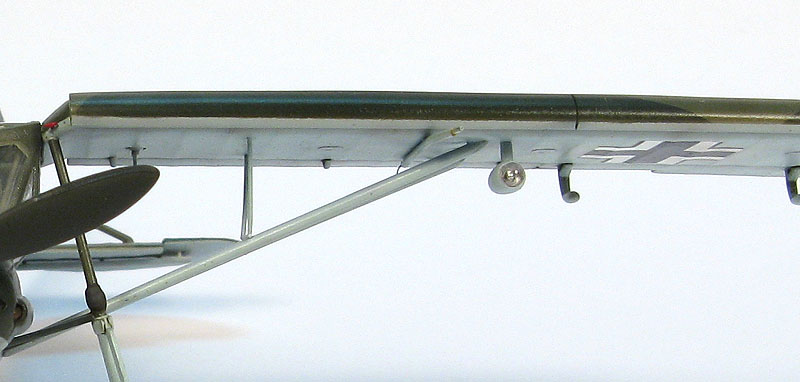
In 1/72 or even 1/48 scales, this simple tricks are enough to produce that 'there's something inside' look and, personally, I think that is all that matters. Here is our demonstration finished and installed under the wing of my Storch - the real light is about 1/3 of the size shown in the photo:
I guess you can adapt these tips to other cases. Go ahead, and show us...
Rato
Marczak
© 2010In this article I'll cover the two most simple cases, related to single bulbs covered with transparent lens. They can be found in many aircraft wingtips and landing lights. More than for completeness' sake, I think that revisiting them here may be useful for the young modeler. Part II will cover aircraft and vehicle lights with reflecting dishes and texturized lenses. Let me add that these methods suit better for small scale aircraft and vehicles. Large scales allow the reproduction of more faithful details, and will be treated in another report.
1. Wingtip lights
This is old news for most of you. All you need is a piece of clear styrene roughly cut to fit the internal shape of the light cover. I like to use left over sprues from clear parts. Cut a thick disk out of the sprue and saw the faces which will be glued to the wingtip. In most cases all you have is a squared angle, but some aircraft have curved shapes. If your kit brings separate clear parts for the lights, check if they can be used, but an oversized chunck of clear plastic will give you more freedom to glue and shape it later. If not, cut off the area where the clear cover will be installed. It is better to do it after glueing the wing halves.
After test-fitting the clear part, drill a hole of suitable size where the bulb goes in the actual machine. Clean throughly any residue from the hole. Now, using a clear paint (the transparent type), fill the hole with the correct color (green, red, amber...). Some modelers use ordinary paint, but I think the transparent type reproduces better the bulb color.
Then glue the clear cover to the wing. The area will be shaped and polished later, so a strong bond is important. I prefer to use liquid glue and actually melt the parts together. Remeber to paint the wingtip with the correct color before. The liquid glue will dissolve the paint a bit, but this will not be discernible unless you really mess up with the liquid glue. Here is the Revell Hawker Hurricane in 1/72 with the clear covers glued on:
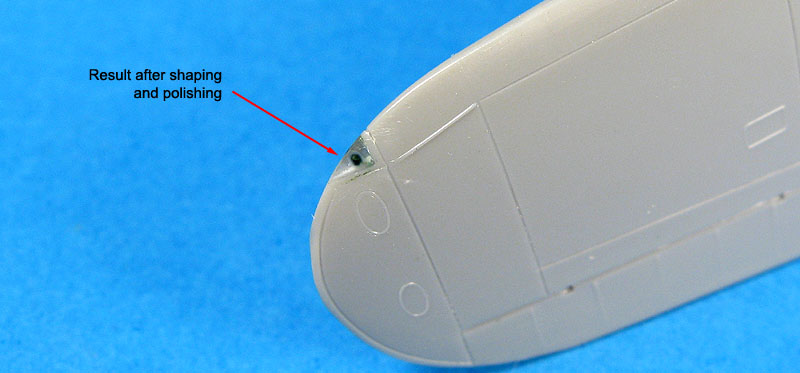
Of course, some aircraft have the wingtip light cover made in colored transparent plastic. In that case, a piece of colored clear plastic (toothbrush handle) will to the trick, as the bulb will not be really visible. Allow the glue to dry completely and start shaping the light cover. A coarse sanding pad can be used to remove much of the clear material, but avoid to sand until the pad reaches the wing parts. That will requise additional work afterwards. Then switch to progressively thinner sanding sticks, rifining the sape until it follows smoothly the contour of the wing. At this point, you can polish the tips using a piece of cloth or polishing sticks.
Here is my Hurricane wingtip right before the final polishing:
2. Aircraft landing lights and vehicles headlights
This variation can be applied to landing lights or headlights where the clear cover does not have any kind of texture. Our focus here is to make something bright inside the light to simulate the buld. If you look at actual photos, the bulbs are quite visible, and a plain transparent part which comes in the kit does not quite do the job. I will use my Heller Storch in 1/72 scale as an example. It had a landing light mounted in a tear drop shaped gondola under the port wing which is big enough to be reworked. The kit, however, brings a simple clear part so that you can mask the lens and paint the rest of the part with the underside color... not really convincing.
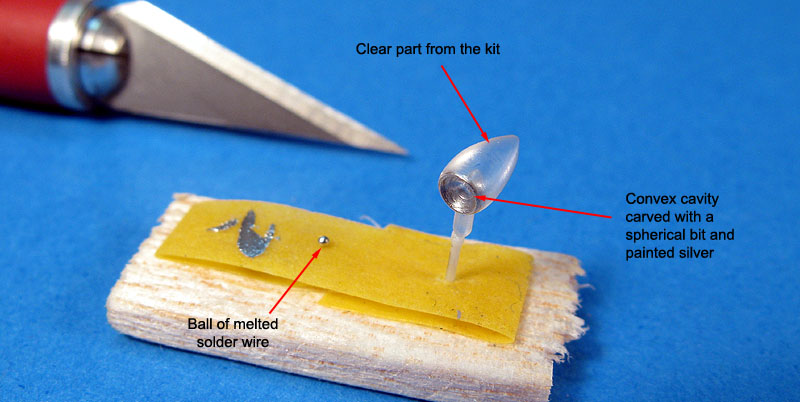
This is what I like to do in such cases. First, the emptiness behind the bulb must be eliminated. Since this kind of light generally has a reflective dish behind the bulb, a spherical drill bit can be used to carve a convex cavity (the lens will be added later). Try to make the surface of the cavity as smooth as you can. This is painted with a bright silver color. Next, we need a bulb. I like to use those small solder balls which invariably spill when soldering something (at least with me). If you prefer, take a small length of solder and melt it on the tip of your solder, with a cup under it. You will collect dozens of these balls. You can use anything spherical enough (stretched sprue put close to a candle flame will make nice bulbs, too), but I like the solder balls because they are already 'chrome plated' (a coat of Future Floor Wax will avoid oxidation). Here is our sample:
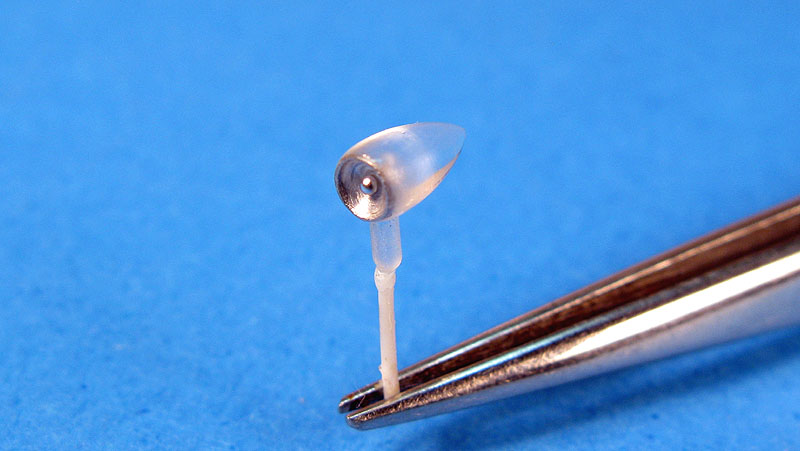
The bulb is glued on the center of the dish - now we have a bulb:
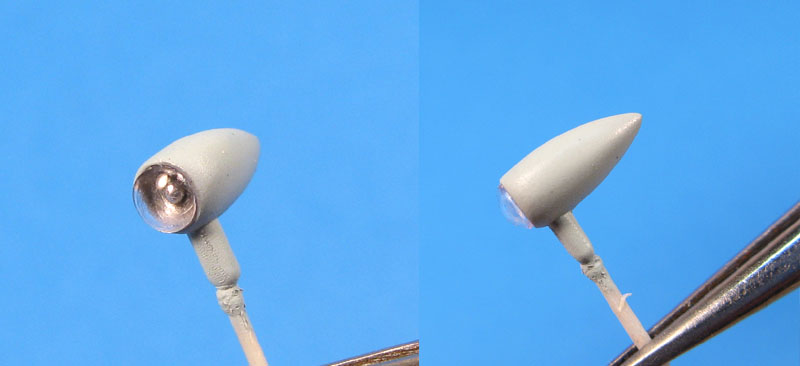
After masking the worked area and painting the remaing of the gondola, a transparent spherical cap is glued in place:
In 1/72 or even 1/48 scales, this simple tricks are enough to produce that 'there's something inside' look and, personally, I think that is all that matters. Here is our demonstration finished and installed under the wing of my Storch - the real light is about 1/3 of the size shown in the photo:
I guess you can adapt these tips to other cases. Go ahead, and show us...
