| Simulating wicker seats for small scale WWI aircraft |
If you like World
War I aircraft, you probably know that many of them used wicker
seats for pilots and crew. Yes, wicker seats, pretty much like the ones
you have on your porch. If it sounds strange, remember that light
metals such as aluminum were not common back then, and these furnishings - which were made from a variety of plant fibers, like bamboo, willow, and rattan -.provided
a stiff and light solution, exactly what you need in an aircraft.
Before we go any further, wicker does not refer to the material, but
the style of weaving... don1 ask me.
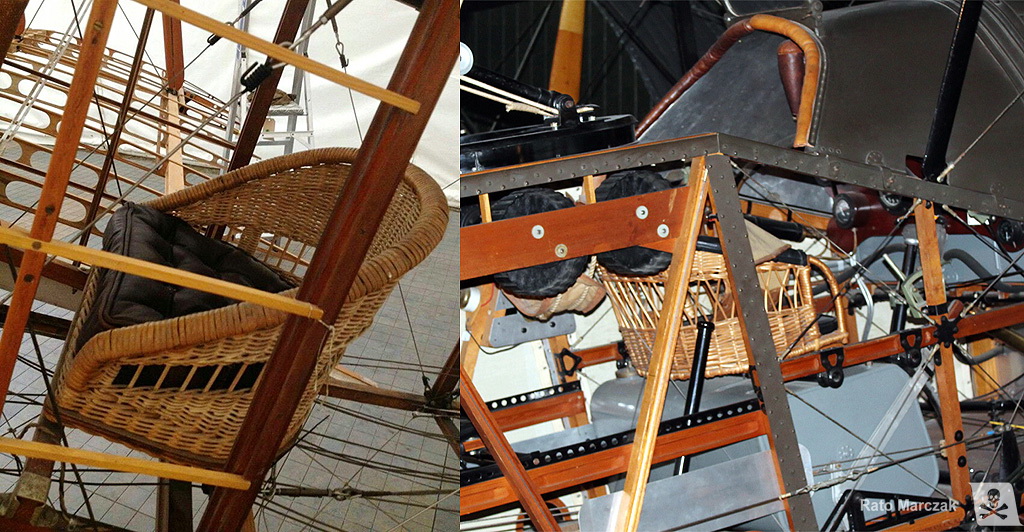
Examples of wicker seats in WWI fighters.
Like anything in aviation, this type of seat was quickly standardized and became part of the aircraft construction like any other component.
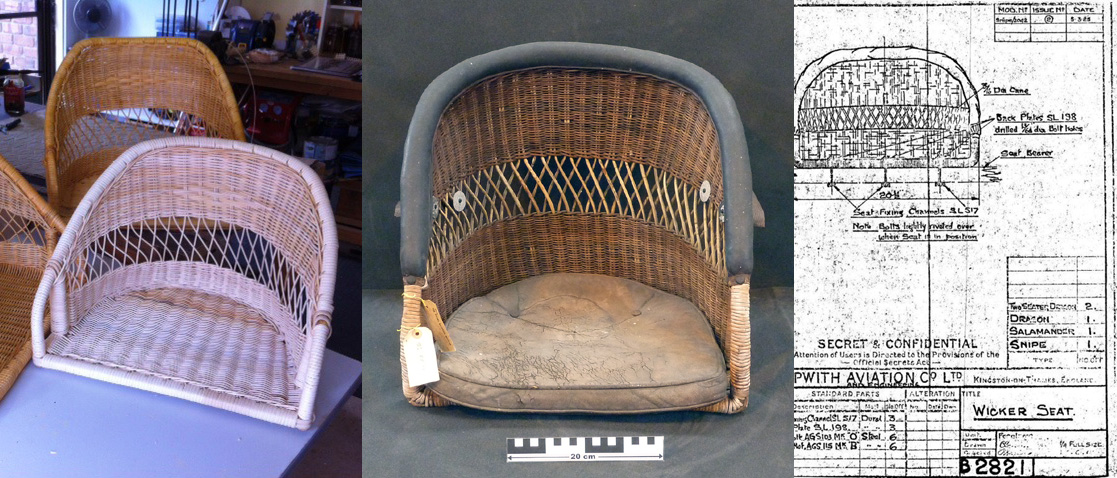
Replicas of the Sopwith Camel pilot's seat (left), an original sample (center), and an excerpt of the Sopwith drawings for seat B28211.
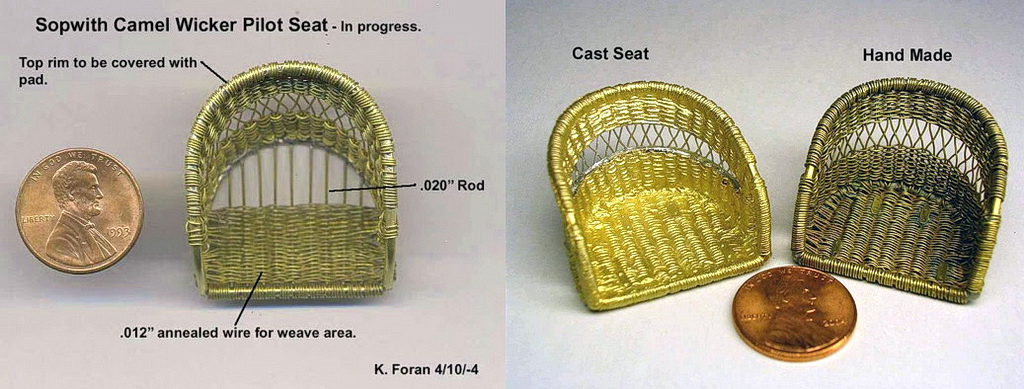
Back to modeling, the question here is: how to include a decent representation of wicker seats in my WWI aircraft? I recently faced this challenge when working on my old Airfix Hannover CL.IIIa in 1/72 scale. And maybe the problem is the scale... In 1/48 or larger scales, the problem is not so challenging. I recall the modeler Ken Foran many years ago when he scratchbuilt his award-winning Sopwith Camel in 1/15 scale. He simply knitted copper wire around the seat's skeleton to obtain an amazingly realistic seat. But applying the same technique in 1/72 scale does not seem possible... at least for me.
Many models come with a geometrically accurate representation of the pilot's seat (some others are terrible!). However, because WWI aircraft did not have canopies, when you look through the cockpit opening, the first thing that you see is the seat. And wicker seats have that unmistakable texture which can be distinguished even in 1/72 scale. So, how we simulate it?
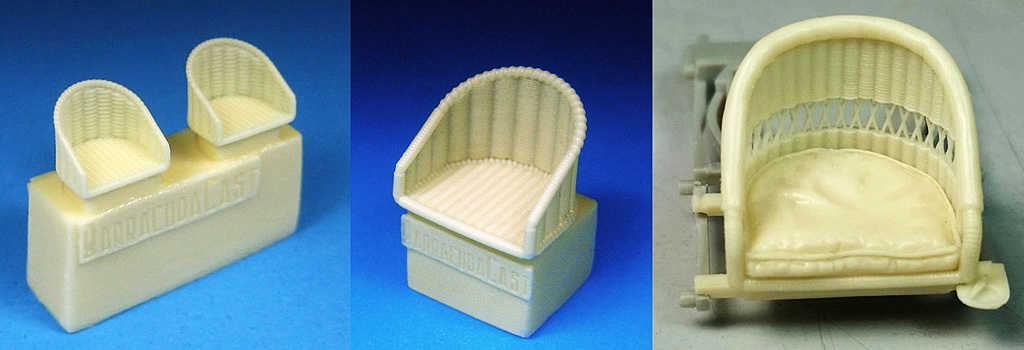
Roy Sutherland's Barracuda Studios comes to the rescue here, offering several models of wicker seats with an unbelievable level of detail and all three popular aviation scales. The texture of these accessories must be seen. It is trully just a matter of shooting a wood color and then apply a dark wash to have a very decent seat in your model.
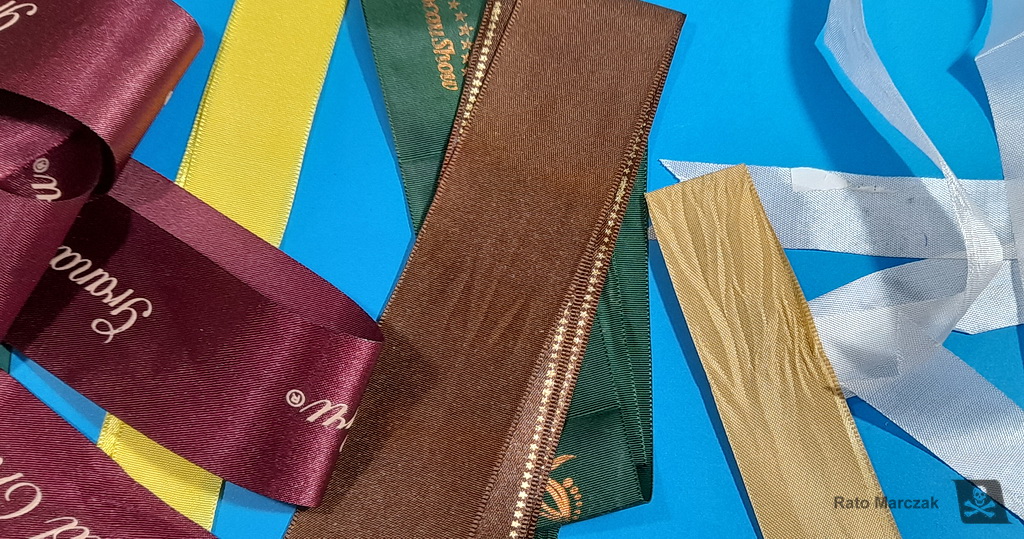
As I said, a few weeks ago I was scratchbuilding the cockpit interior of an Airfix Hannover and had to include a decent wicker seat. Because of the pandemic, however, ordering a seat (plus the many months that it would take to arrive in my country) was out of the question. I needed a simple solution using materials I have at home. It all started with a few gift wrap stripes or Easter egg stripes. I have a few around my workbench to simulate belts and stuff. Some of them have a very prominent weave pattern that resembles the aspect of the wicker seats in scale. So, why not to use the stripes to form a seat for my 1/72 Hannover?
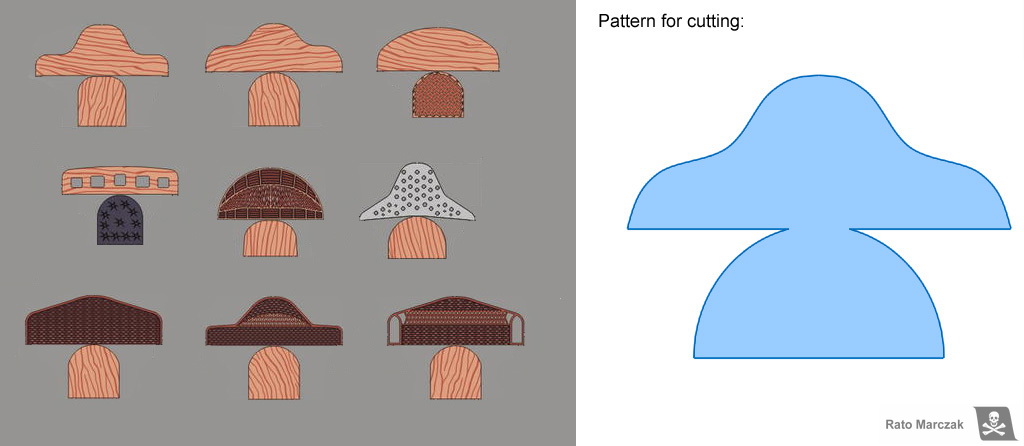
The first step is to select the type of wicker seat you want to replicate. You need to draw a plan of the unfolded seat in scale. It may be tricky to cut the stripe to make a perfectly symmetrical seat. In my case, I rather chose to split the seat into two parts: the backrest and the seat, but if you prefer, you may cut the whole seat as a single piece:
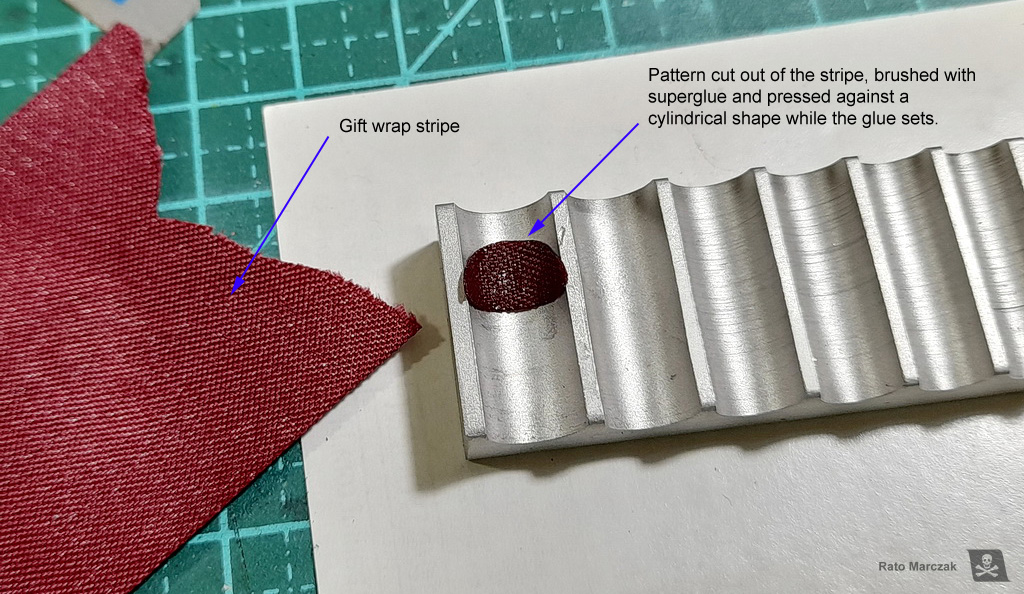
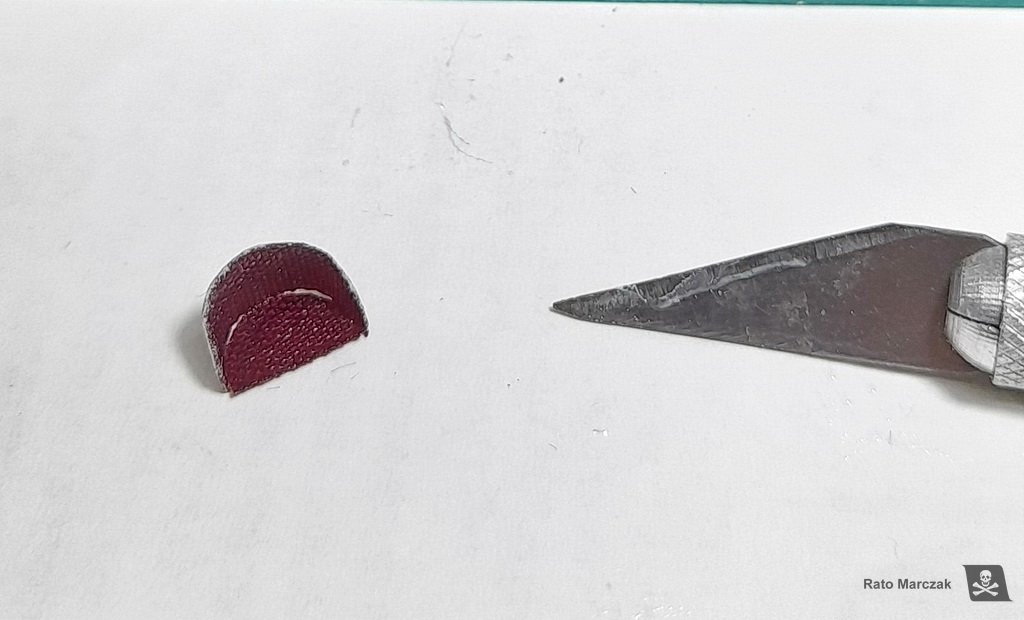
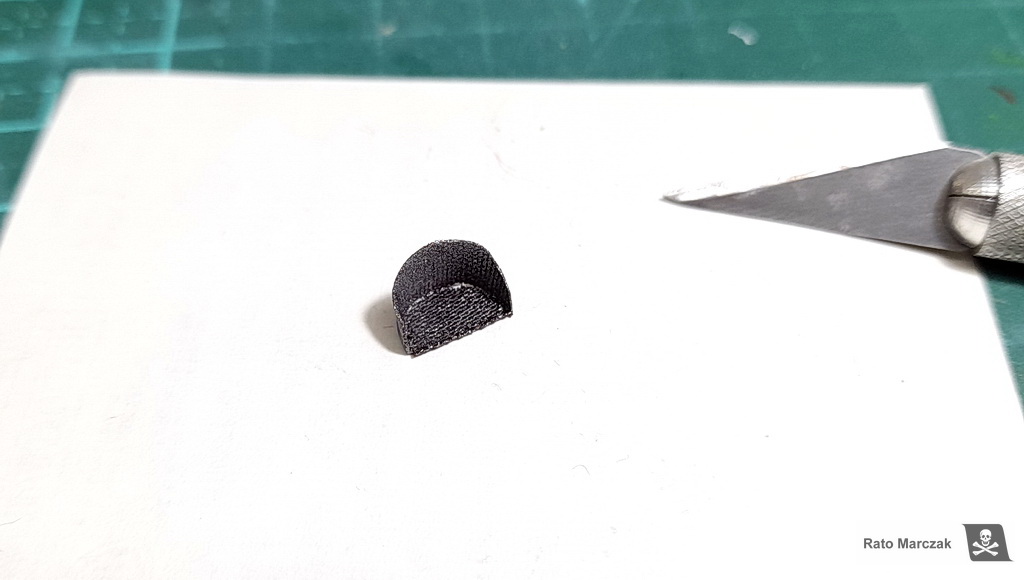
The backrest is more or less cylindrical, so I spread superglue on the aft face of the backrest (which will not be visible) and shaped it against a cylinder, brush handle, or whatever having the correct diameter. It is important to mention that the superglue will flow to the 'mold' by capillary action, so you may want to use a female mold (like the one shown below). This helps to preserve the weave texture on the visible face of the backrest. Hit with an accelerator and pop it out of the mold. The seat is essentially a half-circle. It can be cut with a hobby knife or glued on a thin plasticard and punched out. In the second case, you don't need to reinforce it with superglue. It is also possible that the technique works with other types of glue. I opted for superglue to be faster.
Next, if you made the backrest and the seat separated, it is time to glue them together to assemble the seat. Use small drops of glue at key points and let it dry:
If necessary, fill small gaps with more glue or paint. A coat of primer will help to spot small flaws. Because the tissue is impregnated with superglue, light sanding is possible if needed. Be careful to avoid cracking it though, as corrections at this point will be virtually impossible:
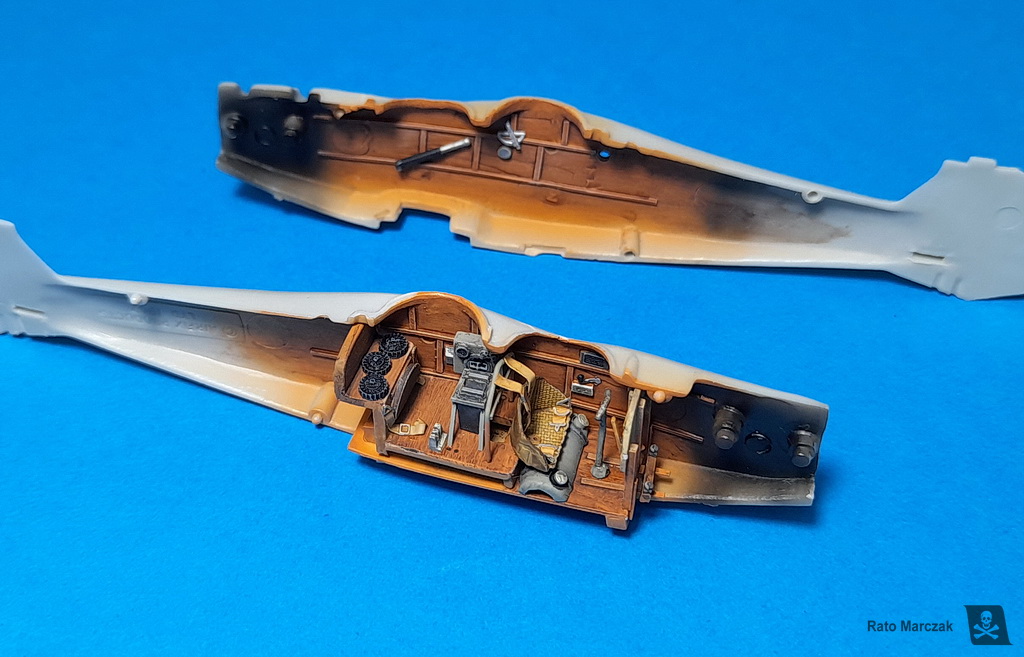
If everything is fine, proceed with the painting. Remember to use a dark brown wash to highlight the weave texture, after all, this is all about texture. For the records, I used Vallejo Wood from their Model Air range as a base color, then I applied a wash of Liquitex Sepia ink. Once dry, a coat of flat clear was airbrushed, followed by a light drybrush with ochre drybrush-paint from Citadel:

And that's it. Quick, easy, and will trick your eyes alright. In case you are interested, here is the fuselage of the Hannover, with my improvised wicker seat in action:
Not all of my ideas work well, I admit. But this one seems to do the trick.
I hope you find this tip useful.
Rato
Marczak
© 2021Examples of wicker seats in WWI fighters.
Like anything in aviation, this type of seat was quickly standardized and became part of the aircraft construction like any other component.
Replicas of the Sopwith Camel pilot's seat (left), an original sample (center), and an excerpt of the Sopwith drawings for seat B28211.
Back to modeling, the question here is: how to include a decent representation of wicker seats in my WWI aircraft? I recently faced this challenge when working on my old Airfix Hannover CL.IIIa in 1/72 scale. And maybe the problem is the scale... In 1/48 or larger scales, the problem is not so challenging. I recall the modeler Ken Foran many years ago when he scratchbuilt his award-winning Sopwith Camel in 1/15 scale. He simply knitted copper wire around the seat's skeleton to obtain an amazingly realistic seat. But applying the same technique in 1/72 scale does not seem possible... at least for me.
Many models come with a geometrically accurate representation of the pilot's seat (some others are terrible!). However, because WWI aircraft did not have canopies, when you look through the cockpit opening, the first thing that you see is the seat. And wicker seats have that unmistakable texture which can be distinguished even in 1/72 scale. So, how we simulate it?
Roy Sutherland's Barracuda Studios comes to the rescue here, offering several models of wicker seats with an unbelievable level of detail and all three popular aviation scales. The texture of these accessories must be seen. It is trully just a matter of shooting a wood color and then apply a dark wash to have a very decent seat in your model.
As I said, a few weeks ago I was scratchbuilding the cockpit interior of an Airfix Hannover and had to include a decent wicker seat. Because of the pandemic, however, ordering a seat (plus the many months that it would take to arrive in my country) was out of the question. I needed a simple solution using materials I have at home. It all started with a few gift wrap stripes or Easter egg stripes. I have a few around my workbench to simulate belts and stuff. Some of them have a very prominent weave pattern that resembles the aspect of the wicker seats in scale. So, why not to use the stripes to form a seat for my 1/72 Hannover?
The first step is to select the type of wicker seat you want to replicate. You need to draw a plan of the unfolded seat in scale. It may be tricky to cut the stripe to make a perfectly symmetrical seat. In my case, I rather chose to split the seat into two parts: the backrest and the seat, but if you prefer, you may cut the whole seat as a single piece:
The backrest is more or less cylindrical, so I spread superglue on the aft face of the backrest (which will not be visible) and shaped it against a cylinder, brush handle, or whatever having the correct diameter. It is important to mention that the superglue will flow to the 'mold' by capillary action, so you may want to use a female mold (like the one shown below). This helps to preserve the weave texture on the visible face of the backrest. Hit with an accelerator and pop it out of the mold. The seat is essentially a half-circle. It can be cut with a hobby knife or glued on a thin plasticard and punched out. In the second case, you don't need to reinforce it with superglue. It is also possible that the technique works with other types of glue. I opted for superglue to be faster.
Next, if you made the backrest and the seat separated, it is time to glue them together to assemble the seat. Use small drops of glue at key points and let it dry:
If necessary, fill small gaps with more glue or paint. A coat of primer will help to spot small flaws. Because the tissue is impregnated with superglue, light sanding is possible if needed. Be careful to avoid cracking it though, as corrections at this point will be virtually impossible:
If everything is fine, proceed with the painting. Remember to use a dark brown wash to highlight the weave texture, after all, this is all about texture. For the records, I used Vallejo Wood from their Model Air range as a base color, then I applied a wash of Liquitex Sepia ink. Once dry, a coat of flat clear was airbrushed, followed by a light drybrush with ochre drybrush-paint from Citadel:
And that's it. Quick, easy, and will trick your eyes alright. In case you are interested, here is the fuselage of the Hannover, with my improvised wicker seat in action:
Not all of my ideas work well, I admit. But this one seems to do the trick.
I hope you find this tip useful.
