| Airfix Beam Engine |
|
Started: October/2015 Finished: December/2016 |
Just like the real thing
is the opening sentence of Arthur Ward's 'The Boy's Book of Airfix'.
Well, not always I'd add... But sometimes not only Airfix made models just like the real thing, but also managed to be the only manufacturer to deviate so boldly from planes, tanks, ships and soldiers.
I never heard about Airifx Museum Models Construction Kit series until a few years ago, when I bought a Trevithick's 1804 steam locomotive, and I'm convinced this is the case. Airfix Series 5 started in 1966, and also included the Paddle Engine, the Four Cycle Engine, and the 19th Century Beam Engine, subject of the present article. The original Roy Cross' boxtop artwork was far more interesting...
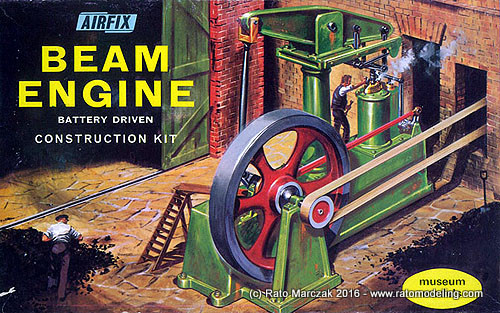
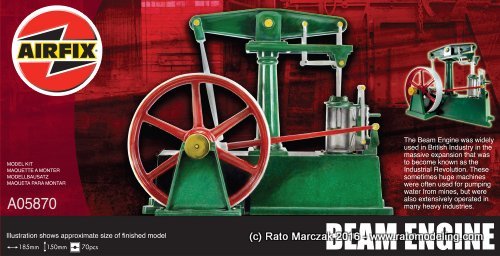
... than my modernized, cold and flimsy version:
Over the years, I'be been building models of strange subjects for an ordinary modeler. Steam locomotives and Da Vinci's inventions are prime examples. Having a degree in Mechanical Engineering, I can't help myself when I find such an Airfix or Renwal models. There are not many out there, though, and I still remember having undergrad vehicle mechanics classes with a professor who used one of them, many years ago.
Having fought health problems during the last years, some drugs affected my touch (literally - a side effect called neuropathy) making extremely difficult for me to use tweezers and small tools, and I thought that bigger models would be a good idea. So I decided to start this one, for at least I could pick the parts using my bare fingers.
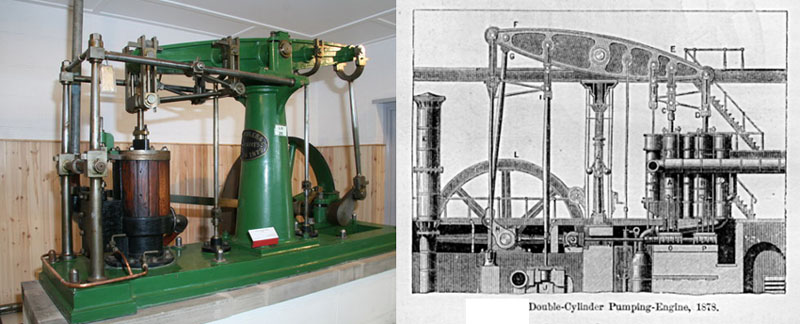
More than that, the steam engine as depicted in this kit is an excellent way to show how the industry was driven until the end of 19th century, when combustion engines took over. Every big industry had one back then, with a single unit generating power for an entire facility. They could be huge - take look at the largest working example at Crossness Pumping Station at east London and also here.
I don't know the scale of the Airfix model, I'm guessing it is around 1/32. I'm telling you, these models are very didactic and functional, showing how steam cycle, intertia wheel and Watt's mechanism, among other things worked...
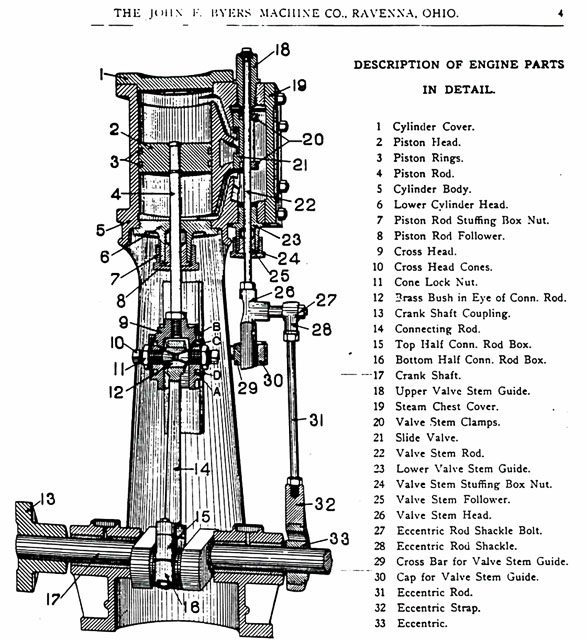
A steam engine could be single or double stroke (or action). The latter was more efficient, and most engines of this type were more or less based on Byer's patent, which allowed the steam act on both sides of the piston by using a slide valve (part #21 in the drawing below):
Note that this is the same principle that made possible the steam locomotives, so I don't have to tell you much about the historical importance of these machines. As a bonus, now you know why engine and locomotive are synonyms:
In a typical steam engine.
In a typical steam locomotive.
Back to the model, the Airfix offering was designed to be motorized, but it no longer comes with a motor. Browsing through the internet, I found very interesting, fully functional, motorized approaches for this model. I simply wanted a static (or manually driven) example.
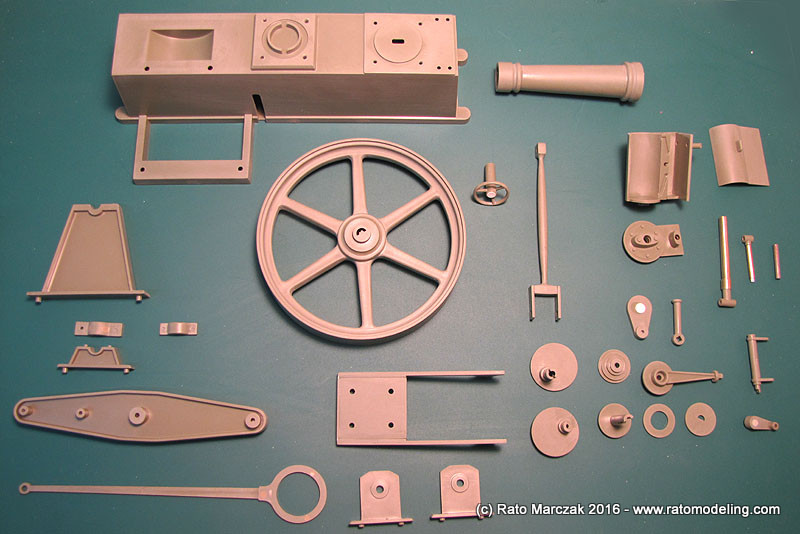
The parts count is small if you don't consider those annoying cylindrical bolts that are never cylindrical. There is considerable amount of flash, so a good deal of time is necessary to prepare the parts for priming. I also had to fill a few sink holes, but not all of them. All and all, it is not bad for a half century old model, literally!
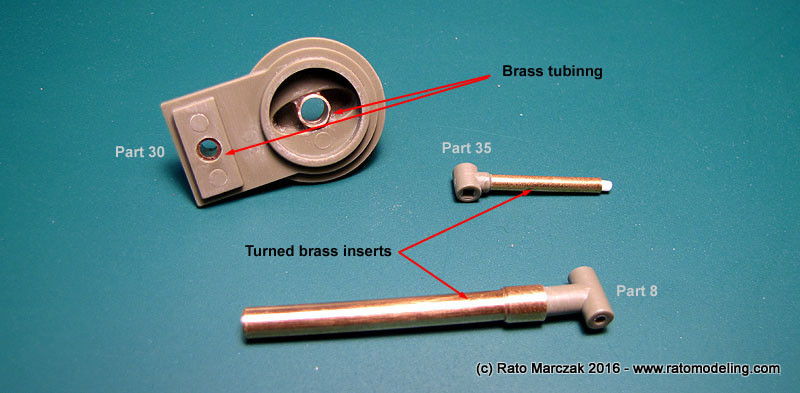
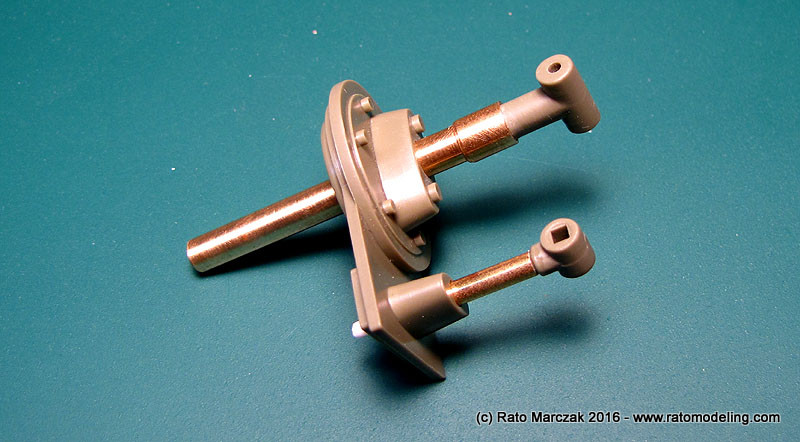
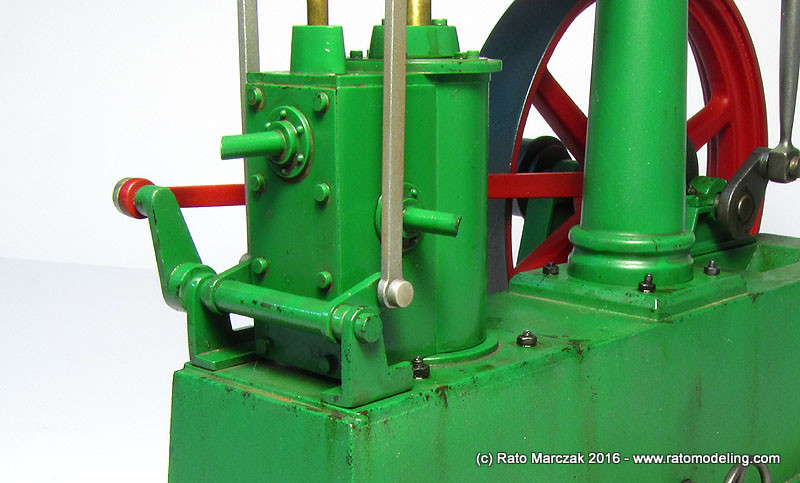
I opted for building the model functional, I mean, movable. Therefore the heart of the engine - the piston/slide valve assembly - should move, and I don't like plastic parts fretting against each other. So I installed brass bushings on the apertures of part #30 where the piston (part #8) and valve (part #35) rods would slide, and replaced the sliding portion of the rods by brass cylinders turned to fit the bushings without gaps:
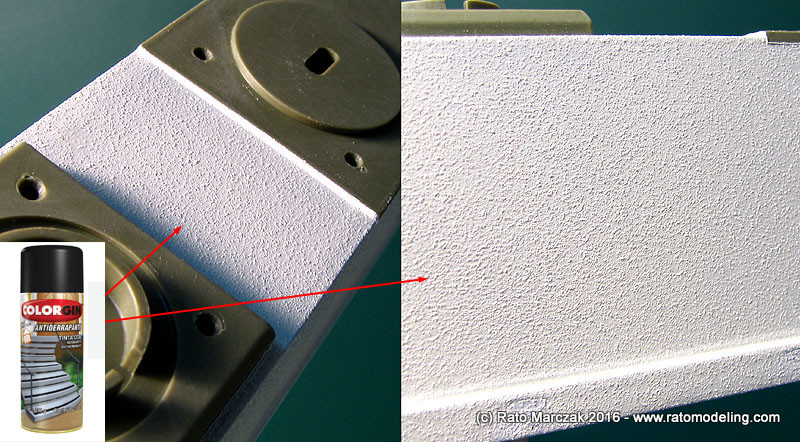
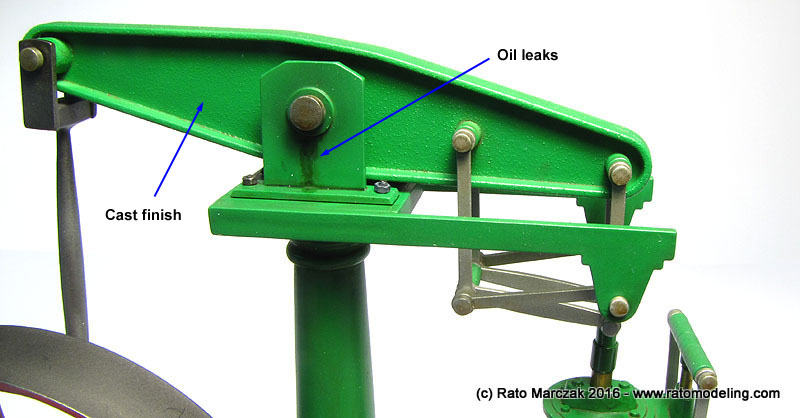
While preparing the main parts of the engine, I realized that they were too perfect. I mean, the finish was very smooth, but welding had not been invented yet, so most machine structures were bolted or cast. I decided to test a method I learned somewhere to simulate cast parts in models. It is so damn simple and works so well that makes me wonder why people don't use it more. Ok, prepared? Drum roll... and the super-upper-drooper product is... anti-slip spray. Yep, that simple! I used a local brand, and all I can tell you is that it looks like regular epoxy or enamel spray paint filled with fine sand... and possibly it is exactly that. I masked the parts that I wanted to depict 'assembled' on the main body. The parts simulated with this method, besides the main body (#13) were the beam (#32), flywheel (#14 & #15), flywheel support (#16) and a couple other parts I forgot now.
After waiting 24 hours of drying time for the anti-slip coat, the parts were primed using automotive grey primer.
Zip... zap... zip... fast forward a few weeks!
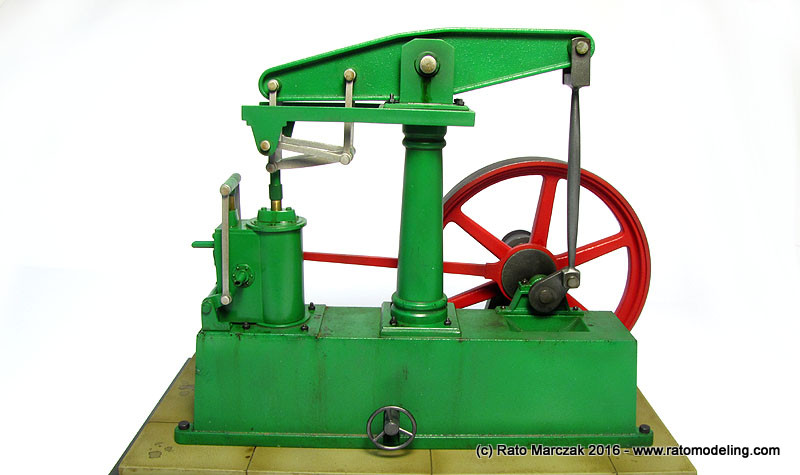
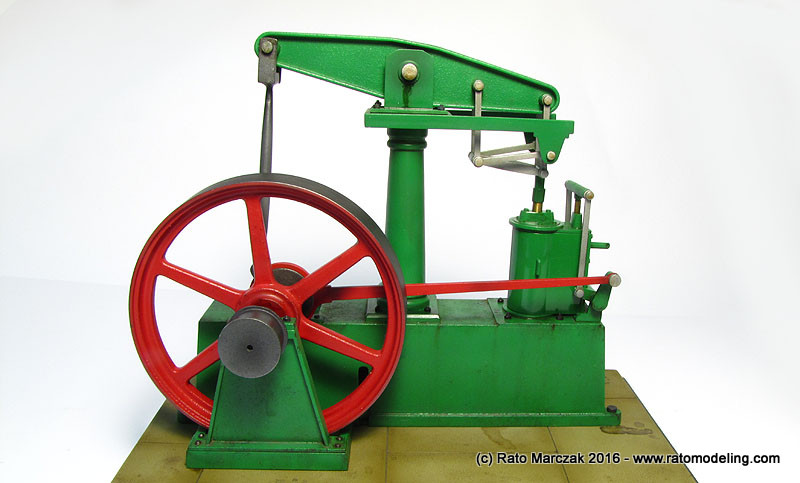
There you have it... My beam engine is finished!

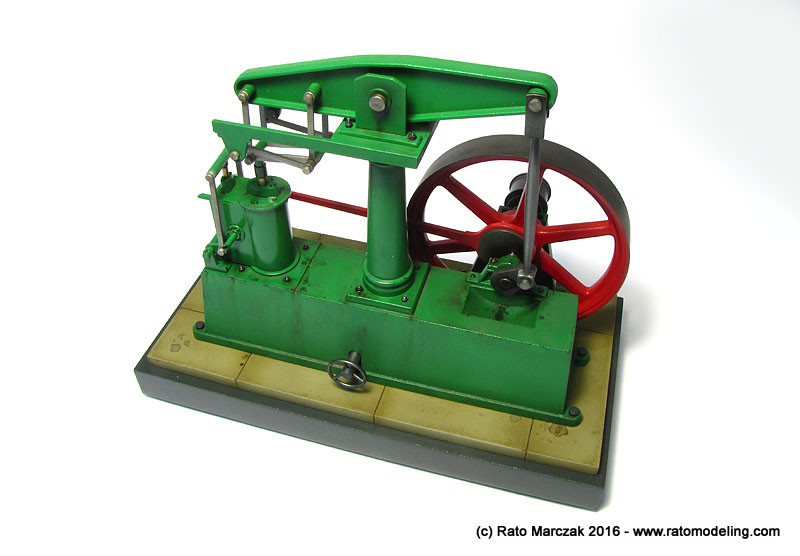
Ok, ok, I'll tell you how I did some details. The basic color was a vivid green which I mixed using Vallejo paints. The color is not only based on the boxart, but also on the fact that this type of green was a prevailing color in industry equipment for more than a century - but that's another story. The flywheel and the master rod were painted red. This makes sense as these parts are moving fast at ground level.
I replaced most bolts in the kit for new ones I turned in acrylic using my lathe. I also removed molded on bolt heads and replaced them for real watchmaker metal nuts and bolts, painted with Humbrol Gunmetal MetalCote, and glued on pre-drilled holes. I used this method to add realism to plates bolted to the main body, bearing housings and flywheel supports. I wish I had a few more of these bolts in different sizes...

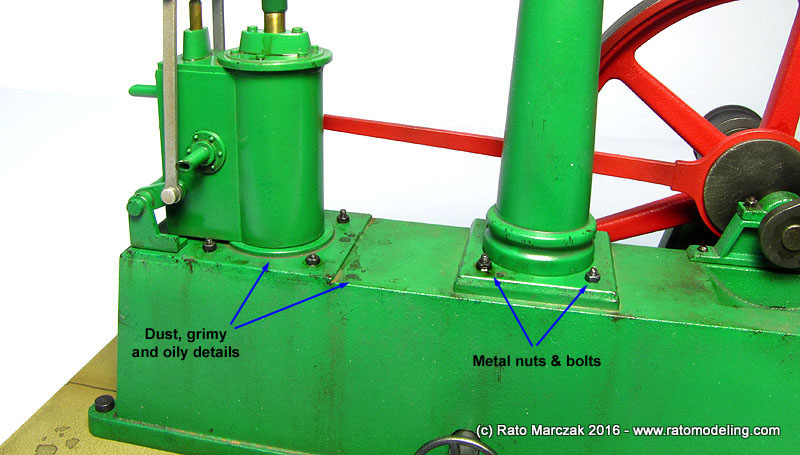
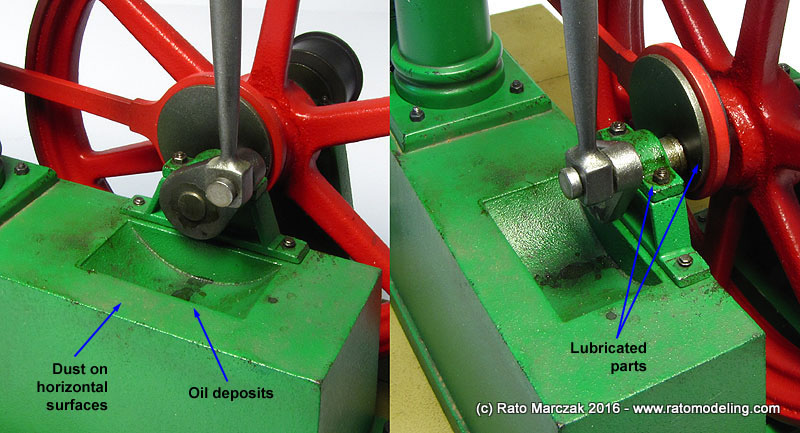
Weathering started by sealing the green and red paint with a semi-gloss acrylic varnish. It was followed by a wash of burnt umber all over the model, switching to pure lamp black on a few spots. Once dry, I used the sponge method to simulate old (dark brown) and new (light green) paint chipping, mostly on corners and edges. Sometimes I used the first over the second. Next I applied a good amount of dust and earth pigments diluted with mineral spirits over horizontal surfaces, recesses and depressions - wherever dust would accumulate. Once dry, I used streaking fluids to make dripping marks.
The final weathering step was the application of lubricant deposits and leaks. Of course the effect was concentrated around bearings, movable parts, but I also added the effect around some bolts, as it could easily pass as condensed steam.
The metalic parts were painted with Tamiya and Vallejo acrylics. I hate metalic acrylic colors, but since was a not-so-serious project, I preferred to use the few I have than throwing them away, The secret is to keep them looking like cast metal parts, and their acrylic nature helps a lot in this regards, because their pigments are not as thin as in the enamel/lacquer counterparts. I used them on the crankshaft, crankshaft bar and linkages.
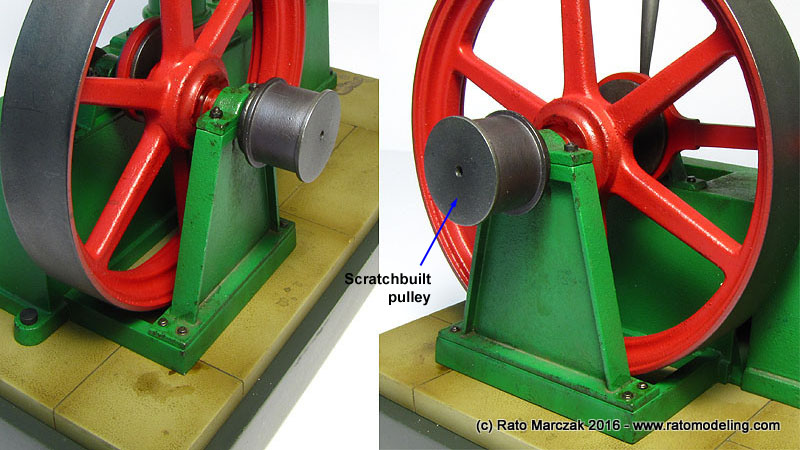
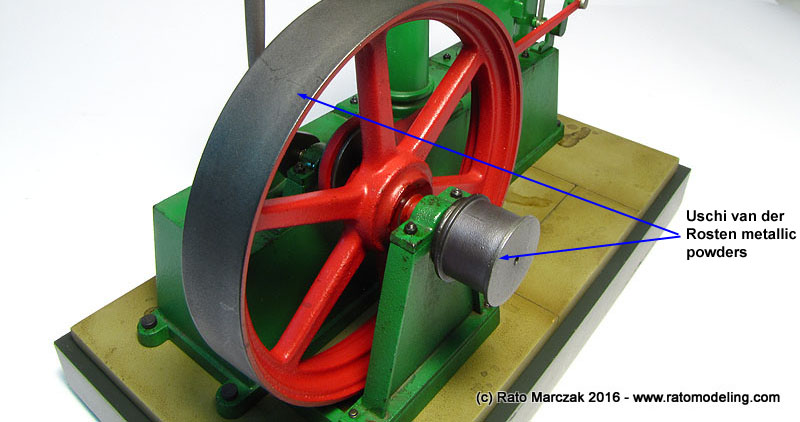
The flywheel and the scratchbuilt pulley were painted in Tamiya Flat Black (XF-1) and rubbed with Uschi van der Rosten Iron and Steel metallic powders.
The base is composed by two MDF boards superposed. The top one was covered with melamine surface, which played concrete surface. It was just a matter of scribing the dividing lines and a generous dark brown oils wash. Add a few pools of oil here and there and you have a convincing concrete surface. I also turned the fixing stakes in acrylic to simulate the fixature of the engine to the ground, replacing the molded on ones that come with the kit. And they truly work as fixing devices!
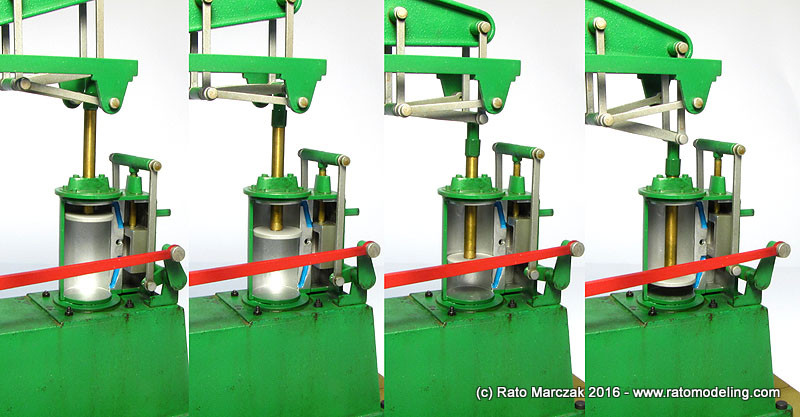
I forgot to mention that the piston/slide valve can be viewed by removing their cover (part #32). I painted the interior surfaces Aluminum and highlighted the steam feeding channels with blue:
And it works:
Ok, I like engineering projects, and this was not for my daughter's school project. I built this engine because I liked it, and the challenge of making a realistic weathering in something other than tanks and aircraft. More importantly, it was a nice diversion from my usual confort zone, and truly improved my modeling skills...
Definitely I'll be trying that different again soon. You should try too... it is guaranteed fun.
I never heard about Airifx Museum Models Construction Kit series until a few years ago, when I bought a Trevithick's 1804 steam locomotive, and I'm convinced this is the case. Airfix Series 5 started in 1966, and also included the Paddle Engine, the Four Cycle Engine, and the 19th Century Beam Engine, subject of the present article. The original Roy Cross' boxtop artwork was far more interesting...
... than my modernized, cold and flimsy version:
Over the years, I'be been building models of strange subjects for an ordinary modeler. Steam locomotives and Da Vinci's inventions are prime examples. Having a degree in Mechanical Engineering, I can't help myself when I find such an Airfix or Renwal models. There are not many out there, though, and I still remember having undergrad vehicle mechanics classes with a professor who used one of them, many years ago.
Having fought health problems during the last years, some drugs affected my touch (literally - a side effect called neuropathy) making extremely difficult for me to use tweezers and small tools, and I thought that bigger models would be a good idea. So I decided to start this one, for at least I could pick the parts using my bare fingers.
More than that, the steam engine as depicted in this kit is an excellent way to show how the industry was driven until the end of 19th century, when combustion engines took over. Every big industry had one back then, with a single unit generating power for an entire facility. They could be huge - take look at the largest working example at Crossness Pumping Station at east London and also here.
I don't know the scale of the Airfix model, I'm guessing it is around 1/32. I'm telling you, these models are very didactic and functional, showing how steam cycle, intertia wheel and Watt's mechanism, among other things worked...
A steam engine could be single or double stroke (or action). The latter was more efficient, and most engines of this type were more or less based on Byer's patent, which allowed the steam act on both sides of the piston by using a slide valve (part #21 in the drawing below):
Note that this is the same principle that made possible the steam locomotives, so I don't have to tell you much about the historical importance of these machines. As a bonus, now you know why engine and locomotive are synonyms:
In a typical steam engine.
In a typical steam locomotive.
Back to the model, the Airfix offering was designed to be motorized, but it no longer comes with a motor. Browsing through the internet, I found very interesting, fully functional, motorized approaches for this model. I simply wanted a static (or manually driven) example.
The parts count is small if you don't consider those annoying cylindrical bolts that are never cylindrical. There is considerable amount of flash, so a good deal of time is necessary to prepare the parts for priming. I also had to fill a few sink holes, but not all of them. All and all, it is not bad for a half century old model, literally!
I opted for building the model functional, I mean, movable. Therefore the heart of the engine - the piston/slide valve assembly - should move, and I don't like plastic parts fretting against each other. So I installed brass bushings on the apertures of part #30 where the piston (part #8) and valve (part #35) rods would slide, and replaced the sliding portion of the rods by brass cylinders turned to fit the bushings without gaps:
While preparing the main parts of the engine, I realized that they were too perfect. I mean, the finish was very smooth, but welding had not been invented yet, so most machine structures were bolted or cast. I decided to test a method I learned somewhere to simulate cast parts in models. It is so damn simple and works so well that makes me wonder why people don't use it more. Ok, prepared? Drum roll... and the super-upper-drooper product is... anti-slip spray. Yep, that simple! I used a local brand, and all I can tell you is that it looks like regular epoxy or enamel spray paint filled with fine sand... and possibly it is exactly that. I masked the parts that I wanted to depict 'assembled' on the main body. The parts simulated with this method, besides the main body (#13) were the beam (#32), flywheel (#14 & #15), flywheel support (#16) and a couple other parts I forgot now.
After waiting 24 hours of drying time for the anti-slip coat, the parts were primed using automotive grey primer.
Zip... zap... zip... fast forward a few weeks!
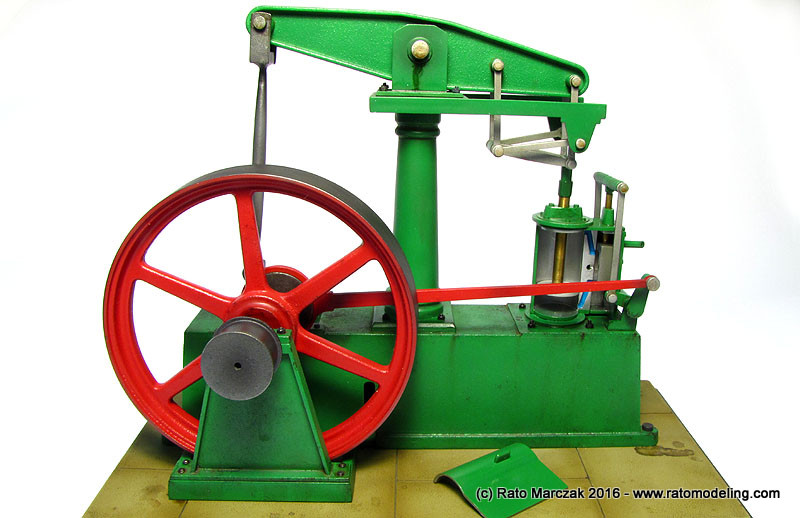
There you have it... My beam engine is finished!
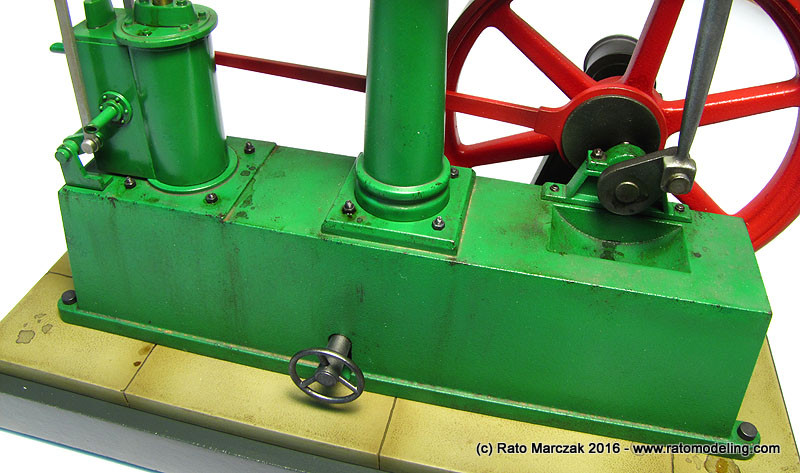
Ok, ok, I'll tell you how I did some details. The basic color was a vivid green which I mixed using Vallejo paints. The color is not only based on the boxart, but also on the fact that this type of green was a prevailing color in industry equipment for more than a century - but that's another story. The flywheel and the master rod were painted red. This makes sense as these parts are moving fast at ground level.
I replaced most bolts in the kit for new ones I turned in acrylic using my lathe. I also removed molded on bolt heads and replaced them for real watchmaker metal nuts and bolts, painted with Humbrol Gunmetal MetalCote, and glued on pre-drilled holes. I used this method to add realism to plates bolted to the main body, bearing housings and flywheel supports. I wish I had a few more of these bolts in different sizes...
Weathering started by sealing the green and red paint with a semi-gloss acrylic varnish. It was followed by a wash of burnt umber all over the model, switching to pure lamp black on a few spots. Once dry, I used the sponge method to simulate old (dark brown) and new (light green) paint chipping, mostly on corners and edges. Sometimes I used the first over the second. Next I applied a good amount of dust and earth pigments diluted with mineral spirits over horizontal surfaces, recesses and depressions - wherever dust would accumulate. Once dry, I used streaking fluids to make dripping marks.
The final weathering step was the application of lubricant deposits and leaks. Of course the effect was concentrated around bearings, movable parts, but I also added the effect around some bolts, as it could easily pass as condensed steam.
The metalic parts were painted with Tamiya and Vallejo acrylics. I hate metalic acrylic colors, but since was a not-so-serious project, I preferred to use the few I have than throwing them away, The secret is to keep them looking like cast metal parts, and their acrylic nature helps a lot in this regards, because their pigments are not as thin as in the enamel/lacquer counterparts. I used them on the crankshaft, crankshaft bar and linkages.
The flywheel and the scratchbuilt pulley were painted in Tamiya Flat Black (XF-1) and rubbed with Uschi van der Rosten Iron and Steel metallic powders.
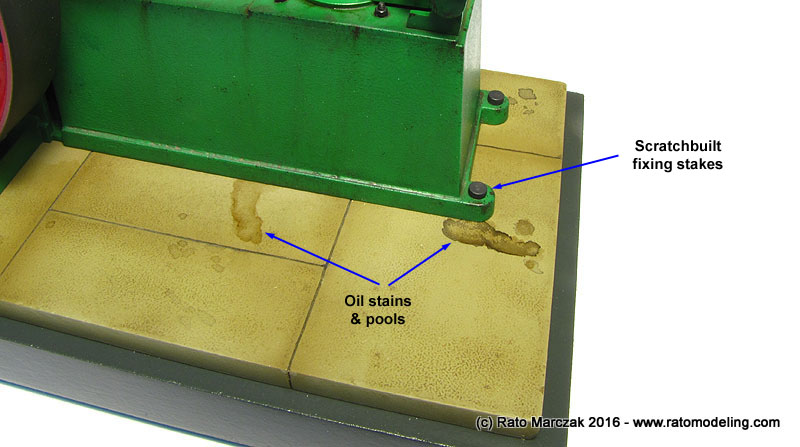
The base is composed by two MDF boards superposed. The top one was covered with melamine surface, which played concrete surface. It was just a matter of scribing the dividing lines and a generous dark brown oils wash. Add a few pools of oil here and there and you have a convincing concrete surface. I also turned the fixing stakes in acrylic to simulate the fixature of the engine to the ground, replacing the molded on ones that come with the kit. And they truly work as fixing devices!
I forgot to mention that the piston/slide valve can be viewed by removing their cover (part #32). I painted the interior surfaces Aluminum and highlighted the steam feeding channels with blue:
And it works:
Ok, I like engineering projects, and this was not for my daughter's school project. I built this engine because I liked it, and the challenge of making a realistic weathering in something other than tanks and aircraft. More importantly, it was a nice diversion from my usual confort zone, and truly improved my modeling skills...
Definitely I'll be trying that different again soon. You should try too... it is guaranteed fun.
| Technical file | |
| Kit:
|
- Airfix #A05870 |
| Additions:
|
|
| Basic
colors: |
-
Primer: general purpose automotive grey primer - Cast iron finish: Colorgin Antiderrapante (anti-slip) spray can - Basic colors: Vallejo mixes - Metalic colors: Uschi van der Rosten pigments, Humbrol Metal Cote Gunmetal, Tamiya acrylics. - Semi-gloss finish: Testors Model Master Acryl |
| Notes: |
-
A few scratchbuilt details (see text). |
Rato Marczak © 2016
