| Amodel D.H. 104 Dove in 1/72 scale - Part 2 |
| Finished: January/2022 |
Well,
let me focus on the diorama construction in this second part. As you
can imagine, it all started before the Dove was finished. I had a
general idea of the display base and decided that a passenger stair and
a generator/compressed air cart would be necessary, plus a couple of
figures. Between stages of the Dove construction (part 1), I
spent some time scratchbuilding these items, as we will see.
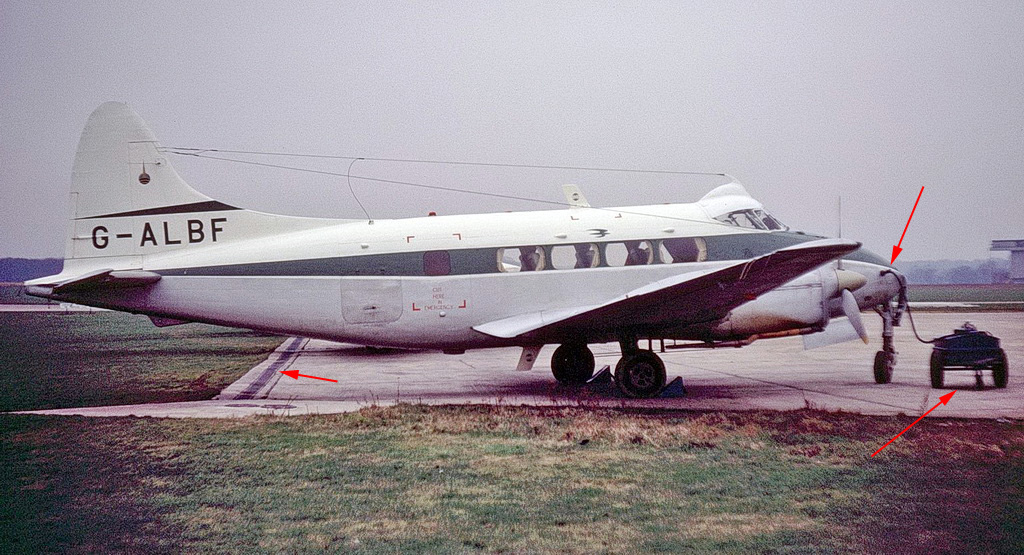
The general arrangement was based on a photo of PH-MAD at Southampton:
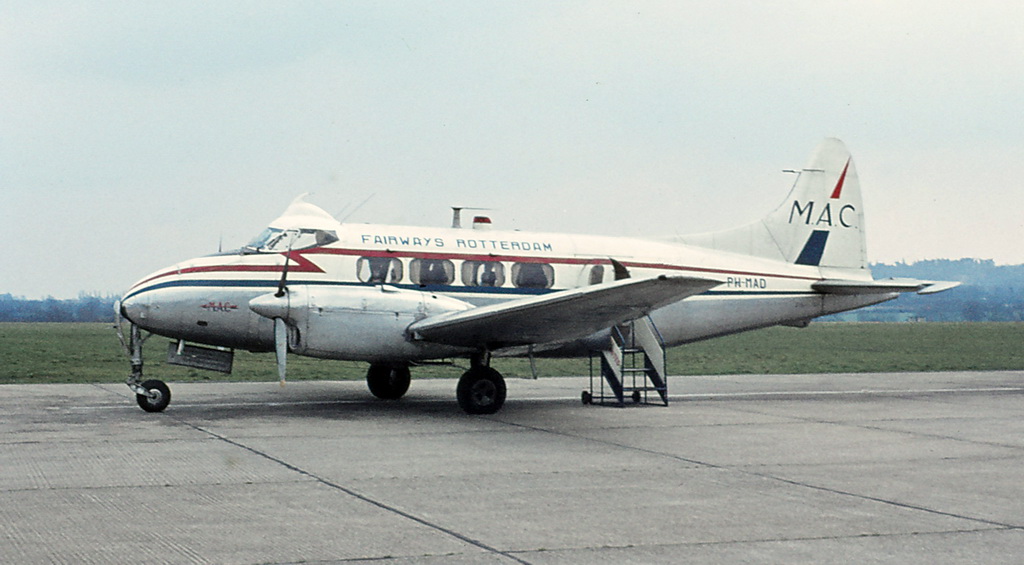
PH-MAD of Martin's Air Charter at Southhampton, 1964. Barry Friend collection
I imagined a scene where the Dove, by late 60s an already old traveler, was being serviced on a corner of the ramp, when an IATA delegate appears to check something... some grass, a drainage gutter, and let's see how it goes.
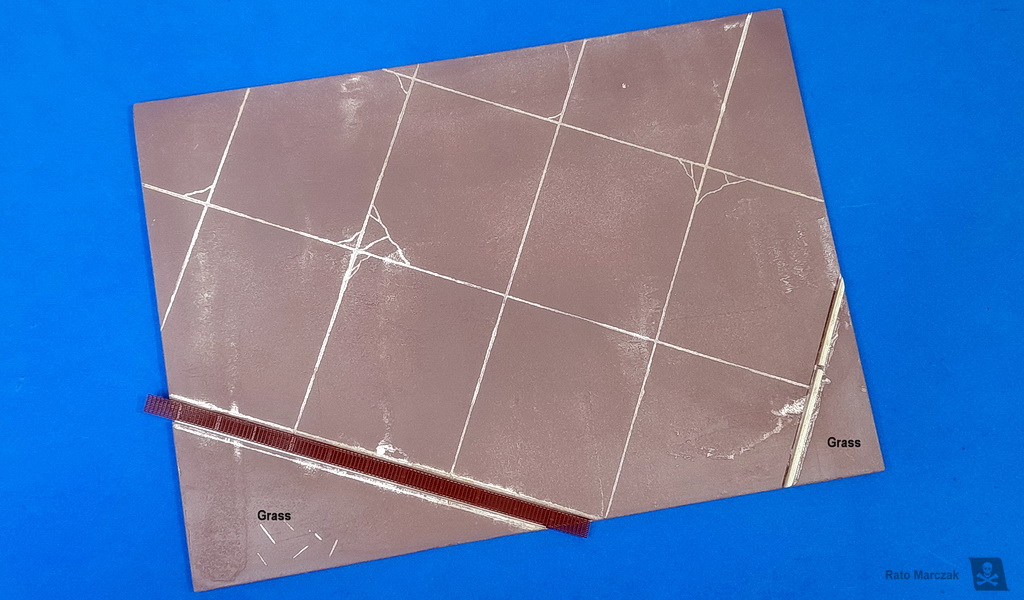
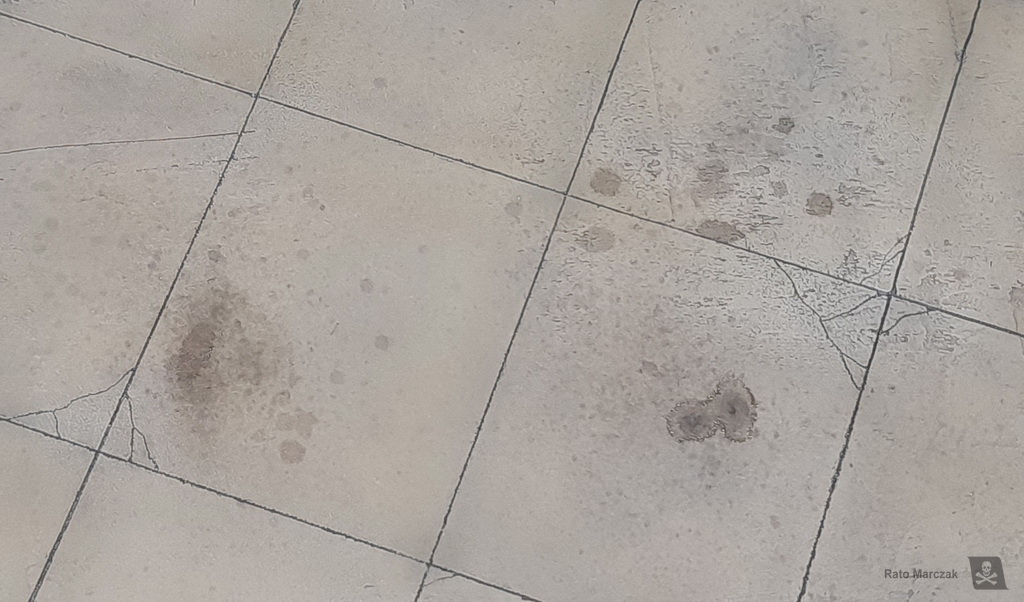
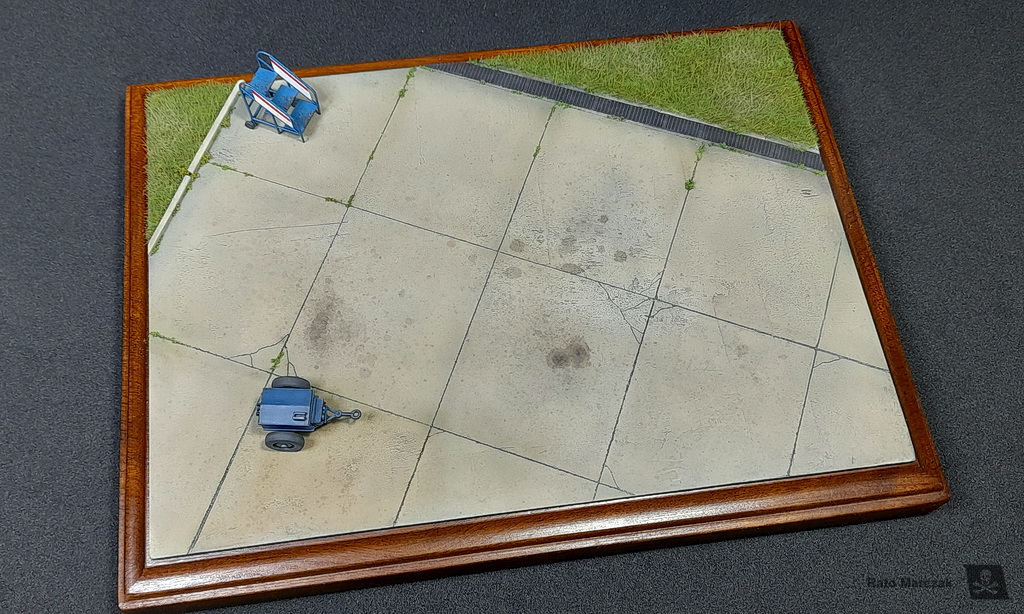
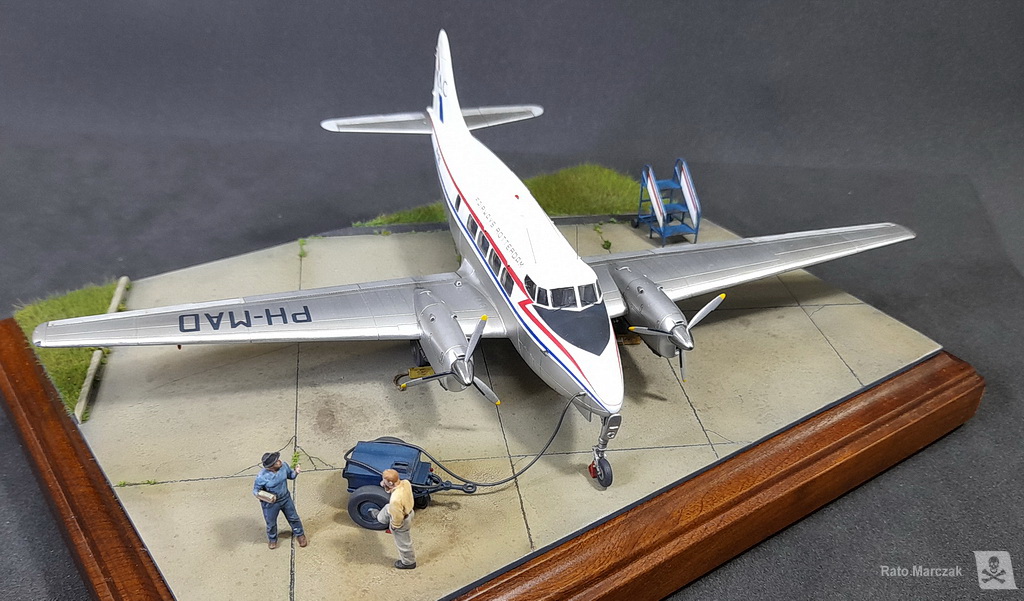
The base itself is one of my standard wooden bases. To model the ramp, I started with a thick piece of construction paper board and applied a thin layer of wood putty using a large spatula. This is not a perfect process, leaving imperfections on the surface that will simulate small eroded spots that we see in old concrete structures. Once the putty was dry, I scribed the separation between the concrete blocks, as well as the characteristic cracks.
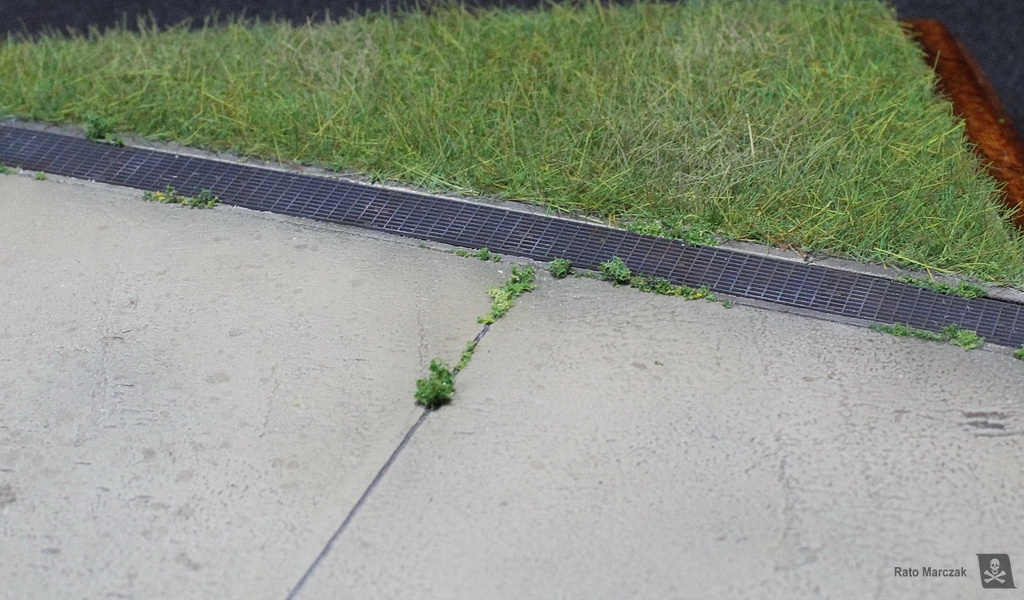
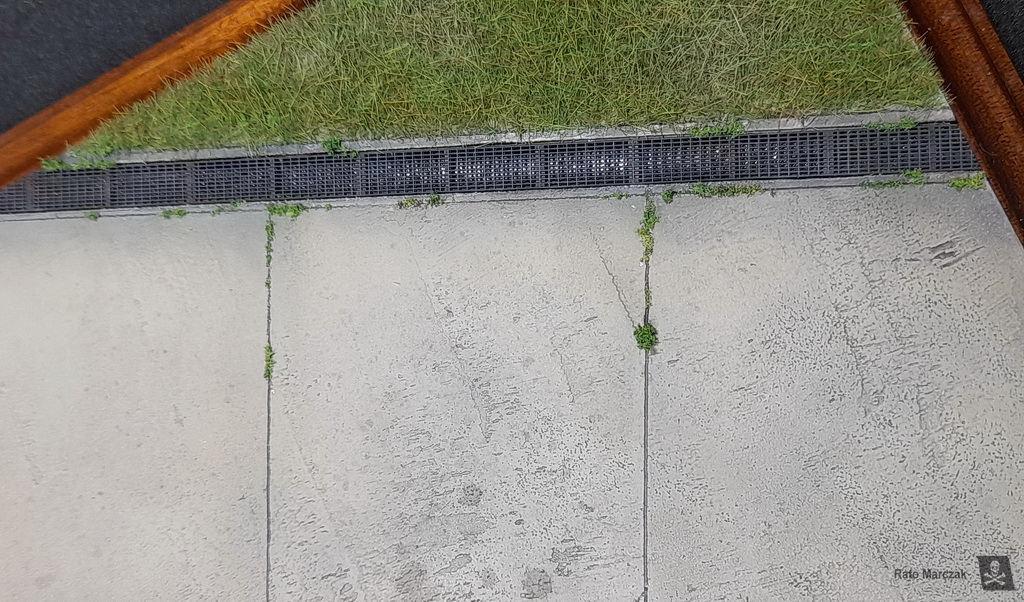
A 5 mm wide depression was made to install the drain channel, another common occurrence in airports. The channel grate came from a 1/87 railroad platform and it worked like a charm. The whole process took me one night, but I strongly recommend that the cardboard is sealed with lacquer paint or varnish::

The next steps were the fun ones. I painted the concrete area and played with filters to produce tonal variations among the blocks. Then a dark grey was applied to simulate the tar between the block edges and show the texture obtained with the putty. When it all was dry, I simulated dried fluid pools here and there with acrylics. Speckling with dark colors increased the realism. A coat of flat varnish, followed by a gentle drybrushing with grey oils finished off the concrete area:
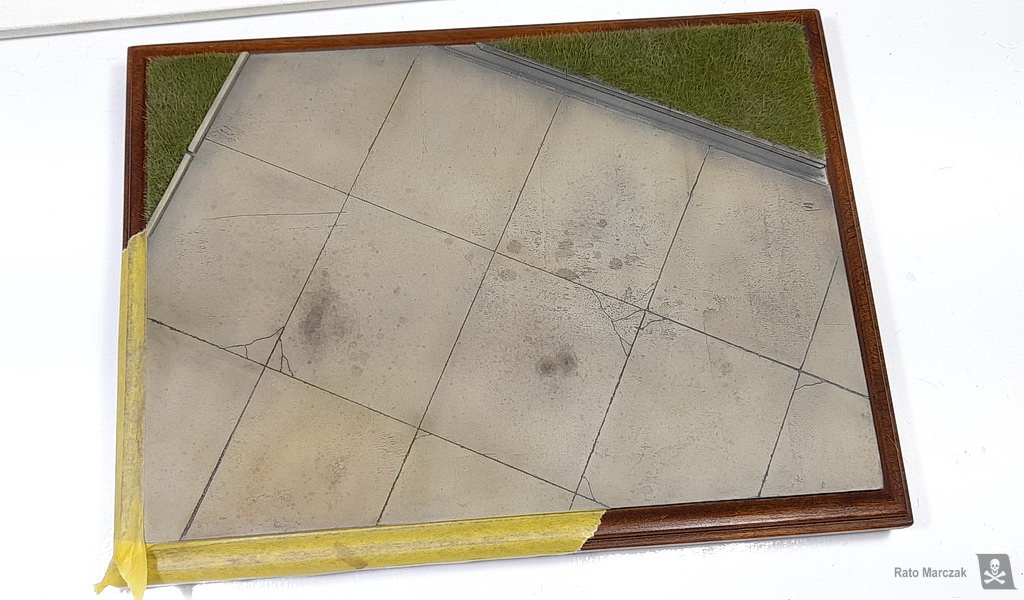
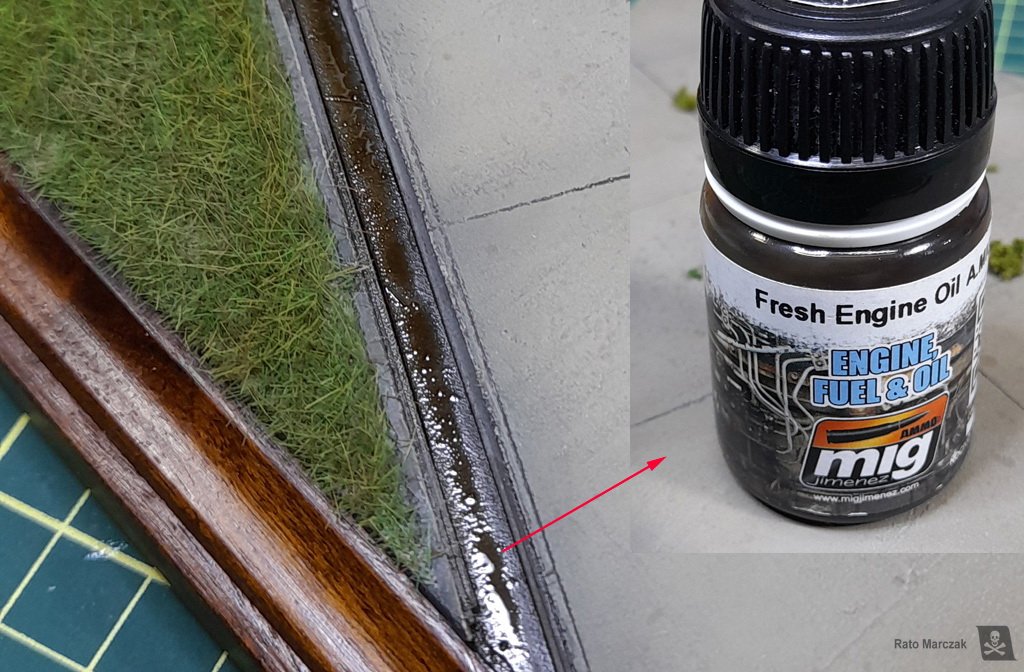
Static grass was applied to the corners of the base using an electrostatic applicator and a mix of 2 and 4 mm grass. The grate was painted, weathered with pigments, and installed in place. But not before putting water running inside it. I wanted that the glossiness of the water (or who knows what!) draining could be seen from above. I simulated the water with Engine Oil from MiG, but any murky glossy medium will do.
Another common occurrence in runways is weeds. I simply glued small medium and light green flocks of Woodland Scenics turf. Evidently, the weeds happen close to the drain and the borders of the ramp.
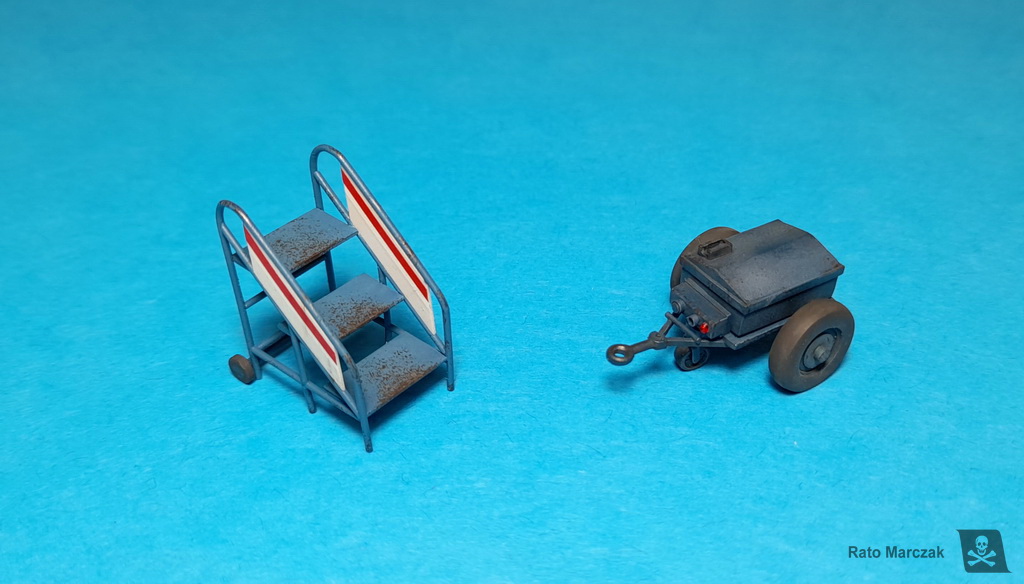
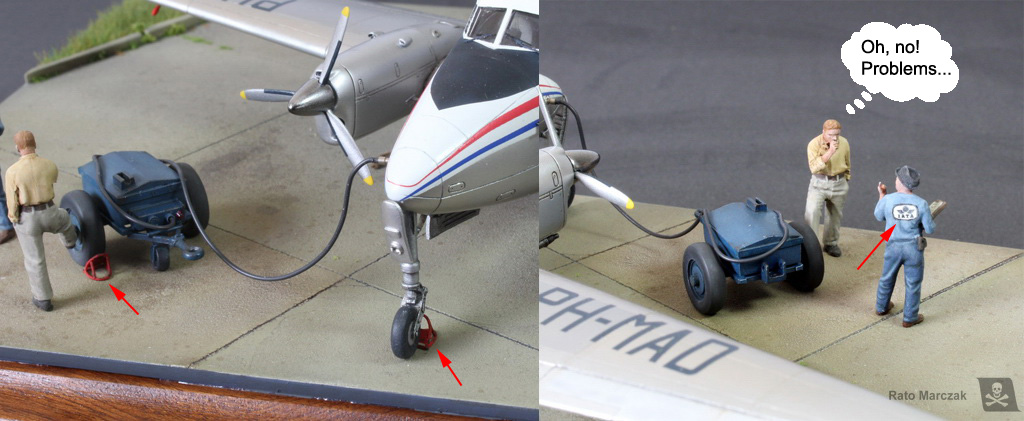
With the base done, I could add the scratchbuilt items that I made especially for this diorama. The first is an accumulator/compressed air cart. These carts are very similar to the ones that we got used to seeing feeding Spitfires and Hurricanes. They are a civilian version very common in airports up to the late 60s. I was told that the Dove uses compressed air for everything: flaps, landing gear...
Another thing that must be around small passenger aircraft is the stairs. Usually, these items are specific for each aircraft, not rarely painted in the colors of the company livery. It is relatively easy to find photos of Doves being serviced by these carts. and some of them have all the elements I wanted:
The cart was scratchbuilt based on eyeball approximations from a few photos of the real equipment. Some pieces of plastic rods, a few leftover wheels, metal tubing, and some old school-sanding... The passenger stair was also scratchbuilt and is a more delicate item. I wrote a small report detailing how it was built.


After painting and weathering them, I also made two sets of wheel chocks, again using things that I could see in period photos. The metal chock was made using a technique described in another article. The tail support was not used in the diorama, but I made it to take photos of the Dove standalone:


My first arrangement of the stairs and cart would not make sense, because the stairs cannot be removed from that spot - it would hit either the fuselage or the wing of the
Dove... Duh! But it is a nice photo:
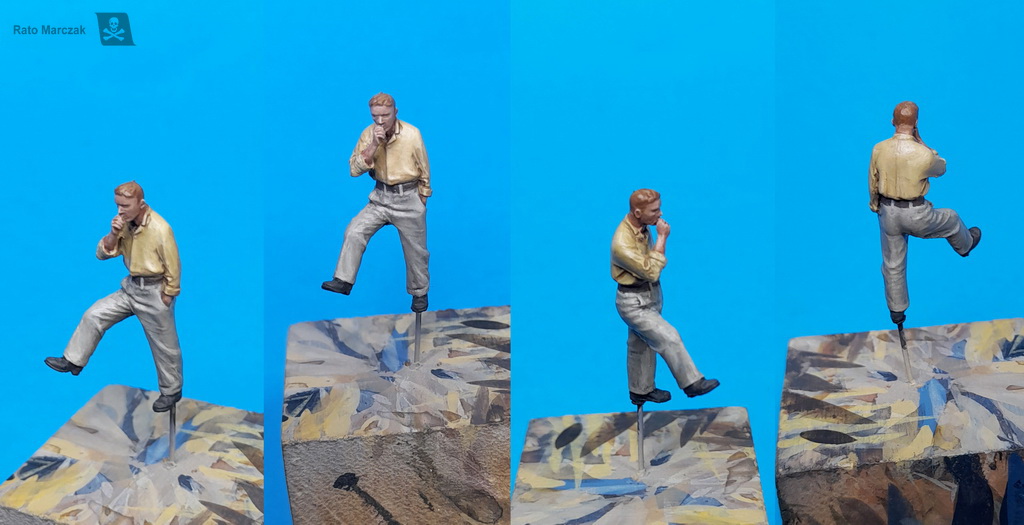
The final items were the figures. Like I said, I wanted to portray an airport employee talking to an IATA (Intl. Air Transport Association) representative. The thoughtful guy is an Orion German tanker. The IATA guy, wearing a hat, I printed from a public domain file.
The wooden chocks were positioned under the main wheels. The metal ones were used on the nose wheel, and the other under one of the cart's wheels, probably a safety measure that I saw in a photo. The hose connecting the cart to the Dove is a piece of 0.6 mm soldering wire, painted in rubber color and glued to an old watch piece simulating the socket.
I said that the final items were the figures, however, after staring at the base for a while, I thought it was too clean. Well, runways use to be clean, but the base was looking too sterile. I then glued some dead leaves here and there. I thought about leaving an old newspaper laid over the drain too, but I couldn't find evidence of dirt in the photos.

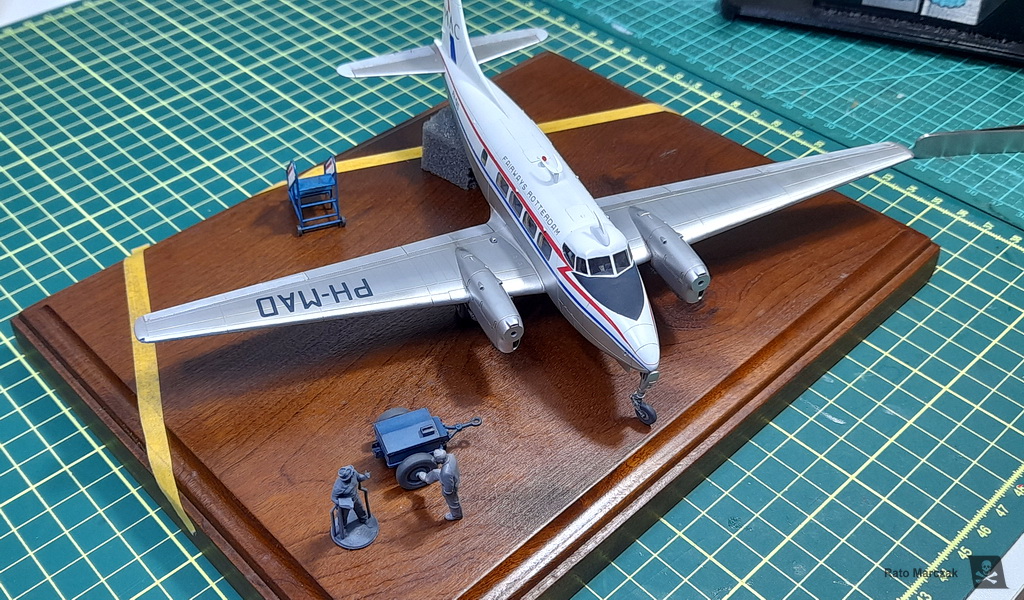
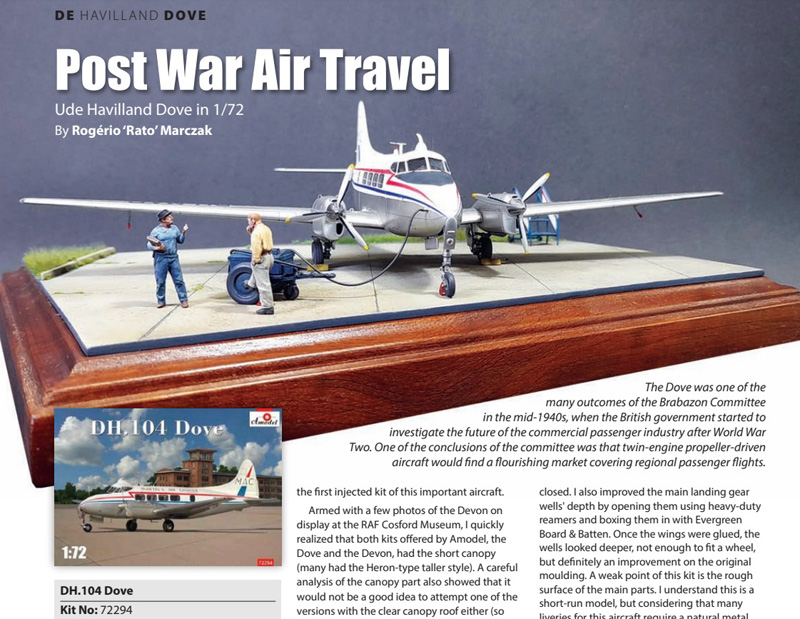
And voilá! My first airliner aircraft model in almost 40 years was finished in a proper setting. The build of the little Dove presented some challenges at times, considering the short-run nature of the kit, but the construction of the diorama was a pleasure from the first minute.


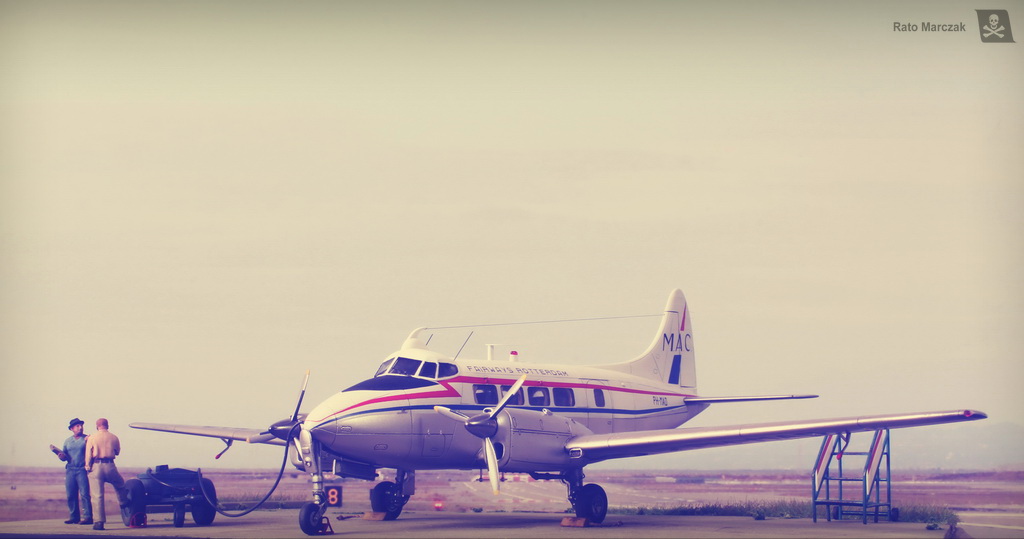
After a couple of days, I decided to print some background posters and take new photos, pretty much like F. Verlinden used to do back in the day.

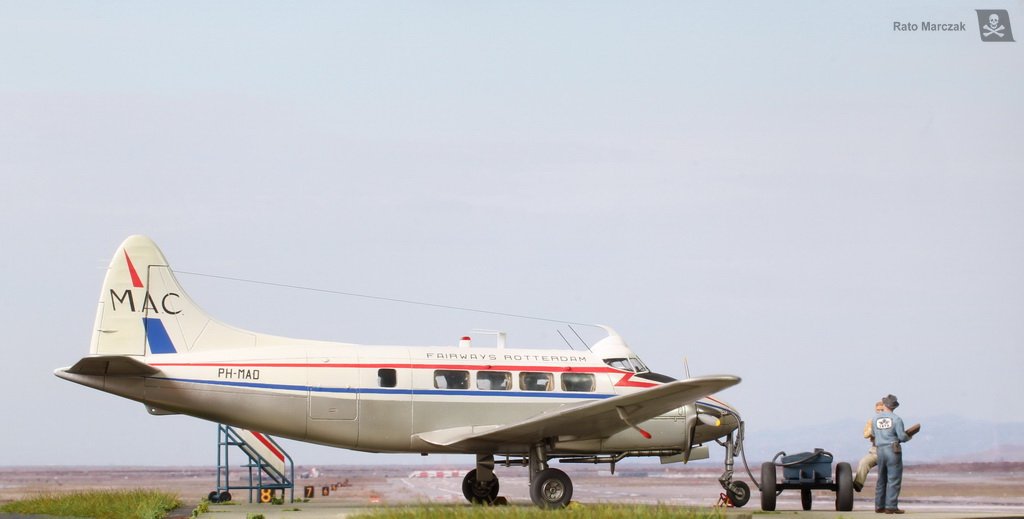
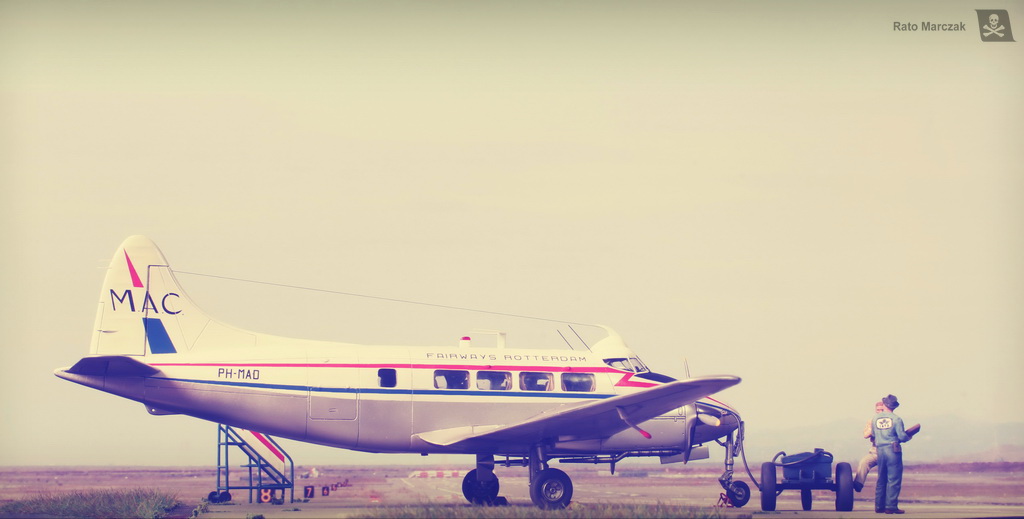
Of course, I could not resist to playing digitally with the new shots. And you know what, I decidedly will be doing the same in my next models. In the case of the dioramas, treated photos many times can convey much better the story being told.

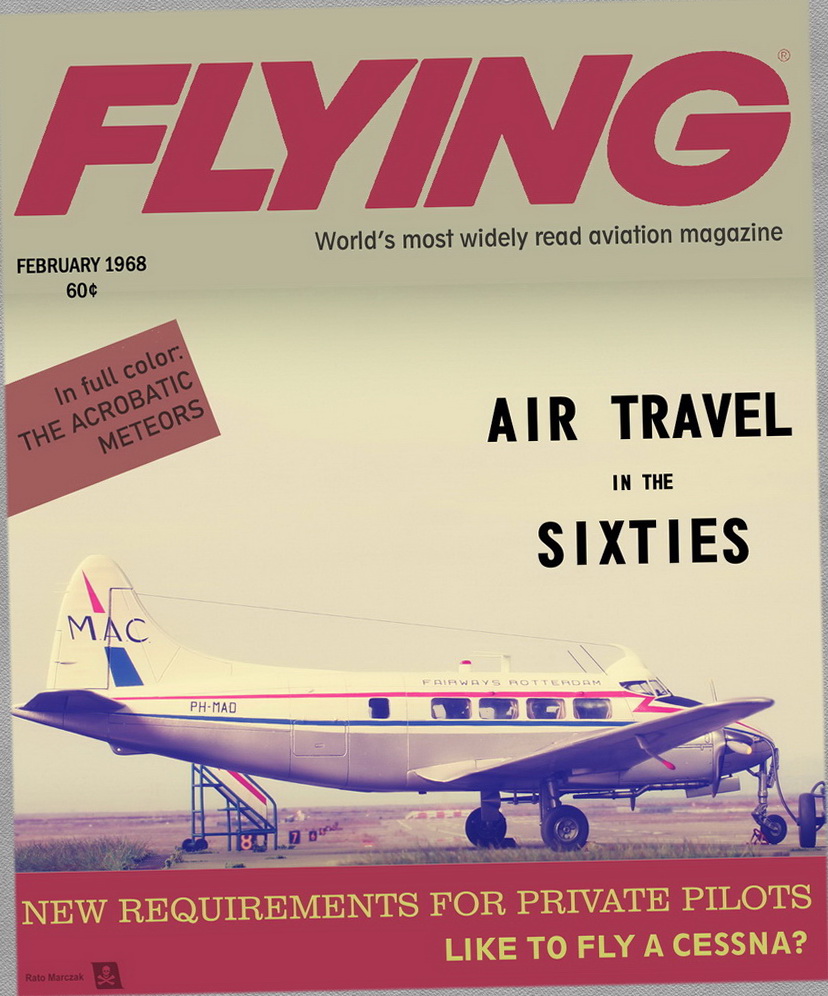
Here is Flying magazine from the month I was born. By the way, all headlines came from real Flying issues of the 60s.
I hope you liked this model. See you in the next one.
Link to Part 1
Another version of this article was published on Scale Aircraft Modelling magazine in June/2022. It is a wonderful modeling magazine. Consider subscribing it...
The general arrangement was based on a photo of PH-MAD at Southampton:
PH-MAD of Martin's Air Charter at Southhampton, 1964. Barry Friend collection
I imagined a scene where the Dove, by late 60s an already old traveler, was being serviced on a corner of the ramp, when an IATA delegate appears to check something... some grass, a drainage gutter, and let's see how it goes.
The base itself is one of my standard wooden bases. To model the ramp, I started with a thick piece of construction paper board and applied a thin layer of wood putty using a large spatula. This is not a perfect process, leaving imperfections on the surface that will simulate small eroded spots that we see in old concrete structures. Once the putty was dry, I scribed the separation between the concrete blocks, as well as the characteristic cracks.
A 5 mm wide depression was made to install the drain channel, another common occurrence in airports. The channel grate came from a 1/87 railroad platform and it worked like a charm. The whole process took me one night, but I strongly recommend that the cardboard is sealed with lacquer paint or varnish::
The next steps were the fun ones. I painted the concrete area and played with filters to produce tonal variations among the blocks. Then a dark grey was applied to simulate the tar between the block edges and show the texture obtained with the putty. When it all was dry, I simulated dried fluid pools here and there with acrylics. Speckling with dark colors increased the realism. A coat of flat varnish, followed by a gentle drybrushing with grey oils finished off the concrete area:
Static grass was applied to the corners of the base using an electrostatic applicator and a mix of 2 and 4 mm grass. The grate was painted, weathered with pigments, and installed in place. But not before putting water running inside it. I wanted that the glossiness of the water (or who knows what!) draining could be seen from above. I simulated the water with Engine Oil from MiG, but any murky glossy medium will do.
Another common occurrence in runways is weeds. I simply glued small medium and light green flocks of Woodland Scenics turf. Evidently, the weeds happen close to the drain and the borders of the ramp.
With the base done, I could add the scratchbuilt items that I made especially for this diorama. The first is an accumulator/compressed air cart. These carts are very similar to the ones that we got used to seeing feeding Spitfires and Hurricanes. They are a civilian version very common in airports up to the late 60s. I was told that the Dove uses compressed air for everything: flaps, landing gear...
Another thing that must be around small passenger aircraft is the stairs. Usually, these items are specific for each aircraft, not rarely painted in the colors of the company livery. It is relatively easy to find photos of Doves being serviced by these carts. and some of them have all the elements I wanted:
The cart was scratchbuilt based on eyeball approximations from a few photos of the real equipment. Some pieces of plastic rods, a few leftover wheels, metal tubing, and some old school-sanding... The passenger stair was also scratchbuilt and is a more delicate item. I wrote a small report detailing how it was built.
After painting and weathering them, I also made two sets of wheel chocks, again using things that I could see in period photos. The metal chock was made using a technique described in another article. The tail support was not used in the diorama, but I made it to take photos of the Dove standalone:
My first arrangement of the stairs and cart would not make sense, because the stairs cannot be removed from that spot - it would hit either the fuselage or the wing of the
Dove... Duh! But it is a nice photo:
The final items were the figures. Like I said, I wanted to portray an airport employee talking to an IATA (Intl. Air Transport Association) representative. The thoughtful guy is an Orion German tanker. The IATA guy, wearing a hat, I printed from a public domain file.
The wooden chocks were positioned under the main wheels. The metal ones were used on the nose wheel, and the other under one of the cart's wheels, probably a safety measure that I saw in a photo. The hose connecting the cart to the Dove is a piece of 0.6 mm soldering wire, painted in rubber color and glued to an old watch piece simulating the socket.
I said that the final items were the figures, however, after staring at the base for a while, I thought it was too clean. Well, runways use to be clean, but the base was looking too sterile. I then glued some dead leaves here and there. I thought about leaving an old newspaper laid over the drain too, but I couldn't find evidence of dirt in the photos.
And voilá! My first airliner aircraft model in almost 40 years was finished in a proper setting. The build of the little Dove presented some challenges at times, considering the short-run nature of the kit, but the construction of the diorama was a pleasure from the first minute.
After a couple of days, I decided to print some background posters and take new photos, pretty much like F. Verlinden used to do back in the day.
Of course, I could not resist to playing digitally with the new shots. And you know what, I decidedly will be doing the same in my next models. In the case of the dioramas, treated photos many times can convey much better the story being told.
Here is Flying magazine from the month I was born. By the way, all headlines came from real Flying issues of the 60s.
I hope you liked this model. See you in the next one.
Link to Part 1
Another version of this article was published on Scale Aircraft Modelling magazine in June/2022. It is a wonderful modeling magazine. Consider subscribing it...
| Technical file | |
| Kit:
|
- Amodel 72294 |
| Additions:
|
- One Orion figure (modified) and another 3D printed. - Woodland Scenics 2 mm and 4 mm grass, and fine turf (light green and medium green) |
| Basic
colors: |
- Several Tamiya, GSI and Vallejo colors - Flat coat: Humbrol Matt Cote. |
| Notes: |
- Scratchtuilt items (see text). |
Rato Marczak © 2023
