| Revell (Hasegawa) Saab J-35J Draken in 1/72 |
|
Started: January/2015 Finished: March/2015 |
A
while ago my friend modeler Victor Tavares claimed that I was simply
unable to build a model out of the box. Convinced to prove him
wrong, I decided to tackle the Revell offering of the Saab Draken in
1/72 scale, which is, in fact, the Hasegawa molding (curiously, during
a short time both, the old Revell original as well as the reboxed
Hasegawa co-existed in the Revell-GmbH catalogue).
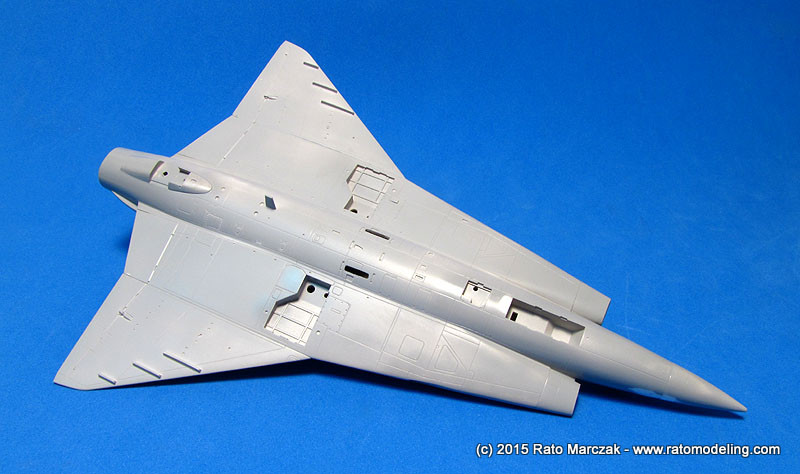
The Hasegawa kit is very well molded, with consistent recessed panel lines but very sparse details on wheel wells and cockpit. The Revell boxing has less appeal because it comes with decals for late camouflages schemes (Swedish and Austrian) only, and Revell tried to compensate that with the inclusion of the commemorative J-35Ö Draken "Ostarrichi 996" in the decal version. Inexplicably, Revell molded the kit in white styrene - terrible to work with, to say the least:
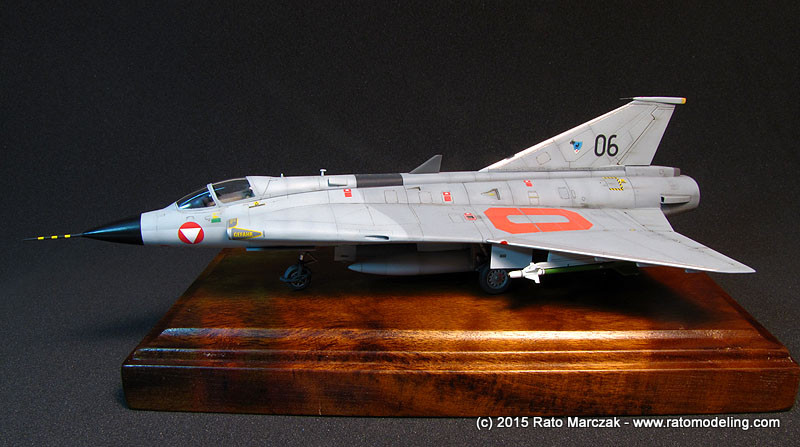
I was initially inclined to go for the Swedish version, but an early inspection of the decals showed a visible registering problem with the Swedish Air Force (Flygvapnet) roundels. That left me with a late camouflage Austrian AF and commemorative version of the boxart. On the other hand, opting for the Austrian version would make an OOB built impossible (more on that later). It would please my Polish/Austrian heritage, though.
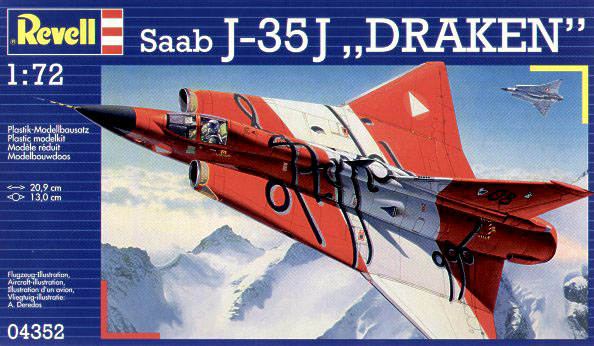
I added scratchbuilt details to the cockpit, and used the kit decals for the control and sidewall panels. Seat belts came from an old Eduard PE set. I decided for a closed cockpit from the outset of this project, so the clear parts were glued shut and masked.
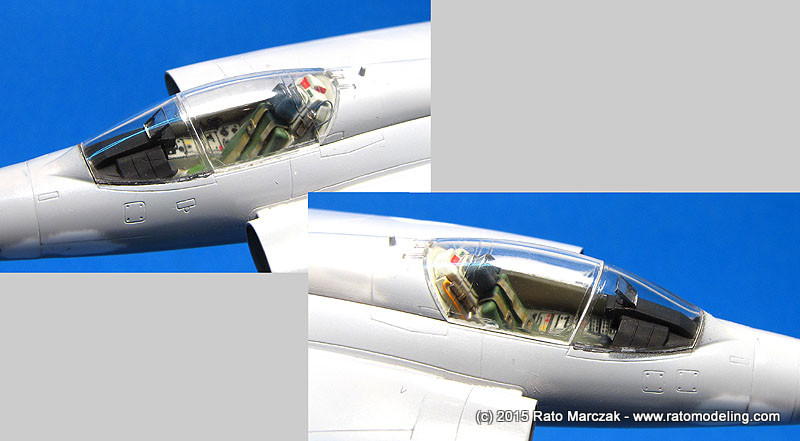
As I mentioned before, it is impossible to make an accurate Austrian version with the parts in the kit. Basically two details should be modified: the top of the vertical stabilizer (part E7) is correct only for the Swedish version, so I sawed it off and carved a new one from a rectangular plastic rod. The other part which is incorrectly depicted for the Austrian version is the air intake on the port fuselage side (part C1), so I vacuum formed a new one according to reference photos. These features are separated parts, so I don't understand why Hasegawa omitted them... Anyway, this mods (plus the cockpit additions) made impossible an OOB project under IPMS rules.
Ok, Victor, you won this battle...
The rest of the assembly progressed well. A coat of Mr.Surfacer 1200 straight from the rattle can helped to find bad spots and prepared the model for the painting phase:
I didn't take any further in progress photos, but since OOB was out of question, I decided to add a few smaller details, without going overboard, though. My walkaround of a Saab Drakken J-35Oe made during a visit to the Heeresgeschichtliches Museum - HGM, at Vienna helped a lot.
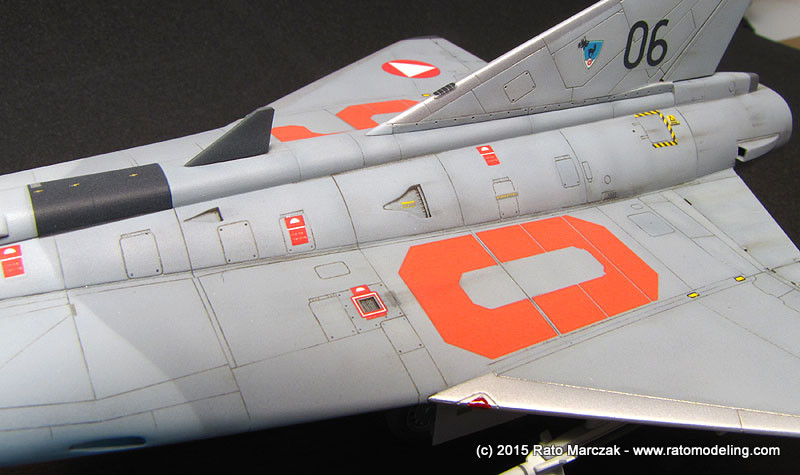
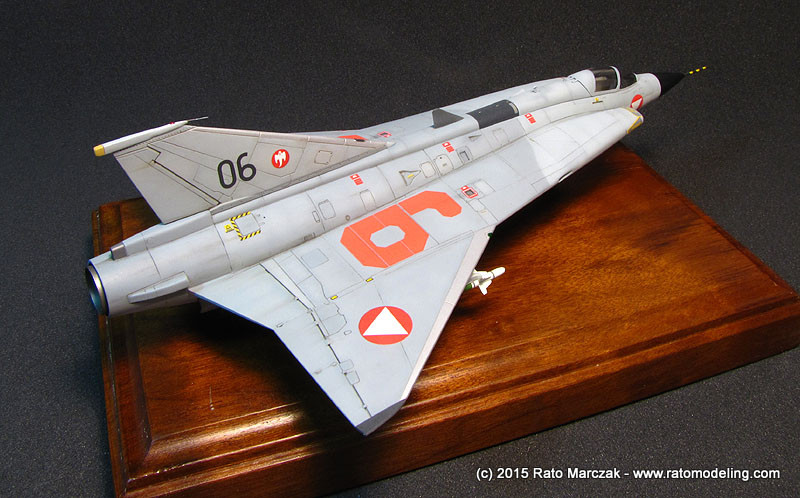
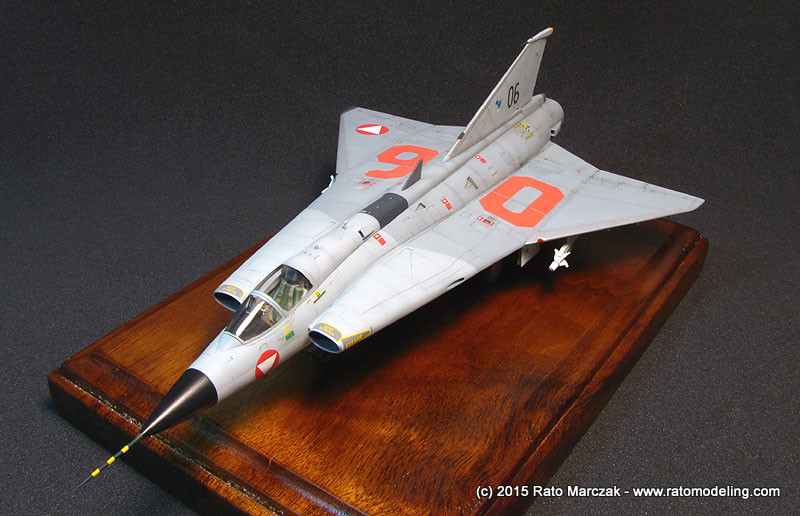
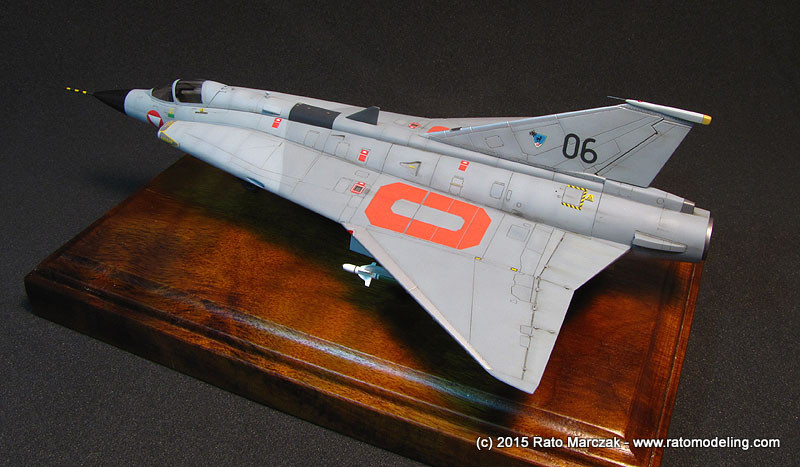
Painting started with a pre-shading in black. My intention was to show a moderate weathering (for a jet) and impart a distinctive scale effect on the camouflage colors, considering the scale. At the end of their carrers, Austrian Drakens used a characteristic three-grays camouflage. The darker ones has a distinctive blue hue, looking like Ghost Grays with different values, while the underside color is almost white.
Recently, I have been doing an effort to use as much as I can of my stash of Model Master and Humbrol enamels. I still prefer lacquers, but always liked these brands, and reasoned that I could use them whenever possible to avoid waste for I still have plenty (some of the bottles still unopened). Therefore I figure out I could use MM #1741 Dark Ghost Gray / FS 36320 straight from the bottle for the darkest grey and add #2143 RLM21 Semi-Gloss White as needed to produce the lighter values. Dark Ghost Gray has the blue hue I was looking for, and the addition of white would do the job for the two other grays.
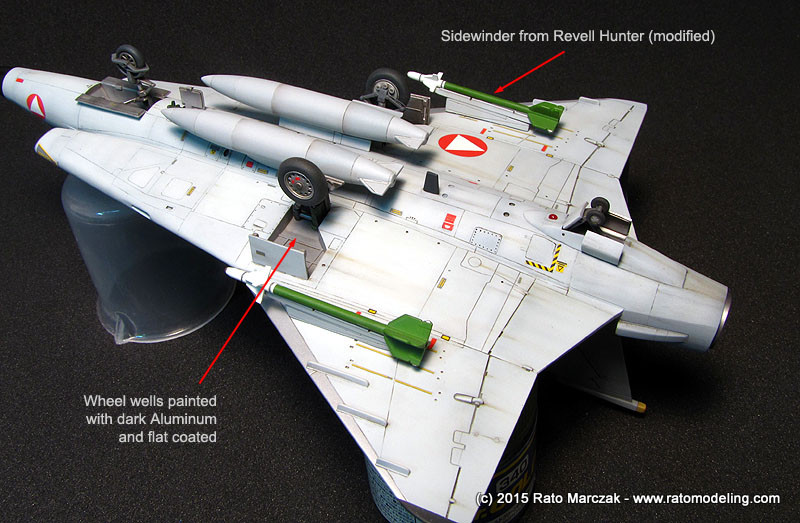
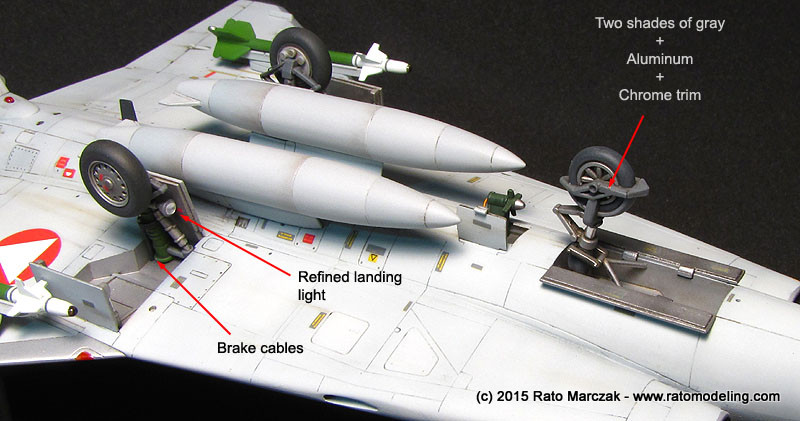
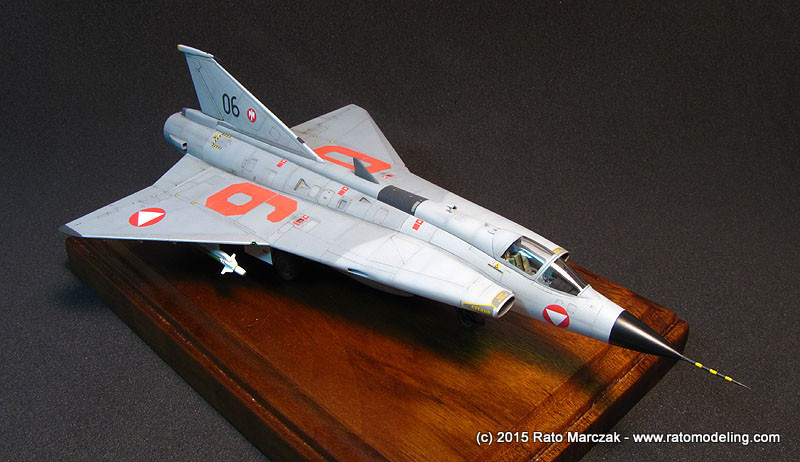
The landing gear bays were painted with a dark Aluminum mix, coated with flat clear afterwards and masked. The camouflage started with the underside color, which was masked and the two other grays airbrushed. I applied the camouflage colors in two steps. First, I airbrushed the colors over the center of the panels, avoiding the panel lines and the pre-shaded areas. Later, with a thinner mix of the colors and a fine tipped airbrush I progressively covered the pre-shaded areas, taking care to not cover it all. This way I was able to control the amount of pre-shading left visible. Following photos of the real thing, I managed to make the aft areas of the fuselage and wings more 'dirty' by the pre-shading. The scale effect was achieved by purposedly making the colors lighter.
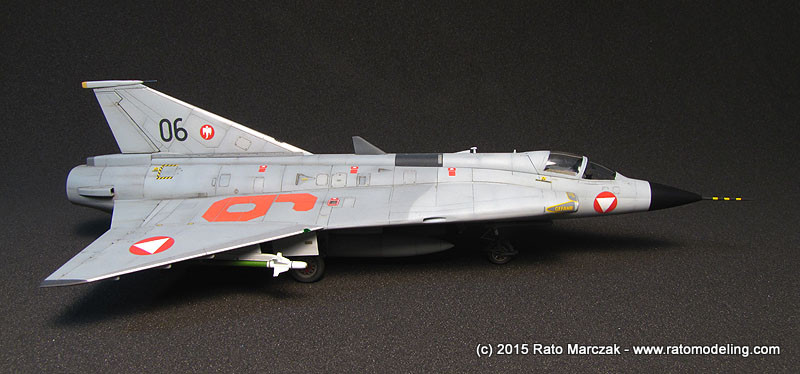
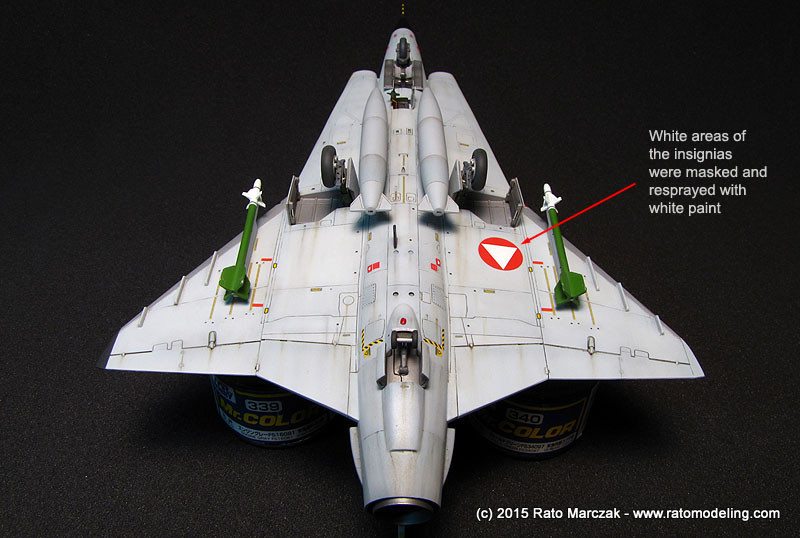
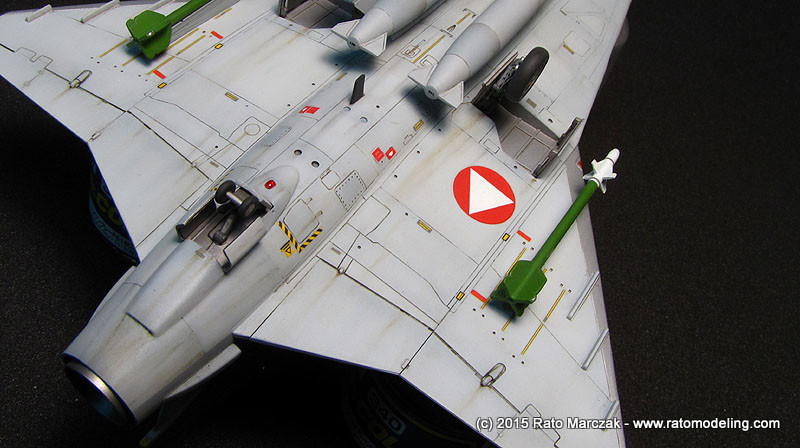
The model was sealed with a coat of lacquer clear gloss in preparation for the decals. I used the kit's sheet and it performed well, except for the white areas of the insignias which were very translucent and then retouched with white color. I spent three nights applying all those little stencils, and left a few out.
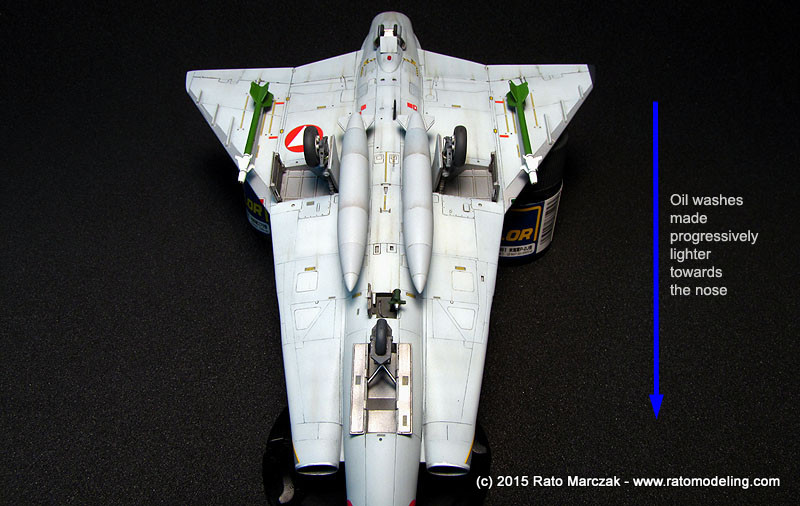
Another gloss coat and I started applying the washes. I used gray oils for the underside and a more brown oil mix on the upperside. Around the engine, I would sometimes add a hint of black to make things darker. During the removal of the excess wash, I tried to clean up more of the oils as I progressed towards the nose of the Draken. This made the oil washes more agressive along control surfaces, engine area and tail pipe, leaving the front of the aircraft significantly cleaner:
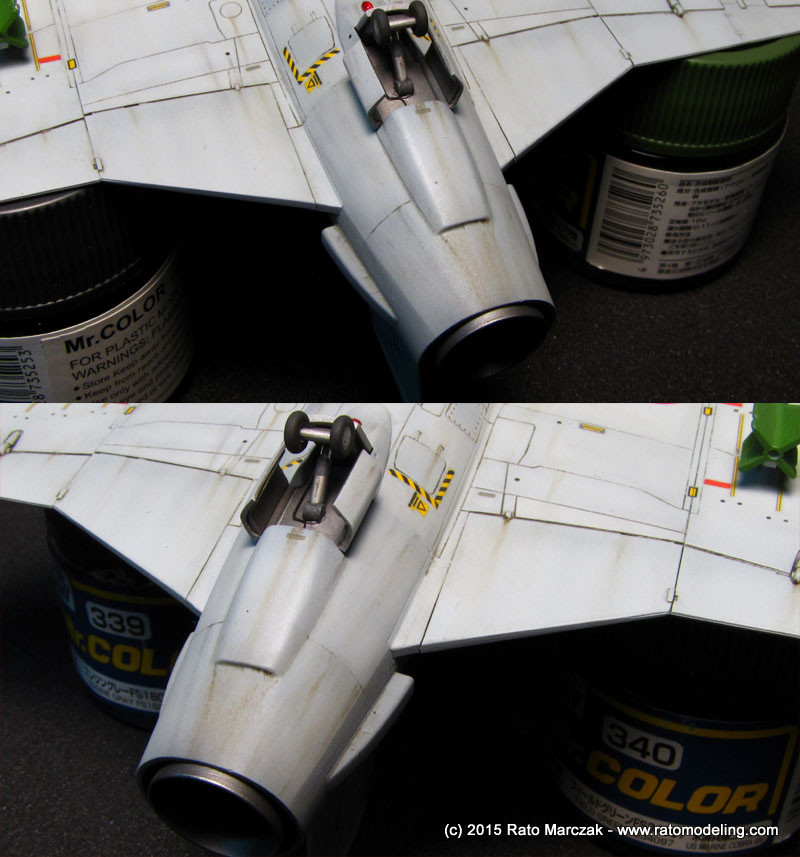
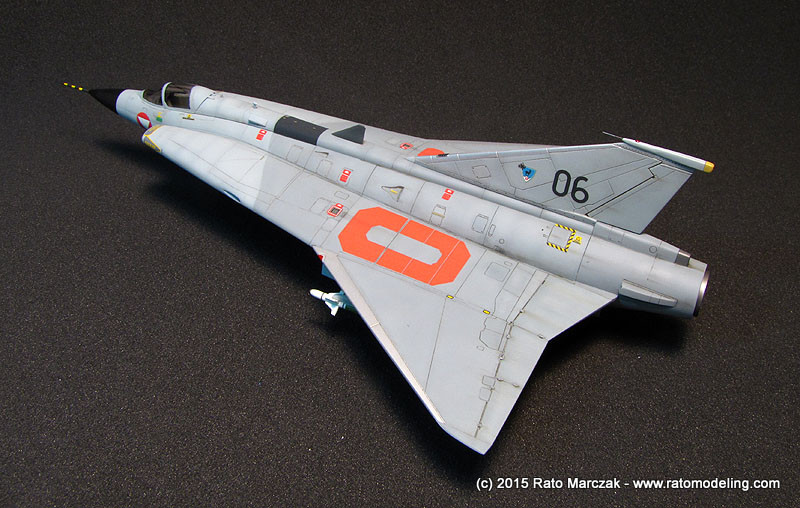
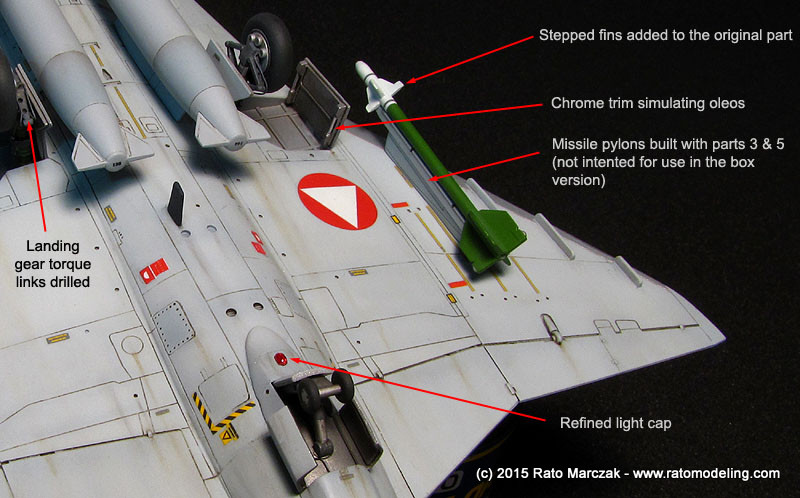
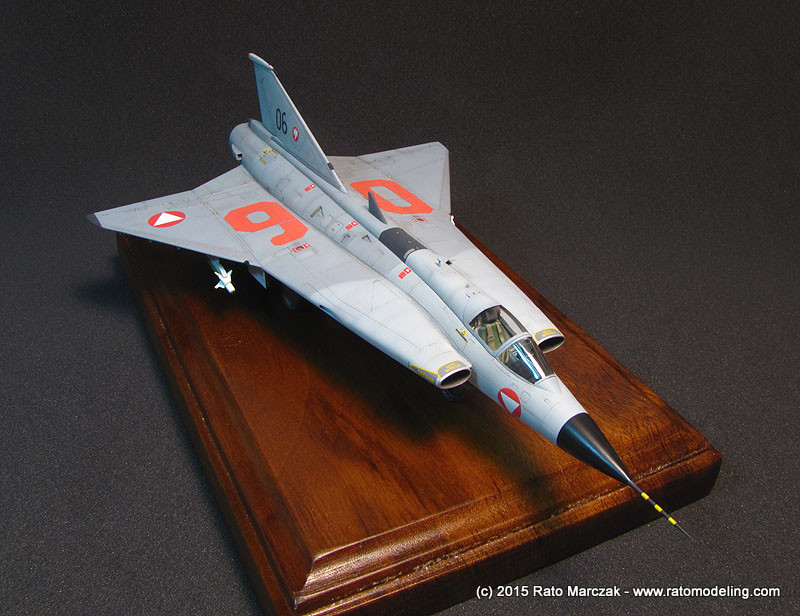
The landing gear and external fuel tanks were assembled as per instructions. With the OOB restrictions out of the way, I drilled the lightening holes to the torque links, added brake lines and refined the landing gear lights by hollowing them and adding clear lenses.
The export version of the Sidewinder missile came from my spare parts, I just had to add the cranked fins. Their pylons are not present in the kit, so I modified parts 3 and 5 in the kit to make new ones, using photos as reference. Painting the nose landing gear was not simple, as it is molded as a single part. After painting each color I sealed the job with lacquer gloss clear, so that any mistake in the subsequent color could be cleaned up with white spirit or water (depending on the type of brand used) without harming the previous one.
Before finishing off, I airbrushed a few lines with MM Gunship Gray to produce some post-shading. In retrospect, I should have done more of it, because the final flat varnish toned down considerably my weathering efforts:
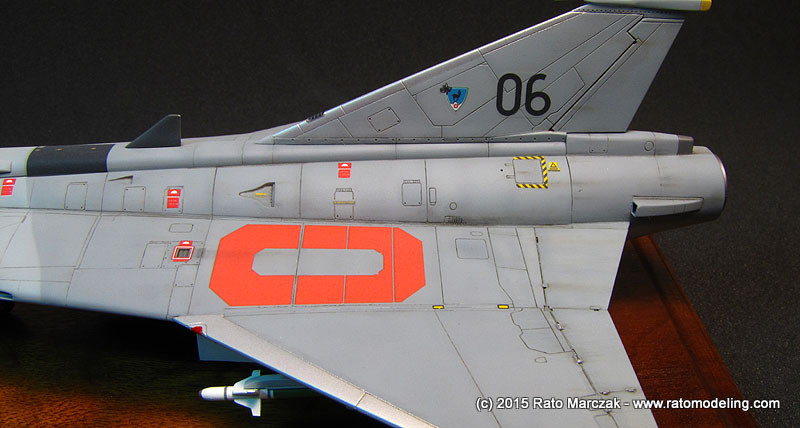
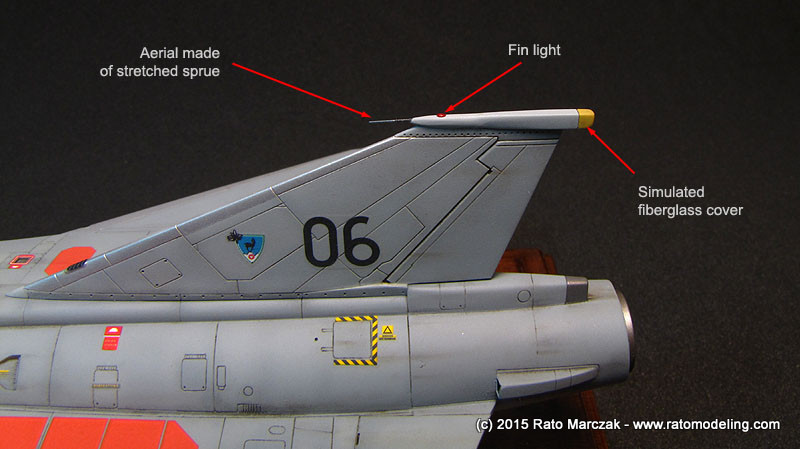
The radome was painted with semi-gloss black, but the nose antenae was flat coated to add some interest. The aerials were glued in place, as well as the wind driven generator. The wing lights were picked out using transparent red and green acrylics.
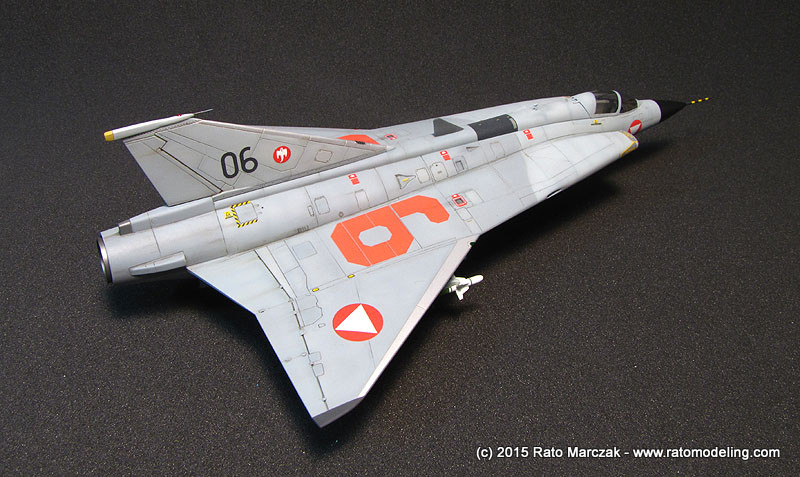
Looking at the model now, the lack of details inside the various wells under the fuselage is obvious, not to mention that main landing gear bay is completely innacurate. I'll live with these minor faults, afterall, it was a fun project, without any hurdles, and pretty quick for my personal standards.

In a next OOB challenge, I'll be more careful in choosing the kit... But at least my Draken is reasonably accurate now.
The Hasegawa kit is very well molded, with consistent recessed panel lines but very sparse details on wheel wells and cockpit. The Revell boxing has less appeal because it comes with decals for late camouflages schemes (Swedish and Austrian) only, and Revell tried to compensate that with the inclusion of the commemorative J-35Ö Draken "Ostarrichi 996" in the decal version. Inexplicably, Revell molded the kit in white styrene - terrible to work with, to say the least:
I was initially inclined to go for the Swedish version, but an early inspection of the decals showed a visible registering problem with the Swedish Air Force (Flygvapnet) roundels. That left me with a late camouflage Austrian AF and commemorative version of the boxart. On the other hand, opting for the Austrian version would make an OOB built impossible (more on that later). It would please my Polish/Austrian heritage, though.
I added scratchbuilt details to the cockpit, and used the kit decals for the control and sidewall panels. Seat belts came from an old Eduard PE set. I decided for a closed cockpit from the outset of this project, so the clear parts were glued shut and masked.
As I mentioned before, it is impossible to make an accurate Austrian version with the parts in the kit. Basically two details should be modified: the top of the vertical stabilizer (part E7) is correct only for the Swedish version, so I sawed it off and carved a new one from a rectangular plastic rod. The other part which is incorrectly depicted for the Austrian version is the air intake on the port fuselage side (part C1), so I vacuum formed a new one according to reference photos. These features are separated parts, so I don't understand why Hasegawa omitted them... Anyway, this mods (plus the cockpit additions) made impossible an OOB project under IPMS rules.
Ok, Victor, you won this battle...
The rest of the assembly progressed well. A coat of Mr.Surfacer 1200 straight from the rattle can helped to find bad spots and prepared the model for the painting phase:
I didn't take any further in progress photos, but since OOB was out of question, I decided to add a few smaller details, without going overboard, though. My walkaround of a Saab Drakken J-35Oe made during a visit to the Heeresgeschichtliches Museum - HGM, at Vienna helped a lot.
Painting started with a pre-shading in black. My intention was to show a moderate weathering (for a jet) and impart a distinctive scale effect on the camouflage colors, considering the scale. At the end of their carrers, Austrian Drakens used a characteristic three-grays camouflage. The darker ones has a distinctive blue hue, looking like Ghost Grays with different values, while the underside color is almost white.
Recently, I have been doing an effort to use as much as I can of my stash of Model Master and Humbrol enamels. I still prefer lacquers, but always liked these brands, and reasoned that I could use them whenever possible to avoid waste for I still have plenty (some of the bottles still unopened). Therefore I figure out I could use MM #1741 Dark Ghost Gray / FS 36320 straight from the bottle for the darkest grey and add #2143 RLM21 Semi-Gloss White as needed to produce the lighter values. Dark Ghost Gray has the blue hue I was looking for, and the addition of white would do the job for the two other grays.
The landing gear bays were painted with a dark Aluminum mix, coated with flat clear afterwards and masked. The camouflage started with the underside color, which was masked and the two other grays airbrushed. I applied the camouflage colors in two steps. First, I airbrushed the colors over the center of the panels, avoiding the panel lines and the pre-shaded areas. Later, with a thinner mix of the colors and a fine tipped airbrush I progressively covered the pre-shaded areas, taking care to not cover it all. This way I was able to control the amount of pre-shading left visible. Following photos of the real thing, I managed to make the aft areas of the fuselage and wings more 'dirty' by the pre-shading. The scale effect was achieved by purposedly making the colors lighter.
The model was sealed with a coat of lacquer clear gloss in preparation for the decals. I used the kit's sheet and it performed well, except for the white areas of the insignias which were very translucent and then retouched with white color. I spent three nights applying all those little stencils, and left a few out.
Another gloss coat and I started applying the washes. I used gray oils for the underside and a more brown oil mix on the upperside. Around the engine, I would sometimes add a hint of black to make things darker. During the removal of the excess wash, I tried to clean up more of the oils as I progressed towards the nose of the Draken. This made the oil washes more agressive along control surfaces, engine area and tail pipe, leaving the front of the aircraft significantly cleaner:
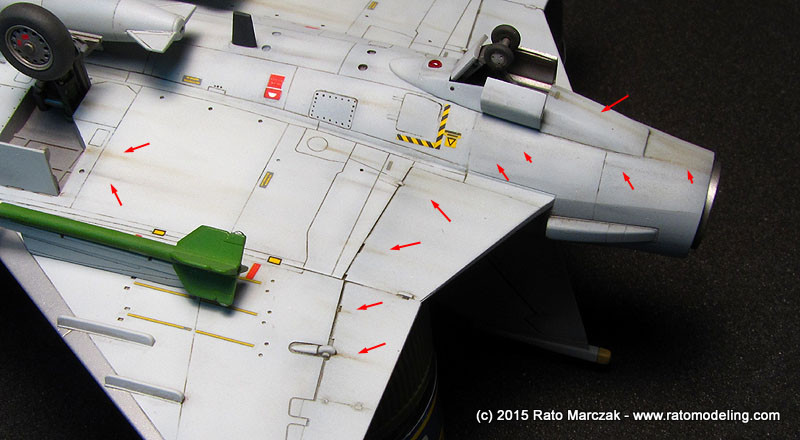
Next,
I started to simulate dirt, oil and leaks along hinges, langing gear
and access panels. I used oils, pastels and also some streaking effects
from AK. Constant checking against photos was necessary, as you can
find very clean airframes as well as some filthy operational examples.
The landing gear and external fuel tanks were assembled as per instructions. With the OOB restrictions out of the way, I drilled the lightening holes to the torque links, added brake lines and refined the landing gear lights by hollowing them and adding clear lenses.
The export version of the Sidewinder missile came from my spare parts, I just had to add the cranked fins. Their pylons are not present in the kit, so I modified parts 3 and 5 in the kit to make new ones, using photos as reference. Painting the nose landing gear was not simple, as it is molded as a single part. After painting each color I sealed the job with lacquer gloss clear, so that any mistake in the subsequent color could be cleaned up with white spirit or water (depending on the type of brand used) without harming the previous one.
Before finishing off, I airbrushed a few lines with MM Gunship Gray to produce some post-shading. In retrospect, I should have done more of it, because the final flat varnish toned down considerably my weathering efforts:
The radome was painted with semi-gloss black, but the nose antenae was flat coated to add some interest. The aerials were glued in place, as well as the wind driven generator. The wing lights were picked out using transparent red and green acrylics.
Looking at the model now, the lack of details inside the various wells under the fuselage is obvious, not to mention that main landing gear bay is completely innacurate. I'll live with these minor faults, afterall, it was a fun project, without any hurdles, and pretty quick for my personal standards.
In a next OOB challenge, I'll be more careful in choosing the kit... But at least my Draken is reasonably accurate now.
| Technical file | |
| Kit:
|
- Revell #04193 |
| Additions:
|
|
| Basic
colors: |
-
Primer: Mr.Surfacer 1200 in spray can - Camouflage: mixes of Model Master Dark Ghost Gray FS 36320 (#1741) and RLM 21 Semi-Gloss White (#2143) enamels - Silver: GSI Creos H-8 Silver - Gloss clear: automotive clear gloss lacquer - Flat finish: Testors Model Master Acryl flat |
| Notes: |
-
A few scratchbuilt details (see text). |
Rato Marczak © 2015
