| Tamiya Douglas F4D
Skyray in 1/72 |
| Started: december/2005 Finished: april/2006 |
This project was started to be one of those fast & fun things. Well, at
least it was fun. The kit is the Tamiya item from their 1/72 Warbird Collection, so you
can't go wrong with that: nice molding, fine recessed details and a
great fit.
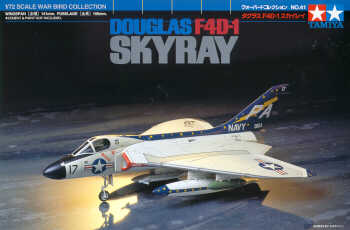
I started with the cockpit. I planned to leave the canopy closed, so I didn't fuzz with many details. Just a few stuffs added from wire and gizzmology, while the ejection seat reails had the holes drilled. The control panel was made using the kit decal with lots of Microsol (didn't had the guts to add the instruments one by one like I did in the F-84 project):
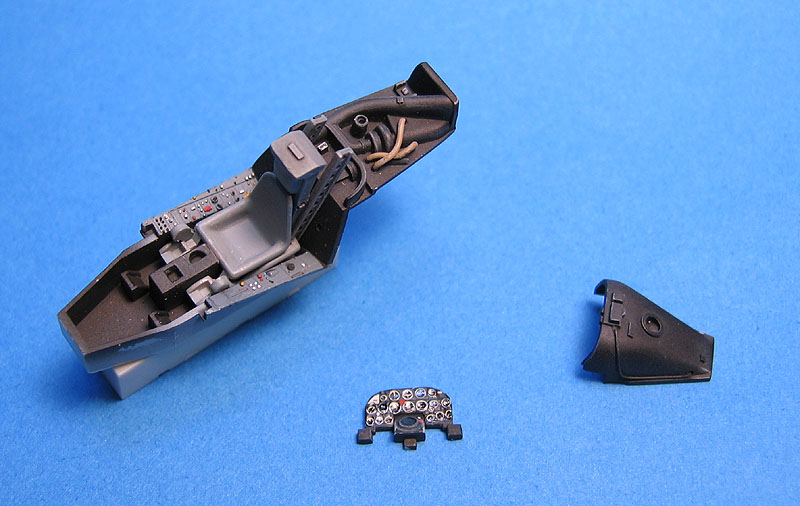
And since I was planning to put it on a carrier deck base, a pilot was necessary. It was franksteinized from other figures, but don't ask which one. I worked on the arms to pose the pilot signaling to the deck officer, and decalled an arrow on his helmet (by accident, it would eventually match the markings of the aircraft...). The ejection seat grips were made from stretched sprue:
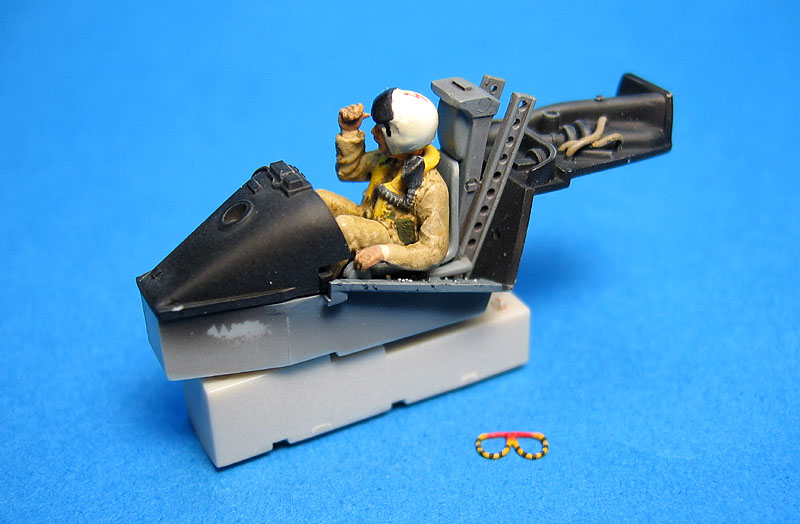
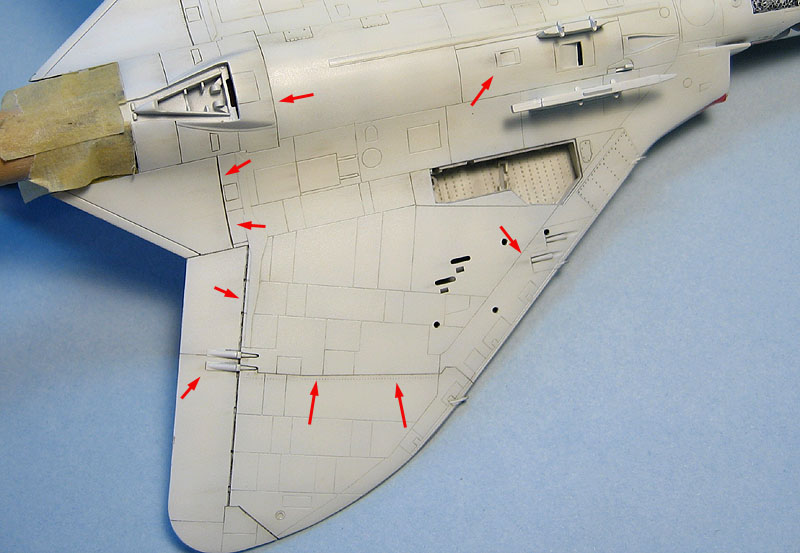
Next, I glued the major subassemblies without any problem. I don't recall using any filler on the airframe. The fuel tanks are another story, mostly due to my ability to misalign perfect matching parts. The wheel wells and the arrestor hook area were airbrushed with Model Master #2143 RLM21 (semi gloss white), sealed with Future, washed and dirtied a bit.
Next, the airframe was primed with Mr. Surfacer 500 and polished with a cotton rag. The fuel tanks and wing pods were primed in white. The pre-shading is simply diluted Tamiya XF-1:
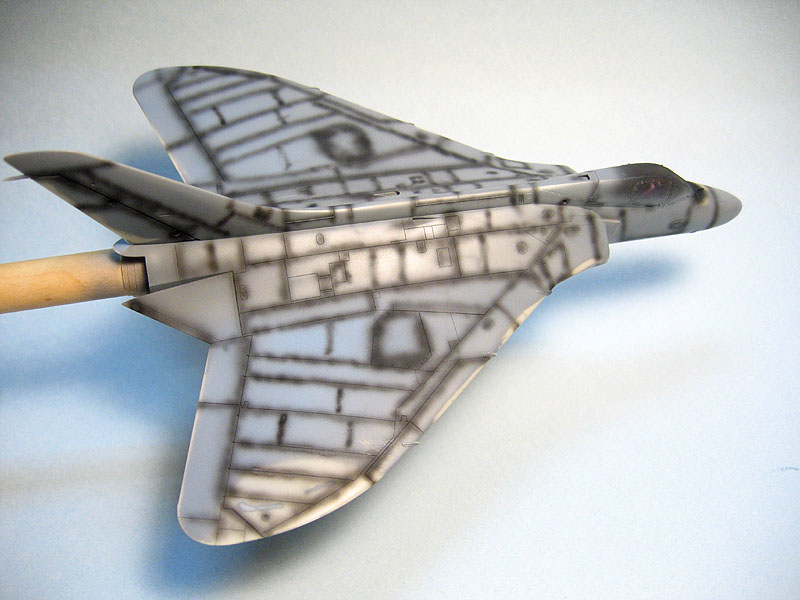
The base cammouflage colors were then applied. I used the Model Master #2143 RLM21 for the underside. By the way, this is a very good choice for white color in my opinion. I mean, whites are always a problem (finish x covering). Flat paints have a better covering, but usually are too much rough, while the gloss ones have poor covering, and may yellow with time. I tested the Model Master #2143 for the first time during this project, and I found it has excellent covering (since it is a semi-gloss paint), and leave a very smooth finish that would accept decals without any problem. For the light gull gray (FS36440), I used an old bottle of Aeromaster #1047, from their now defunct Warbird Colors, which is very flat. I had my share of problems with this paint. In order to speed up the drying, I like to use lacquer thinners whenever possible, but Aeromaster paints don't like it as much as me, and tend to reach the surface of the model almost dry. This produces a dusty surface which requires polishing to be acceptable. After a few shots, I found it was just a matter of getting my airbrush closer to the surface.


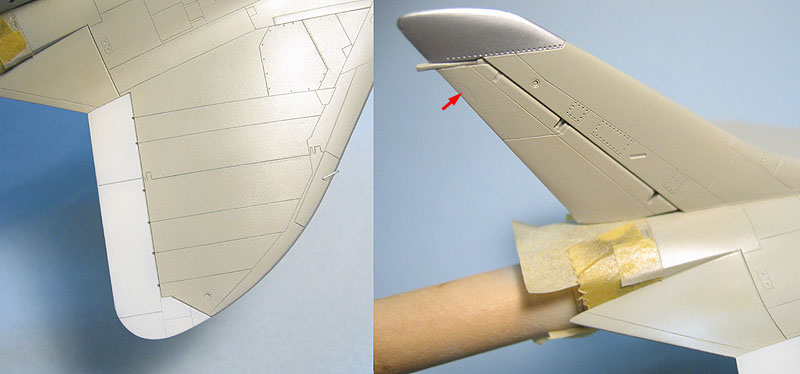
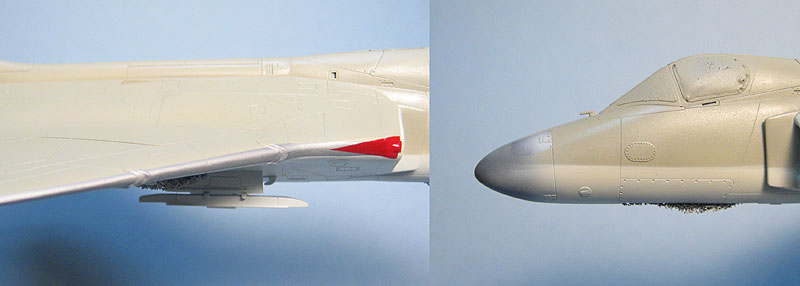
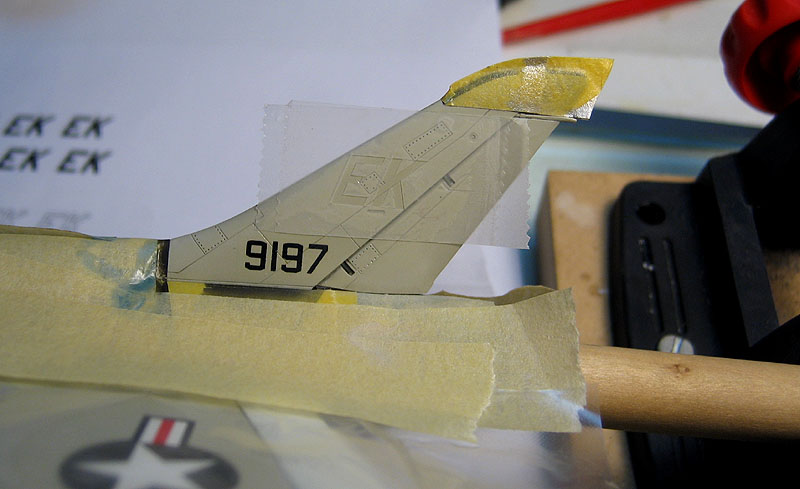
The natural metal tip of the vertical stabilizer was masked and painted with Floquil Old Silver. I also used this color on the exhaust area, which would be weathered later. This may sound too glaring, but check the photos of actual Skyrays and you will see that the area looks like bare Aluminum. At this point I found some minor glitches to correct that I missed before... first retouching round.
The only major challenging step during the application
of the cammo was the soft edge between the upper and lower colors
behind the cockpit. I used a simple straight piece of paper held with
one hand while I airbrushed with the other. Simple, fast and effective.
The other painting details during this phase were the natural metal
leading edge (don't know why, but I used Tamiya XF-16 for that
- definitely not a good choice) and the red warning outlines of the
engine intake. I based my model on a picture showing only the
triangular outer area of the intake painted in red (while most jets
have the complete red trim along the intake leading edge). Easier for
me (once dry, I would cut the danger warning arrow from the decal sheet
and apply over the red):
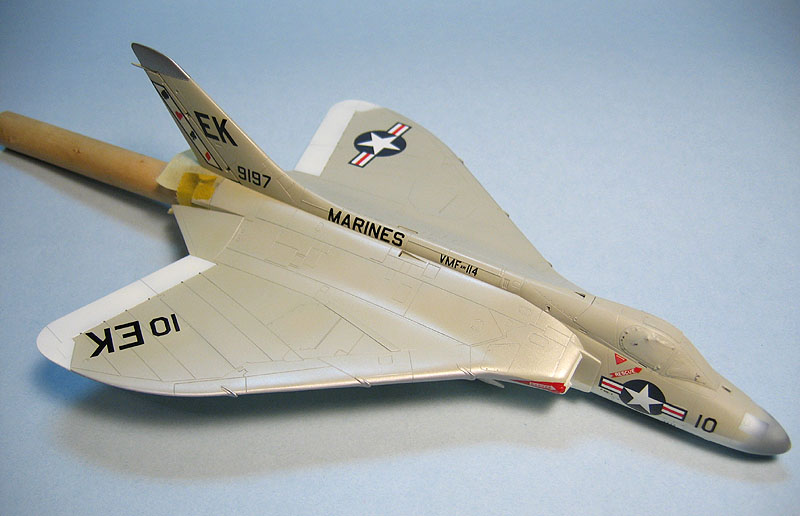
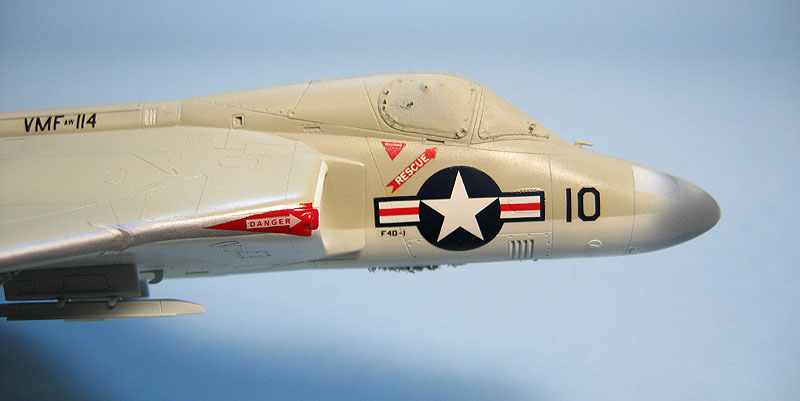
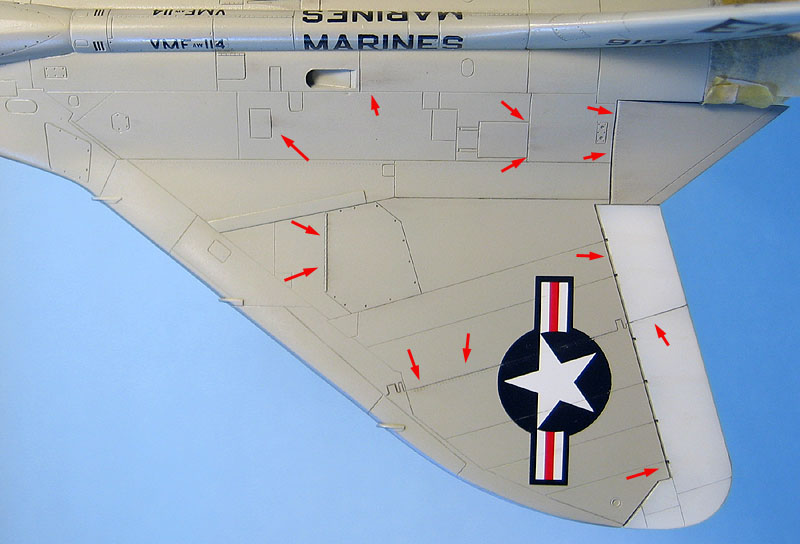
A good coat of Future sealed everything (except the natural metal areas) and I started with the decals. My model should be the F4D-1 s/n 139197, radio call #10 from VMF(AW)-114, onboard USS Franklin D. Roosevelt (CVA-42) during her shakedown cruise in Mediterranean Sea during 1960. I could used most of the kit's decals, but I found them slightly oversized, and besides, you know Tamiya decals... thicker than photoetched parts. Antecipating any problems with them, I elected to use a generic Aeromaster ID numbers sheet for the wings/fuselage codes and serial numbers. The Marines code along the spine were too small to be applied letter by letter. My friend and modeler Flávio Estrela came to help here, generously handing over and old Microscale #186 sheet. That filled the bill. I sticked with Tamiya insignias, though (and copious amounts of MicroSol to make them to conform the surface details).
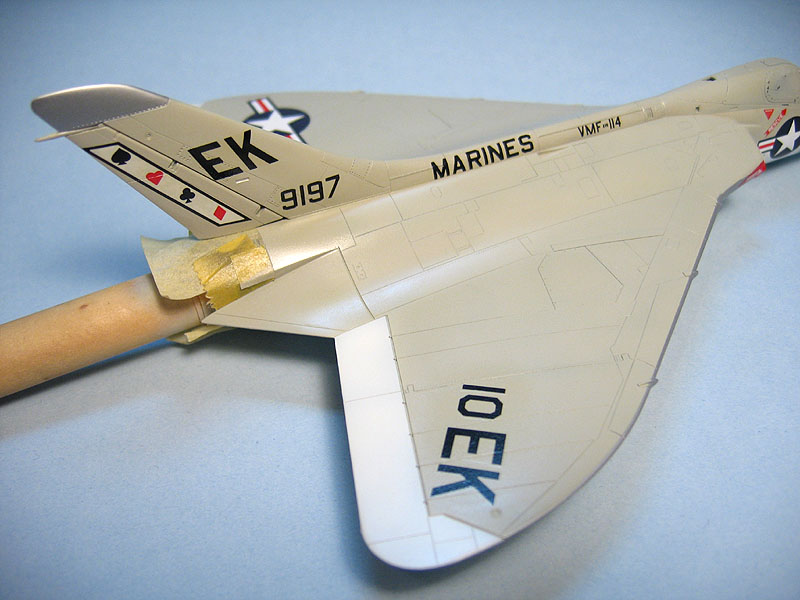
A small accident damaged the tail codes (will spare you the details, but I'm getting used to it near the end of my models). Touch-up round two! Another friend, John Doerr, simply sent me a new sheet of this very same model. I used the rudder decks, but decided to paint the tail codes instead. Using a photocopy of the decal sheet, I laid three layers of Scotch Magid tape atop of the markings I wanted and cut along the boundaries (the tape allow you to see through). I then removed the upper two layers and used them as a relatively stiff mask. A coat of Tamiya flat black solved the problem:
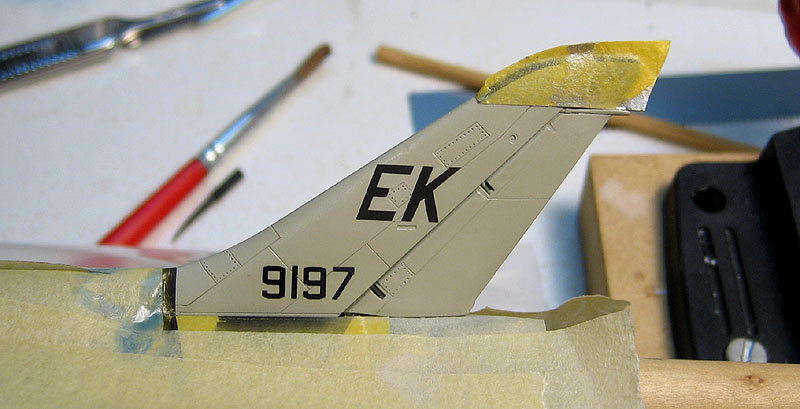
I'm very satisfied with the result, and probably will adopt the technique in other occasions (well, maybe not). Nothing beats painted on markings... With the model virtually done, I applied a coat of Future and waited 48 hours to apply the washes. Here's my basic stuffs for that:
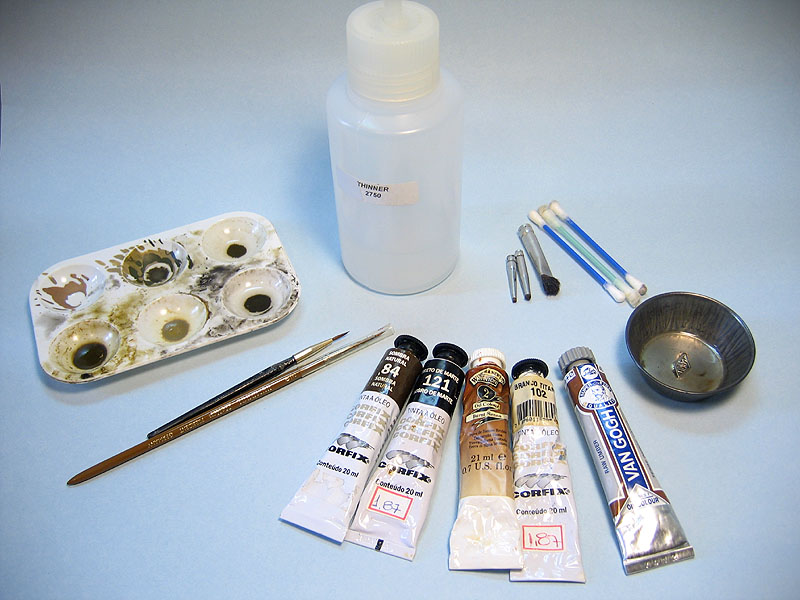
I started applying an overall wash of Natural Shadow color, diluted in white spirits.Usually I wait it to dry for 15 or 20 minutes and wip off the excess in the direction of the air flow. Therefore, I have to repeat the process several times on more grimy areas. On the other hand, the process gives me much more control:
I applied almost pure oil paints on selected spots to simulate leads and dirt around movable parts. Just a matter of applying a tiny amount of oil and rubbing it back with a flat, dry brush. Colors varied from pure black to dark browns. Believe me, the effect is better on the real model than the photos below show:
When used superimposed to pre-shading, the technique is quite effective to break an otherwise monotone finish:
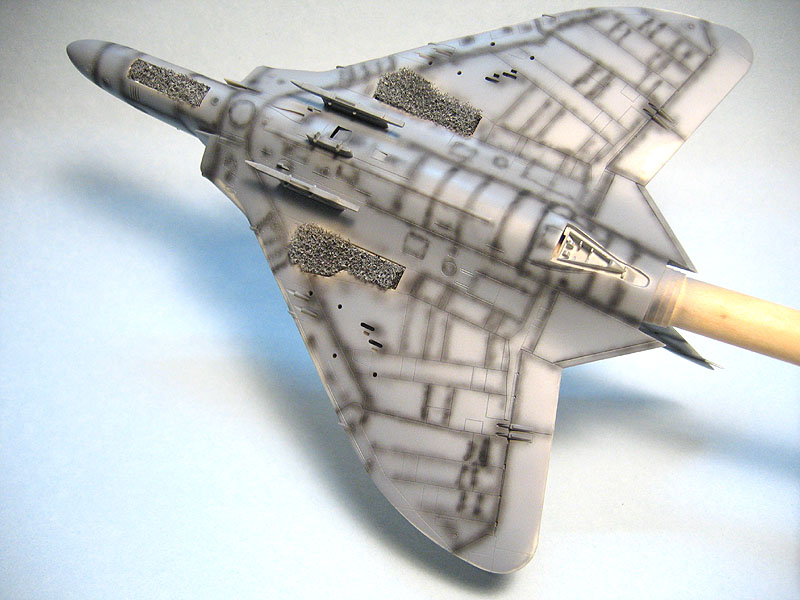
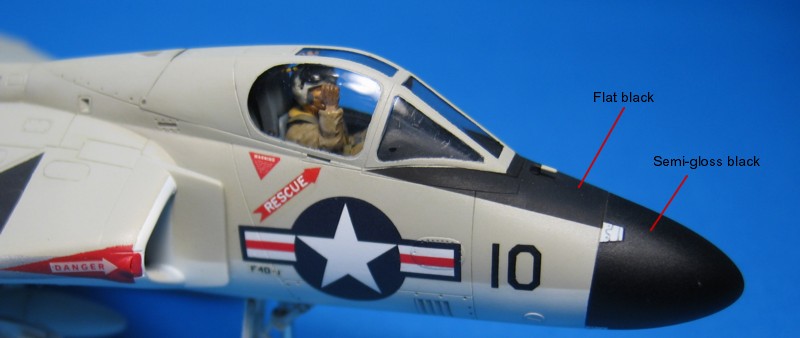
The black walkways on the top of the wings were masked and airbrushed with several mixes of dark gray. Light gray pastel chalk was rubbed on that area to evidence the panel lines. A coat of semi-gloss Model Master acryl was then airbrushed to seal everything and blend the shine. The anti-glare panel was aibrushed with Model Master flat black FS37038 (#1749). The radome cone was painted with Humbrol semi-gloss black (#85). Both are excellent colors, by the way.
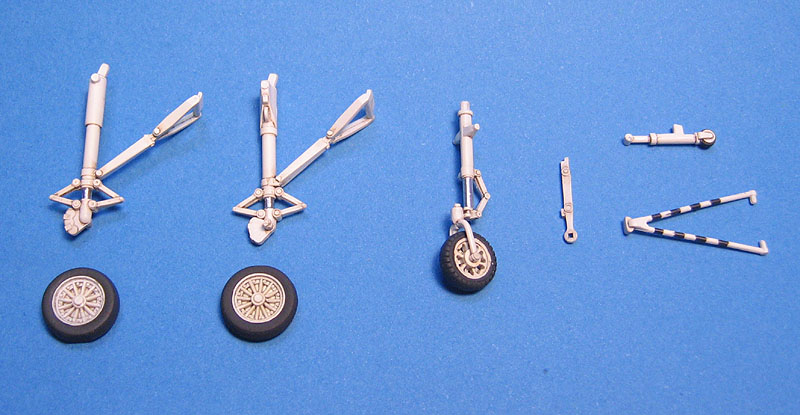
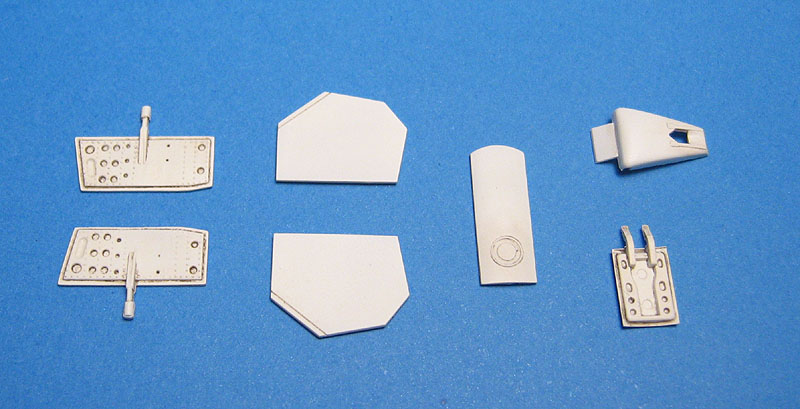
I then proceeded to the smaller details. The landing and arrestor gear parts were painted, washed, and the oleos covered with Bare Metal Foil. The doors received the same treatment, after the removal of the more visible (and annoying) ejection pin marks:
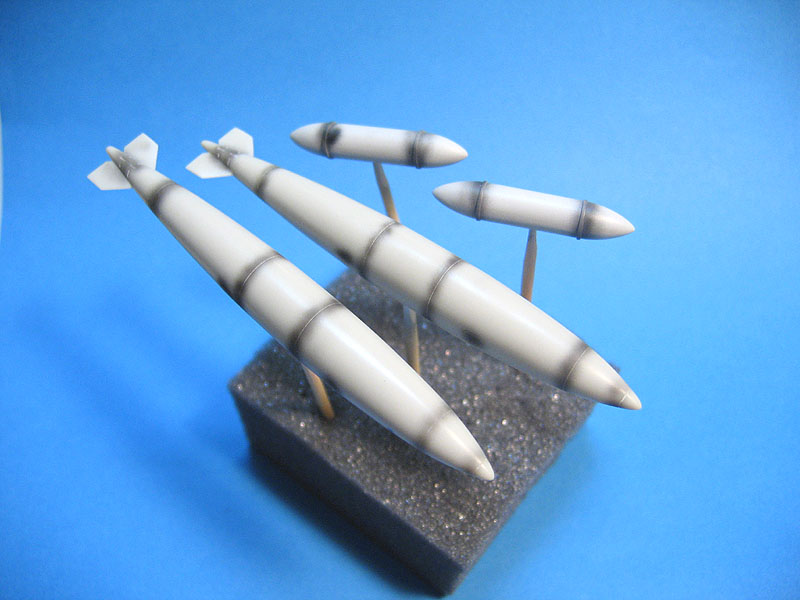
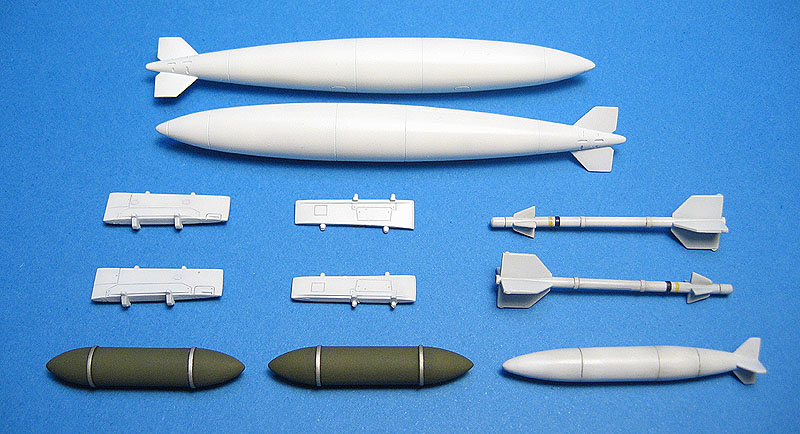
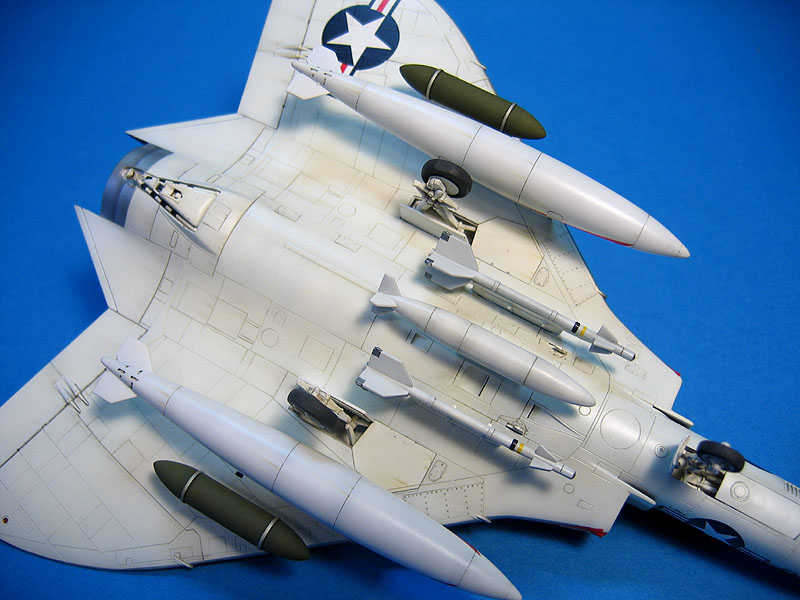
The kit supplied the 300 gal wing tanks, AIM Sidewinders, rocket pods and the central NAVPAC pod. The 300 gal tanks were painted RLM 71, sealed, washed and stained to simulate fuel leaks and the dirt collected for being so close to thr ground. The squadron arrows on the tanks were masked and painted, and they match the one on pilot's helmet (by accident, seriously - I had no idea of which aircraft markings to choose when I finished the pilot). The rocket pods were painted Dark Green with Aluminum braces and washed with raw umber oil paints. The AIM-9B Sidewinders had a slightly different paint scheme than their modern cousins. Here's the work under way (no weathering so far, and the AIM-9 rollerons are not painted yet):
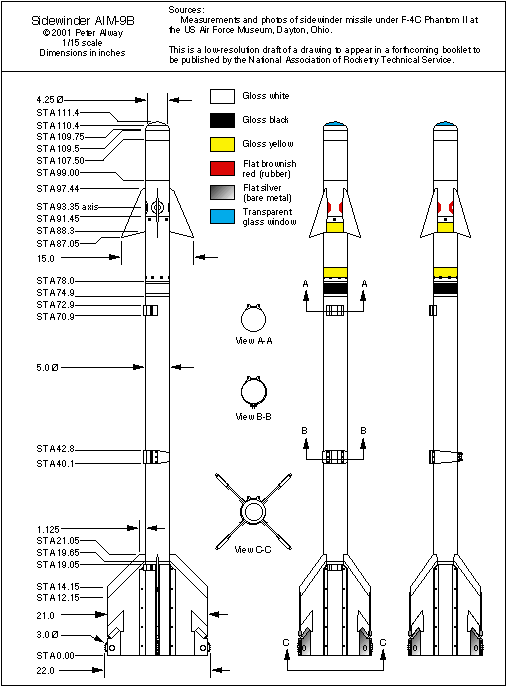
In case you're wondering, here's my painting reference for the AIM-9B:
Here´s a pic of the weathered ordnance:
With everything in place, I unmasked the protected areas, and applied some soot to the exhaust panels:
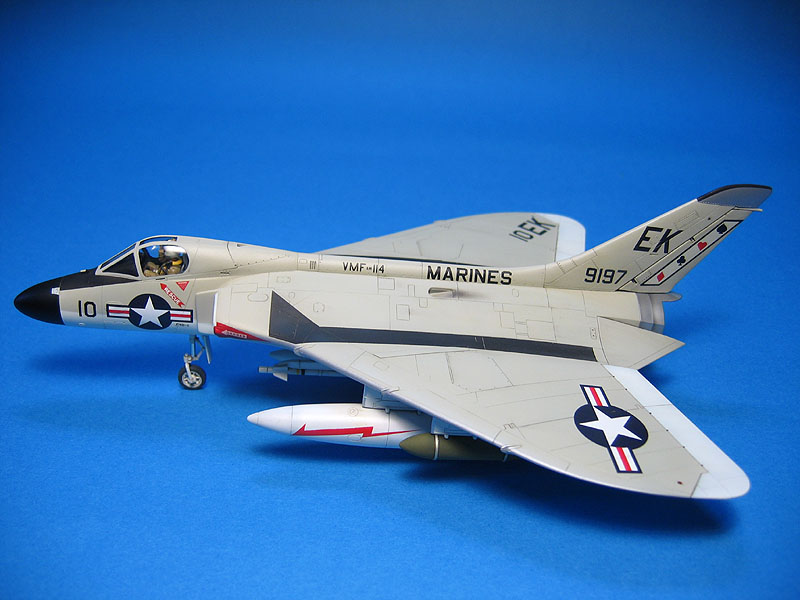
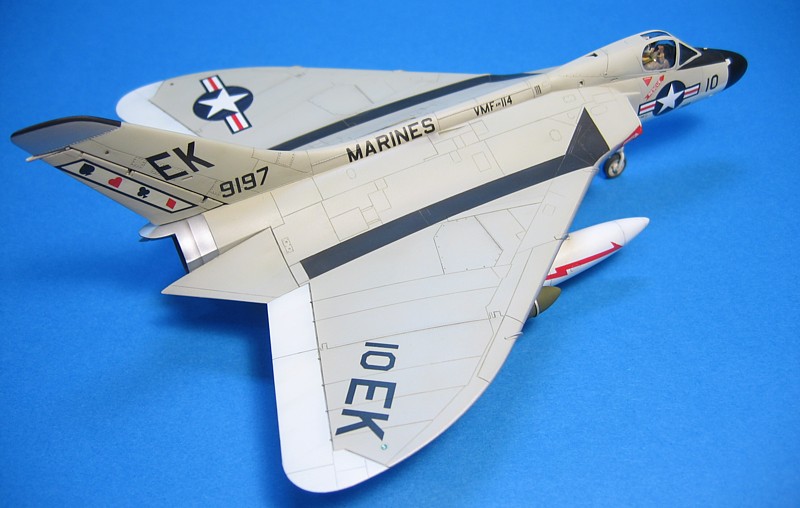
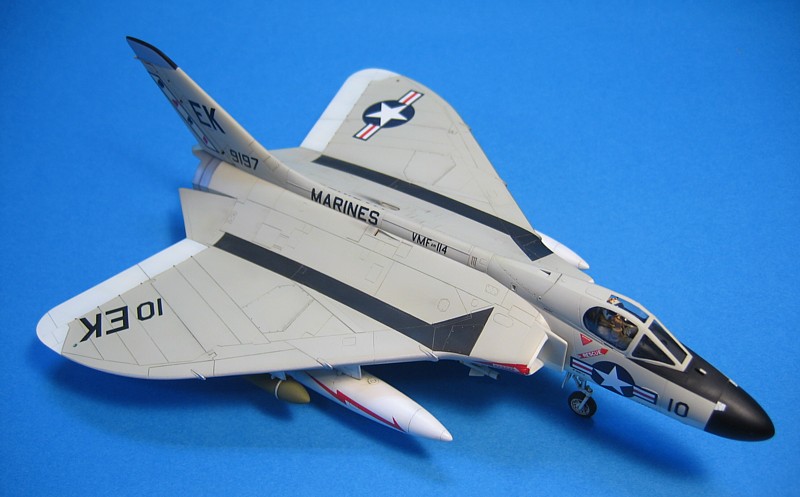
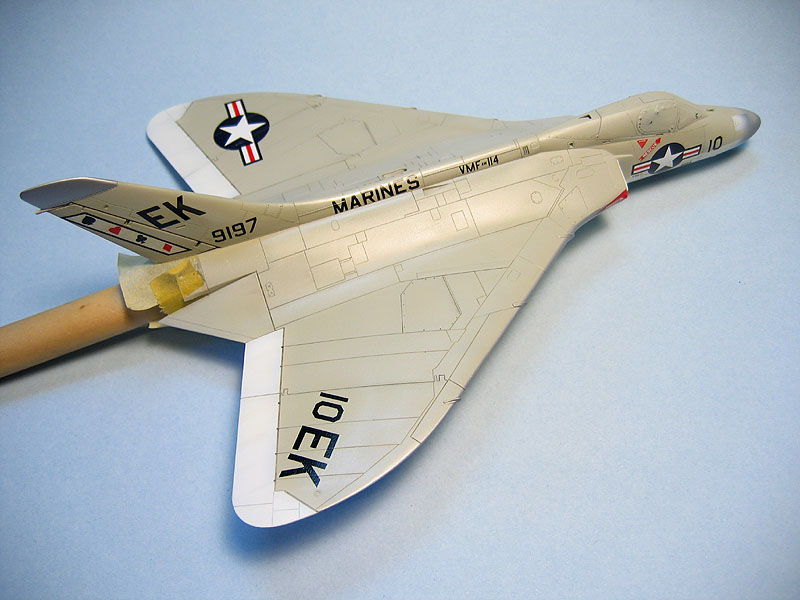
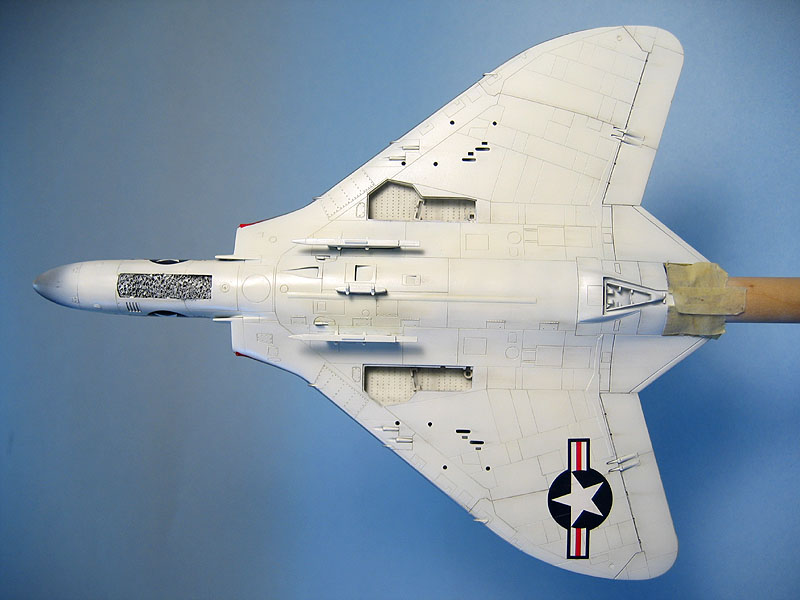
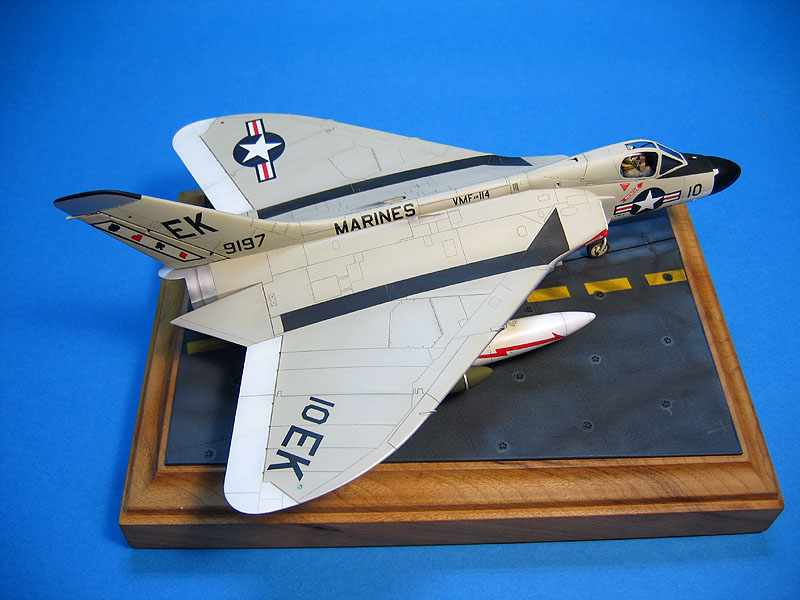
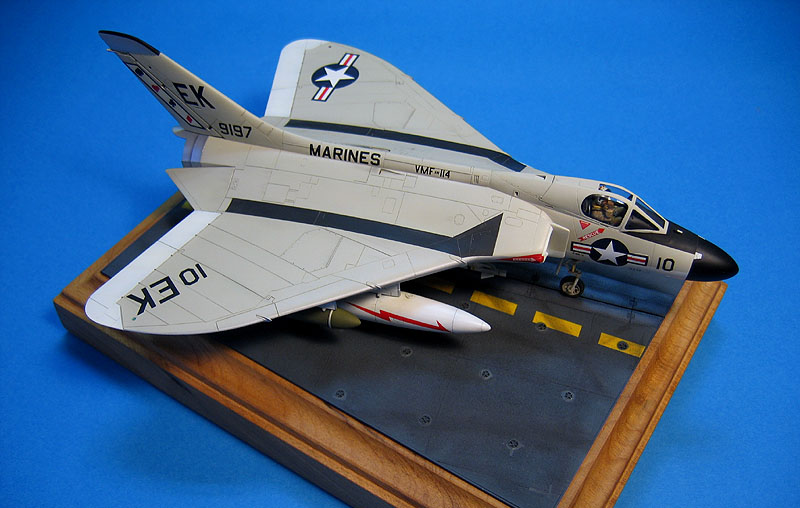
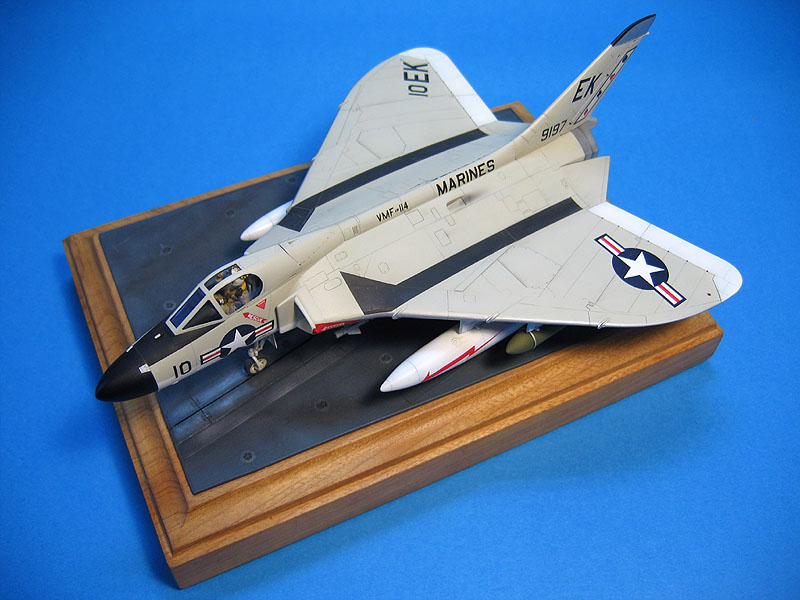
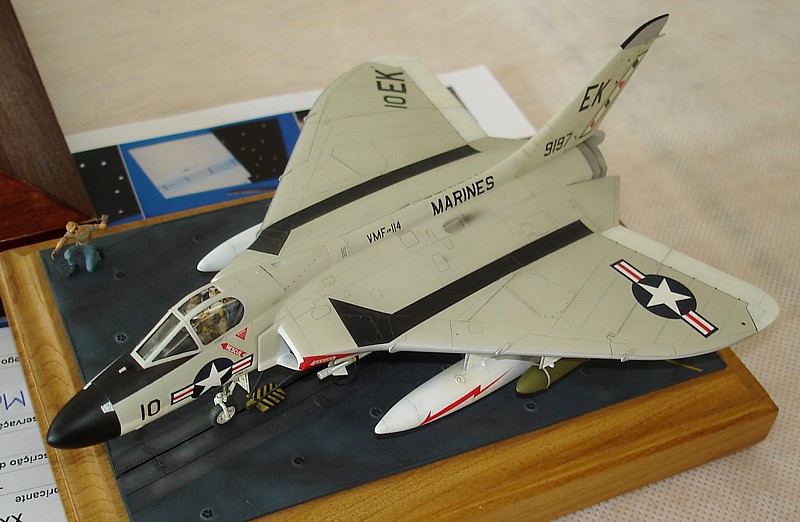
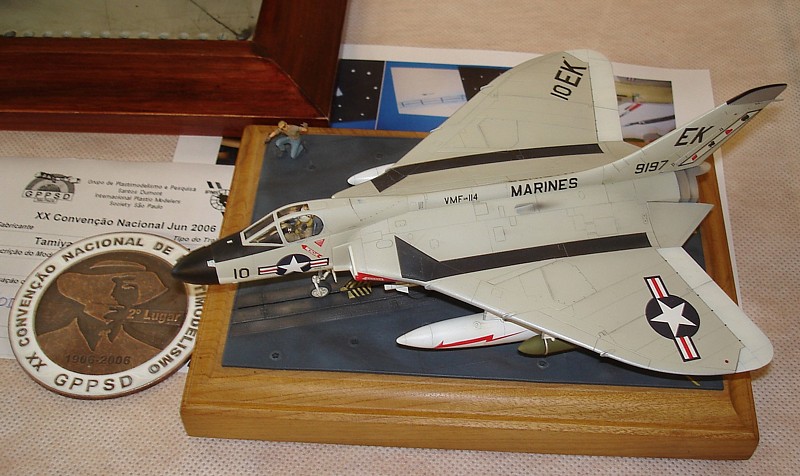
To finish everything off, I decided to stratchbuilt a carrier base. Here are a few shots of the completed model:
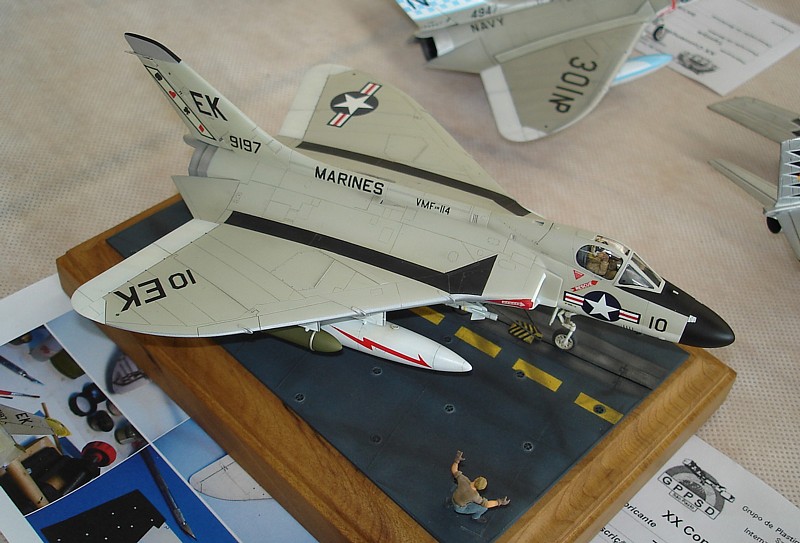
This
model was awarded a Silver medal in "Jets - 1/72 scale" category during
the Brazilian IPMS National Convention in 2006:I started with the cockpit. I planned to leave the canopy closed, so I didn't fuzz with many details. Just a few stuffs added from wire and gizzmology, while the ejection seat reails had the holes drilled. The control panel was made using the kit decal with lots of Microsol (didn't had the guts to add the instruments one by one like I did in the F-84 project):
And since I was planning to put it on a carrier deck base, a pilot was necessary. It was franksteinized from other figures, but don't ask which one. I worked on the arms to pose the pilot signaling to the deck officer, and decalled an arrow on his helmet (by accident, it would eventually match the markings of the aircraft...). The ejection seat grips were made from stretched sprue:
Next, I glued the major subassemblies without any problem. I don't recall using any filler on the airframe. The fuel tanks are another story, mostly due to my ability to misalign perfect matching parts. The wheel wells and the arrestor hook area were airbrushed with Model Master #2143 RLM21 (semi gloss white), sealed with Future, washed and dirtied a bit.
Next, the airframe was primed with Mr. Surfacer 500 and polished with a cotton rag. The fuel tanks and wing pods were primed in white. The pre-shading is simply diluted Tamiya XF-1:
The base cammouflage colors were then applied. I used the Model Master #2143 RLM21 for the underside. By the way, this is a very good choice for white color in my opinion. I mean, whites are always a problem (finish x covering). Flat paints have a better covering, but usually are too much rough, while the gloss ones have poor covering, and may yellow with time. I tested the Model Master #2143 for the first time during this project, and I found it has excellent covering (since it is a semi-gloss paint), and leave a very smooth finish that would accept decals without any problem. For the light gull gray (FS36440), I used an old bottle of Aeromaster #1047, from their now defunct Warbird Colors, which is very flat. I had my share of problems with this paint. In order to speed up the drying, I like to use lacquer thinners whenever possible, but Aeromaster paints don't like it as much as me, and tend to reach the surface of the model almost dry. This produces a dusty surface which requires polishing to be acceptable. After a few shots, I found it was just a matter of getting my airbrush closer to the surface.
The natural metal tip of the vertical stabilizer was masked and painted with Floquil Old Silver. I also used this color on the exhaust area, which would be weathered later. This may sound too glaring, but check the photos of actual Skyrays and you will see that the area looks like bare Aluminum. At this point I found some minor glitches to correct that I missed before... first retouching round.
A good coat of Future sealed everything (except the natural metal areas) and I started with the decals. My model should be the F4D-1 s/n 139197, radio call #10 from VMF(AW)-114, onboard USS Franklin D. Roosevelt (CVA-42) during her shakedown cruise in Mediterranean Sea during 1960. I could used most of the kit's decals, but I found them slightly oversized, and besides, you know Tamiya decals... thicker than photoetched parts. Antecipating any problems with them, I elected to use a generic Aeromaster ID numbers sheet for the wings/fuselage codes and serial numbers. The Marines code along the spine were too small to be applied letter by letter. My friend and modeler Flávio Estrela came to help here, generously handing over and old Microscale #186 sheet. That filled the bill. I sticked with Tamiya insignias, though (and copious amounts of MicroSol to make them to conform the surface details).
A small accident damaged the tail codes (will spare you the details, but I'm getting used to it near the end of my models). Touch-up round two! Another friend, John Doerr, simply sent me a new sheet of this very same model. I used the rudder decks, but decided to paint the tail codes instead. Using a photocopy of the decal sheet, I laid three layers of Scotch Magid tape atop of the markings I wanted and cut along the boundaries (the tape allow you to see through). I then removed the upper two layers and used them as a relatively stiff mask. A coat of Tamiya flat black solved the problem:
I'm very satisfied with the result, and probably will adopt the technique in other occasions (well, maybe not). Nothing beats painted on markings... With the model virtually done, I applied a coat of Future and waited 48 hours to apply the washes. Here's my basic stuffs for that:
I started applying an overall wash of Natural Shadow color, diluted in white spirits.Usually I wait it to dry for 15 or 20 minutes and wip off the excess in the direction of the air flow. Therefore, I have to repeat the process several times on more grimy areas. On the other hand, the process gives me much more control:
I applied almost pure oil paints on selected spots to simulate leads and dirt around movable parts. Just a matter of applying a tiny amount of oil and rubbing it back with a flat, dry brush. Colors varied from pure black to dark browns. Believe me, the effect is better on the real model than the photos below show:
When used superimposed to pre-shading, the technique is quite effective to break an otherwise monotone finish:
The black walkways on the top of the wings were masked and airbrushed with several mixes of dark gray. Light gray pastel chalk was rubbed on that area to evidence the panel lines. A coat of semi-gloss Model Master acryl was then airbrushed to seal everything and blend the shine. The anti-glare panel was aibrushed with Model Master flat black FS37038 (#1749). The radome cone was painted with Humbrol semi-gloss black (#85). Both are excellent colors, by the way.
I then proceeded to the smaller details. The landing and arrestor gear parts were painted, washed, and the oleos covered with Bare Metal Foil. The doors received the same treatment, after the removal of the more visible (and annoying) ejection pin marks:
The kit supplied the 300 gal wing tanks, AIM Sidewinders, rocket pods and the central NAVPAC pod. The 300 gal tanks were painted RLM 71, sealed, washed and stained to simulate fuel leaks and the dirt collected for being so close to thr ground. The squadron arrows on the tanks were masked and painted, and they match the one on pilot's helmet (by accident, seriously - I had no idea of which aircraft markings to choose when I finished the pilot). The rocket pods were painted Dark Green with Aluminum braces and washed with raw umber oil paints. The AIM-9B Sidewinders had a slightly different paint scheme than their modern cousins. Here's the work under way (no weathering so far, and the AIM-9 rollerons are not painted yet):
In case you're wondering, here's my painting reference for the AIM-9B:
Here´s a pic of the weathered ordnance:
With everything in place, I unmasked the protected areas, and applied some soot to the exhaust panels:
To finish everything off, I decided to stratchbuilt a carrier base. Here are a few shots of the completed model:
| Technical file | |
| Kit:
|
-
Tamiya item #60741 |
| Acessories:
|
-
Aeromaster generic ID numbers (black) decals - Microscale #186 decals (F4D-1 Skyrays - VMF (AW) 114, VMF115, VF74 & VF213) |
| Stolen
parts: |
- A pilot from some kit... |
| Basic
colors: |
-
Primer: Gunze Mr. Surfacer 500 - White: Model Master #2143 enamel - Light Gull Gray: Aeromaster FS36440 (#1047) lacquer - Aluminum (engine area and stabilizer tip): Floquil Old Silver enamel - Aluminum (leading edges): Tamiya XF-16 acrylic - Red (engine inlets): Humbrol #19 enamel - Black (anti-glare panel): Model Master #1749 enamel - Black (radome cover): Humbrol #85 enamel - Tires: Aeromaster Tire Black (#1004) lacquer |
| Notes: |
-
A few details in the cockpit were scratchbuilt. |
Rato Marczak © 2007
