| Trumpeter Fairey Gannet T.Mk.2 in 1/72 |
|
Started: August / 2012 Finished: October/2012 |
1. A tale of many mistakes
This project is about the less than celebrated Fairey Gannet. The kit is the Trumpeter #1630 in 1/72. I always thought of this aircraft as something so ugly that it is impossible not to pay attention on it. Some guys call it beauty... I scored the kit in a local hobby shop (I didn't want the trainer, but it was the only one left) and started a few weeks later, something rare to me. Anyway, this is the kit:
It is not a bad kit, but as most Trumpeter kits, it looks much better in the box than when you start assembling. My kit in particular had a pebbly surface on the main parts, and although I sanded some of them, I didn't thought that would be a problem. That was my first mistake.
2. The second mistake
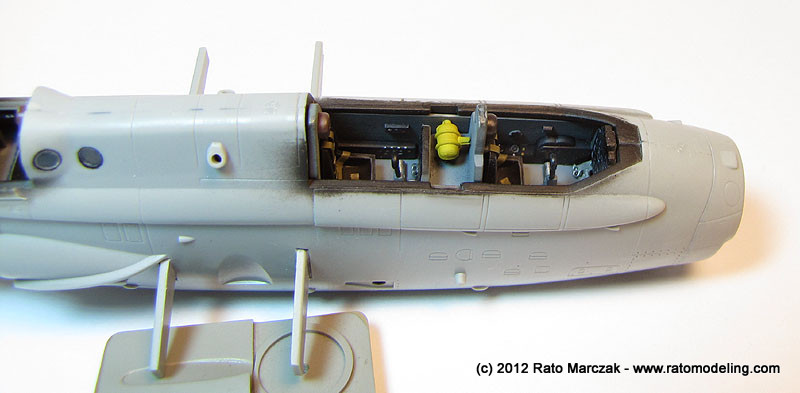
I really wanted to go fast with this one. Having so many models in my shelf of doom, the last thing I needed was another one there. I started with almost no research at all, relying on the instructions, and that was my second mistake. I assembled the cockpits parts without many additions. Just some scratchbuilt detail here and there, plus seat belts from an old Eduard set and instrument dials pressed on the kit parts using a beading tool. As I followed the instructions, I used grey as the main cockpit color. Later I dug out some books on the subjetct, only to discover that the interior of the Gannets were painted black in general. Fortunately I chose black for the instruments and seats, minimizing somewhat the error.
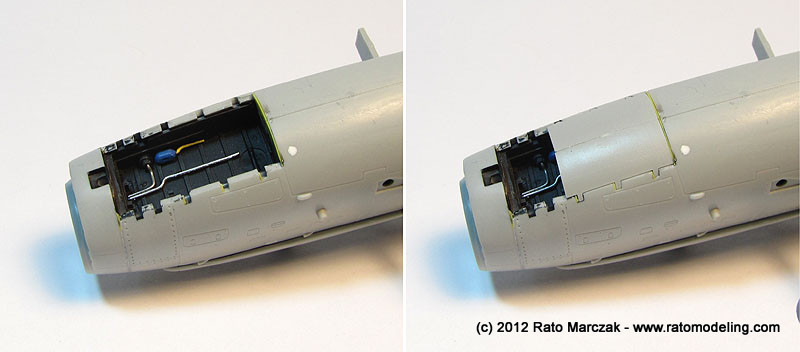
The nose wheel well was detailed using creative gizmology (or whatever you call it when you cheat). It was installed inside the fuselages and, wherever was some room left, pieces of metal were glued to avoid tail sitting... After checking many photos, I realized that the aft front wheel doors used to remain shut when the aircraft was on the ground. So I took advantage of this and detailed only the front area of the well:
3. The third mistake
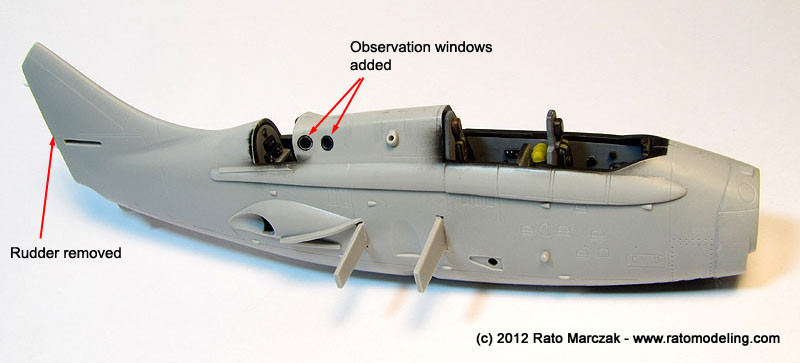
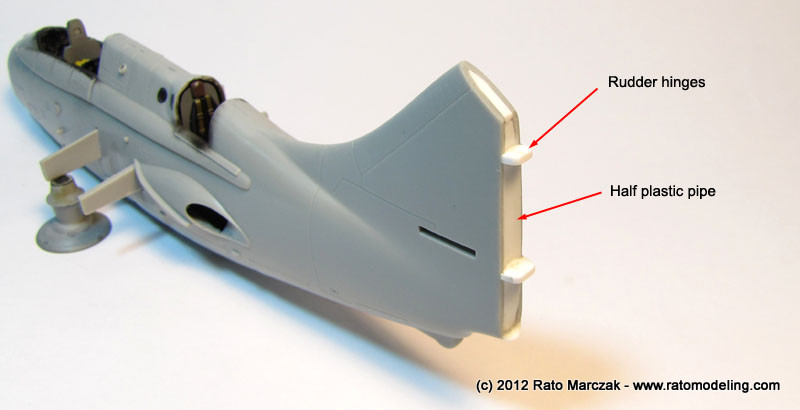
Once the fuselage was closed, I decided to remove the rudder and the elevators. At this point I also drilled the observation windows on the rear fuselage which for some reason Trumpeter molded shut (no clear parts). I drilled the holes and glued disks punched out of a clear sheet.
The fin had to be closed where the rudder was removed. I used pieces of styrene and a half pipe to close the space and provide the hinges.
In order to make the slots for the hinges along the rudder and elevators leading edges, I took a short cut: I installed a cutting disk on my milling machine and voilá... the quickest slots ever:
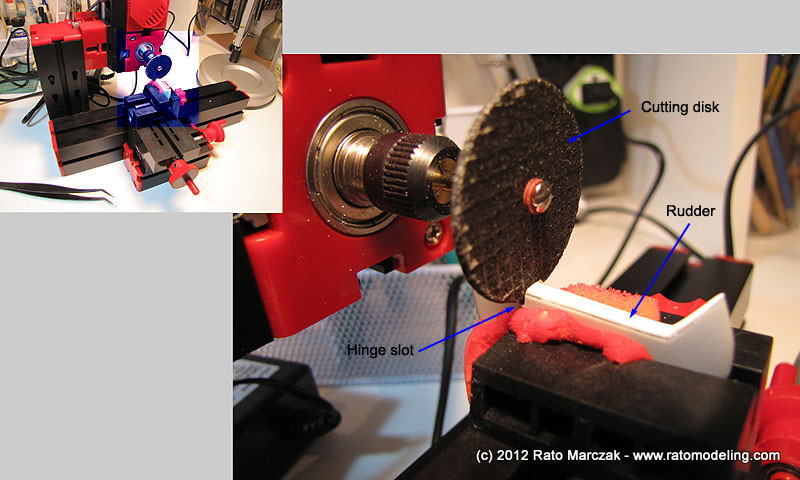
Here I made my third mistake: since I was not following any drawings, I used the recessed lines of the kit parts as a guide to make the hinges. Comparing to photos of the actual aircraft later, it became clear that those hinges I made were way too thick...
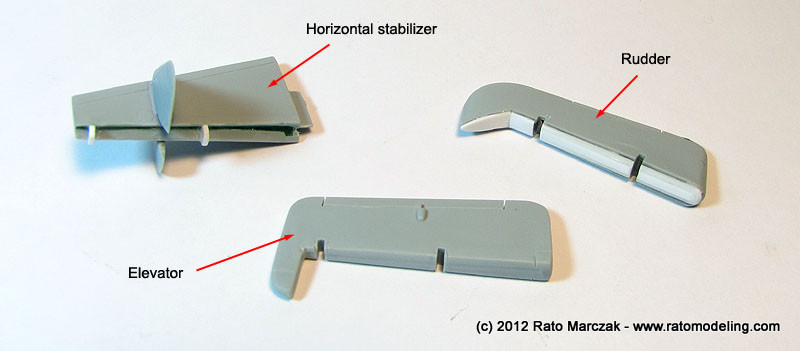
The rudder, elevators and the horizontal stabilizers were finished and trued to fit nicely to each other:
4. The fourth mistake
Onto the wings, then. The first step was to remove/fill the many ejector pin marks along the flap bays. I used Mr. Dissolved Putty for that. Later, because I used lacquer thinner to thin all colors, the puttied areas deformed a bit under the action of the thinner and can be seen from some angles. I don't know why I haven't used CA glue as I usually do in these cases... that was my 4th mistake. The interior of the flap bays shoud have a rounded corner where the leading edge of the flaps sit, but it was molded as a corner. I left that this way.
After gluing the wings halves, I attached the wingtip lights using the kit parts. I just drilled holes in the clear parts and filled them with red and blue clear paints. The navigation lights on the leading edges were another story, as Trumpeter parts were of Coke bottle type. I thermoformed new ones after installing simulated bulbs inside. Both navigation and wingtip lights were glued with a mix of CA glue and Humbrol black paint, dismissing the need to paint the edges of the clear covers - that would make the gluing weak. The same mix CA+paint was used to fill the remaining seams, and everything was sanded flush and polished later on.
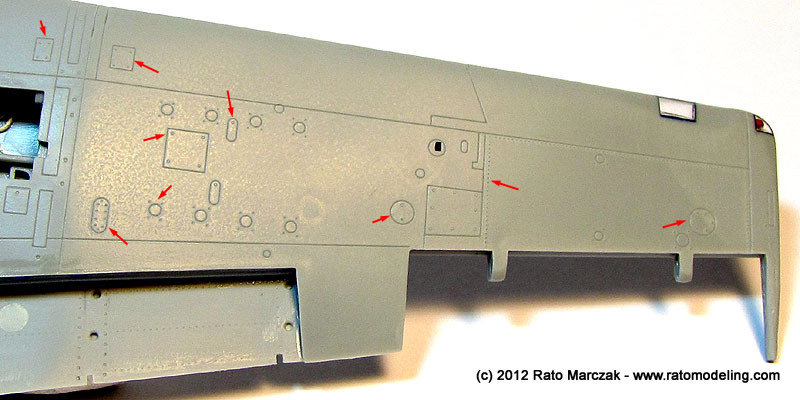
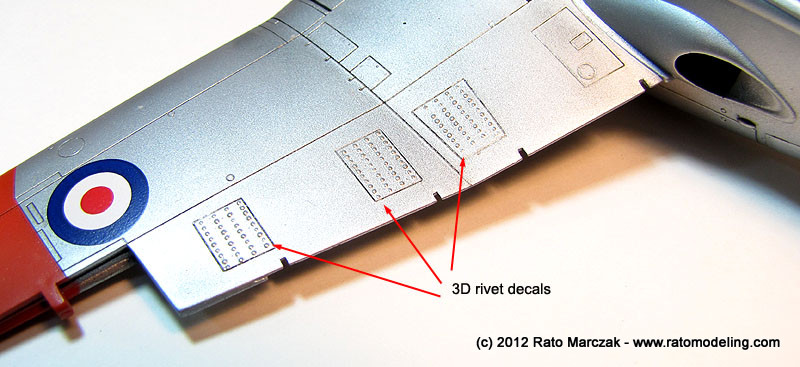
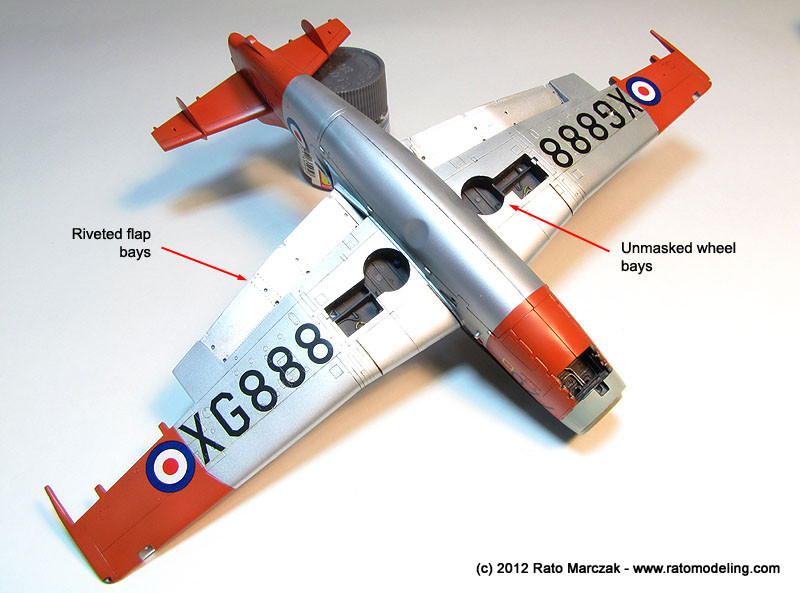
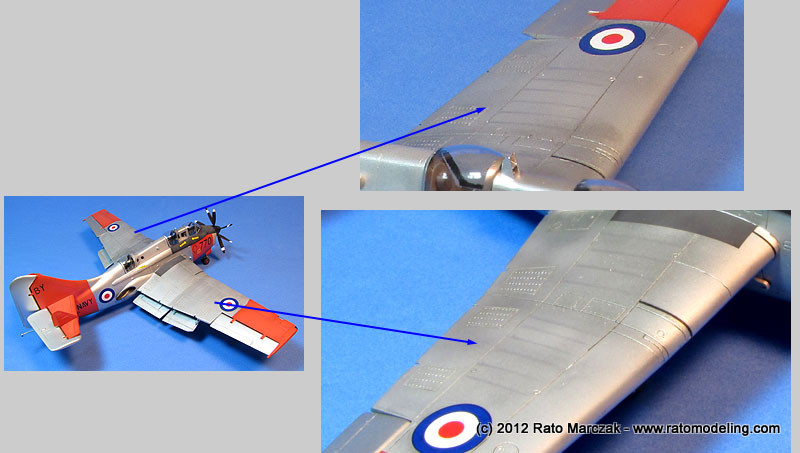
I spent some time riveting some areas of the wings, since I didn't like the flatness of them. The flaps bays received a few rivet lines, while virtually every access panel on the wings had rivets/fasteners embossed individually. This added a lot of realism to an otherwise boring paneling surface. A couple of selected panels recieved rivet lines. Following what I saw in photos, three large rectangular panels along the trailing edge of each wing were riveted with raised rivet decals from Micro Mark, but I took no picture of it at this stage.
Flipping the wings, the main wheel wells were detailed using plastic and thin warms of Milliput, roughly based on walkaround photos of the real thing.
5. The fifth and sixth mistake
Next, the wings were attached to the fuselage. Thanks to spars provided by the kit, I had no problems with the dihedral. Wing root seams were filled with Vallejo putty and the excess cleaned with a cotton bud moistened with water - no sanding necessary.
The canopies used in the Gannet had unique shapes, and Trumpeter captured them well. However, not so regarding the size. The rear canopy (part D9) had the rear edge substantially larger than the fuselage profile, protuding outwards when it shoud leave just a small step there. And the cockpit clear parts should stack one after the other, parts D6, D7, D3, and D8, in that sequence, but again, they didn't fit well in my sample, particularly the pilot's sliding part (D7) which shoud match the windscreen (D6) with the same angle. I glued them together and used water soluble putty to fill the seams. They were masked and cemented on the fuselage. That was my 5th mistake. Don't lose the count, more on that later.
The horizontal stabilizers were also glued in place and I applied a coat of Tamiya Gloss Black (X-1) in preparation for the natural metal finish. This was the 6th mistake.
6. The scores
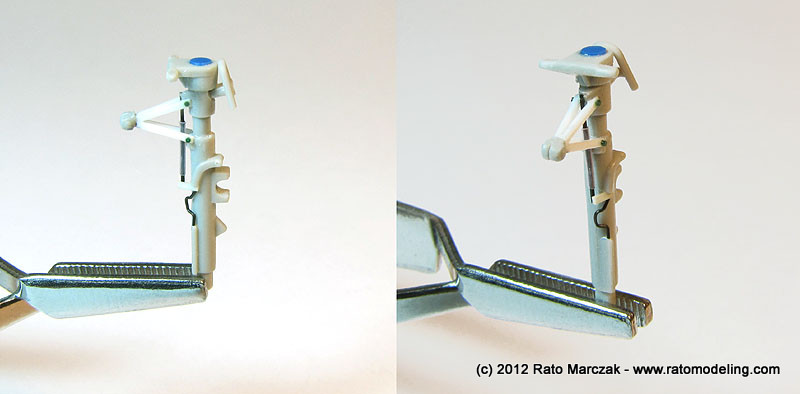
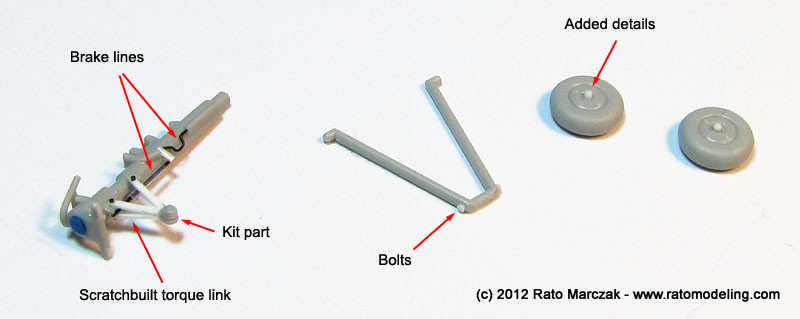
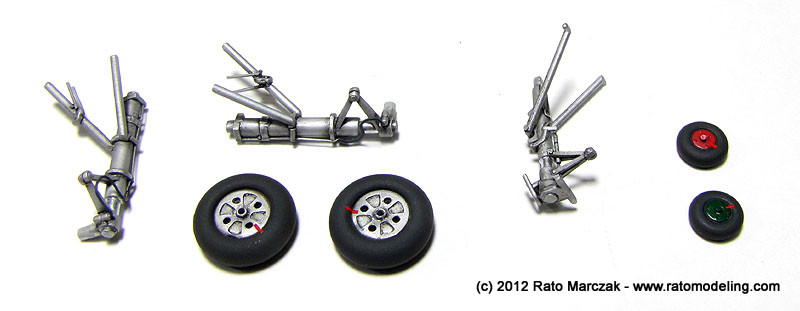
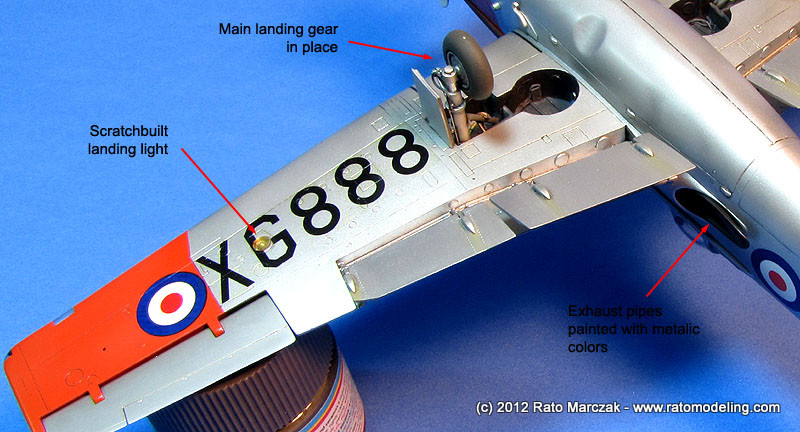
Well, at least I manage to score on a few points. The landing gears received a lift in the form of bolts, hinges, brake lines as well as a couple of missing arms seem on the real thing. The details on the main wheel hubs were deepened. Later I changed the final leg of the brake lines and installed brackets using adhesive Aluminum tape.
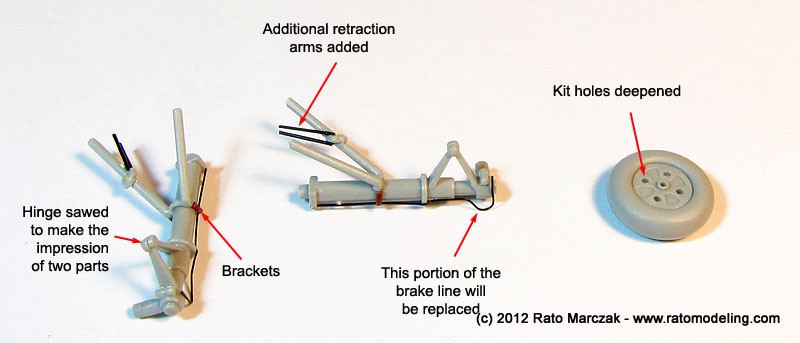
The nose wheel leg was more heavily modified. Essentially, I had to remove the (solid) torque link from the kit part and make a new one in order to install the brake mechanism passing through it. Its wheels recived a new hub with details embossed:
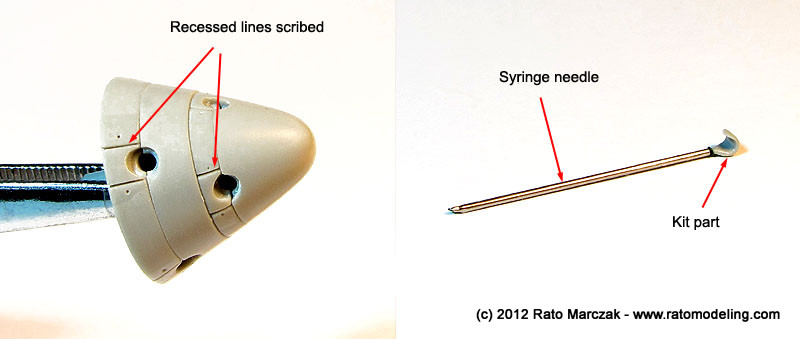
And while at it, I cleaned and test fit the counter-rotating propellers of my Gannet. Trumpeter made each propeller blade as a separated part. They lay perfectly in proper slots inside each spinner, making them all equally angled... in feathered position! C'mom Trumpeter. Before sandwiching each row of blades in their respective spinner (step 13 in the instructions), I scribed lines to simulate the back plates fitting, just like the real thing. And since I broke the tail hook arm during sanding, it was replaced by a syringe needle:
6. Back to the fifth and sixth mistake... and more!
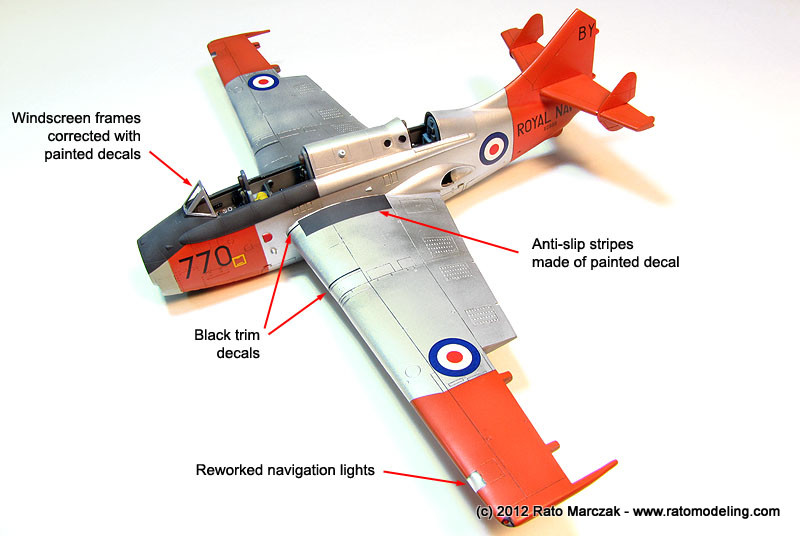
The model was cleaned with tap water and primed using automotive primer. I found several faulty spots to correct, and at this point I started to see that the rough surface of the moldings could be a problem. I sanded the more visible areas to try to minimize the problem a bit. Another wash, another coat of primer. Once satisfied, I shot the Aluminum color using Aerotech automotive paint. I then masked the model in preparation for the red-orange colors. The instructions called for insignia red, but color photos of the Gannet show clearly that this color had an orange hue. It is not dayglo, though.
After waiting the model dry for a day, I applied a good coat of semi-gloss automotive clear, the model was ready for the decals. They went on very well. These Trumpeter & Hobby Boss decals are very thin, and once applied, you barely can see the clear film, even on a metallic finish. I decided not to coat the model with a clear gloss varnish to protect the decals. This was my 7th mistake. When I applied the wash (oil paints + mineral spirits) I noted that the mineral spirits could dissolve the decals. Fortunately I noted that in time to avoid a disaster, but I couldn't clean the wash as I wanted under the wings.
Now, remeber my 5th mistake, when I opted for glueing the clear parts to the fuselage before painting the model? Well, when I removed the masks from the clear parts, the tape pulled almost all the paint on them. At that point I was starting to regret not to make my Gannet fly to the wall earlier... I had no other option but to remove the clear parts from the model, clean the attaching points, and work on the clear parts separately. I should have done that from the beginning. Anyway, it ended up being a good thing, as the clear parts were stained and full of particles, probably consequence of the several baths. It would be impossible to clean this with the clear parts glued in place.
Now, the 6th mistake mentioned before. During this terrible stage of removing the clear parts and reworking the affected areas, I found several fingerprints marked in relief here and there. I spent a lot of time thinking on what could have happened. My conclusion: my Aluminum (and clear coats) were diluted with hot thinner. This softened the underlying acrylic black layer, but because automotive colors dry quickly, the result was a soft black layer sealed by a dry Alluminum+clear layer. That is, the black would take days to fully harden. Not knowing that, I left several fingerpring impressions and had no other choice but to sand the affected areas and retouch the paint. The problem wouldn't happen had I applied very thin layers of the subsequent colors after the black one, but I must confess that I shot the Aluminum a bit too heavy. You are probably guessing how I was feeling about this model by then...
7. The eighth - almost disastrous - mistake
Ok, I confess. I was pissed off with all that. But what else could happen? Well, let me tell you: I dropped the model on the floor!... Yes, I managed to do that. The Gannet hit the floor with its tail, and with all that weight on the nose, the impact pushed the rudder hinges inside the fin, opening the rear fuselage. Mind you, the painting was done, and the decals applied. More repair work, more paint touch ups... I should be collecting stamps instead...
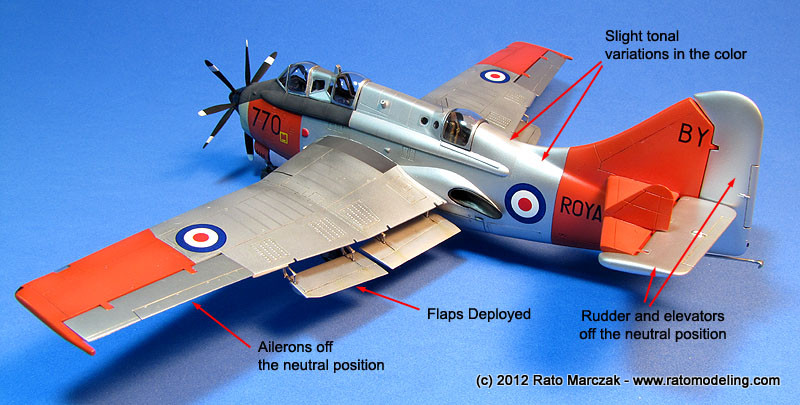
Nonetheless, I insisted in continuing with that damn model, don't ask me why. Next, I added the anti-slip band on the wing root. This was made by pre-cutting a decal previously painted with flat black and grey. I also added two thin stipes on the wings' leading edges using left over decals, something I found in photos of real Gannets. The lights were unmasked as were the landing gear wells, and here is the result:
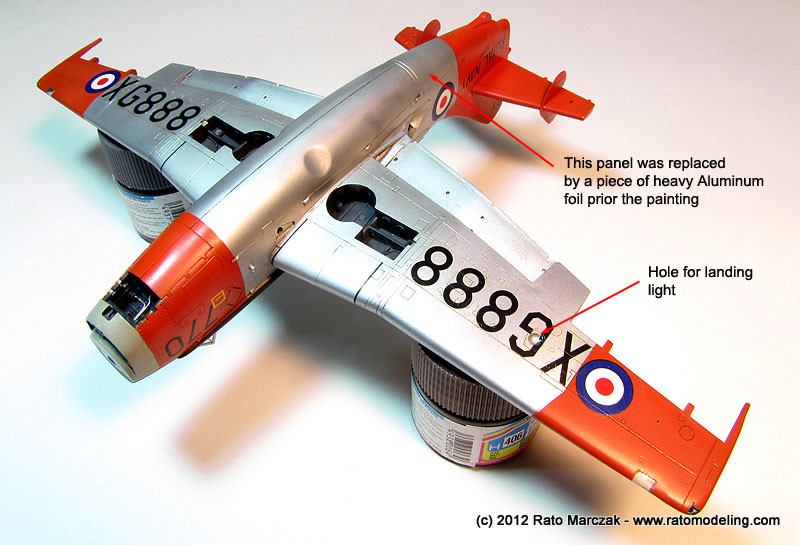
Something I forgot to mention before was that Trumpeter has not included the landing light, but molded its contour under the starboard wing. I drilled a spherical opening to insert a light there later:
8. A few more scores, finally...
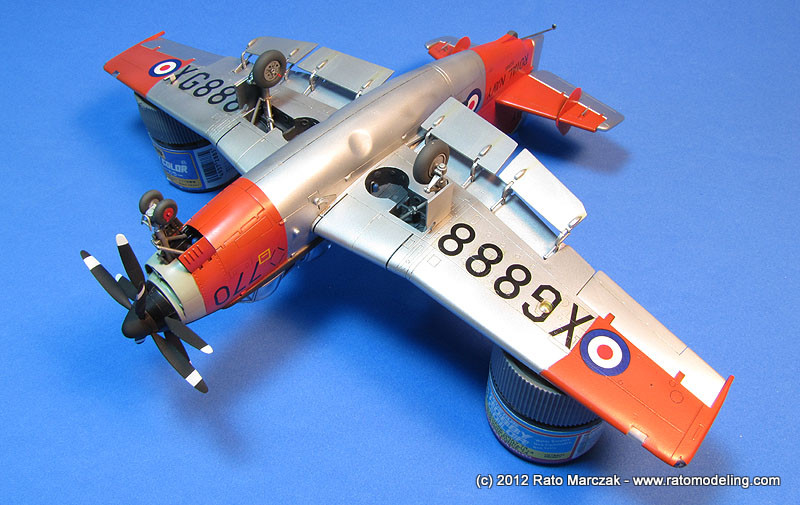
At least I managed to finish the other parts without major hurdles. The landing gear resulted nice:
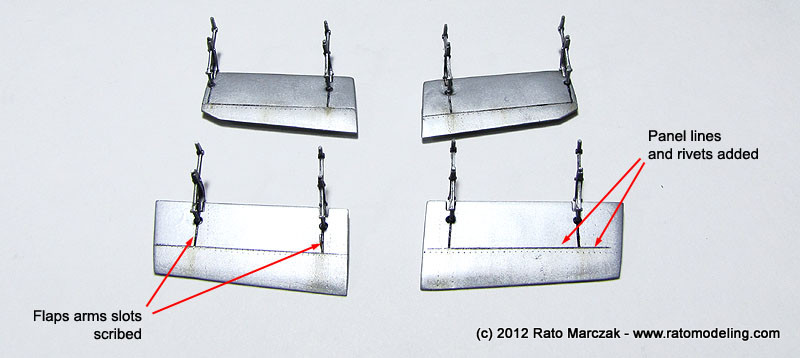
And the flaps had some details added, including a characteristic slot where the retraction arms slide. On the other side of the flaps you can discern the molding marks that I mentioned before. I'll live with that... All I wanted was to finish this beast off:
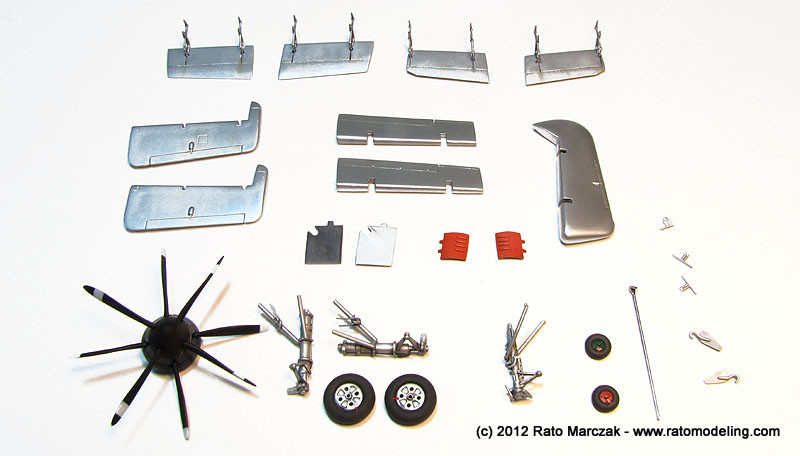
I also painted the landing gear doors, propellers and other smaller details. Here is the family shot before their final installation:
When the time to install the arresting hook came, I realized I lost it. I had to make another one from scratch. That's alright, I couldn't feel any pain anymore...
9. The ninth (can you believe?) mistake... and more!
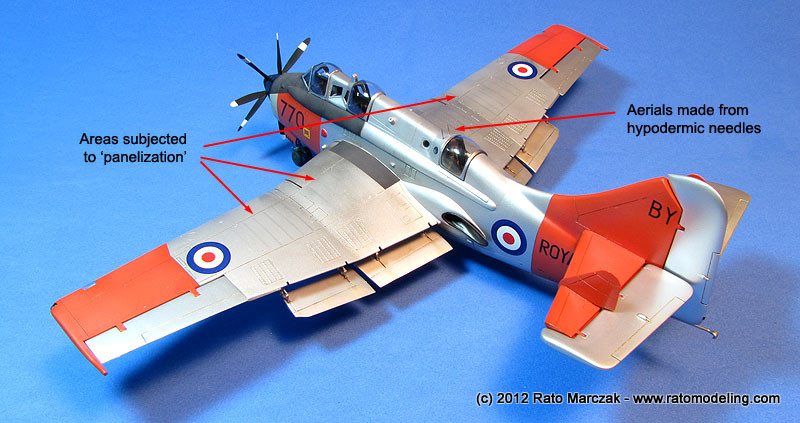
While the canopies were still off the model, I decided to play a bit with effects. I used an empty and cleaned felt pen to scrup Aluminum powder (like SNJ) along a few lines on the wings. This gave an interesting effect, and I should have done more, but you can imagine that I was no longer taking risks. I took one more, however, and drilled holes in front of the rear cockpit to accept 0.3 mm hypodermic needles simulating a pair of aerials.
I also masked an area around the rear cockpit and applied a slightly different Aluminum color. At this point I installed most of the remaining parts. A amber colored clear plastic was punched out to make the landing light under the starboard wing:
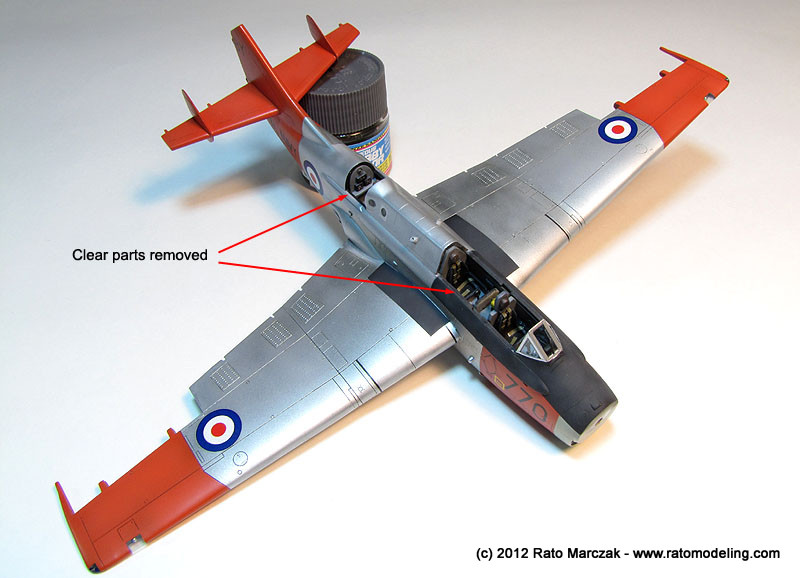
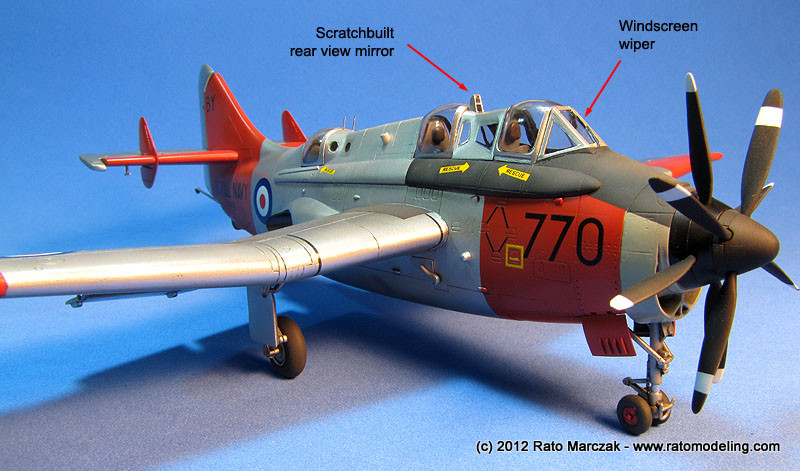
With the model almost ready, I started work on the clear parts. "Just a matter of masking, shooting some color, and gluing them in place". Right, but I couldn't find the tree front clear parts (glued together). When I starte to look for them I heard that 'crack' sound... Yep. I stepped on the clear parts. My 9th mistake. Upon inspection, I realized that only the instructor part of the canopy broke. I had no other way out but to vacuum form a replacement using the remains of the original part as a master. Before painting the clear parts I replaced the bad kit's instructor's mirror for a scratchbuilt one. I also enhanced the windscreen wiper, which came molded on the windscreen:
The painted canopies were then glued in place. It didn't result perfect, but what is perfect in this f***ing model? By then all I wanted was to finish it and never touch it again...
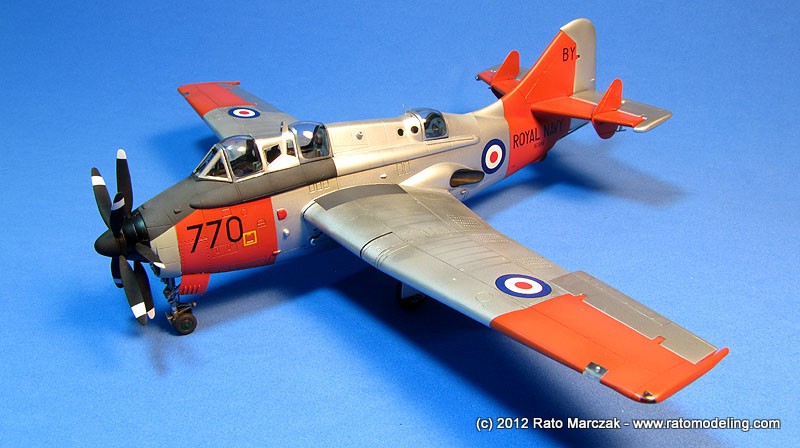
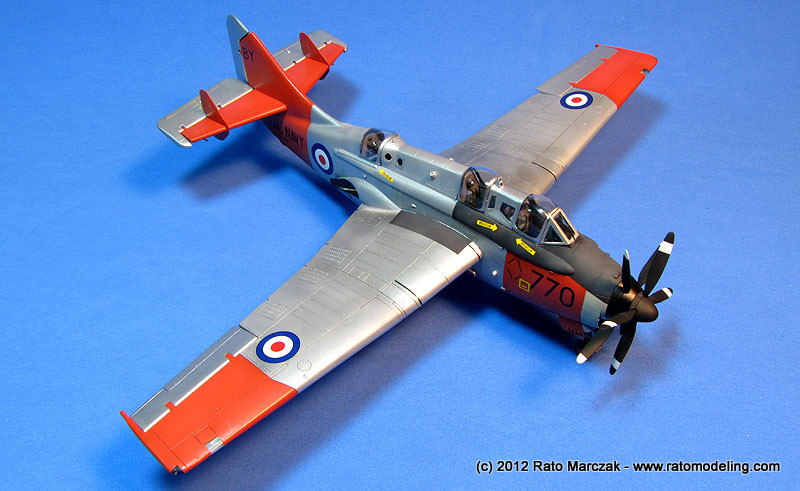
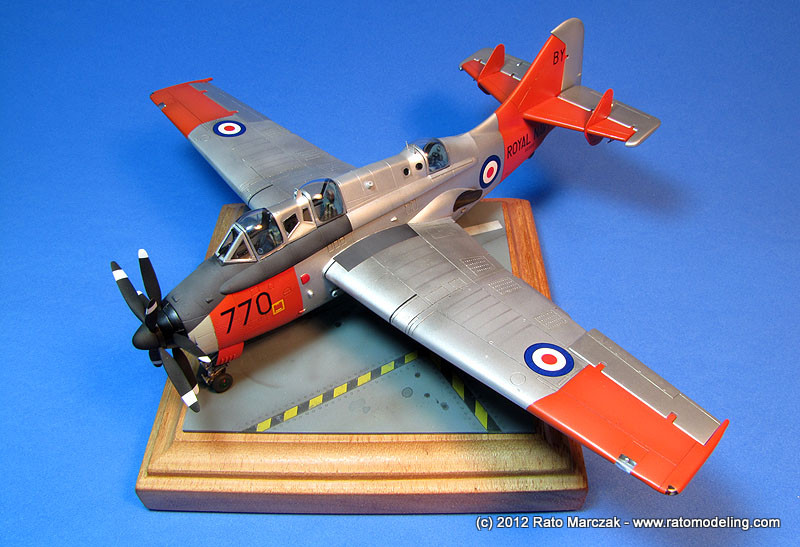
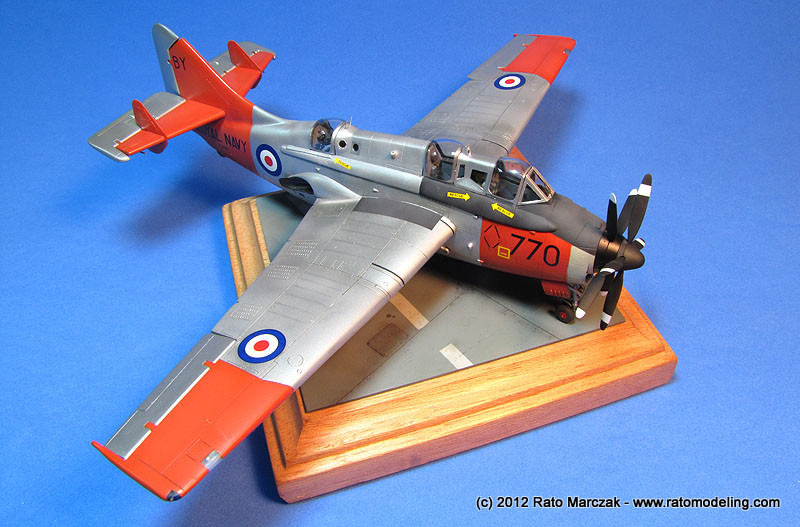
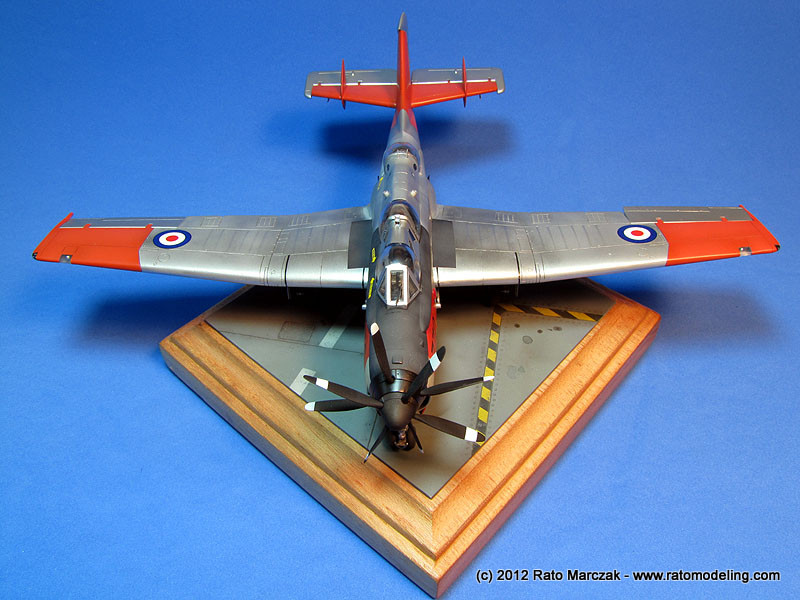
10. A happy end (or sort of)
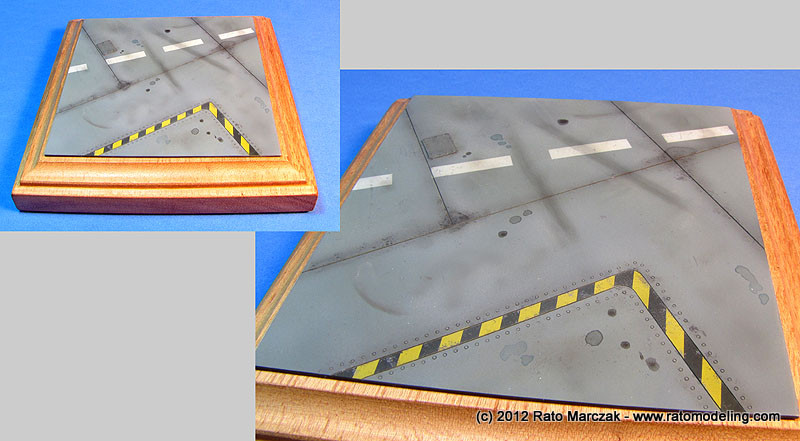
As usual, I like to display my models on a simple base. In this case, I wanted to represent a generic section of an aircraft carrier. Since British carriers started using welded steel plates for their flight decks long before the Americans, I simply scored a few lines on a piece of plastic card. Some bolts were simulated and after mere 30 minutes I was painting and weathering the base. This is the result:
All that was left was to touch my little Gannet for the last time, and set it on its new home:
This project is about the less than celebrated Fairey Gannet. The kit is the Trumpeter #1630 in 1/72. I always thought of this aircraft as something so ugly that it is impossible not to pay attention on it. Some guys call it beauty... I scored the kit in a local hobby shop (I didn't want the trainer, but it was the only one left) and started a few weeks later, something rare to me. Anyway, this is the kit:
It is not a bad kit, but as most Trumpeter kits, it looks much better in the box than when you start assembling. My kit in particular had a pebbly surface on the main parts, and although I sanded some of them, I didn't thought that would be a problem. That was my first mistake.
2. The second mistake
I really wanted to go fast with this one. Having so many models in my shelf of doom, the last thing I needed was another one there. I started with almost no research at all, relying on the instructions, and that was my second mistake. I assembled the cockpits parts without many additions. Just some scratchbuilt detail here and there, plus seat belts from an old Eduard set and instrument dials pressed on the kit parts using a beading tool. As I followed the instructions, I used grey as the main cockpit color. Later I dug out some books on the subjetct, only to discover that the interior of the Gannets were painted black in general. Fortunately I chose black for the instruments and seats, minimizing somewhat the error.
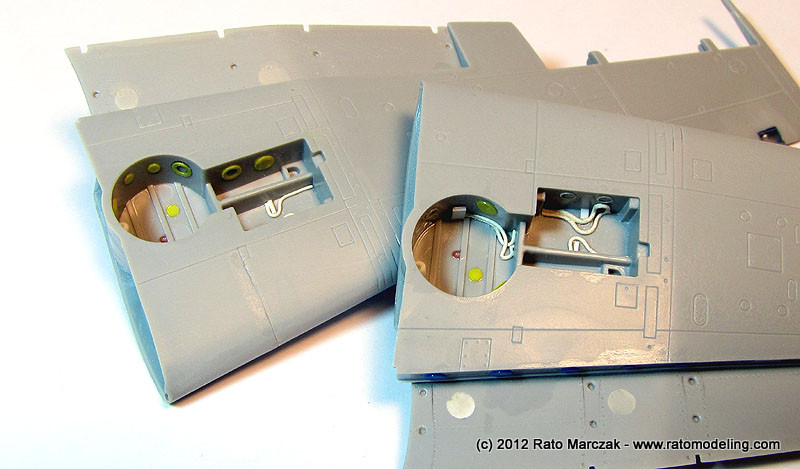
The nose wheel well was detailed using creative gizmology (or whatever you call it when you cheat). It was installed inside the fuselages and, wherever was some room left, pieces of metal were glued to avoid tail sitting... After checking many photos, I realized that the aft front wheel doors used to remain shut when the aircraft was on the ground. So I took advantage of this and detailed only the front area of the well:
3. The third mistake
Once the fuselage was closed, I decided to remove the rudder and the elevators. At this point I also drilled the observation windows on the rear fuselage which for some reason Trumpeter molded shut (no clear parts). I drilled the holes and glued disks punched out of a clear sheet.
The fin had to be closed where the rudder was removed. I used pieces of styrene and a half pipe to close the space and provide the hinges.
In order to make the slots for the hinges along the rudder and elevators leading edges, I took a short cut: I installed a cutting disk on my milling machine and voilá... the quickest slots ever:
Here I made my third mistake: since I was not following any drawings, I used the recessed lines of the kit parts as a guide to make the hinges. Comparing to photos of the actual aircraft later, it became clear that those hinges I made were way too thick...
The rudder, elevators and the horizontal stabilizers were finished and trued to fit nicely to each other:
4. The fourth mistake
Onto the wings, then. The first step was to remove/fill the many ejector pin marks along the flap bays. I used Mr. Dissolved Putty for that. Later, because I used lacquer thinner to thin all colors, the puttied areas deformed a bit under the action of the thinner and can be seen from some angles. I don't know why I haven't used CA glue as I usually do in these cases... that was my 4th mistake. The interior of the flap bays shoud have a rounded corner where the leading edge of the flaps sit, but it was molded as a corner. I left that this way.
After gluing the wings halves, I attached the wingtip lights using the kit parts. I just drilled holes in the clear parts and filled them with red and blue clear paints. The navigation lights on the leading edges were another story, as Trumpeter parts were of Coke bottle type. I thermoformed new ones after installing simulated bulbs inside. Both navigation and wingtip lights were glued with a mix of CA glue and Humbrol black paint, dismissing the need to paint the edges of the clear covers - that would make the gluing weak. The same mix CA+paint was used to fill the remaining seams, and everything was sanded flush and polished later on.
I spent some time riveting some areas of the wings, since I didn't like the flatness of them. The flaps bays received a few rivet lines, while virtually every access panel on the wings had rivets/fasteners embossed individually. This added a lot of realism to an otherwise boring paneling surface. A couple of selected panels recieved rivet lines. Following what I saw in photos, three large rectangular panels along the trailing edge of each wing were riveted with raised rivet decals from Micro Mark, but I took no picture of it at this stage.
Flipping the wings, the main wheel wells were detailed using plastic and thin warms of Milliput, roughly based on walkaround photos of the real thing.
5. The fifth and sixth mistake
Next, the wings were attached to the fuselage. Thanks to spars provided by the kit, I had no problems with the dihedral. Wing root seams were filled with Vallejo putty and the excess cleaned with a cotton bud moistened with water - no sanding necessary.
The canopies used in the Gannet had unique shapes, and Trumpeter captured them well. However, not so regarding the size. The rear canopy (part D9) had the rear edge substantially larger than the fuselage profile, protuding outwards when it shoud leave just a small step there. And the cockpit clear parts should stack one after the other, parts D6, D7, D3, and D8, in that sequence, but again, they didn't fit well in my sample, particularly the pilot's sliding part (D7) which shoud match the windscreen (D6) with the same angle. I glued them together and used water soluble putty to fill the seams. They were masked and cemented on the fuselage. That was my 5th mistake. Don't lose the count, more on that later.
The horizontal stabilizers were also glued in place and I applied a coat of Tamiya Gloss Black (X-1) in preparation for the natural metal finish. This was the 6th mistake.
6. The scores
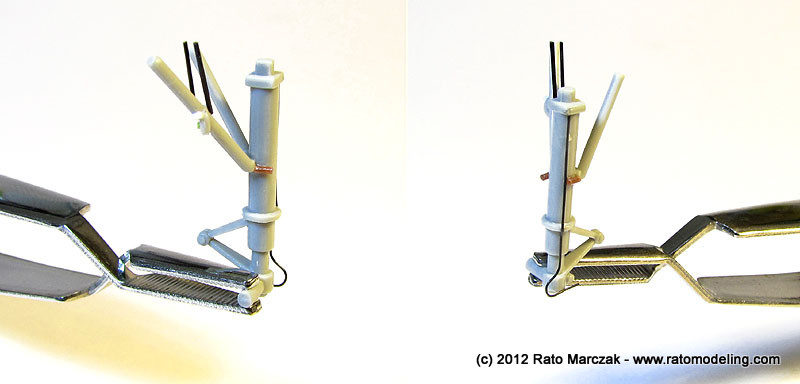
Well, at least I manage to score on a few points. The landing gears received a lift in the form of bolts, hinges, brake lines as well as a couple of missing arms seem on the real thing. The details on the main wheel hubs were deepened. Later I changed the final leg of the brake lines and installed brackets using adhesive Aluminum tape.
The nose wheel leg was more heavily modified. Essentially, I had to remove the (solid) torque link from the kit part and make a new one in order to install the brake mechanism passing through it. Its wheels recived a new hub with details embossed:
And while at it, I cleaned and test fit the counter-rotating propellers of my Gannet. Trumpeter made each propeller blade as a separated part. They lay perfectly in proper slots inside each spinner, making them all equally angled... in feathered position! C'mom Trumpeter. Before sandwiching each row of blades in their respective spinner (step 13 in the instructions), I scribed lines to simulate the back plates fitting, just like the real thing. And since I broke the tail hook arm during sanding, it was replaced by a syringe needle:
6. Back to the fifth and sixth mistake... and more!
The model was cleaned with tap water and primed using automotive primer. I found several faulty spots to correct, and at this point I started to see that the rough surface of the moldings could be a problem. I sanded the more visible areas to try to minimize the problem a bit. Another wash, another coat of primer. Once satisfied, I shot the Aluminum color using Aerotech automotive paint. I then masked the model in preparation for the red-orange colors. The instructions called for insignia red, but color photos of the Gannet show clearly that this color had an orange hue. It is not dayglo, though.
After waiting the model dry for a day, I applied a good coat of semi-gloss automotive clear, the model was ready for the decals. They went on very well. These Trumpeter & Hobby Boss decals are very thin, and once applied, you barely can see the clear film, even on a metallic finish. I decided not to coat the model with a clear gloss varnish to protect the decals. This was my 7th mistake. When I applied the wash (oil paints + mineral spirits) I noted that the mineral spirits could dissolve the decals. Fortunately I noted that in time to avoid a disaster, but I couldn't clean the wash as I wanted under the wings.
Now, remeber my 5th mistake, when I opted for glueing the clear parts to the fuselage before painting the model? Well, when I removed the masks from the clear parts, the tape pulled almost all the paint on them. At that point I was starting to regret not to make my Gannet fly to the wall earlier... I had no other option but to remove the clear parts from the model, clean the attaching points, and work on the clear parts separately. I should have done that from the beginning. Anyway, it ended up being a good thing, as the clear parts were stained and full of particles, probably consequence of the several baths. It would be impossible to clean this with the clear parts glued in place.
Now, the 6th mistake mentioned before. During this terrible stage of removing the clear parts and reworking the affected areas, I found several fingerprints marked in relief here and there. I spent a lot of time thinking on what could have happened. My conclusion: my Aluminum (and clear coats) were diluted with hot thinner. This softened the underlying acrylic black layer, but because automotive colors dry quickly, the result was a soft black layer sealed by a dry Alluminum+clear layer. That is, the black would take days to fully harden. Not knowing that, I left several fingerpring impressions and had no other choice but to sand the affected areas and retouch the paint. The problem wouldn't happen had I applied very thin layers of the subsequent colors after the black one, but I must confess that I shot the Aluminum a bit too heavy. You are probably guessing how I was feeling about this model by then...
7. The eighth - almost disastrous - mistake
Ok, I confess. I was pissed off with all that. But what else could happen? Well, let me tell you: I dropped the model on the floor!... Yes, I managed to do that. The Gannet hit the floor with its tail, and with all that weight on the nose, the impact pushed the rudder hinges inside the fin, opening the rear fuselage. Mind you, the painting was done, and the decals applied. More repair work, more paint touch ups... I should be collecting stamps instead...
Nonetheless, I insisted in continuing with that damn model, don't ask me why. Next, I added the anti-slip band on the wing root. This was made by pre-cutting a decal previously painted with flat black and grey. I also added two thin stipes on the wings' leading edges using left over decals, something I found in photos of real Gannets. The lights were unmasked as were the landing gear wells, and here is the result:
The
MicroMark 3D rivet decals performed very well, although some of them
disappeared after so many repairs and heavy handling:
Something I forgot to mention before was that Trumpeter has not included the landing light, but molded its contour under the starboard wing. I drilled a spherical opening to insert a light there later:
8. A few more scores, finally...
At least I managed to finish the other parts without major hurdles. The landing gear resulted nice:
And the flaps had some details added, including a characteristic slot where the retraction arms slide. On the other side of the flaps you can discern the molding marks that I mentioned before. I'll live with that... All I wanted was to finish this beast off:
I also painted the landing gear doors, propellers and other smaller details. Here is the family shot before their final installation:
When the time to install the arresting hook came, I realized I lost it. I had to make another one from scratch. That's alright, I couldn't feel any pain anymore...
9. The ninth (can you believe?) mistake... and more!
While the canopies were still off the model, I decided to play a bit with effects. I used an empty and cleaned felt pen to scrup Aluminum powder (like SNJ) along a few lines on the wings. This gave an interesting effect, and I should have done more, but you can imagine that I was no longer taking risks. I took one more, however, and drilled holes in front of the rear cockpit to accept 0.3 mm hypodermic needles simulating a pair of aerials.
I also masked an area around the rear cockpit and applied a slightly different Aluminum color. At this point I installed most of the remaining parts. A amber colored clear plastic was punched out to make the landing light under the starboard wing:
With the model almost ready, I started work on the clear parts. "Just a matter of masking, shooting some color, and gluing them in place". Right, but I couldn't find the tree front clear parts (glued together). When I starte to look for them I heard that 'crack' sound... Yep. I stepped on the clear parts. My 9th mistake. Upon inspection, I realized that only the instructor part of the canopy broke. I had no other way out but to vacuum form a replacement using the remains of the original part as a master. Before painting the clear parts I replaced the bad kit's instructor's mirror for a scratchbuilt one. I also enhanced the windscreen wiper, which came molded on the windscreen:
The painted canopies were then glued in place. It didn't result perfect, but what is perfect in this f***ing model? By then all I wanted was to finish it and never touch it again...
10. A happy end (or sort of)
As usual, I like to display my models on a simple base. In this case, I wanted to represent a generic section of an aircraft carrier. Since British carriers started using welded steel plates for their flight decks long before the Americans, I simply scored a few lines on a piece of plastic card. Some bolts were simulated and after mere 30 minutes I was painting and weathering the base. This is the result:
All that was left was to touch my little Gannet for the last time, and set it on its new home:
Statistically,
I don't think I'll run into so many troubles in a same kit so soon, but
better not to take many risks from now on...
| Technical file | |
| Kit:
|
-
Trumpeter #01630 |
| Additions:
|
|
| Basic
colors: |
-
Primer: automotive gray primer - Black undercoat: Tamiya Gloss Black (X-1) - Aluminum: Aerotech acrylic lacquer - High visibility red: 60% red + 40% orange Aerotech automotive lacquers. - Flat black: Aerotech lacquer. - Clear coat: Automotive semi-gloss lacquer |
| Notes: |
-
Several scratchbuilt details (see text). |
Rato Marczak © 2012
