| Hobby Boss USS Gato
(SS-212) in 1/700 |
|
Start:
September / 2010 Finished: August/2011 |
If
there
is a weekend project in
, this is it. At least in what concerns glueing the parts... I got this
kit during a modeling convention in 2010. Since my ever growing stash
of model ships is now officially stuck in 1/700 scale, I decided
it would be nice to have a few submarines side by side with other
vessels. The SS-212 (kit #87012) used here is the 1941 version. Hobby
boss also released the 1944 version, which is different in several
areas.
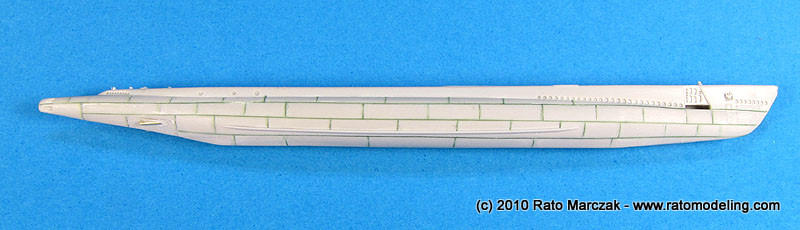
The kit is the simplicity in itself. It has 12 parts, but 3 are a display stand and two others are optional parts. That leaves you with mere 7 parts to play with. The quality of the molding is generally good, and the tower is particularly well done, with periscope and snorkel both raised.
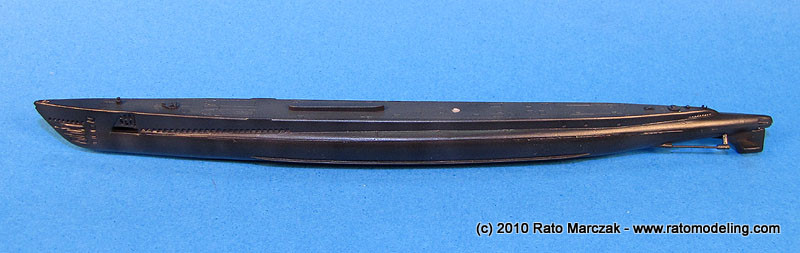
I started by cleaning the parts. The very delicate details of the tower were just brushed with liquid glue to smooth mold parting lines out. Don't try to sand them. The hull is split horizontally, so that you can model it as a waterline ship. Planning to show it on a display stand, I opted for the full hull and glued both parts. I decided to add the weld lines by glueing sections of very thin stretched sprue. Once the glue was set, the welds were sanded lightly to subdue the effect.
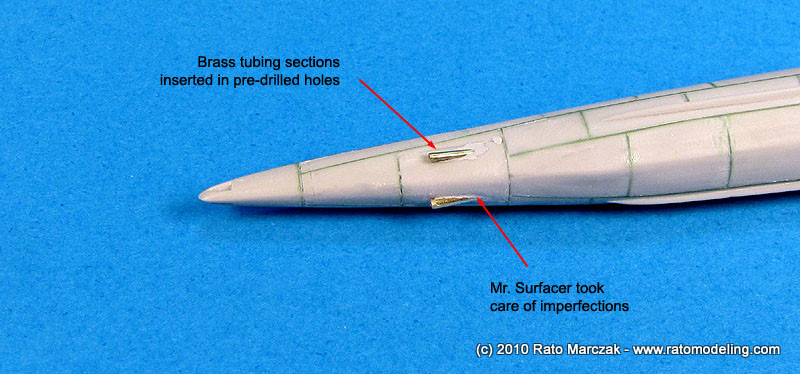
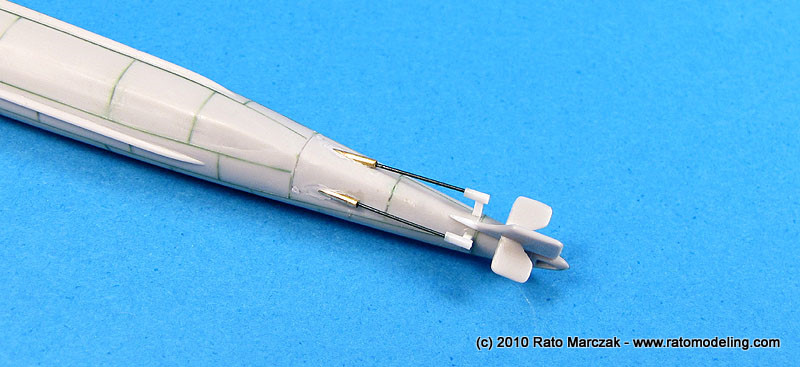
The most disappointing area of this small kit are propulsion system. The propeller shafts, rudder and rear diving planes are molded in a single part. While the rudder and diving planes are well molded, the shafts are a bit on the heavy side and make the sanding of that section of the hull impossible. I elected to cut the rudder and diving planes off to be installed later, glued the affected hull section and sanded everything flush. That meant I had to scratchbuilt new propeller shafts.
I started by drilling holes to accept brass tubing sections glued with slow setting super glue to allow time to align them correctly. I used two straight pieces of piano wire temporarily inserted in the brass tubes for that. Once the glue was set, I smoothed the area with Mr. Surfacer which, once dry, was cleaned with a cotton bud moistened in isopropyl alcohol.
Using the piano wires as a reference, I built new shaft supports with pieces of plastic card and tubing. The definitive shafts were made of plastic rod and glued in place, as well as the rudder and diving planes. The result is much better and scale appealing than the original parts:
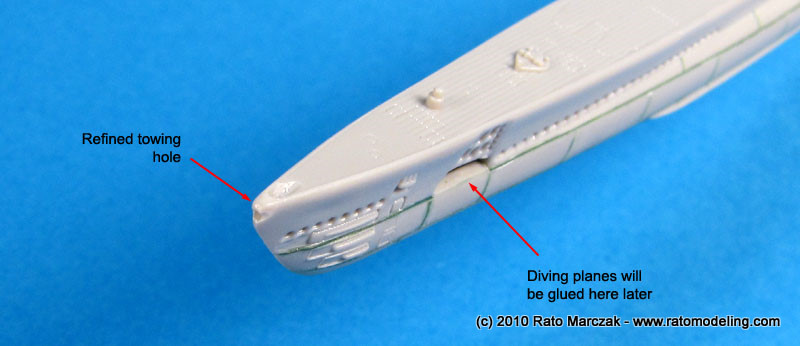
At this stage I also added a few improvements to the model. Several holes were drilled to accept various masts later. The aft diving planes, which can be posed retracted or deployed, are designed to be inserted between the hull halves. Since I wanted to add the retraction arms to them, they were sliced in the middle forming two parts that would be glued right before the painting phase. I just had to insert them in their slots on the hull sides. I also refined the bullnose hole:
Although I didn't have my mind made up about the correct painting scheme of the SS-212, I started applying the black paint over the hull. I used automotive gloss black lacquer in a single pass. I then added a few drops of white to the airbrush cup and applied vertical highlights along several stations to break the color monotonicity:
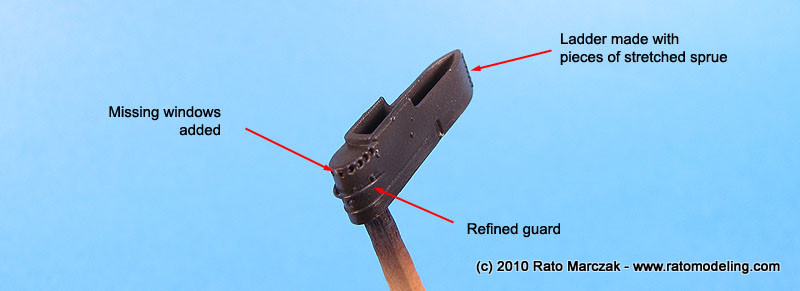
By adding a few more drops of white the mixture, I airbrushed a lighter tone of gray to the upper deck, which was made of wook on the real subject. Next, I turned my attention to the tower. I drilled the missing windows and glued a thin guard saw in wartime photos. I also re-made the molded-on ladder on the rear of the tower. The part containing the periscope, snorkel and anti-aircraft gun would be added later, but everything was already black by then.
At this point I had to solve a serious doubt of mine: were the first Gato class submarines painted in overall black? I'm no expert on the subject, but after a fair amount of research, I gathered enough reasons to believe not.
The SS-212 was the first of her class, being commissioned on December 31, 1941. By then, Measure 9 was effective. From P. Hreachmack's book The Painter's Guide to WWII Naval Camouflage, Measure 9 (also known Black System) reads simply (pp.9): "Specific for submarines, the entire vessel above the waterline was painted black". Simple right? Problem is: and what about below the waterline?
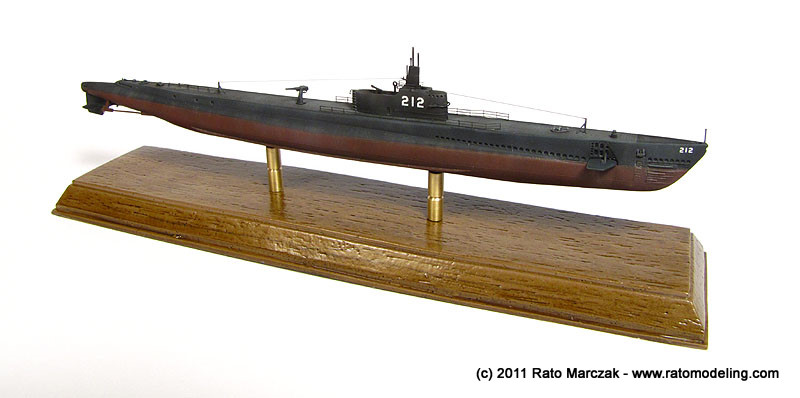
After reading several builds of Gato models in different scales on the internet, I was puzzled by the fact that some talented modelers used hull red below the waterline on their models. Digging deeper, I found a few B&W wartime photos of the first Gato class subs with a visible color change below the waterline. Talking to a couple of friends devoted to the subject, I made my mind that it should be hull red. Later I found that the AFV Club's 1/350 offering of the 1941 Gato class model also indicates hull red there. Well, at least I'm not alone on this. Be aware, however, that this applies to 1941 submarines, only. Later in the war not only the camouflage changed on these vesses, but also their deck and tower configurations.
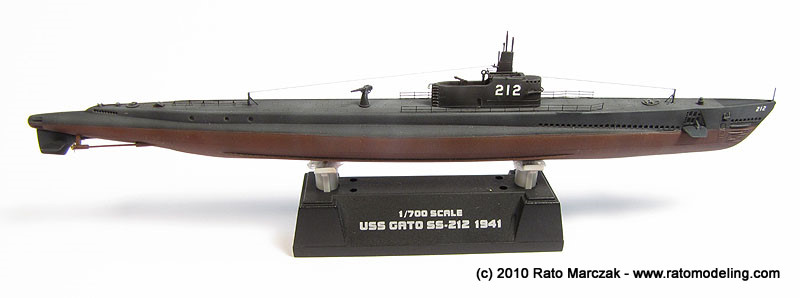
And so I masked the lower hull, airbrushed the hull red and reapplied the post-shading. Being a lacquer paint, I applied an artist's oil wash directly over the painted parts, without any protective acrylic coat. In such small scale, the less paint coats you apply, the better.
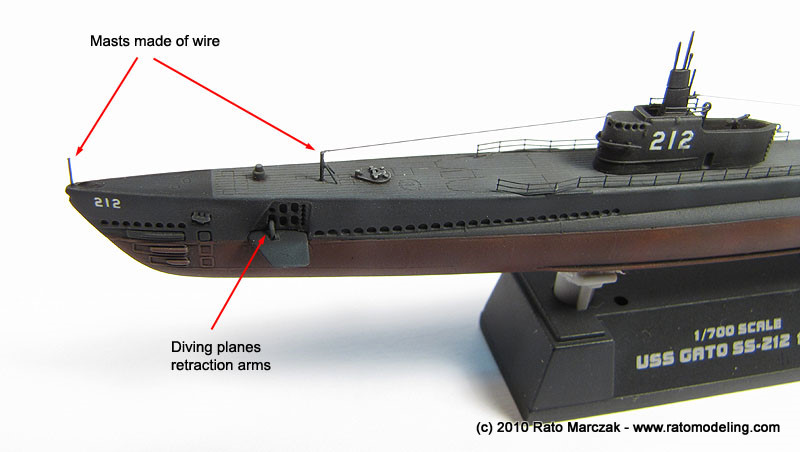
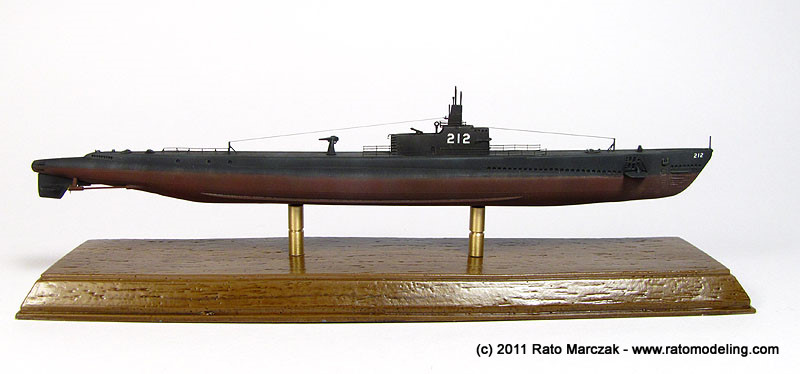
The tower details were glued in place, as well as the deck gun. I also glued two or three masts in previously drilled holes, and applied a thinned coat of Testors Dullcote. Once dry, I made two small holes on the bottom of the 'hull to accept metal pins fixed on the display stand. I was planning to make a better stand later, but the kit's one provided a good fixture to handle the delicate model. Next, I drybrushed several prominent details with gray oil paint, particularly over the deck. This also highlighted the planking details beautifully.
New propellers were made using a simple photoetching trick, painted and glued in place:

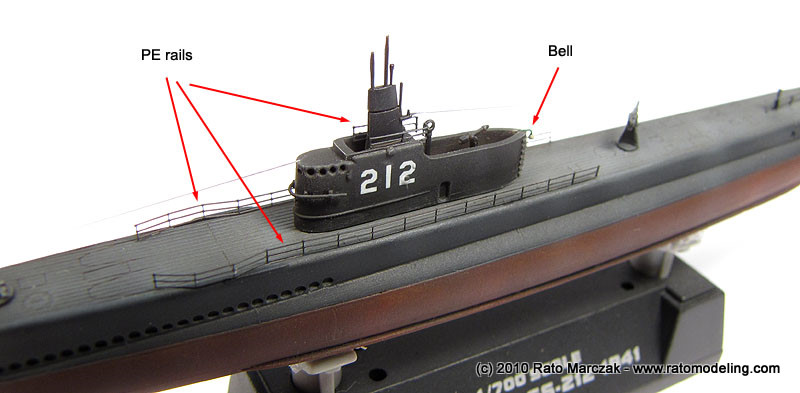
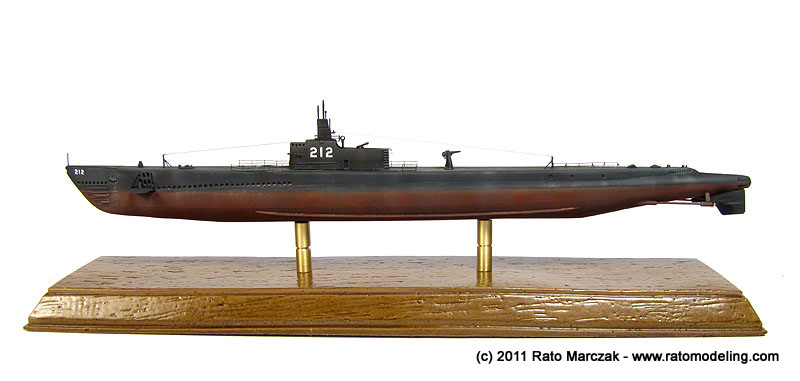
Now you may be wondering if I was planning to add PE rails. Yes, but I opted for installing them after the final flat coat. My idea was to use Pledge Future from a small bottle that I left open for several nights. This made the was much more thick than in the original bottle, but still brushable. I like to use it as a liquid glue for small parts. Although fairly thick, it dries very thin.
Anyway, I converted the necessary PE rails from an old three-rail fret to a two-rail version, and carefully trimmed them to size, and bent wherever necessary. In 1/700 scale, this is the ultimate test to you patience, I tell you! With the rails ready, I dabbed small areas along the position of the rails with my concentrated Future and calmly positioned each rails. Practive apnea first, and stop drinking coffe 24h prior this step. The Future will allow some re-positioning if necessary. After it dries, I re-shot some Testors Dullcote over the area and I bet you cannot tell where I applied Future...

I'm happy with the result so far, but I still need to apply some rust here and there, and design a new display stand.
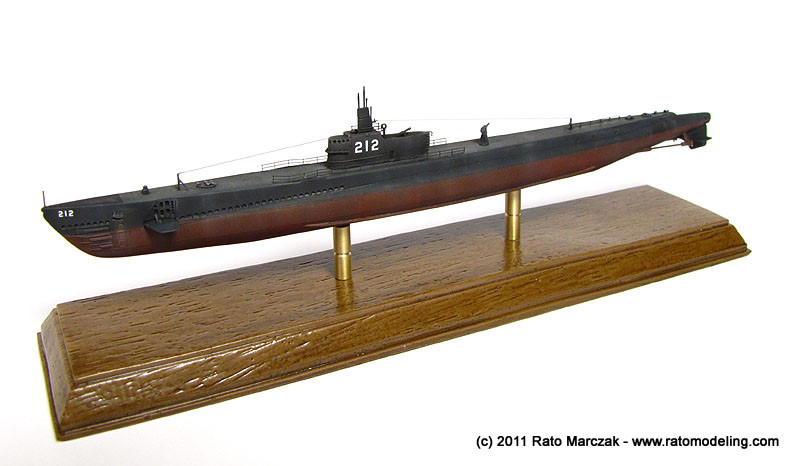
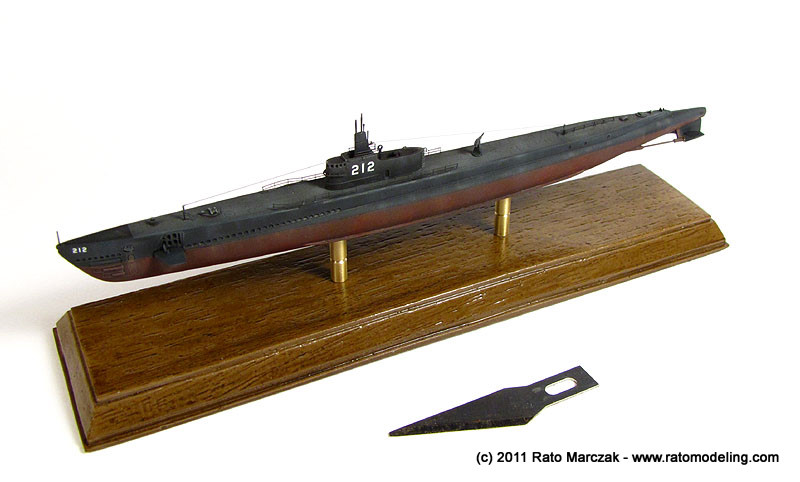
I didn't like these display bases which come with Hobby Boss subs. Instead, I made a resin copy of the Revell Cutty Sark base and painted simulating stained wood. I then milled brass supports in my mini-lathe and coated these parts with semi-gloss clear varnish. It is still missing a plaque, but it is done:
The kit is the simplicity in itself. It has 12 parts, but 3 are a display stand and two others are optional parts. That leaves you with mere 7 parts to play with. The quality of the molding is generally good, and the tower is particularly well done, with periscope and snorkel both raised.
I started by cleaning the parts. The very delicate details of the tower were just brushed with liquid glue to smooth mold parting lines out. Don't try to sand them. The hull is split horizontally, so that you can model it as a waterline ship. Planning to show it on a display stand, I opted for the full hull and glued both parts. I decided to add the weld lines by glueing sections of very thin stretched sprue. Once the glue was set, the welds were sanded lightly to subdue the effect.
The most disappointing area of this small kit are propulsion system. The propeller shafts, rudder and rear diving planes are molded in a single part. While the rudder and diving planes are well molded, the shafts are a bit on the heavy side and make the sanding of that section of the hull impossible. I elected to cut the rudder and diving planes off to be installed later, glued the affected hull section and sanded everything flush. That meant I had to scratchbuilt new propeller shafts.
I started by drilling holes to accept brass tubing sections glued with slow setting super glue to allow time to align them correctly. I used two straight pieces of piano wire temporarily inserted in the brass tubes for that. Once the glue was set, I smoothed the area with Mr. Surfacer which, once dry, was cleaned with a cotton bud moistened in isopropyl alcohol.
Using the piano wires as a reference, I built new shaft supports with pieces of plastic card and tubing. The definitive shafts were made of plastic rod and glued in place, as well as the rudder and diving planes. The result is much better and scale appealing than the original parts:
At this stage I also added a few improvements to the model. Several holes were drilled to accept various masts later. The aft diving planes, which can be posed retracted or deployed, are designed to be inserted between the hull halves. Since I wanted to add the retraction arms to them, they were sliced in the middle forming two parts that would be glued right before the painting phase. I just had to insert them in their slots on the hull sides. I also refined the bullnose hole:
Although I didn't have my mind made up about the correct painting scheme of the SS-212, I started applying the black paint over the hull. I used automotive gloss black lacquer in a single pass. I then added a few drops of white to the airbrush cup and applied vertical highlights along several stations to break the color monotonicity:
By adding a few more drops of white the mixture, I airbrushed a lighter tone of gray to the upper deck, which was made of wook on the real subject. Next, I turned my attention to the tower. I drilled the missing windows and glued a thin guard saw in wartime photos. I also re-made the molded-on ladder on the rear of the tower. The part containing the periscope, snorkel and anti-aircraft gun would be added later, but everything was already black by then.
At this point I had to solve a serious doubt of mine: were the first Gato class submarines painted in overall black? I'm no expert on the subject, but after a fair amount of research, I gathered enough reasons to believe not.
The SS-212 was the first of her class, being commissioned on December 31, 1941. By then, Measure 9 was effective. From P. Hreachmack's book The Painter's Guide to WWII Naval Camouflage, Measure 9 (also known Black System) reads simply (pp.9): "Specific for submarines, the entire vessel above the waterline was painted black". Simple right? Problem is: and what about below the waterline?
After reading several builds of Gato models in different scales on the internet, I was puzzled by the fact that some talented modelers used hull red below the waterline on their models. Digging deeper, I found a few B&W wartime photos of the first Gato class subs with a visible color change below the waterline. Talking to a couple of friends devoted to the subject, I made my mind that it should be hull red. Later I found that the AFV Club's 1/350 offering of the 1941 Gato class model also indicates hull red there. Well, at least I'm not alone on this. Be aware, however, that this applies to 1941 submarines, only. Later in the war not only the camouflage changed on these vesses, but also their deck and tower configurations.
And so I masked the lower hull, airbrushed the hull red and reapplied the post-shading. Being a lacquer paint, I applied an artist's oil wash directly over the painted parts, without any protective acrylic coat. In such small scale, the less paint coats you apply, the better.
The tower details were glued in place, as well as the deck gun. I also glued two or three masts in previously drilled holes, and applied a thinned coat of Testors Dullcote. Once dry, I made two small holes on the bottom of the 'hull to accept metal pins fixed on the display stand. I was planning to make a better stand later, but the kit's one provided a good fixture to handle the delicate model. Next, I drybrushed several prominent details with gray oil paint, particularly over the deck. This also highlighted the planking details beautifully.
New propellers were made using a simple photoetching trick, painted and glued in place:
Now you may be wondering if I was planning to add PE rails. Yes, but I opted for installing them after the final flat coat. My idea was to use Pledge Future from a small bottle that I left open for several nights. This made the was much more thick than in the original bottle, but still brushable. I like to use it as a liquid glue for small parts. Although fairly thick, it dries very thin.
Anyway, I converted the necessary PE rails from an old three-rail fret to a two-rail version, and carefully trimmed them to size, and bent wherever necessary. In 1/700 scale, this is the ultimate test to you patience, I tell you! With the rails ready, I dabbed small areas along the position of the rails with my concentrated Future and calmly positioned each rails. Practive apnea first, and stop drinking coffe 24h prior this step. The Future will allow some re-positioning if necessary. After it dries, I re-shot some Testors Dullcote over the area and I bet you cannot tell where I applied Future...
I'm happy with the result so far, but I still need to apply some rust here and there, and design a new display stand.
I didn't like these display bases which come with Hobby Boss subs. Instead, I made a resin copy of the Revell Cutty Sark base and painted simulating stained wood. I then milled brass supports in my mini-lathe and coated these parts with semi-gloss clear varnish. It is still missing a plaque, but it is done:
| Technical
file |
|
| Kit:
|
-
Hobby
Boss
87012 |
| Additions:
|
-
PE rails from generic sets. - Scratchbuilt new propeller & shafts. |
| Basic
colors:
|
-
Primer:
Gunze Mr. Surfacer 500 - Main color: Aerotech's Gloss Black automotive lacquer with drops of Flat White for highlights. - Hull red: Aerotech's Hull Red automotive lacquer - Brass (propellers): Model Master Brass Non-Buffing Metalizer (#1417) - Flat clear coat: Testors Dullcote (#1160) |
| Notes: |
|
Rato Marczak © 2011
