| Red Pounder - PST KV-122 heavy tank in 1/72 |
|
Started: December/2015 Finished: May/2018 |
PST is a Russian plastic model manufacturer relatively well known for their many unusual 1/72 tanks, trucks and soft-skin military vehicles. Years ago, I got my PST KV-122 in a bargain, and it remained in my stash for a long time until I decided to give it a go. Actually, I was interested in their rare KV repair tractor, but switched the subjects for some reason. Maybe it was the almost cartoonish bad-ass silhouette of the KV-122, maybe it was the heavily sagged usual pattern of the KV series track... I don't know.

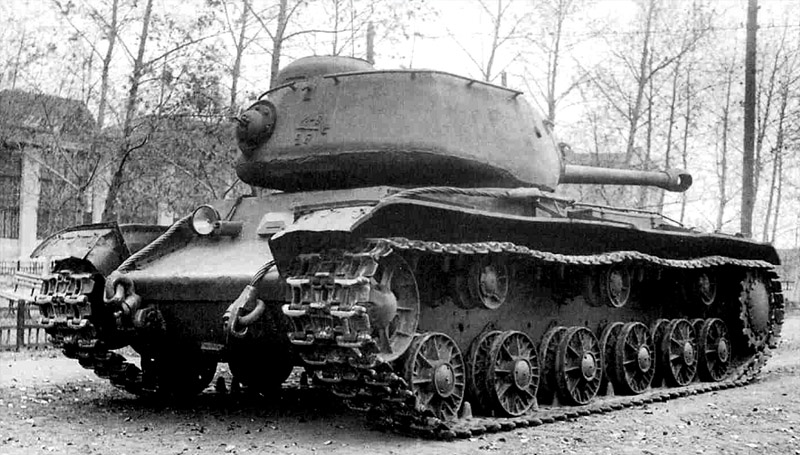
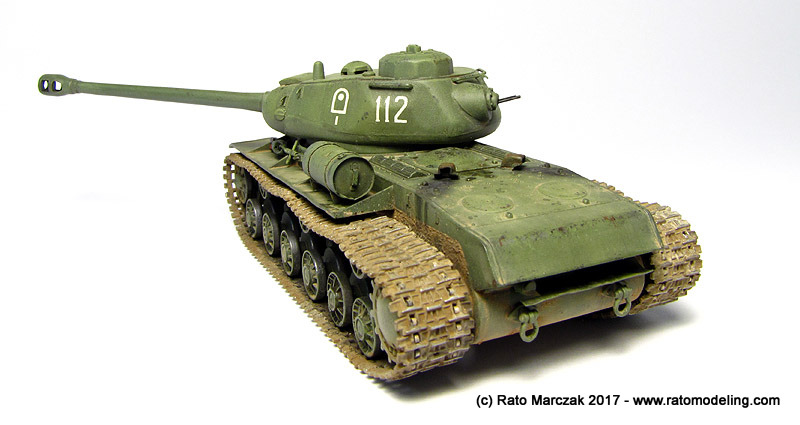
The KV-122, however, is not a famous tank. In fact, it is more to the obscure side of the tank warfare. For the records, the Russians mounted a 122 mm gun turret (that would be used later in the IS tanks) on a KV-85 chassis as a test bed. References indicate one single prototype built during the Autumn 1943 (never officially called KV-122), but no production run. However, the idea worked well and many combat units uprated damaged KV-85s with the IS turrets. Photographic evidences of the KV-122 in action are slim at best, but at least the 62nd heavy tanks regiment of the 8th guard tanks corps was equipped with a number of them during 1943.

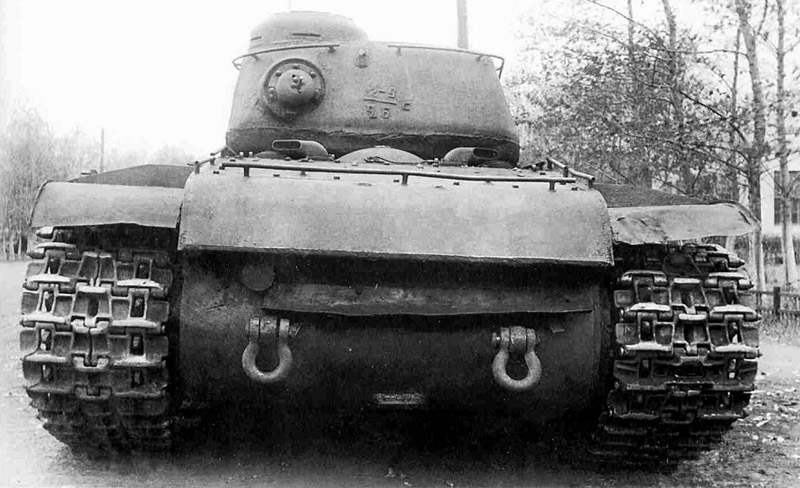
A production KV-85 fitted with IS-122 turret seen in Kirov plant No.100, Chelyabinsk, Autumn 1943.
A production KV-85 fitted with IS-122 turret seen in Kirov plant No.100, Chelyabinsk, Autumn 1943.
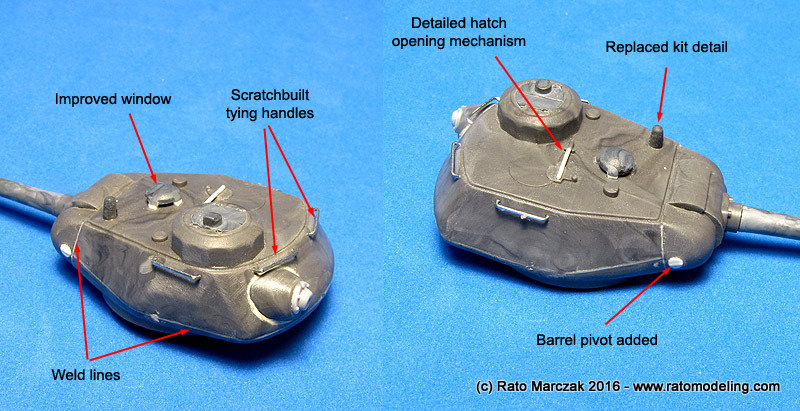
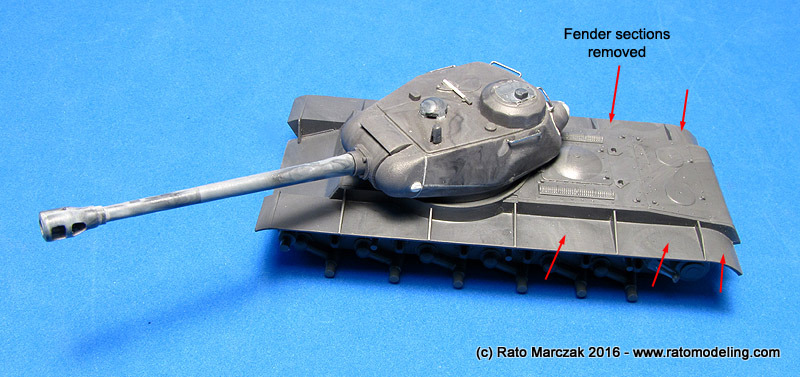
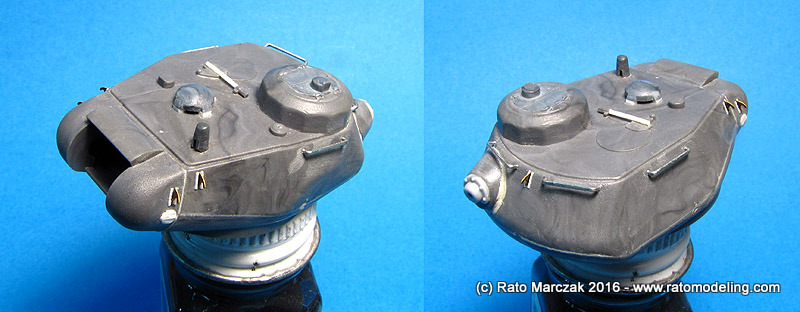
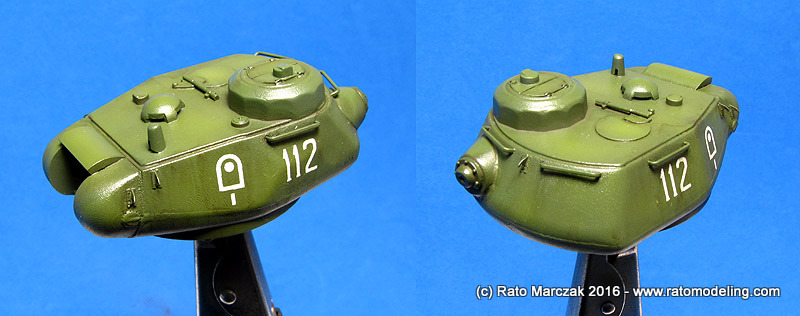
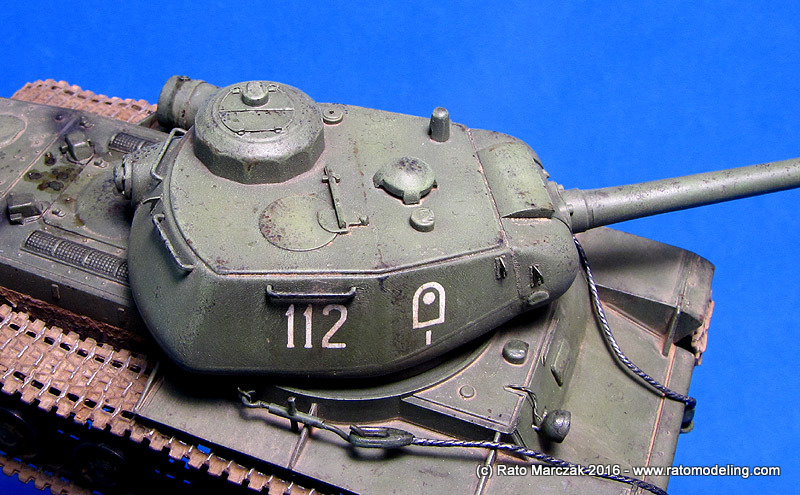
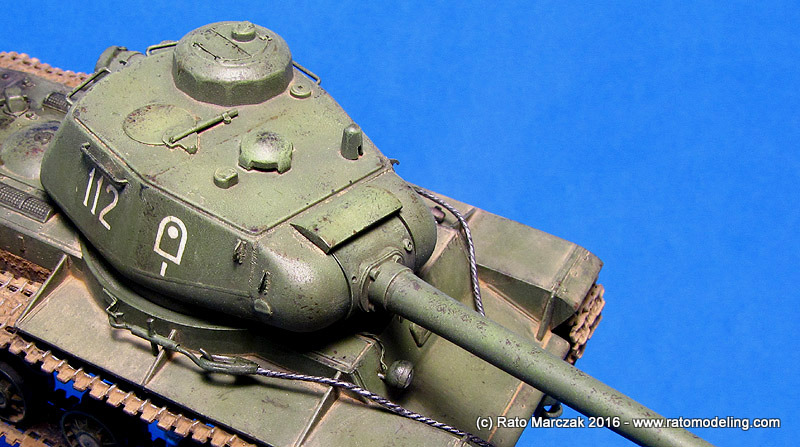
The kit is very basic, with parts ranging from well molded to others indistinguishable from the sprues. PST seems to use whatever is the styrene color in the injection machine, as some parts are injected in a mosaic of colors - something I found in other kits of the brand. Their sprues are common to most, if not all, PST tanks based on the KV hull, leaving many parts unused in the sprues. But the basic shape is there, so I started working on the turret. I replaced many details by scratchbuilt ones, refined others, and added the handles around the turret by staples. I used liquid glue to add some texture to the cast parts of the turret, and simulated weld lines with the traditional stretched sprue method. At this point, I was hooked by a few photos of KV's with some sections of the fenders missing, and decided to reproduce that on my model.
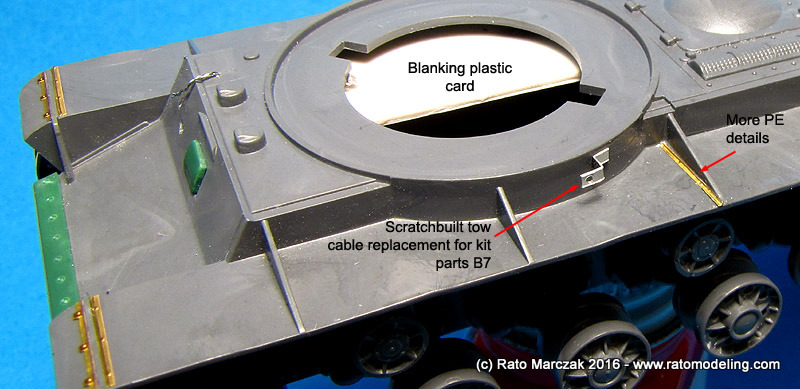
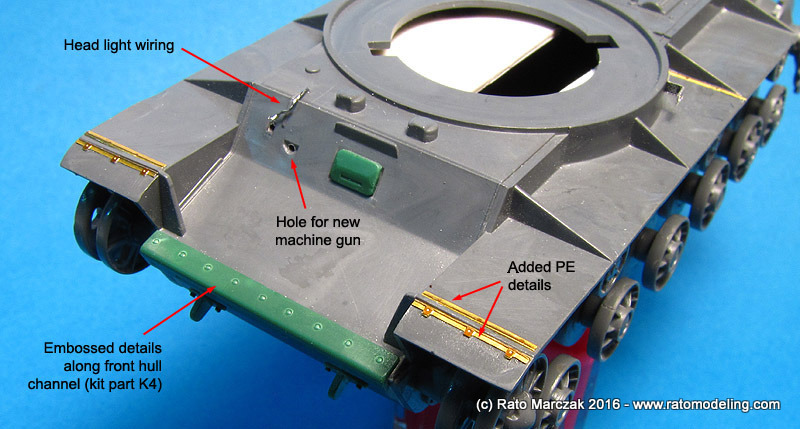
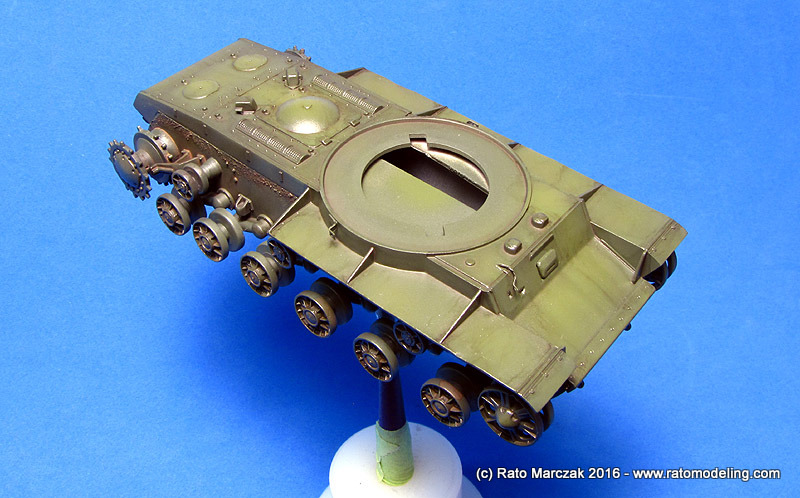
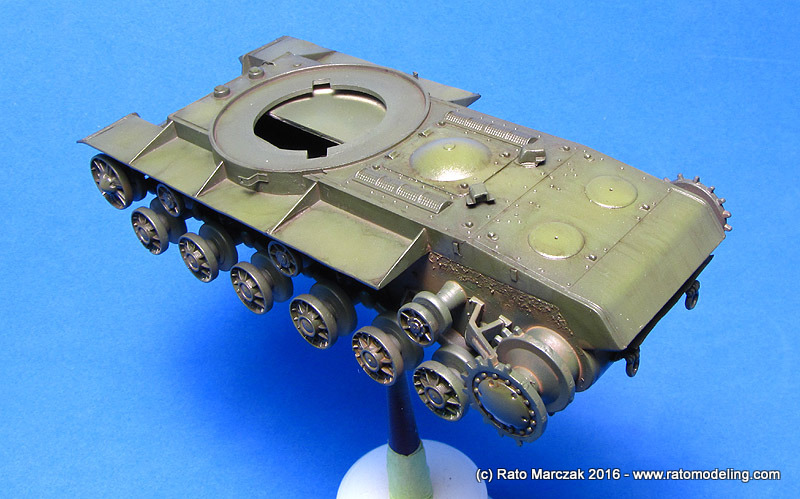
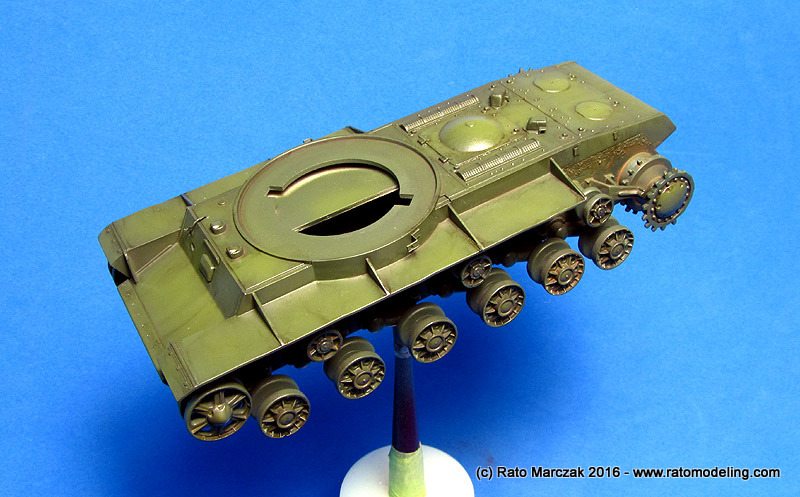
The hull and wheels were quickly assembled (cleaning the wheels is another story...). I noted that the round walls mounting the turret extended to the hull sides, so I blanked the apertures under the fenders with plastic card sheets. A Part photoetched fret designed to the ISU-152 was hanging around in my bench, and I decided to use some parts from it. I started detailing the fender joints with them, but couldn't use much more than that. The KV characteristic towing cable tensioner mounts were terribly represented in the kit (parts B7), so I made new ones from Aluminum sheet and glued to the sides of the hull. A torn length of thin wire was installed to feed the headlight. I also embossed the bolts along the front hull joint (part K4):

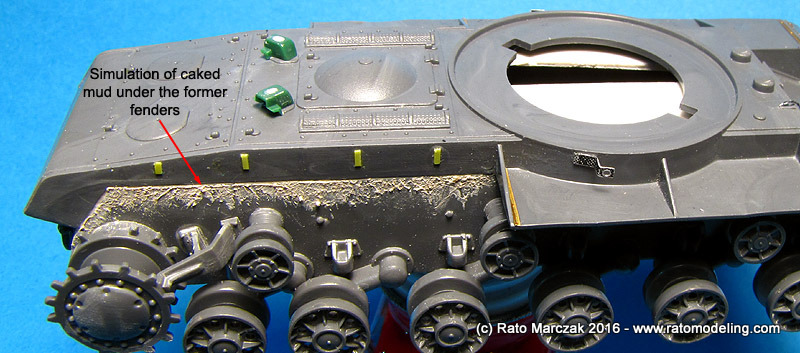
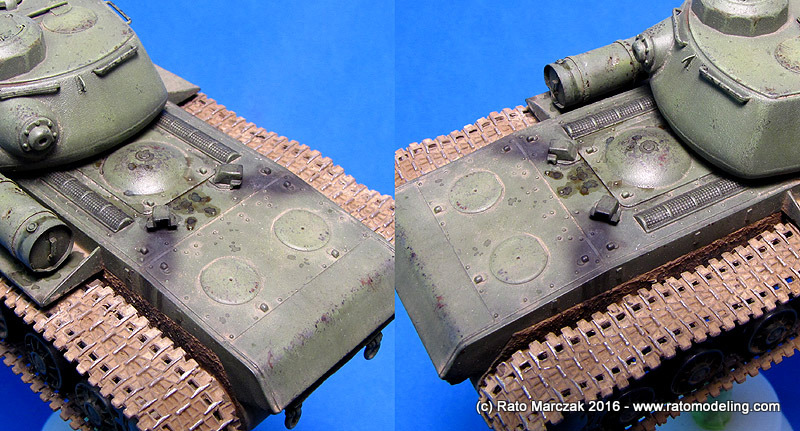
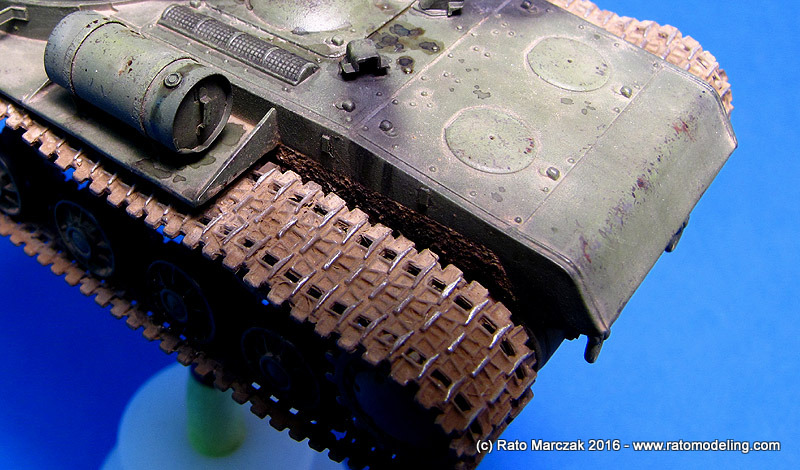
Sticking to my initial plan, I removed three fender sections from the right side and two from the left side. Before proceeding, I tried a method to show the characteristic caked mud which accumulates under the fenders. I simply laid masking tape along the lines where the removed fenders would run and applied a mixture of modeling putty and fine sand by tapping a brush along the tape edge. Then I removed the tape before the putty set. During the weathering phase, this area would be painted in earth colors to emulate remnants of mud stuck to the hull sides before the fenders were lost:
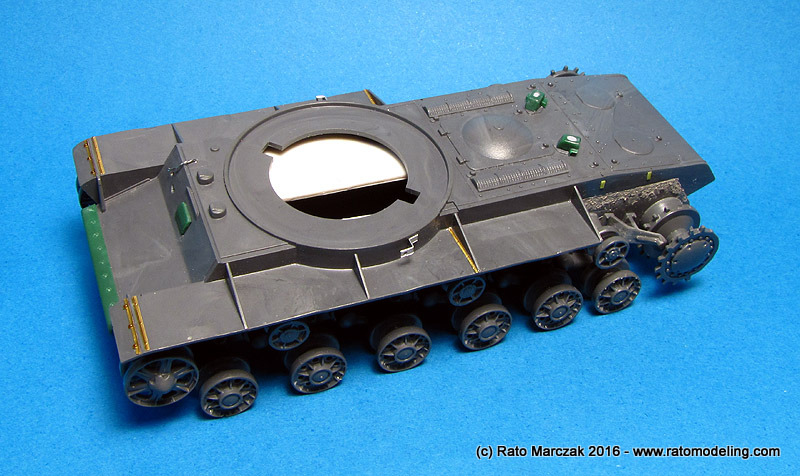
A few more parts were cemented in place and the hull was essentially finished. I then went back to the turret and added more photoetched details, namely, the lifting hooks welded to the turret sides and gun mount. At each of these spots, two small lengths of stretched sprue were used to simulate the welds and leave a narrow slot where the hooks were glued into.

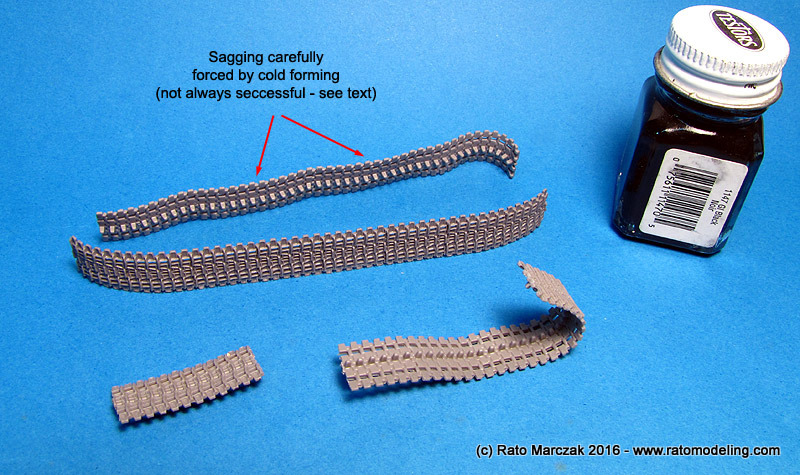
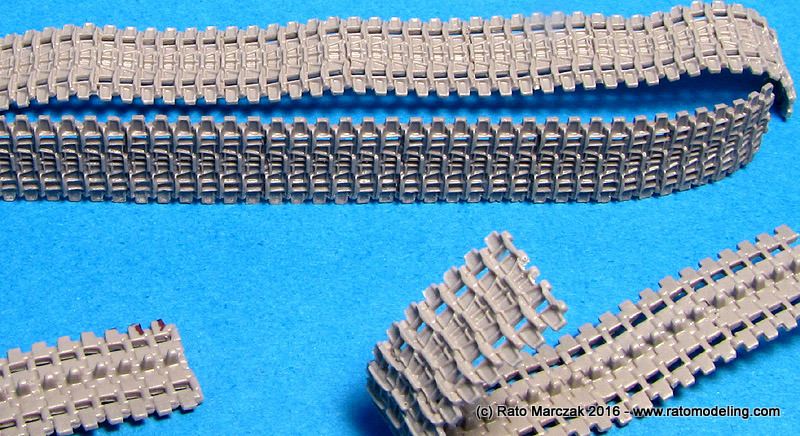
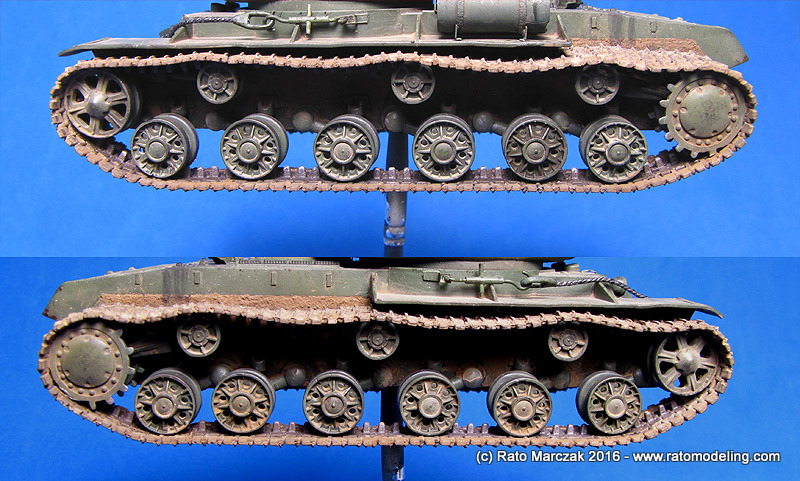
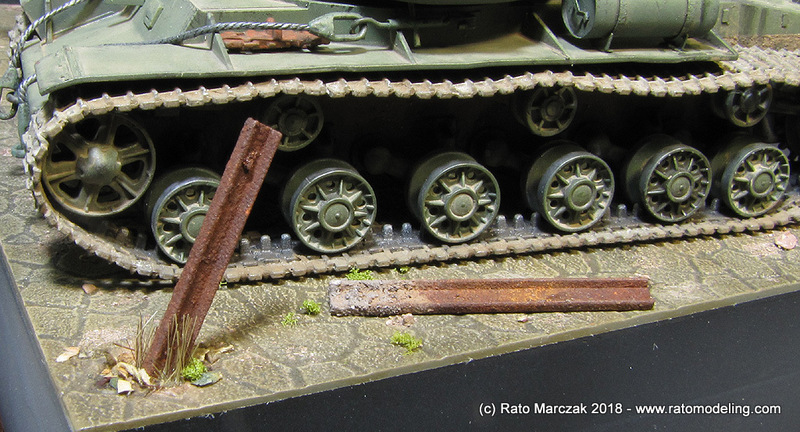
Later on I noted that I could have added one or two other missing details... Anyway, by then I was really upset with the tracks provided by the kit. They were of the link-by-length type, and not exactly bad, but the details were too soft for my taste, and I couldn't devise a good way to represent the sag between the return rollers using the kit parts. At that point I left the model aside for several months, until a friend warned me about the OKB Grigorov resin tracks. I ordered a sample and they were simply stunning. Made of a (supposedly) workable resin, what really jumped to the eyes was the level of detail in these parts, rivaling some 1/35 tracks around.
In theory, hot water could be used to shape the tracks. I used this method to make the turns around the idle and tractor wheels, but I found it impossible to shape the sags using hot water without distorting other areas already shaped. In the end, brute force was used and it sort of worked, except that sometimes the tracks broke - fortunately at the hinges - putting me back to the link-by-length approach. I think I need more practice. After bending and test fitting countless times, I finally had a usable set of track lengths that would hopefully stay in place with super glue. Many hidden tooth of the traction wheels (those hooked to the tack links) were removed to make the installation less prone to breaking. In the process, I also got some spare links. In summary, it was worth the money and the time spent: I had realistic sagging and faithful details on my tracks. After a good coat of Testors Model Master Track Brown I left them aside to dry thoroughly.
With renewed interest, I finally started painting the model. After a coat of Vallejo Dark Green primer, I painted the basic assembly using automotive lacquer paints. A friend handed me his secret mix of Russian Green (thanks Bradley!) which I used as a base color. Then, using Aerotech (a Brazilian brand) lacquers I highlighted somewhat the horizontal surfaces with their Russian Army Green color and finished by applying a further highlight on raised areas using the same color with yellow added.
I wanted to test a different weathering technique than the one I usually do (see, for instance, my Renault FT-17 or the Famo) in order to speed up the processes a bit. Additionally, I also would like to leave some residual shine of the glossy lacquers here and there on the model to simulate what I found in many wartime photos. The idea was to reduce the shine of the green camouflage 'naturally', I mean, without using any flat or semi-gloss varnish, but instead leaving the washes and pigments do their job just like real dirt and dust do on a glossy surface. In order to do so, I had to ensure that all my weathering agents would dry flat. Fortunately this is generally true for oils, washes and other modeling effects on the market.
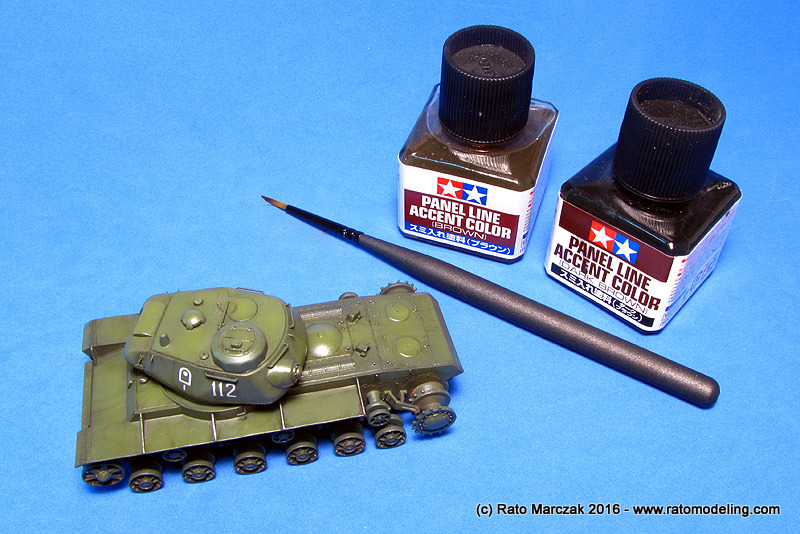
I started applying a generous coat of Tamiya Accent Color Brown, cut with mineral spirits, over the whole model. Capillarity does the job for you, concentrating the pigments along corners and recesses:
After letting this initial wash dry throughly, I then applied uncut Tamiya Accent Color Dark Brown using a fine brush to concentrate the effect on deeper recesses and around the perimeter of raised features. The excess was spread right after with a small flat brush just slightly dampened in white spirit. Vertical movements of the brush naturally left streaking marks. You may need to repeat the step a couple of times, but the beauty of this method is that I didn't have to use any weathering fluids or oils washes to obtain a subtle effect. Very quick and effective:
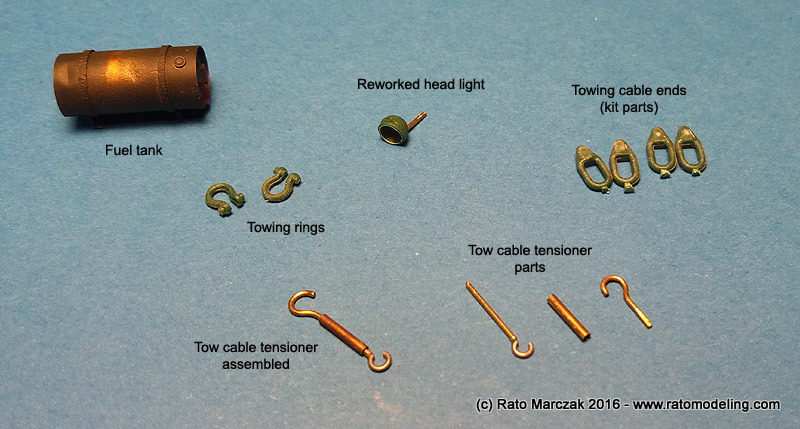
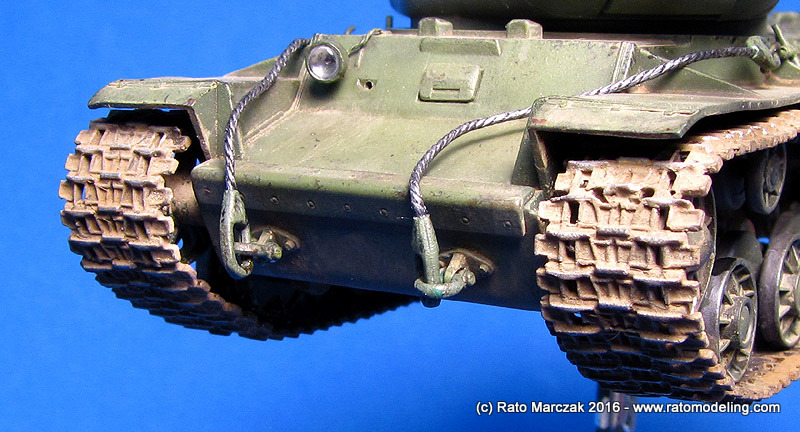
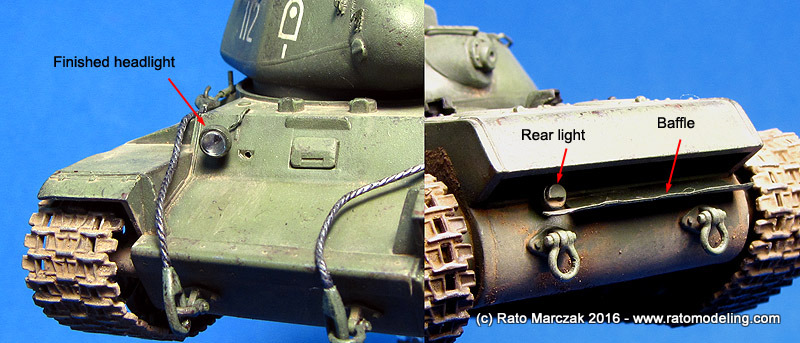
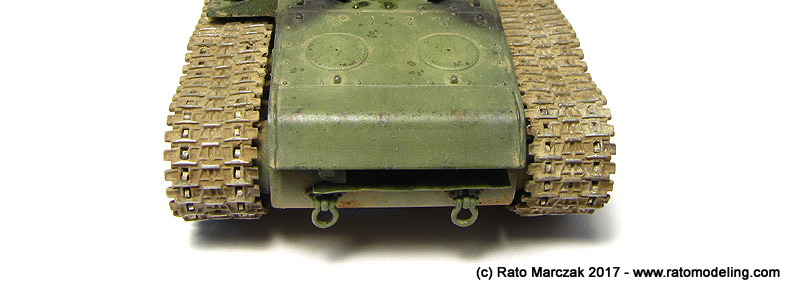
While the models were drying, I started working on smaller details. Two things that had to be addressed were the tow cable tensioners, whose kit parts are terribly awful, and the rear area of the engine, missing the rear light and an air outlet deflector. These are very prominent features in the real thing, and therefore worth the extra time invested. Like I always said, the soul of 1/72 models is in the smaller details 'you don't see':
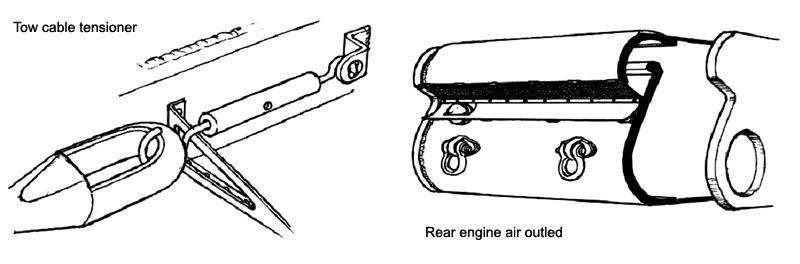
The rear light and the rear air outlet were scratchbuilt with plastic, the latter randomly torn, painted and glued to their plates. The cable tensionsers were not so easy, and while I was at it, I also worked on other things.
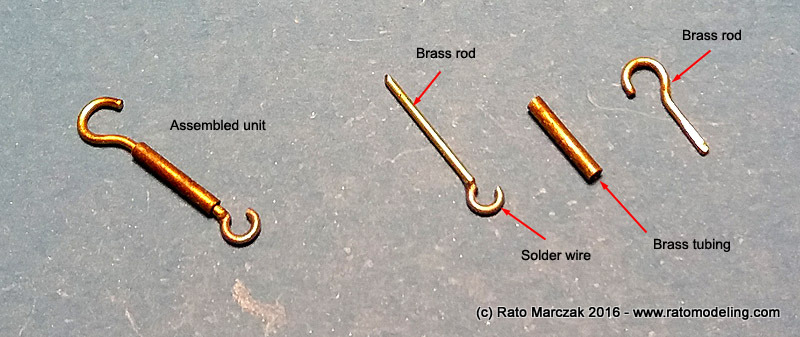
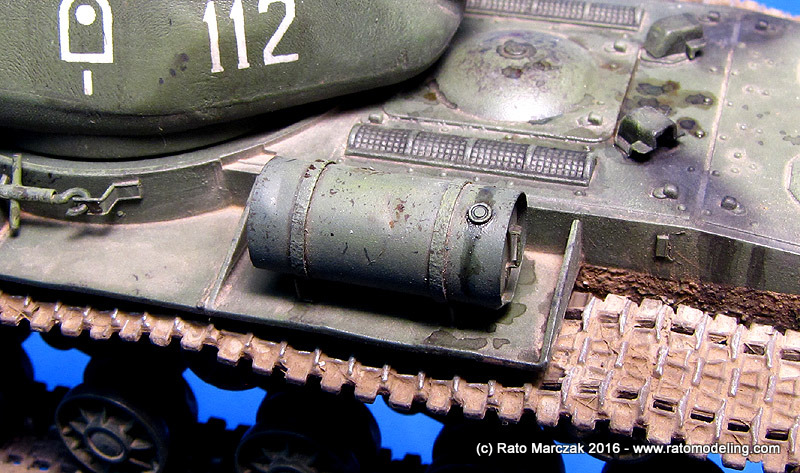
The fuel tank came from the Part photoetched set. I simulated some battle damage by hitting the assembly with a small screwdriver, leaving realistic dents. The tensioners were done more or less like the real thing, i.e., two hooks inside a threaded pipe. The larger hook was made with brass rod shaped in jeweler pliers but I failed to get the same results for the smaller one, so I used 0.5 mm rolled around a toothpick. All I left to add to the tensioners were the turning bars, which would be added later:
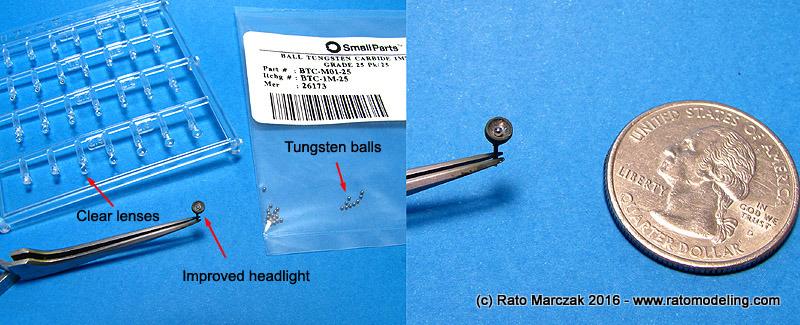
The kit headlight (part B14) was improved by mixing two known methods (described in detail here and here). I started hollowing the kit part with a spherical bit. Then I painted the hollowed area with silver paint. A small Tungsten ball was glued in the center with Pledge Future to simulate a bulb. The lens came from a after market item (Wave) but are not yet installed in the photos below:
The tracks were then treated with dark washes. Since the KVs didn't have rubberized wheels, I scrubbed Uschi van der Rosten Iron Metal Polishing Powder on the inner bands to simulate the characteristic polished effect that the road wheels yield. The sides of the lower, front and rear hull received a sludge of earth pigments (dark and light), fine sand, and chopped static grass with a few drops of decal setting solution. This simulated the dry mud/dirt accumulated on the areas closer to the ground. Before assembling the tracks in place, I scrubbed Humbrol Polished Metal around the outer rings of the wheels using a cotton swab. Once the weathering was done they would be polished again with a small piece of cotton. Only then the track sections were assembled in place, and I had to retouch the paint on the attaching links to hide glue marks and sanded spots. This sequence is important, as the weathering could now proceed allowing the same dusting effects on the hull to be used on the tracks as well.

Still in the mood for trying new techniques, I returned to the weathering ready to test something that have been in my mind for quite a while. At this point I still had to dust the model and apply other effects, but the surface details were not as highlighted as I wanted them. Had I just applied dust pigments, they would be even more outshining. Here is what I did, crossing my fingers that it would work:
1. Paint chipping and scratches applied first with pencils, pens and sponge along edges, hatches, handles etc. Dark brown and black colors. Fresh chipping would be re-applied on selected areas later on.
2. An overall pass of light dust pigments heavily diluted in water and a few drops of Windex. Used over the turret, hull, wheels and tracks.
3. Dark dust applied on corners, upper and lower hull, some of the wheels and tracks using a medium brush. This was applied dry and fixed with Windex.
4. Once the pigments are completely dry, a stiff flat brush was used to remove the excess of pigments. This is an extremely important step, often overlooked by modelers, to bring the dusting effect to scale instead of leaving a 'coat' of pigments. If you are interested in reproducing the aspect of a well used vehicle in dry weather, it is something to consider. Evidently, no fixing solution was used.
5. Only then I applied a moderate dry-brushing using light green oils. This is a novelty to me... coming after the enamel/oil washes, the dry-brushing effect would not be changed and no protective varnish is needed neither. The dry-brushing also removes some of the previous pigments, and therefore you don't need to be heavy handed during the step 4.
6. The previous step will render the paint chipping more visible, some more (newer chipping) some less (older chipping). But at this point you may want to add really fresh paint chipping. I did on movable parts and along the edges where the towing cables would be bashing.
In summary, I changed the usual order of the things a bit, particularly with the dry-brushing used after the dusting. Contradicting many modelers, I think dry brushing still is an irreplaceable technique, at least for small scale models. For some reason, this sequence worked very well for me. If you really want, fixing solutions could be airbrushed now to keep them in place.
Once the previous weathering was dry, things were rounded off with the effects around the engine:
7. Oil pools were simulated around and over the engine access panels. You may vary the shine of the pools with more or less gloss effects, as well as their intensity by repeated applications. The same applies to fuel leaks.
8. A localized black oils wash was carefully applied over the engine grilles to add depth to them. I wanted to use a photoetched item from the Part set instead, but it would not fit the kit molded on ones.
9. Exhaust stains were airbrushed with black paint trailing the engine stacks. The effect was refined smudging dark gray pastels on the center of the stain marks. Later on, restrained rust marks would be added to the exhaust stacks.
It seems a lot of steps, I know, but if you look again, steps 1 to 6 are all done in the same modeling section. And note that no flat clear coat was used, not only speeding up the project, but also leaving a realistic shine here and there. I guess in the end what I did was follow better the same sequence of Nature, apart from the dry-brushing, and it payed off. Of course you can always go back and redo something that does not look good or natural. I did so several times! Best of all, the whole process lasted two modeling nights on my workbench... way faster than my previous weathering experiences.

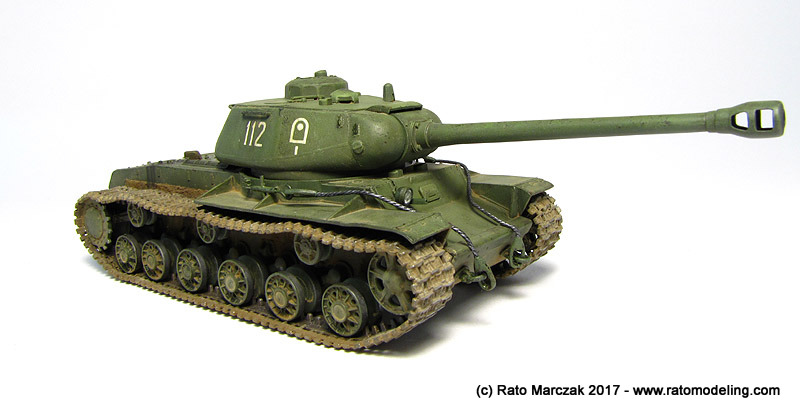
The towing cables used the kit parts for the eyes and a length of cord, painted and weathered. In order to make them look more natural, after painting the cables with Humbrol Polished Steel and applying a black wash, I dampened the cable with Turpenoid and a fine brush at the points where I wanted them bent more severely. This softened the paint which would dry again in the correct shape.They were installed connecting the tensioners to the towing rings at the front hull:
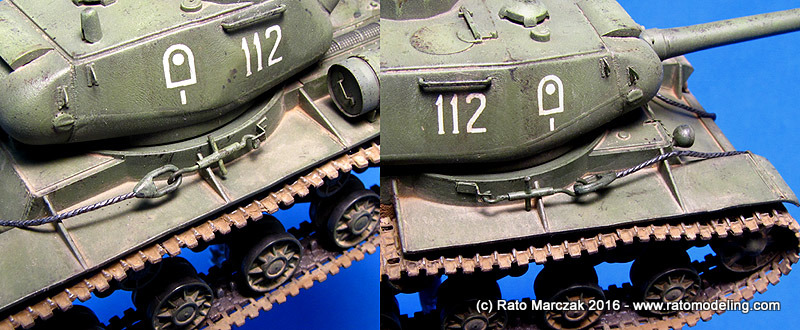
The headlight was finished with a Wave clear lens and glued in place:
The contact areas of the tracks were treated with a silver pencil. I did the same with the links tooth on the inner faces. I liked the final aspect of the tracks, even though no wash or drybrush was used there at this stage. Chalk up another point for OKB tracks... Eventually, I would simulate the tooth removed from the driver wheels with bits of plastic inserted in their slots:
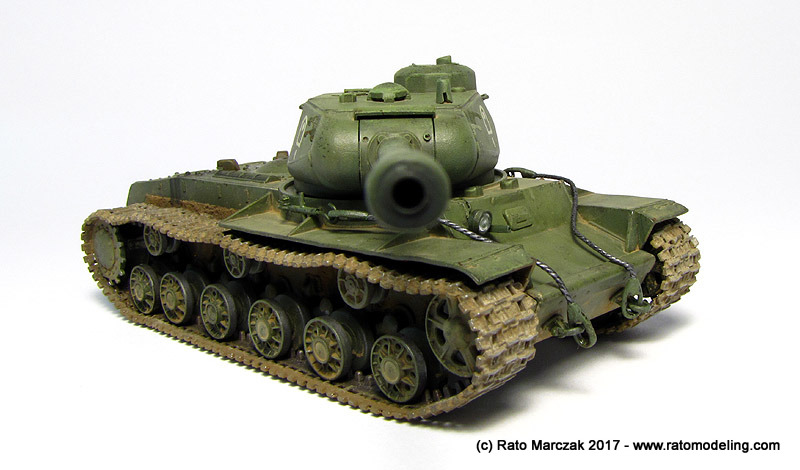
And if you want to see how the sagging of the tracks resulted, here they are - not perfect, but surely much better than what I would end up with, had I used the kit parts:
I made some more weathering on the fly, but I will not remember of them all. This is how the project stands as for now:
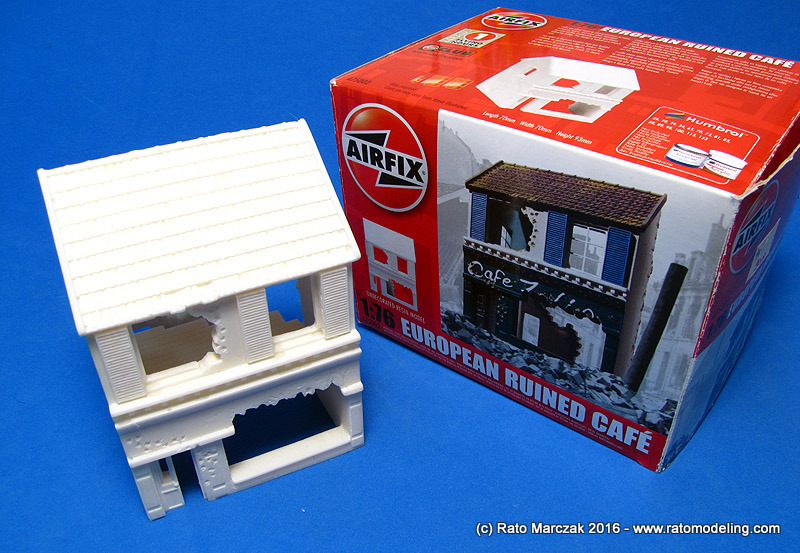
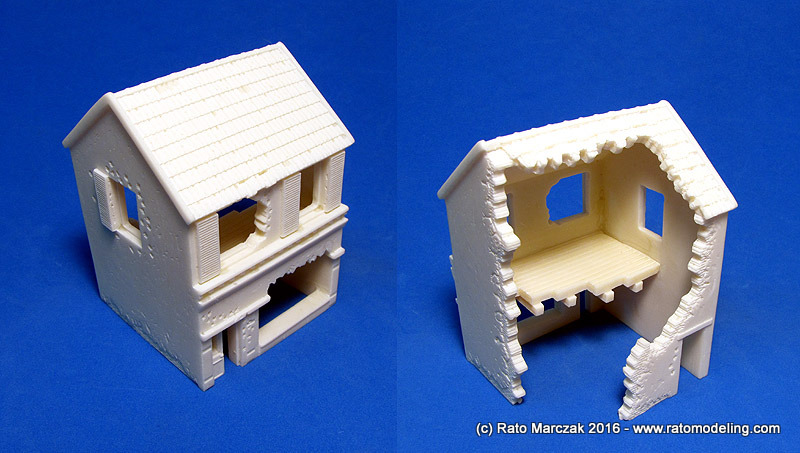
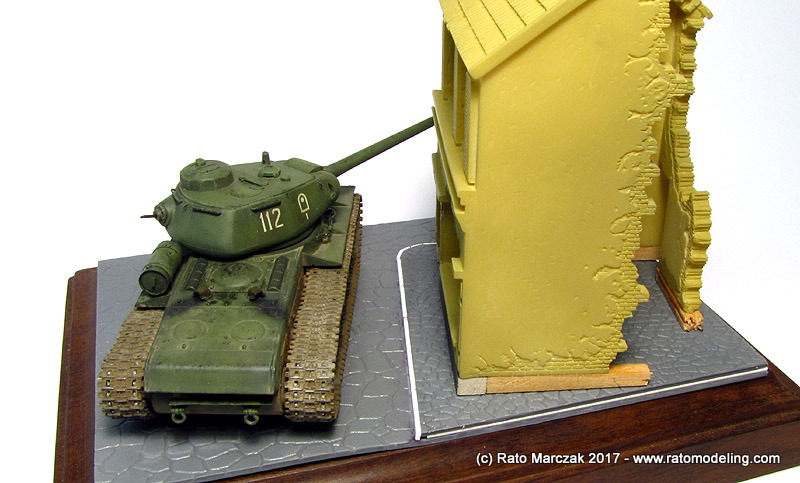
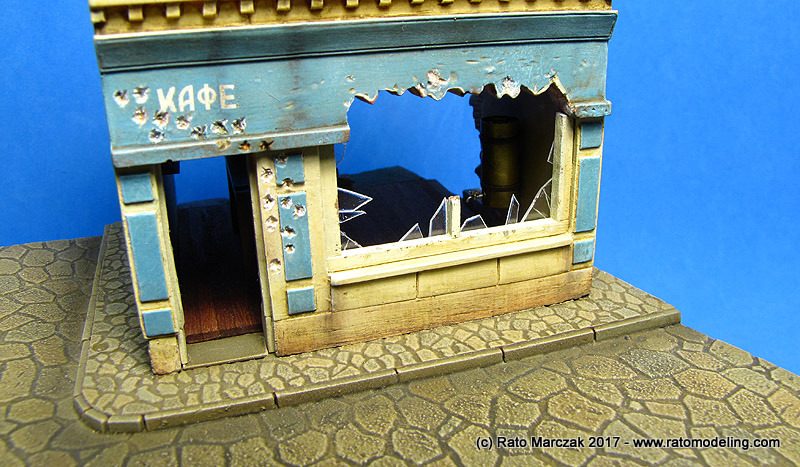
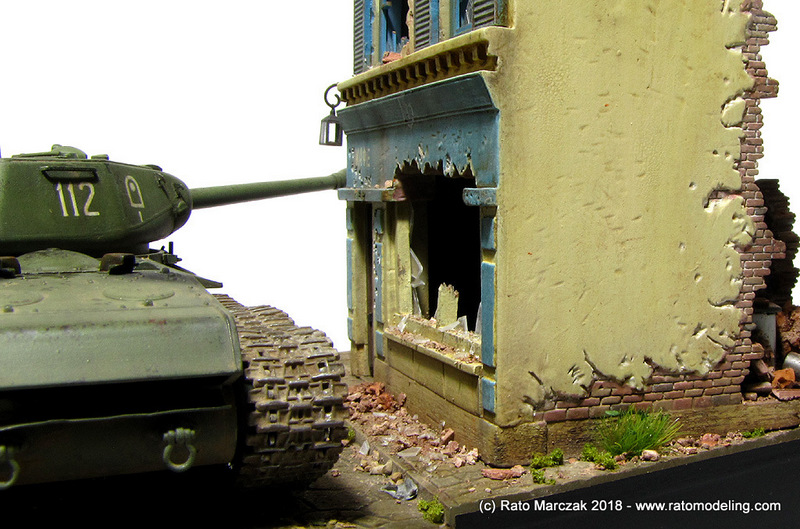
Moving on, it was time to think on a suitable base. It is a difficult choice, for as like I said, there are not many photos of KV-122s in action. I made a quick research - more on that later. After looking for what I had in hand, I found a resin item released a while ago by Airfix - European Ruined Café. The box states 1/76 scale, but I wondered if it is 1/87... Even an elf would not pass through the front door of the building. The model comes with photoetched frames for the windows, but is not quite realistic in some areas, probably to make possible its casting in a single piece. And the resin used is probably the same material used in the Tiger tanks armor - almost indestructible.
While gathering material for the base, I added the last bits to the KV. First, I had to fix the tooth of the traction wheel that were removed earlier because they would not fit the track openings. After scratching my head for sometime, I came up with the following solution.
I cut small slices (approximately 0.75mm wide) from a 1mm soldering wire. Since the tooth should look polished due to abrasion, and solder wire oxidizes with time, it was treated with a Metal primer before slicing:
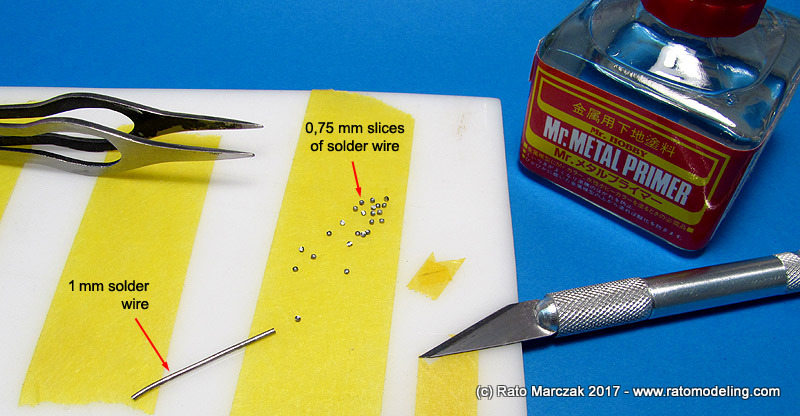
The slices were then inserted in the empty openings of the tracks and fixed with a small dab of flat varnish. Worked like a charm... and so easily:
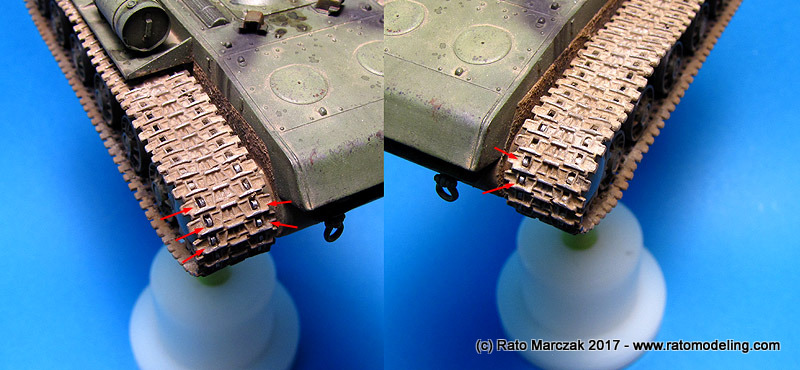
But they were a tad too bright in comparison to the rest of the track, so I knocked down the shine with some pigments and water. Much better:
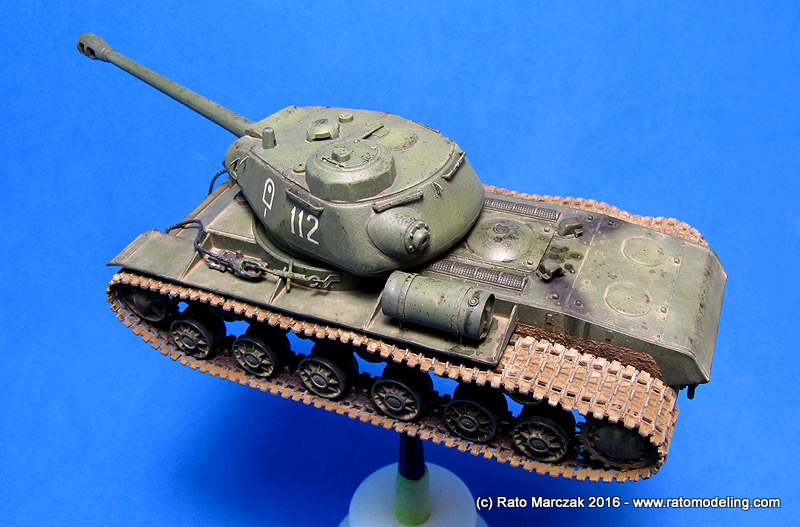
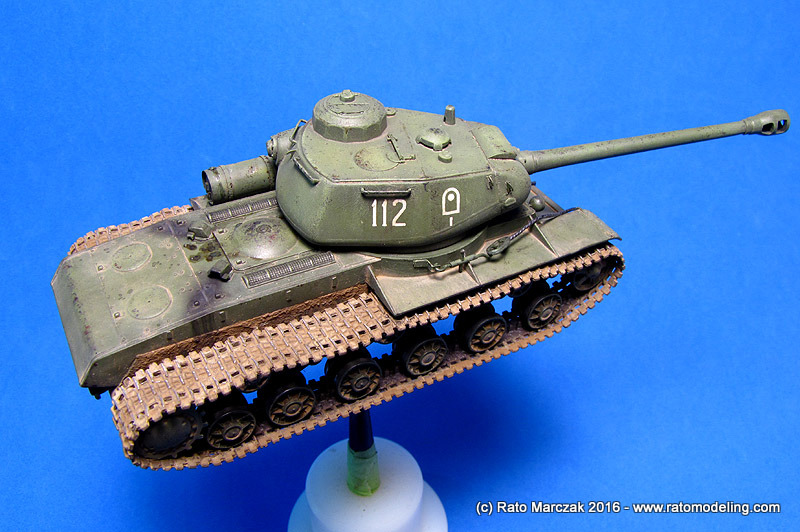
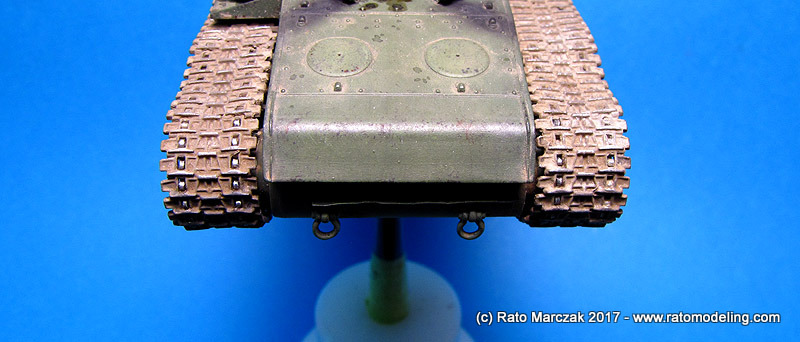
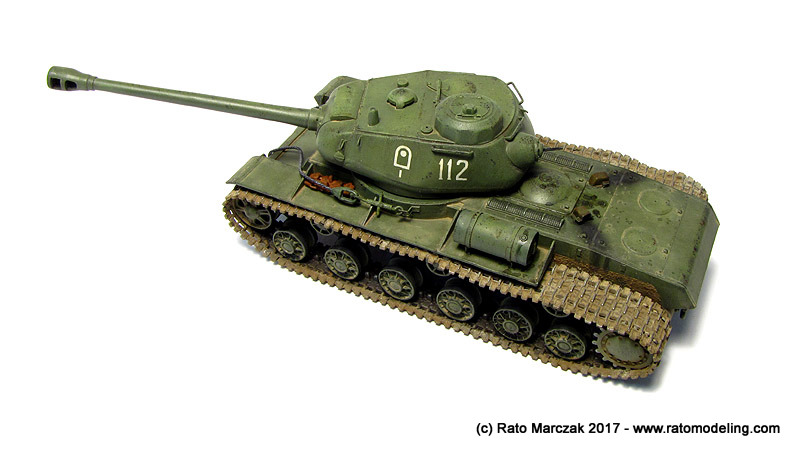
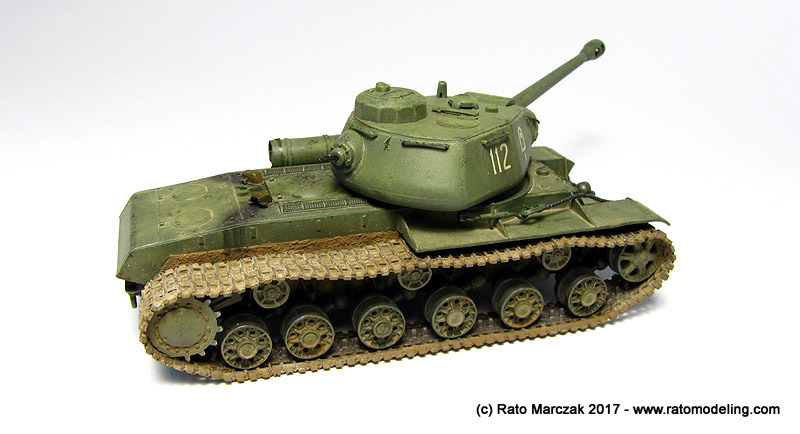
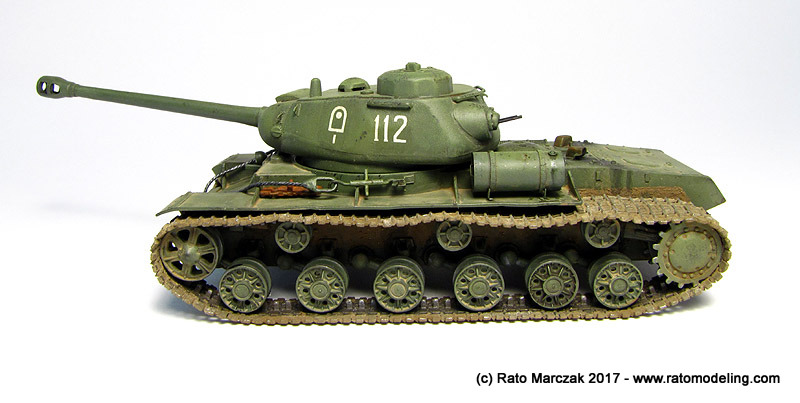
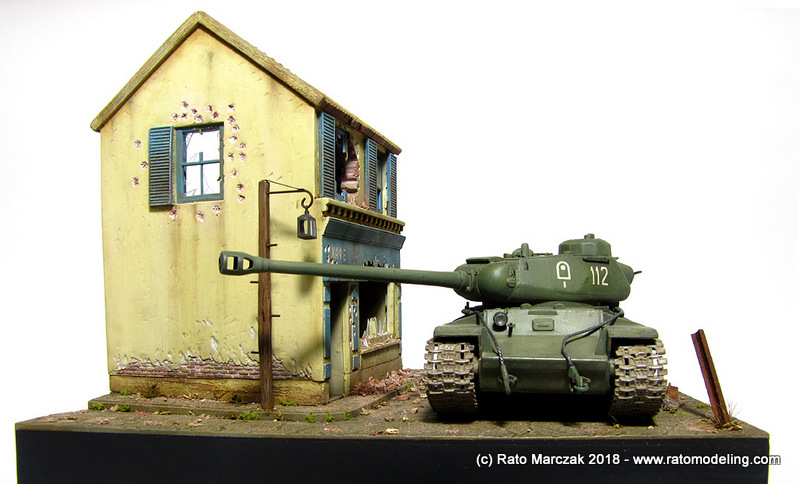
The last two item added to the model were the scratchbuilt front hull and rear turret machine guns. And that was it. Before continuing with the display base, here are a few photos of the finished model, at last:

Looking at wartime photos, I realized that the exhaust stacks were not right. Ces't la vie... blame PST, but not me... Wow, it rhymes!!! Am I a poet or what?
Achtung KV...
In case you are wondering about the plans for the display base, here is a glimpse of the initial idea:

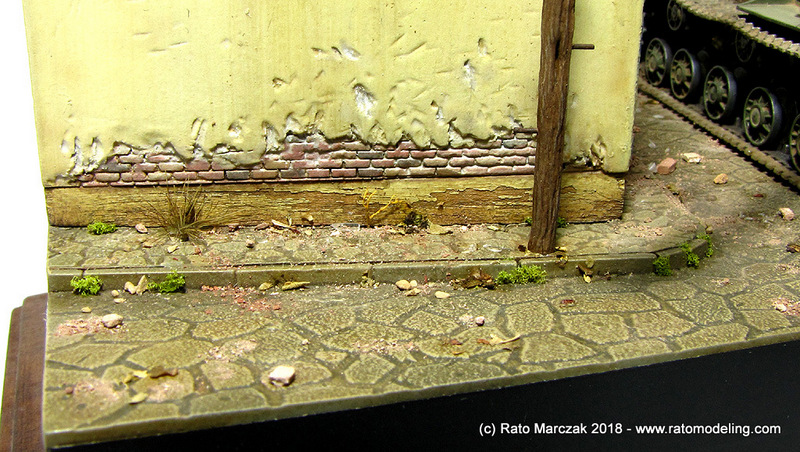
Like most of my projects, this one had a long halt waiting for some spare time. Once it came, I started working more seriously on the base. My first task was to raise the vignette two inches or so above the wood base for a better visual effect. For that I had to build a rectangular box and glue the paved street, walkways and house base using injected plastic sheets with different stone block patterns. There are several types, and they are used for architectural purposes. I prefer to work with them whenever possible because they accept plastic cement and are somewhat flexible. On the other hand, the texture details are a tad too shallow...
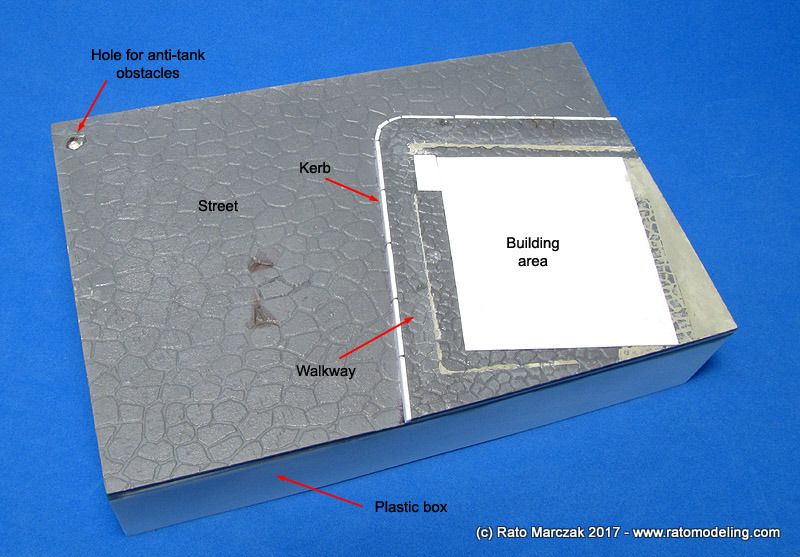
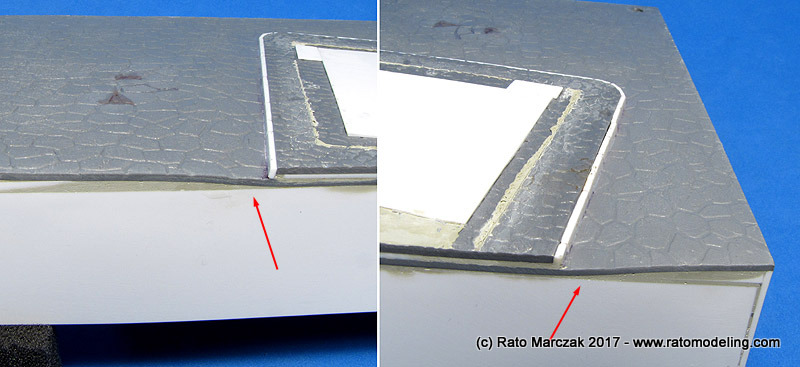
One thing that I constantly see in dioramas and vignettes containing streets and walkways is the lack of transverse street slope to allow the water to flow along kerbs. I represented the effect by sandwiching plastic shims between the pavement and the box top. Once the glue was set I puttied all seams and sanded everything smooth.
Another interesting trick I use in such situations is to temporarily glue the house to its position using white glue, putty the seam and then remove the house. This allows me to produce a 'controlled crack seam' where the building meets its base, emulating the cracks we see in real life, but without excessively large gaps:
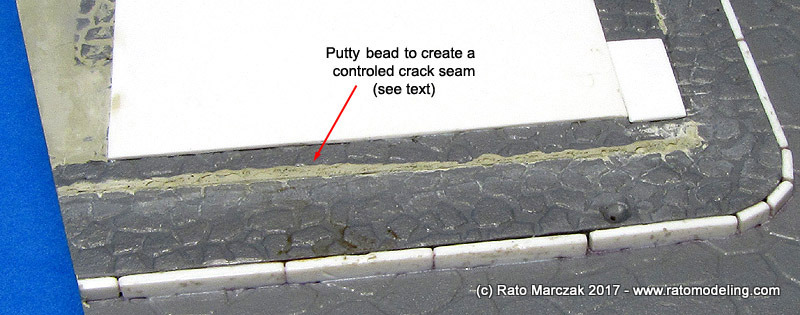
Mind you, these initial steps were not as easy as they may seem. The house was not perfectly aligned to an horizontal line, I mean, its base line was slightly angled, as if the house was built on a terrain with a small slope. So the plastic box was not a perfect hexaedron...
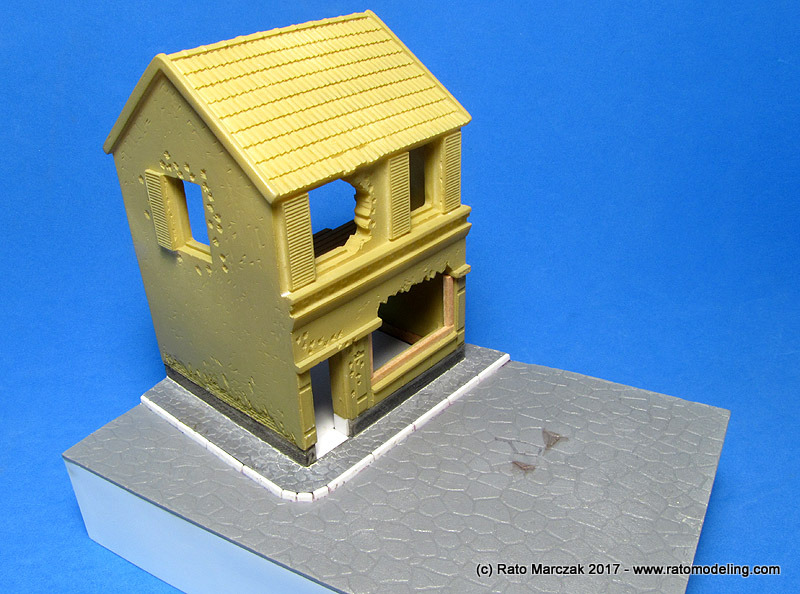
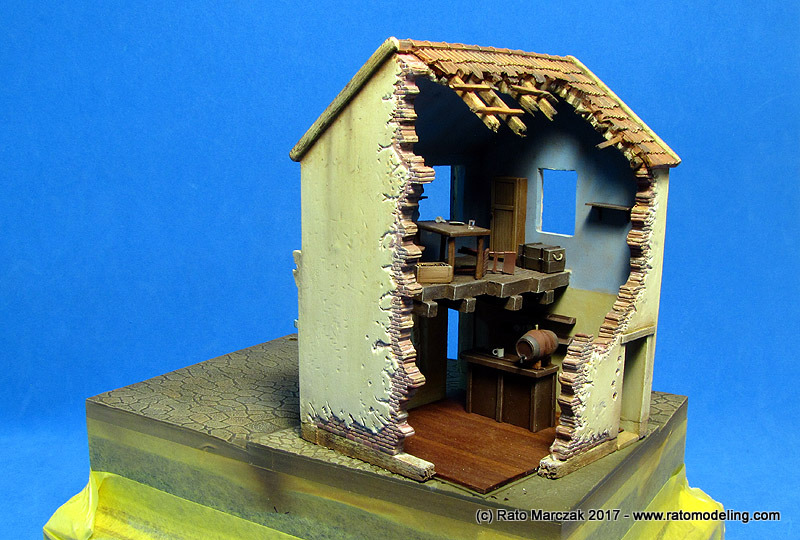
The house piece was cleaned and primed. I had to increase the wall base height by gluing 5 mm wood sections. This made the door heights more close to a 1/72 scale. I also added remains of the wood structure in the destroyed part of the roof. At this point I could test fit the house - or the Kafe - on its final position:
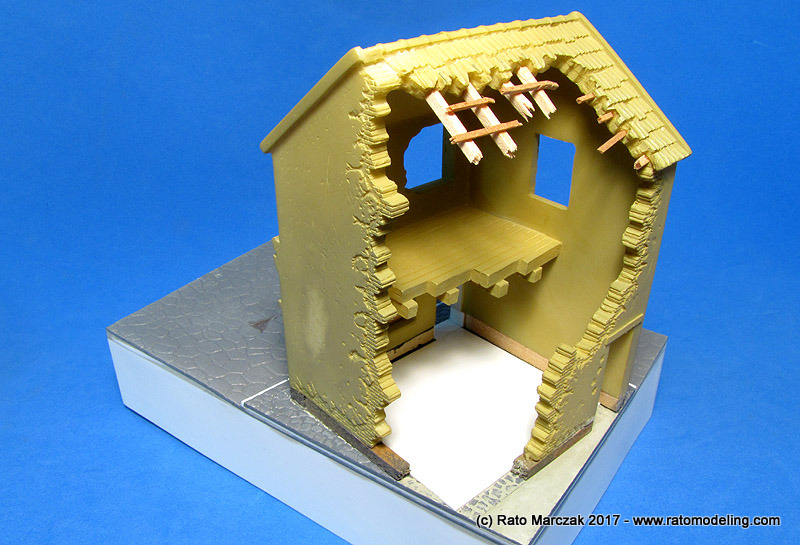
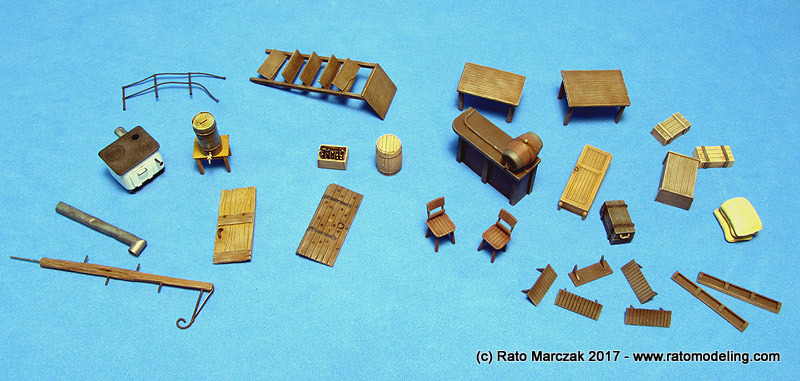
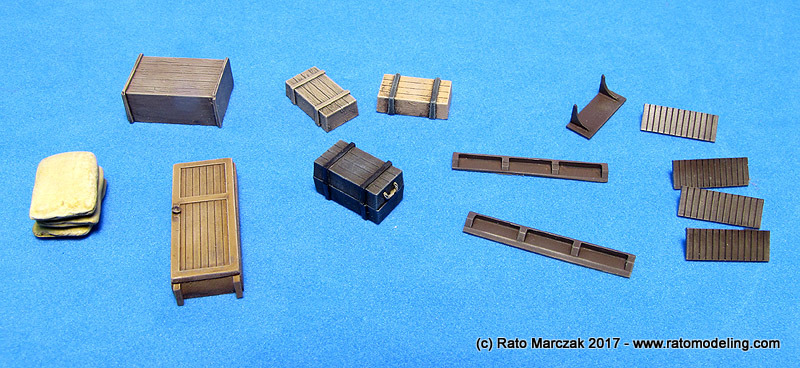
The next step was to prepare the several items which would decorate the interior of the coffee house, even though it was partially destroyed. I needed some furniture, accessories for coffee, wine, food, and of course things that we possibly would find in such places. Some structural items were also necessary, but the initial idea was to represent a place in a small town with no electric energy... Wood didn't use to last long in such places. Well, back to the detail parts, this is was I did (everything you see in the photo below was scratchbuilt except for the tables, one door, the barrel and some crates):
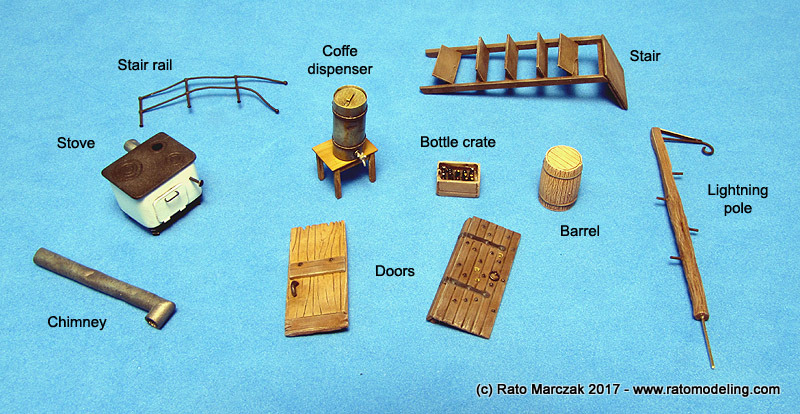
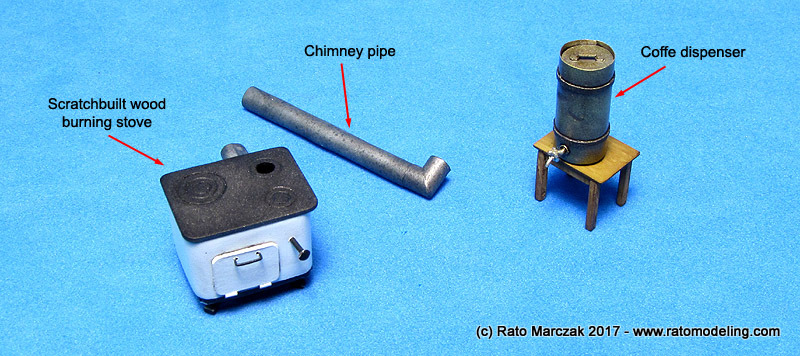
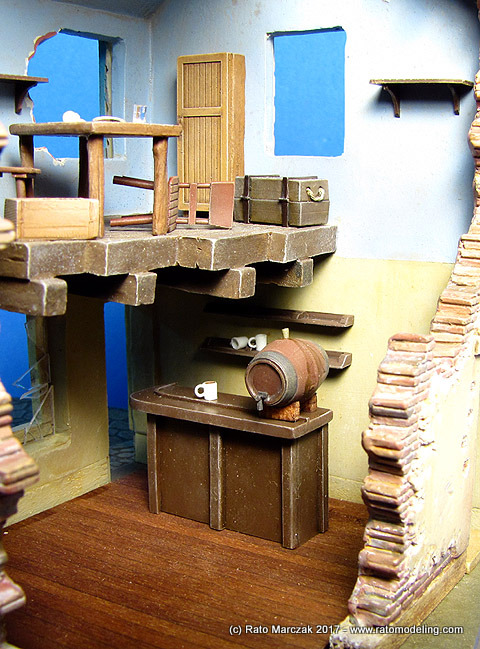
Let's check some of these parts in detail. Although by the time I made these parts I wasn't quite sure about their use or where they would be used, I elected some elements as indispensable for the picture I had in my mind. First, I wanted a wooden stove an one of those vintage coffee dispensers. The stove would be necessary to boil water and cooking, and the coffee dispenser is what gives the name to the business. By the way, the coffee dispenser was scratchbuilt from one of the fuel tanks left over from a PE fret for KV tanks...
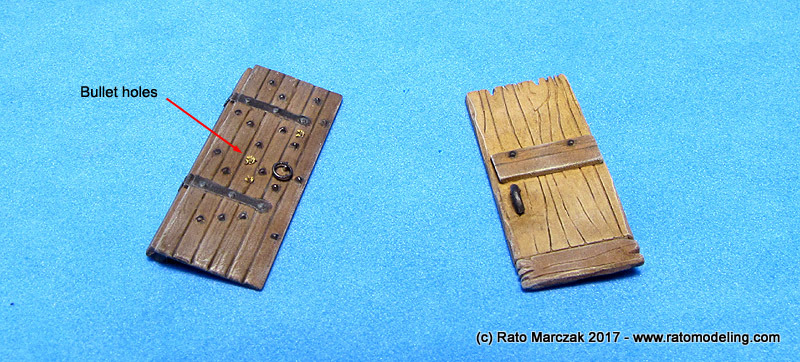
Other items needed were the doors. I scratchbuilt one of them and the other (the darker one) started as a railroad item with details added, including bullet holes.
Well, sure part of these things would be buried under rubble, but here they are:
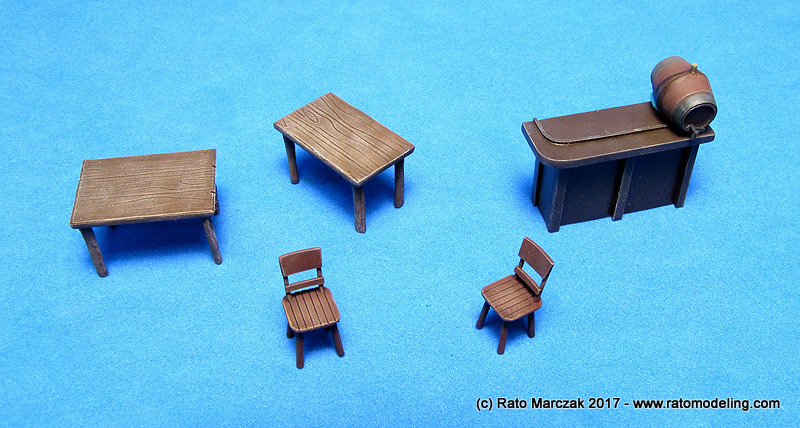
The furniture is basically composed by wooden items: tables, chairs, balcony, chest, crates, cabinet and shelfs. The tables came from an old Esci diorama kit. The wine barrel is a railroad details and the crates came from an old Hasegawa accessory set. All the rest is scratchbuilt:
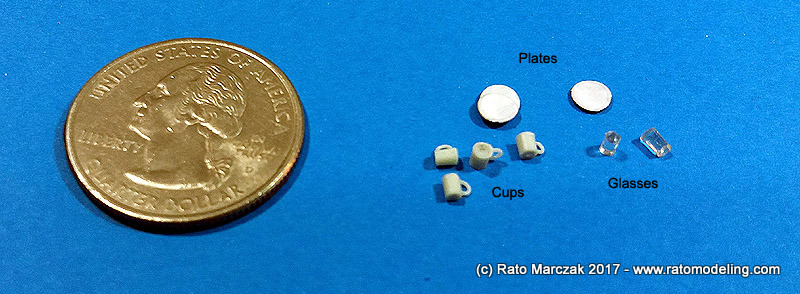
And since it was a coffee house, glasses, cups and plates were also in order. Not perfect, but tolerable for 1/72 scale. No cutlery, though... they were all stolen, I was told. Rats!
At this point I could start painting the structure. Not an easy task, as much of it was destroyed, exposing mortar and bricks... I didn't had all that experience in painting these things, so I had to learn some things on the fly. My research led me to the region of Zaporozhye, formerly Alexandrovsk, a city in southeastern Ukraine in mid-1943. That is the most probable area and time of the use of the few KV-122s by the 8th Guard Tank Corps, during their offensive in the direction of the Dnieper river. I chose a small village nearby and tried to make a color image of the scene I wanted.
For the house, I have chosen a cream yellow for the exterior, with windows and details in a shade of pastel blue. This is what I ended up with:
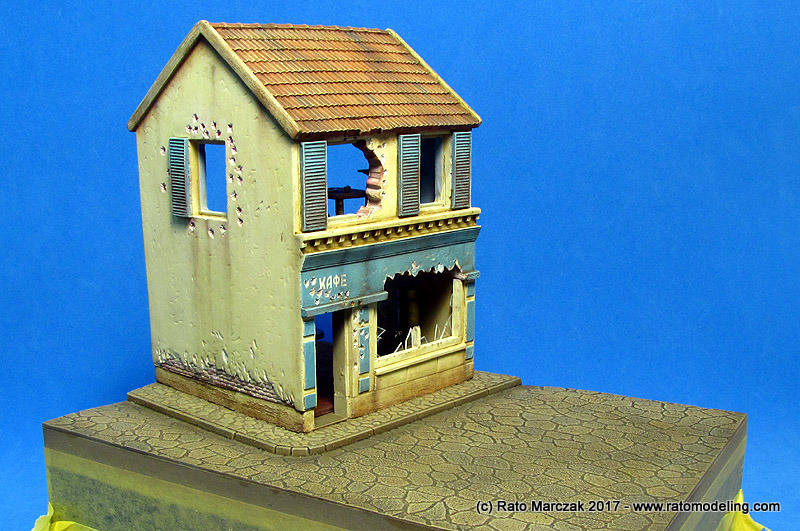
I used a lot of filters, washes and paint chipping. Streak/rain marks were also used abundantly. I wanted to depict what was probably the only paint job that the small coffee house ever had. Two important things to remember were that several details represented painted wood, therefore they must be painted with wood color beforehand in preparation for chipped paint effects. The other thing were the exposed brick & mortar, making the painting more complicated. More on that later...
 :
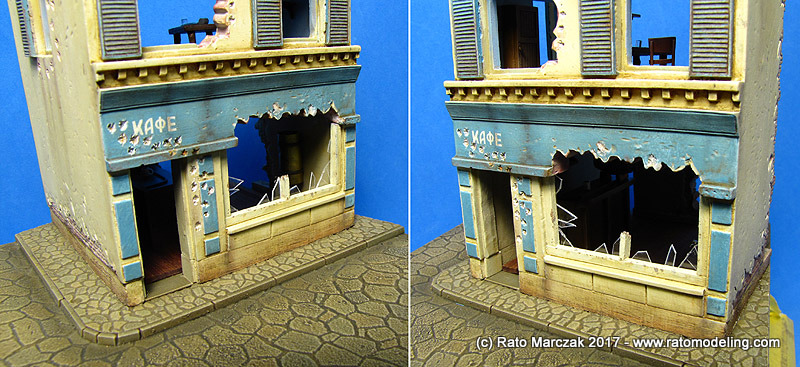
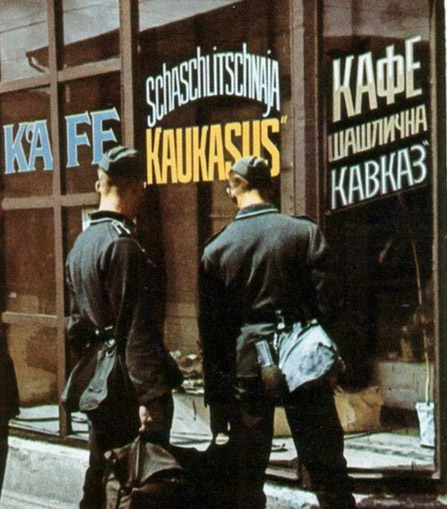
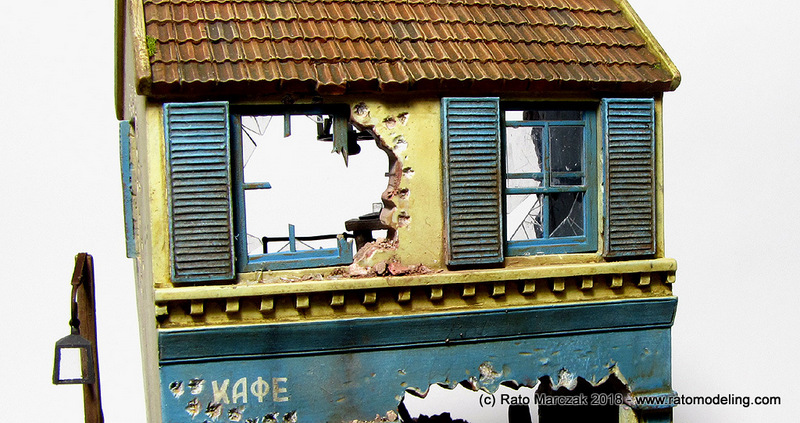
:The facade of the coffee house was painted by hand using pastel blue, taking advantage of the raised details. You don't need absolute precision here, it was painted by hand in the real thing as well. I improvised a lettering in Cyrillic, based on a period photo taken in Ukraine during the war:
Now let me take you through the particulars of the main painting stages.
The first area to be painted were the streets and sidewalks. Cars were a rare thing in countryside Ukraine, I mean, except for ox carts, probably most of the traffic by then was composed by Wehrmacht vehicles. I used essentially dark brown tones to depict a paved street which has not seen much abrasion. The areas along the kerbs were painted with a darker shade:

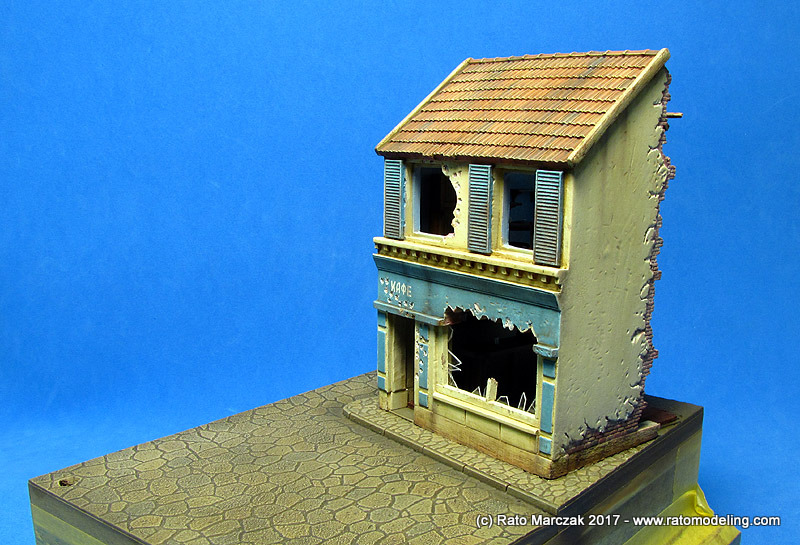
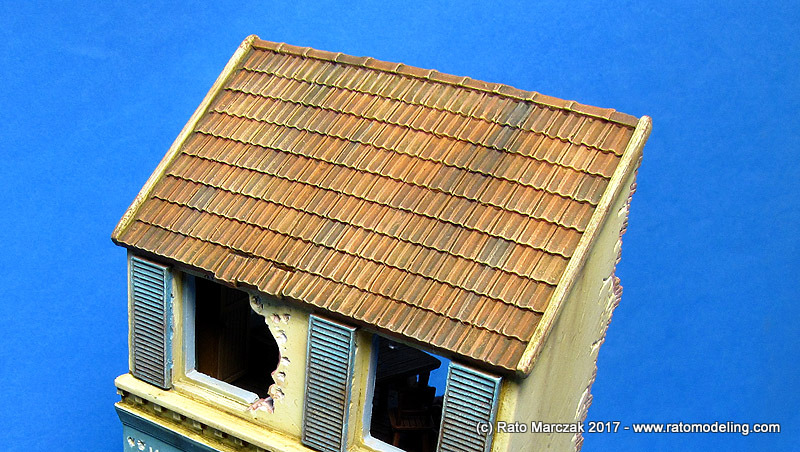
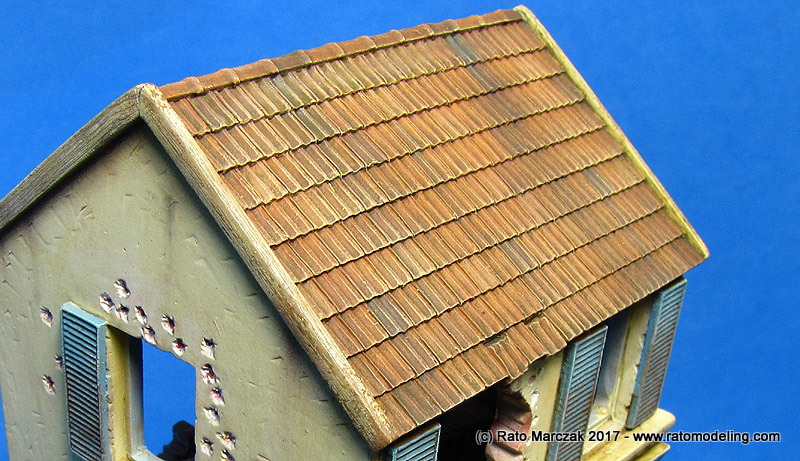
The roof was a lot of fun. I really mean it... No worries whatsoever, I just bush painted several shades on randomly picked shingles over a base color. Then an aggressive dark brown wash and the mandatory rain marks. After a flat coat, an orange drybrushing brought the relief to life. The lateral beams of the roof were scrubbed to show the wood color underneath and finish the job there.
Not bad for a single piece, resin cast structure:
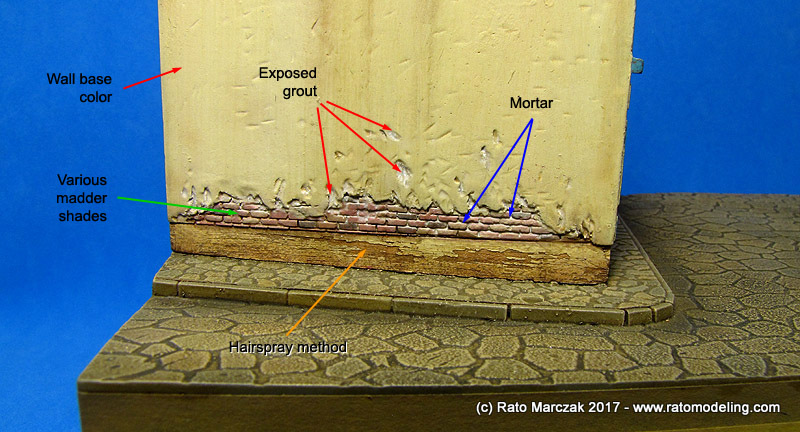
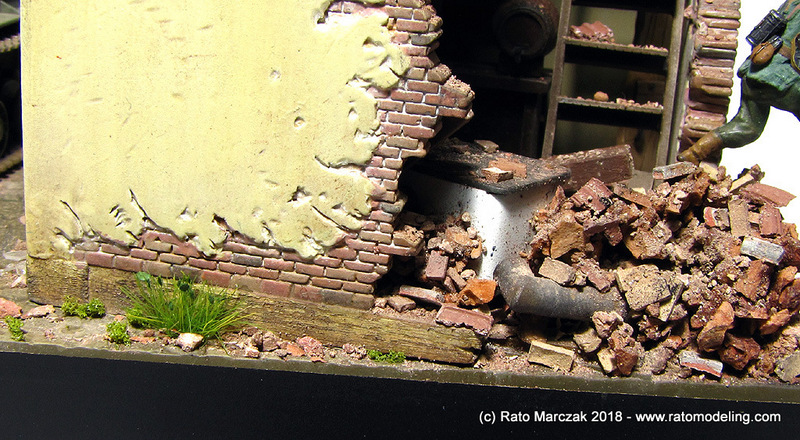
Like I said, exposed brick & mortar makes the painting of any structure more difficult. After painting the base color (cream yellow). I hand painted the bricks with madder color, then went back picking up a few individual ones with darker and lighter shades for a better visual effect. You have to be aggressive in the color shift, because the effect will attenuate significantly after washes, drybrushing and flat coat. Once finished with the bricks, I painted the exposed areas of grout fallen from the walls (not between bricks) and cracks with light gray - a time consuming but very important step. A simple method to paint the mortar between the bricks was used in my Retreat diorama: after painting the bricks, all walls were protected with a good coat of gloss automotive lacquer. Then I prepared a gray oil sludge - thinned to the point of an enamel paint - applied like an oil wash over the recesses between the bricks without much care. A piece of old T-shirt stretched over my finger was rubbed over the walls while the sludge was still wet. This cleaned up the excess paint over the bricks leaving the gray oils in the recesses, only. Wooden areas were treated with the hairspray method:
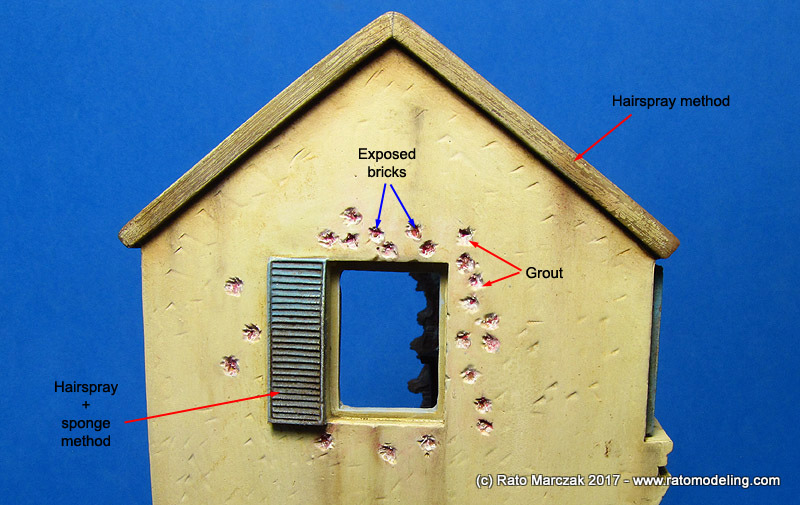
Similar technique had to be applied at the spots hit by bullets. The impact will destroy part of the grout, revealing the brick underneath. Therefore, besides the base color, you have to paint the shallow areas of the spot in light gray (grout) and the deeper points with a touch of madder color. I frequently see this particularity missed by most modelers:
The upper floor window frames came from a railroad detail set and would be added later. The front window frame was made out of balsa wood pieces and decorated with shattered glass cut from an 0.25mm Evergreen clear PS sheet. I should have put a bit more of work there, but...
With the basic structure painted, I could start to study the arrangement of the stuff inside the building. In order to start so, a stained wooden floor from model ship planking was glued to the base and the housing was finally cemented to its position. As for the several items inside the house, I tried many configurations, but in the end I chose one without thinking much about it. After all, there will be a lot of rubble and dust on top of everything... This is my final study, still missing the stove, windows and doors:
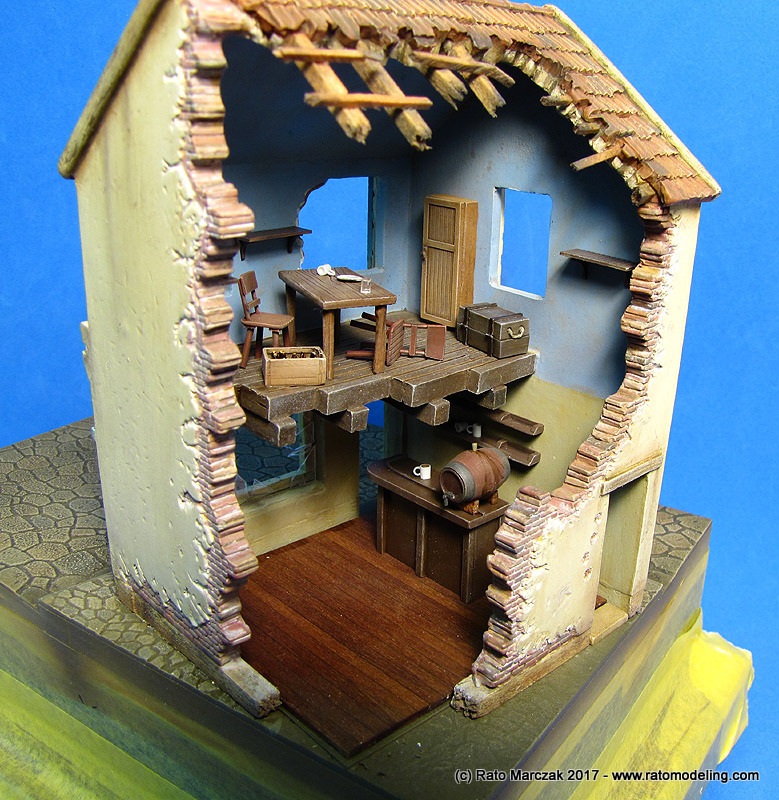
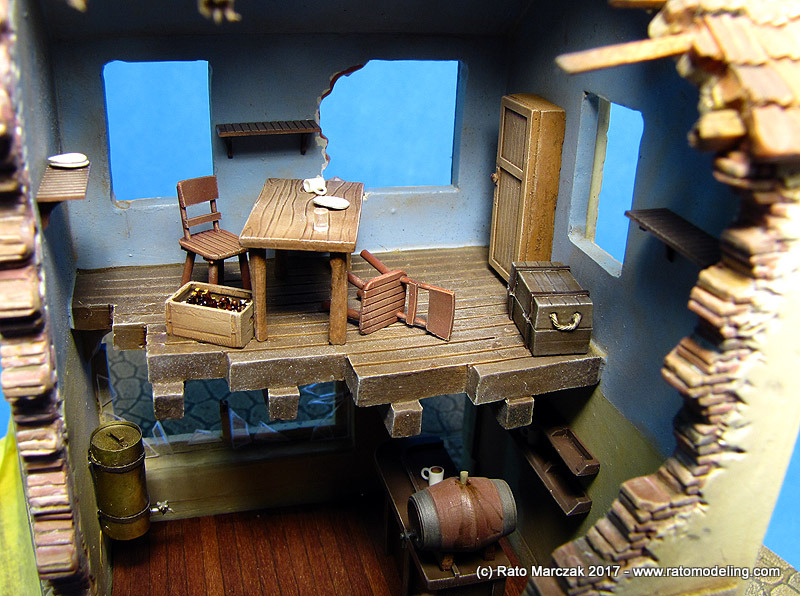
Don't ask me exactly what happened to that house... all I know is what you see: some walls have fallen, as has part of the upper floor and the roof. The locals looted wood pieces during the night... you got the idea.
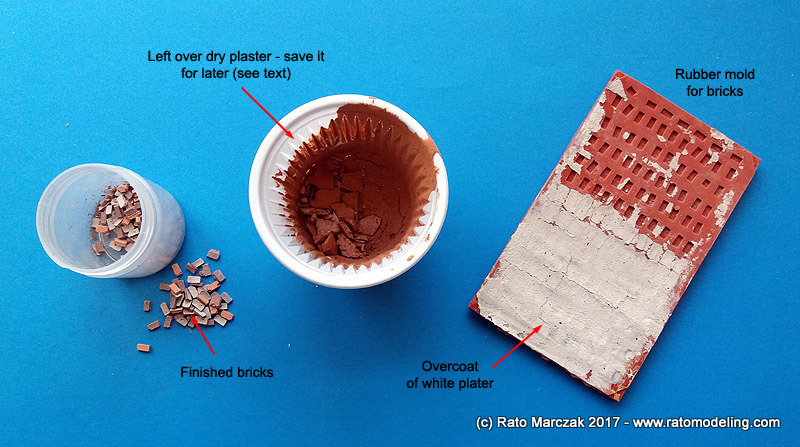
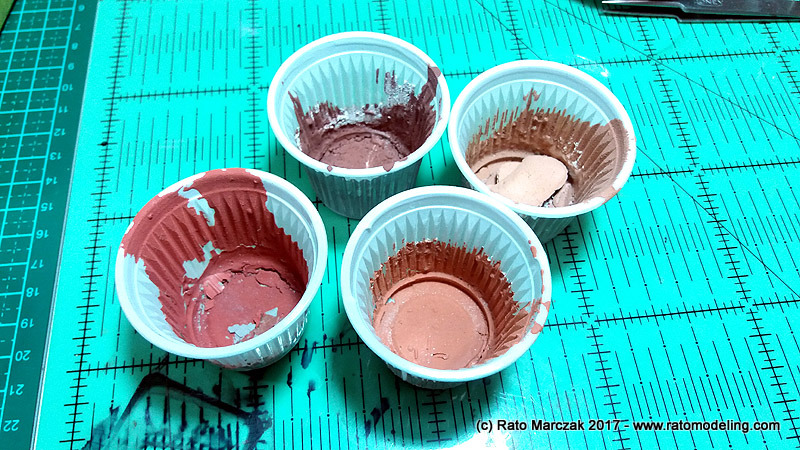
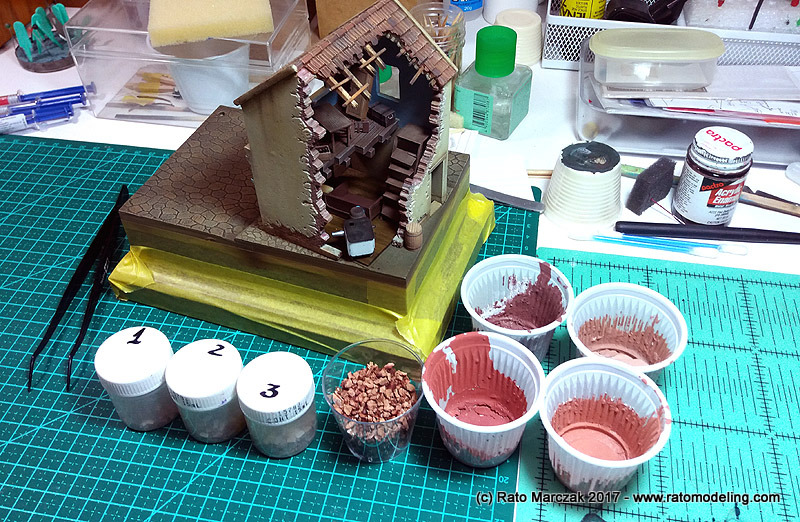
Everything in place, time to produce some rubble, bricks and dirt. I made a rubber mold to cast my own bricks in different colors. I used plaster for a number of reasons: (a) plaster would allow me to realistically break them into pieces to make a more believable and in scale rubble. (b) The bricks found in rubble are not new - they belonged to a destroyed wall. Therefore, they should have layers of mortar around them. I tried to simulate the effect by first spreading a thin mixture of gray plaster over the mold, then pouring the madder colored plaster, and finally applying another thin layer of gray plaster. This way, I made realistic bricks to be used directly as rubble. (c) Plaster is faster to dry than most resins:
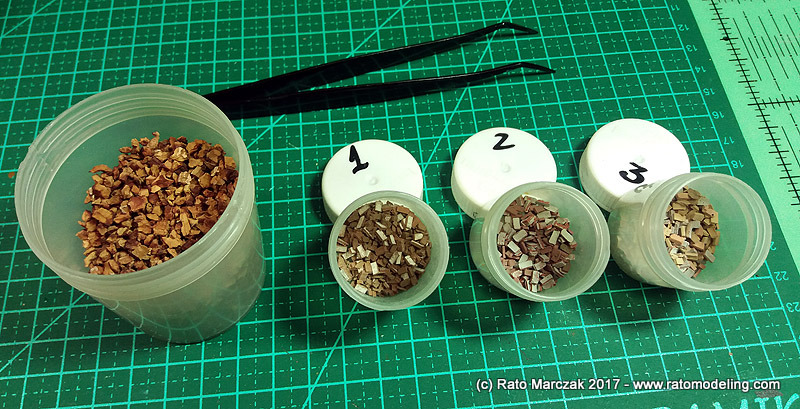
Using my little brick factory (accelerated by a kitchen oven) I was able to produce a good amount of bricks in three different colors - including a few 'new' ones. It would be a waste to use them under the rubble piles. I decided to save some with another trick: cork scatter. Railroad modelers use it for a number of things in their scenarios and I had some at home. The plan was to form the piles using the cork and sprinkle the bricks on top of them:
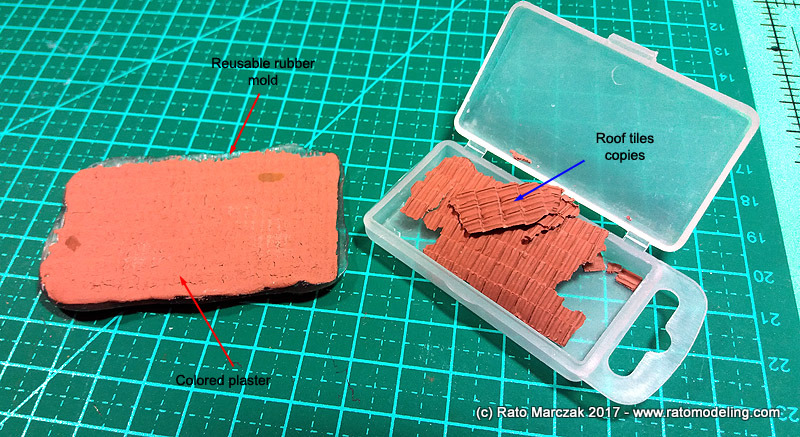
Another important item in every rubble recipe should be broken roof shingles. I needed a solution to make copies of the same type of shingle used in the house roof. My solution was reusable rubber, the type you heat and press over the original to make a quick mold without damaging the original. Once cooled down, plaster was used again to make copies of the shingles. Worked perfectly:
The bricks I made earlier were great, but I also needed some brick dust, and that was made by saving the dry plaster left over from the bricks fabrication to be ground later and mixed to the rubble. Since I made bricks and shingles of different colors, I had dust of several shades. Actually, it was not really dust, but fine rubble. That's why I couldn't use pigments... I needed something coarser.
All ready, here is a last glimpse of the coffee house in its pristine state before the gods of filth start to mess up with everything:
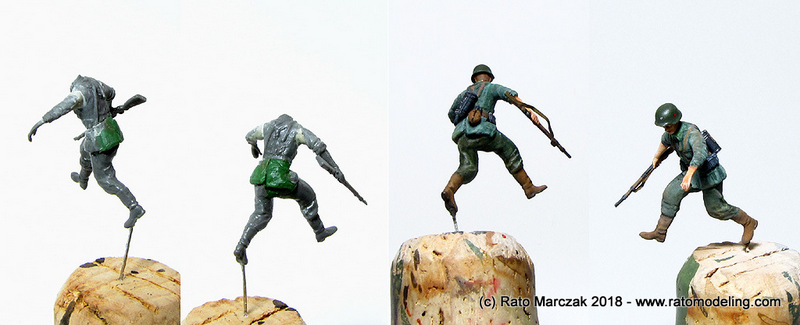
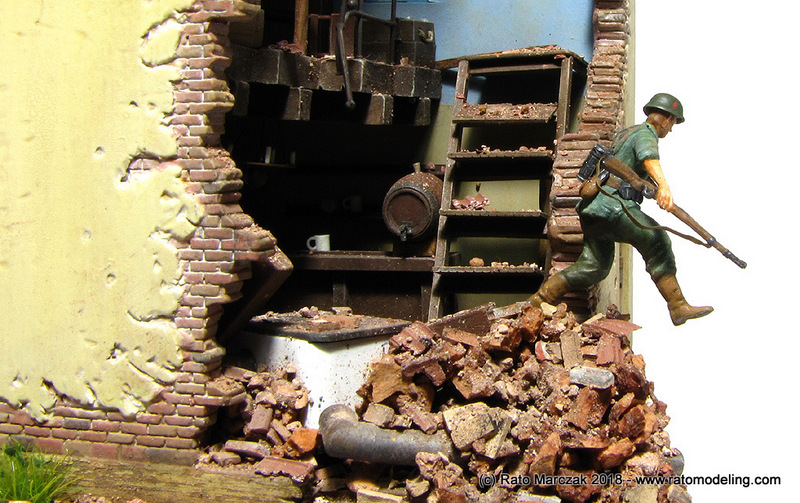
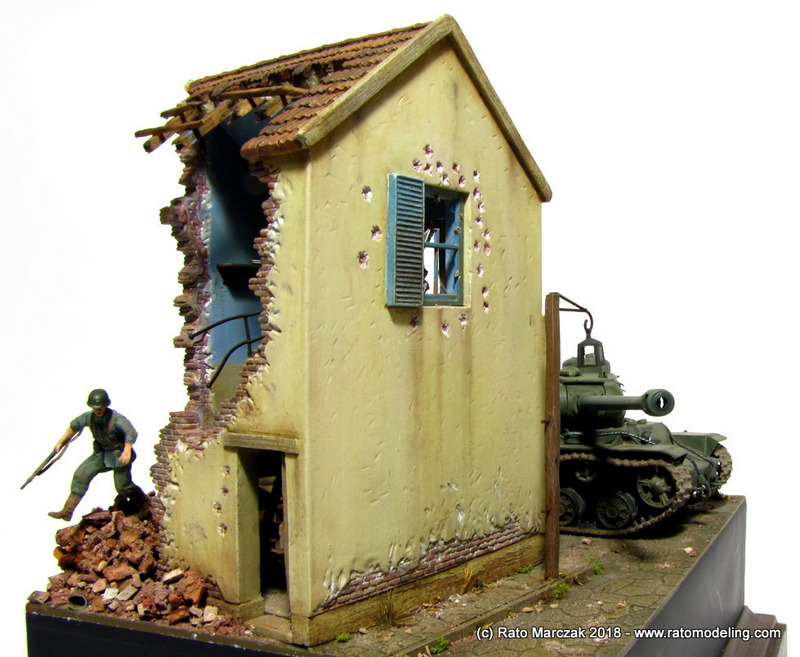
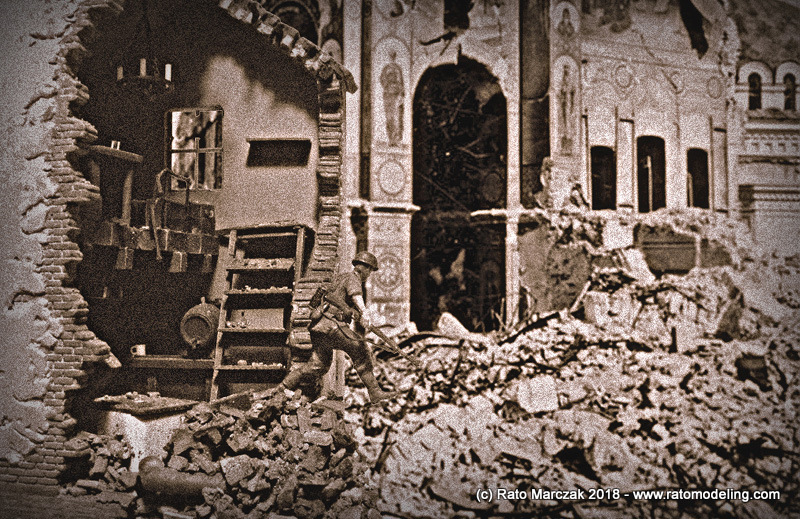
The last touch was a troop which I would put as the last man to abandon the building. I used parts from Preiser and other brands, plus some Green Stuff, and tried to pose him jumping across a big pile of rubble, in the best of Shep Paine's style (except for the scale, of course)...
I'll skip the boring come and go steps that came next. You all know realistic scale scenes are built by superimposing different layers of materials and effects, and here it wan no different. The first task was to make the rubble piles where it would make more sense, considering the scene. Along with that, a few structural fallen timbers were placed inside the house.
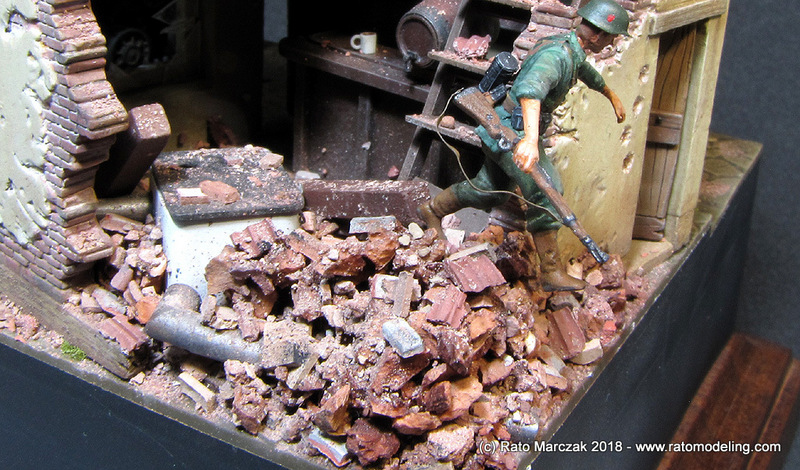
The German troop was glued to the top of what once were part of the back walls of the building.

Before gluing the mix of bricks, shingles and etc., I had of course to think about a credible order of falling for everything. But in the end you are only trying to make the brain of the observer confused... kinda planned mess.
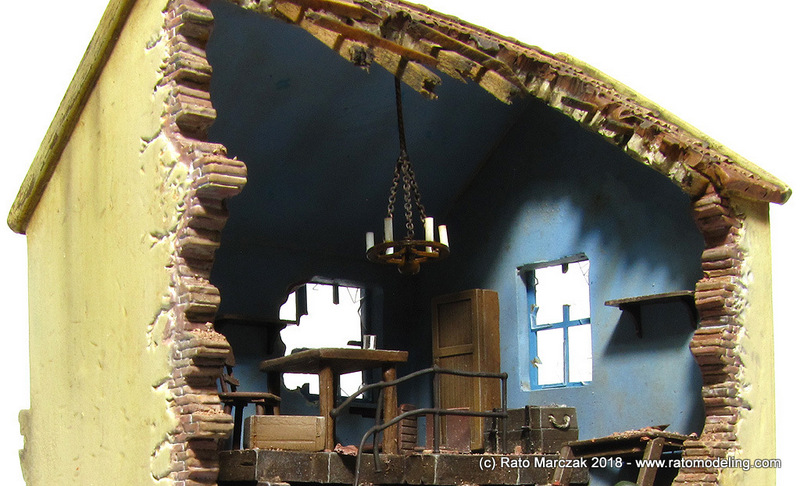
I addeed a torn rail besides the stairs and a few other details, but basically my job was to spread rubble on everything. I also installed a primitive chandelier supported by chains in the upper floor and a simpler version on the ground floor:
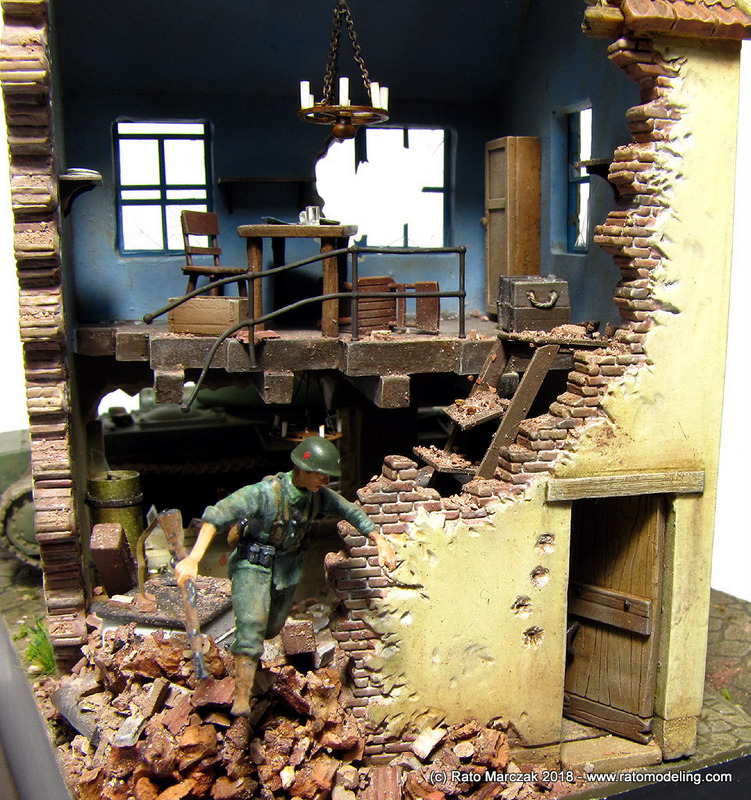
The next step was to install the window frames, which came from a Tichy Train railroad item, and all that broken glass resulting from the shoot-outs. I started making the shattered windows using pieces of transparent styrene, but a much better solution came out incidentally: my daughter broke her iPhone display and I stole the useless part to make... yes, you guessed it! Nothing better to simulate shattered glass than shattered glass. I used it around the windows frames and wherever gravity would send such pieces:
During the whole process, I would sift some fine rubble around the house. The I added some life in the form of small bushes and ground vegetation.
Then, some rudimentary dragon teeth were made using 1/87 rail treated with an oxidizing solution. Again, real rust simulating scale rust:
Of course I repeated some of these steps until happy with the results. I could do a couple more things but you know plastic modeling - we are never fully satisfied.
At this point I just looked at my ongoing projects and decided to declare this one done...
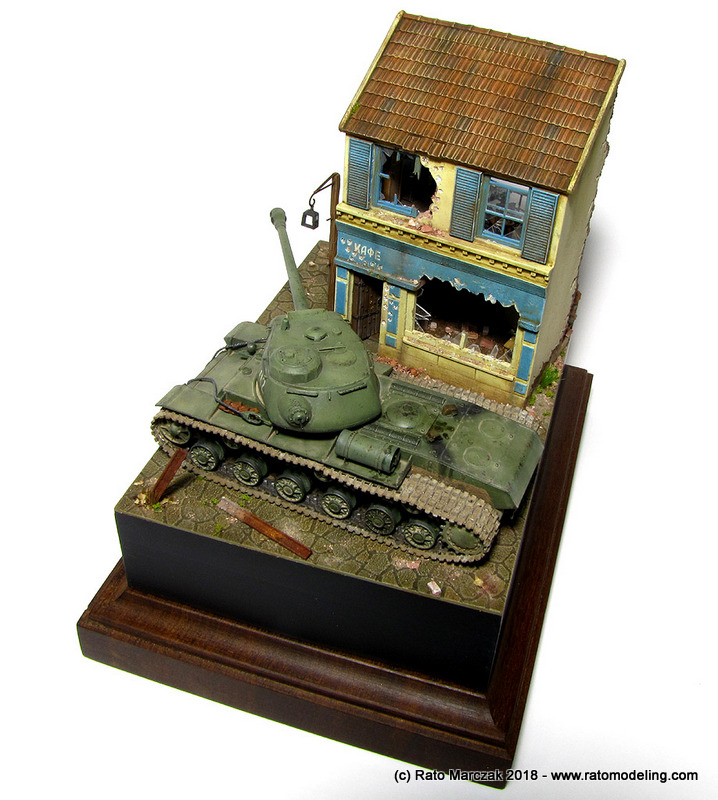
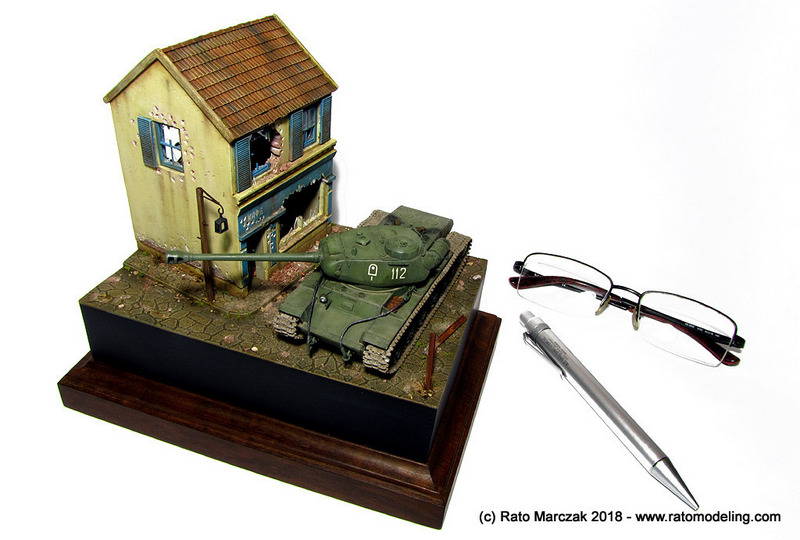
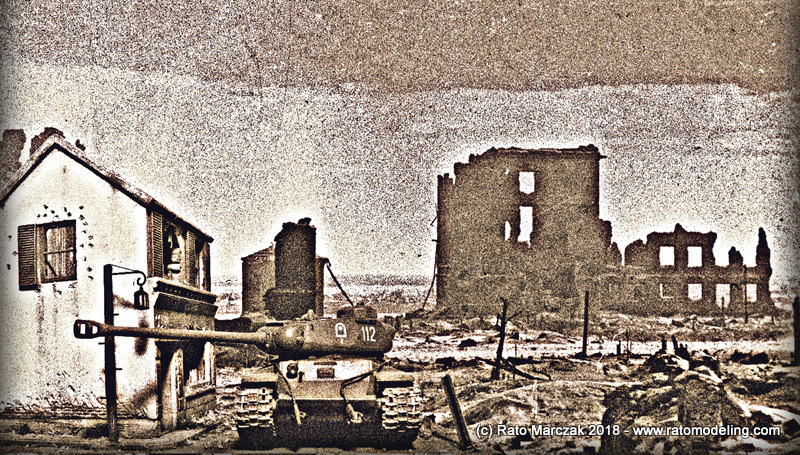
Some extra photos of the little diorama. I'm too lazy to chose a few:


And evidently I played with Photoshop a little...
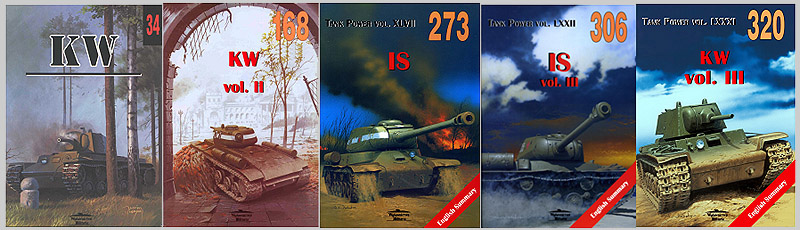
References
There are not many books about the KV-122, if any. I found a few volumes of the Wydawnictwo Militaria Tank Power collection useful for this project, though:
| Technical file | |
| Kit:
|
- PST #72009 |
| Additions:
|
- OKB Grigorov resin detail set S72051 - Tracks for KV, 700 mm in 1/72 - Part P72-011 - Photoetched detail set of PST ISU-152 in 1/72 - Hasegawa/Minicraft FT32 - Field Camp Equipment - Diorama Accessories in 1/72 - ESCI 8060 - Diorama Accessories in 1/72 |
| Basic
colors: |
-
Primer: Vallejo Dark Green primer - Camouflage: mix of automotive lacquer colors - Tracks: Model Master Track Brown #2150 - Flat finish: Testors Model Master Acryl semi-gloss |
| Notes: |
-
Many scratchbuilt details (see text). - Some railroad scenary items used. |
Rato Marczak © 2018
