| Revell Me-109G-10 in 1/72 |
| Started: February/2010 Finished: November/2011 |
This
article is about another combatent rescued from my shelf of doom. I
started this kit while
living in US, mostly to kill some spare time. Keeping my promise to not
start a new kit until I reduce my stash of halted projects to an
acceptable number, here you have the whole story.
First off, I know there are the nice Fine Molds kit of the Bf-109G-10 in 1/72, but as I said, I grabbed the Revell one from Avenel Hobbies' shelves more to keep my modeling skills barely sharp than anything else. Ok, this is a lie, I did intend to finish the model then... Anyway, the Revell offering is a decent model, except for the bare cockpit and the useless canopy. The propeller seems wrong, too. Another problem found in my sample is that for some reason one of the sprues came smeared with some kind of grease (mold release?), and that stuff attacked the surface details. More on that later.
The panel lines are recessed, and the model depicts reasonably well a Gustav-10. I checked a few hatches and other characteristic details, but I'm no Messerschmitt expert by any means. Stock markings are for a Defense of the Reich bird, and well printed, although a bit thick, as you probably would expect from Revell. The registry is good, but the stenciling letters are too heavy for the scale.
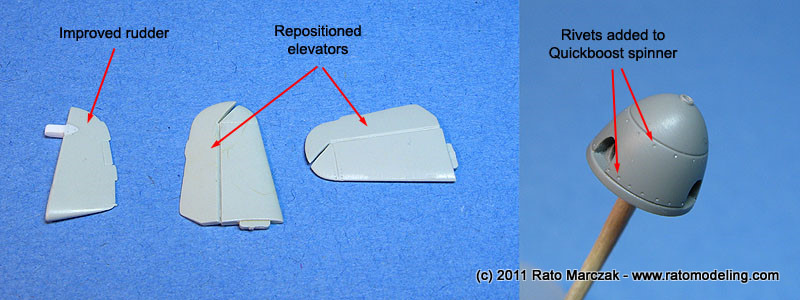
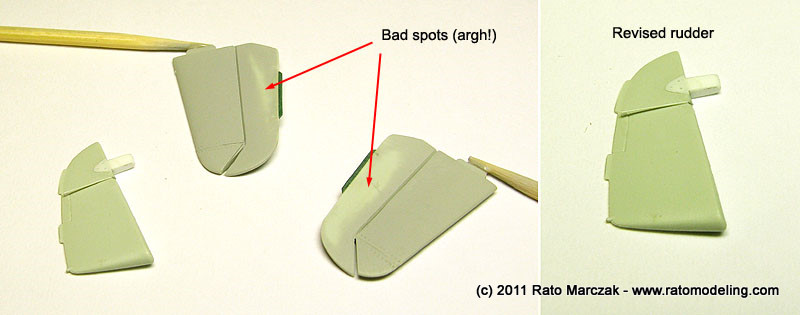
Revell added a semi-circular line of rivets on both sides of the cowling that I couldn't find in any photos. So I filled them with putty and sanded flush. The rudder was removed at this point:.

First off, I know there are the nice Fine Molds kit of the Bf-109G-10 in 1/72, but as I said, I grabbed the Revell one from Avenel Hobbies' shelves more to keep my modeling skills barely sharp than anything else. Ok, this is a lie, I did intend to finish the model then... Anyway, the Revell offering is a decent model, except for the bare cockpit and the useless canopy. The propeller seems wrong, too. Another problem found in my sample is that for some reason one of the sprues came smeared with some kind of grease (mold release?), and that stuff attacked the surface details. More on that later.
The panel lines are recessed, and the model depicts reasonably well a Gustav-10. I checked a few hatches and other characteristic details, but I'm no Messerschmitt expert by any means. Stock markings are for a Defense of the Reich bird, and well printed, although a bit thick, as you probably would expect from Revell. The registry is good, but the stenciling letters are too heavy for the scale.
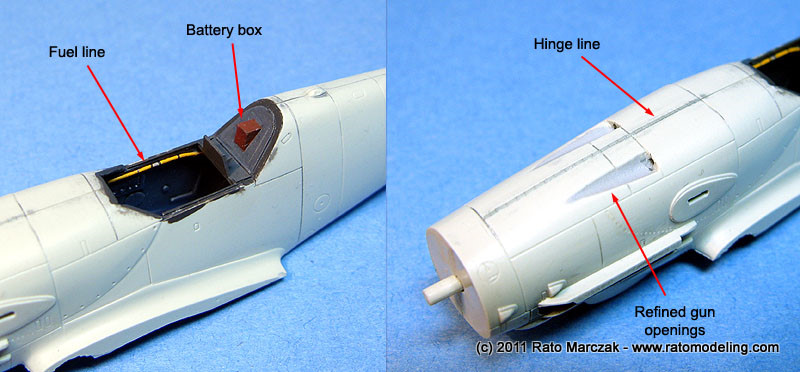
My first step was to improve
the cockpit and surface details. I added a battery box to the rear
cockpit and the fuel line along the starboard cockpit wall. These were
made with plastic bits and stretched sprue. I also used stretched sprue
to simulate the center hinge line along the cowling panels. This is a
simple trick: glue a length of stretched sprue along the hinge line,
trim it to size and wait the cement dry completely. Once the sprue is
secured in place, protect both sides of the hinge line with masking
tape. Then, using a micro saw or the tip of a hobby knife, score lines
perpendicular to the sprue to simulate the hinges. Try to keep a
regular spacing. Once done, remove the tape and brush some thin liquid
cement to smooth everything. Voilá... hinge lines like a breeze.
I also had to rework the gun muzzle openings, since the molded on muzzles were removed to be replaced later:
I also had to rework the gun muzzle openings, since the molded on muzzles were removed to be replaced later:
Revell added a semi-circular line of rivets on both sides of the cowling that I couldn't find in any photos. So I filled them with putty and sanded flush. The rudder was removed at this point:.
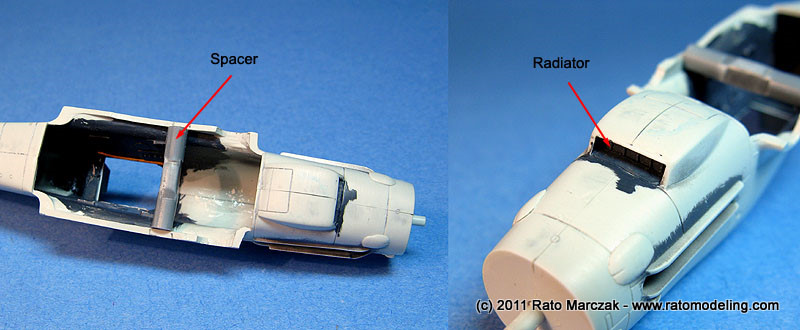
Test fitting revealed that a piece of sprue acting as a spacer would make the fit so tight that I wouldn't need any filler. Just pay attention to avoid changes in the dihedral. I also added a fake oil radiator screen and painted it in dark grey.
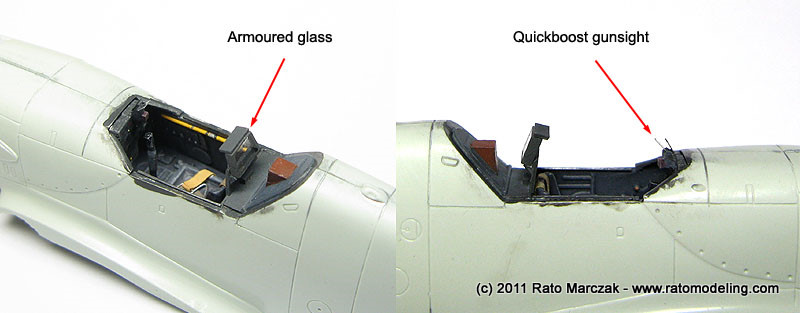
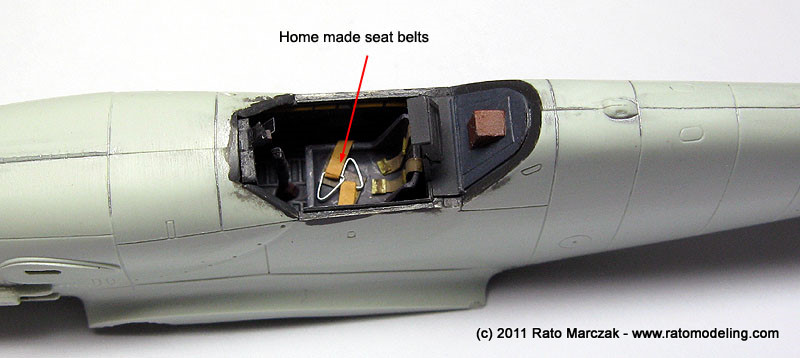
One of the advantages of the Me-109 is that in most kits you can insert the cockpit after glueing the fuselage halves. This one is the case, so I could avoid the inevitable sanding residue in the cockpit. I made an armoured glass from a CD cover, painted accordingly and glued it to the pilots headrest. The kits gunsight is very poor, and was replaced by a quickboost one. Small rectangles of acetate simulate the glasses:
Since this model would have the canopy closed, I didn't go crazy about the cockpit. I added, however, the pilot's harness from tape with buckles made with fuse wire. Not perfect, but they will do the job when viewed through the canopy:
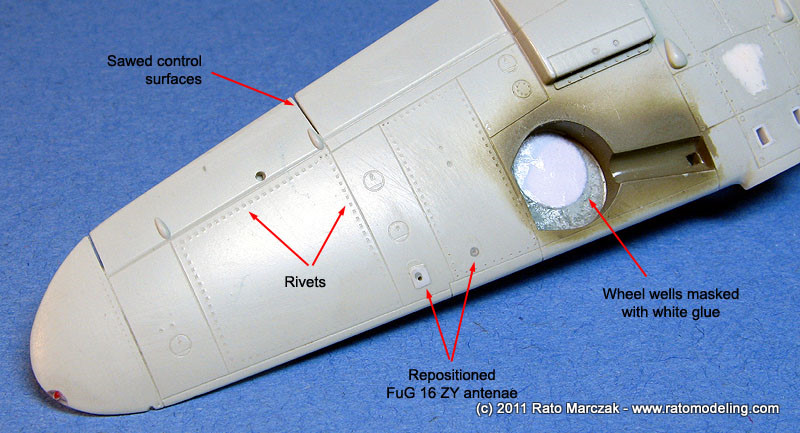
After assembling the wings, I noted that a small step would result on the center of the wing root joint with the fuselage fairing. A small piece of plastic increased the wings' cord just enough to fit perfectly to the fuselage. I also opened the empty shell casing channels all the way through the belly and refined their shape with small pieces of plastic card:

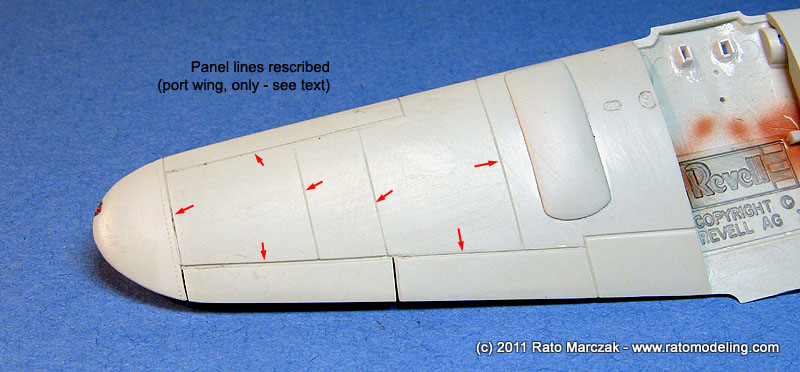
While working on the wings, I washed the parts several times with soap and water to remove the grease smears I mentioned above. After a final clean up with isoprophyl alcohol, I rescribed all panel lines on the upper port wing, since the mold release attacked the plastic on that part to the point of smoothing out most panel lines.
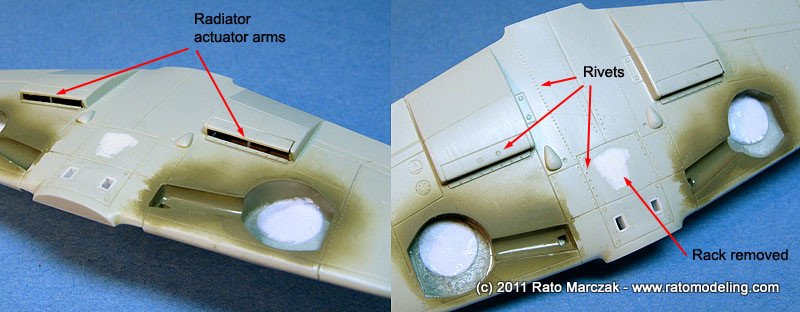
I also added rivets and fasteners, particularly along the panels which I planned to leave in natural metal later. I found out that the FuG16 anchor point was wrong in the kit, so I relocated it. The etc belly rack came molded with the lower wing, so I removed it and sanded the area flush.
New wingtip lights were made using a well known method:

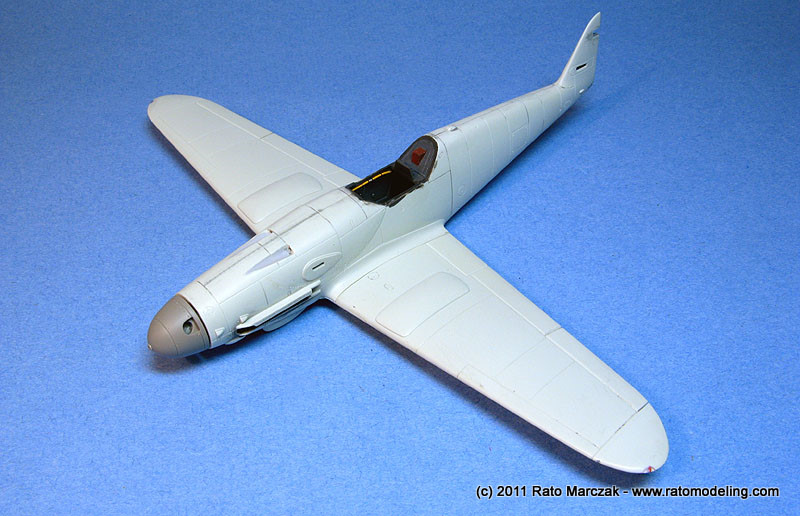
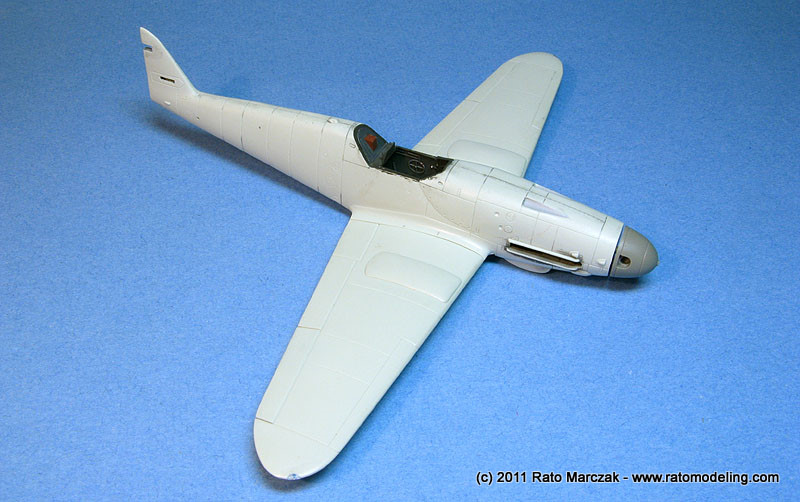
And the basic airframe was done:
Next, I took care of the smaller details. The supercharger air intake was improved by adding weld beads, panel lines and rivets. In retrospect, I think it is a tad too big, but I'll live with that...

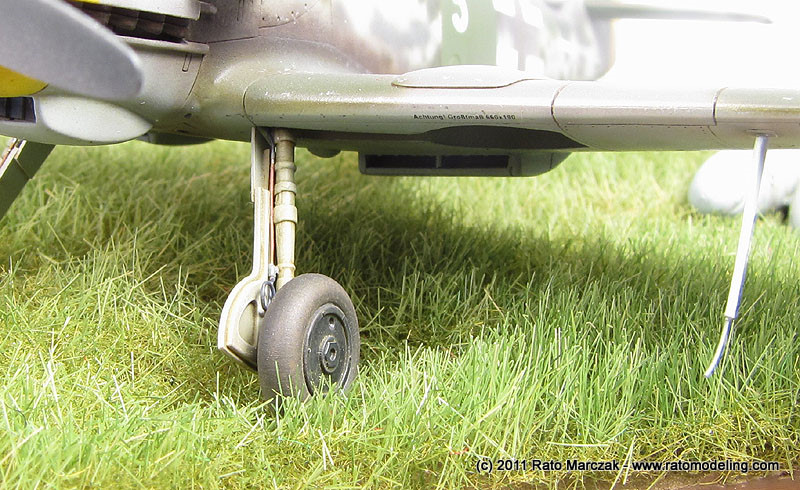
The landing gear doors were sanded to a more in scale appearance, while the remaining landing gear parts are stock:

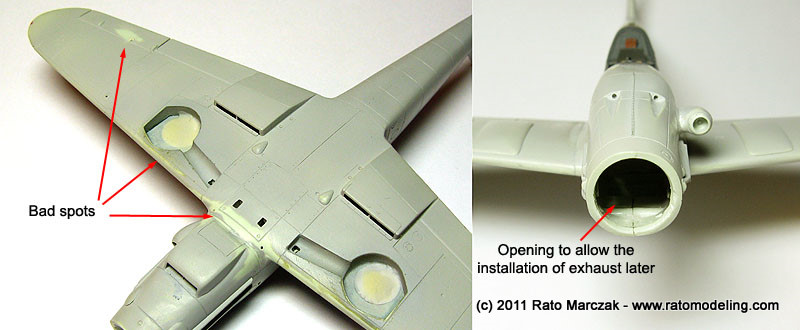
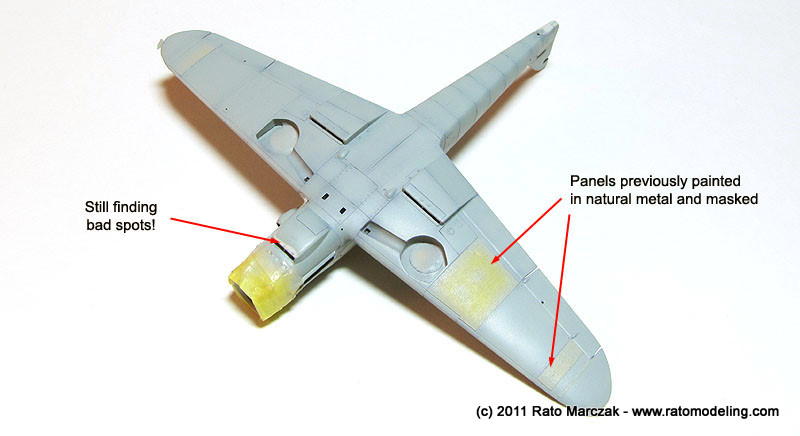
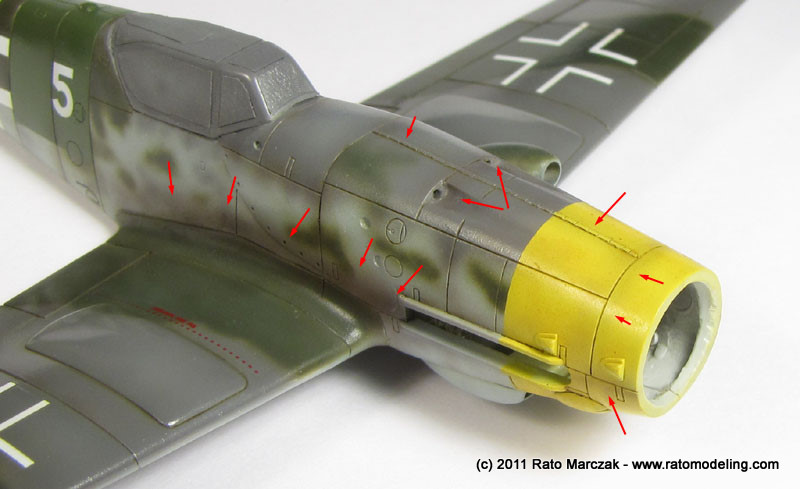
The model received a good coat of automotive grey primer, showing several bad spots to rework. A trim tab actuator was added to the rudder. At this point I found out that it would be impossible to install the kit's exhaust stacks from the outside, so I opened the nose to allow their installation later. I didn't liked the look of the stock exhausts, and would replace them by left overs from an Academy Me-109G:
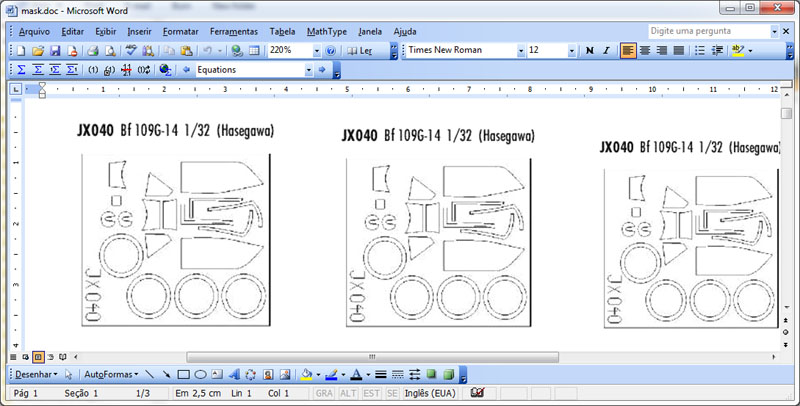
As I said, the stock clear parts are very bad. The canopy is virtually useless in my sample. After a hard time trying to find a usable replacement that would fit, I gave up and ended resourcing to an old thermoformed Falcon canopy. I hate to work with these acetate canopies, and I'm afraid this is possibly one of the worst areas of my model. Furthermore, they don't have the frames crisply molded, so one cannot lay a piece of tape on it to retrieve the cutting lines for masking. A trick which works fine many times is to use internet drawings of commercial pre-cut masks. Using in any software, you can print them in the correct size, it is just a matter of using a compass to take a couple basic dimensions. Once printed, you can overlay your favorite masking tape over it and cut your own masks. Unfortunately this method does not work everytime, since the masks may have been designed for a different kit (my case), but it is a good starting point to adapt the masks for your model. At least it is a safe method, since you are not running sharp blades over your canopy:
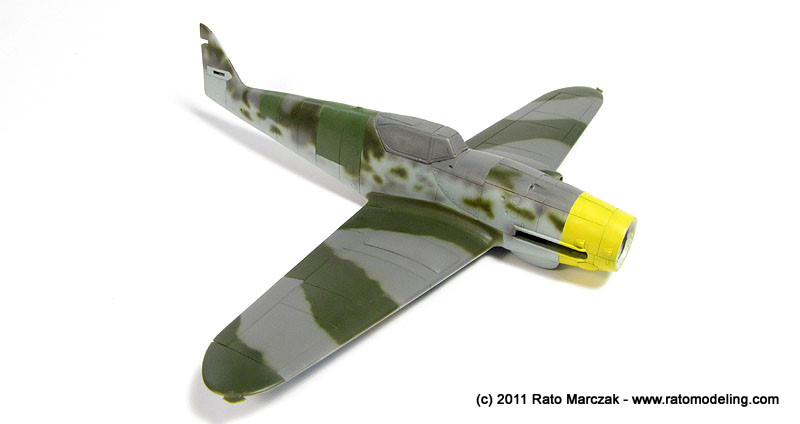
The model was grossly pre-shaded with black paint. Gunze lacquer RLM 76 was sprayed over the undersurfaces and fuselage. I hade already made my mind about which version to depict, so the nose was painted yellow and masked prior the RLM 76. As you can see, more faulty spots were found... more sanding, more painting. Ahhhrgh! Good bye pre-shading...

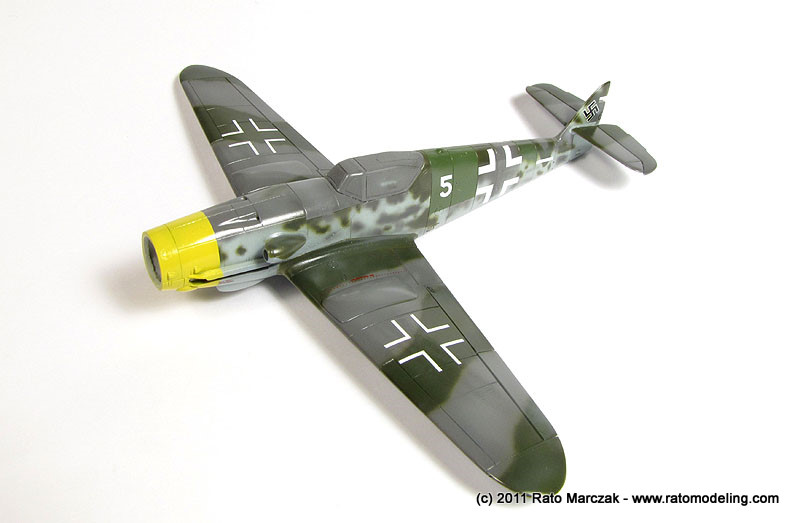
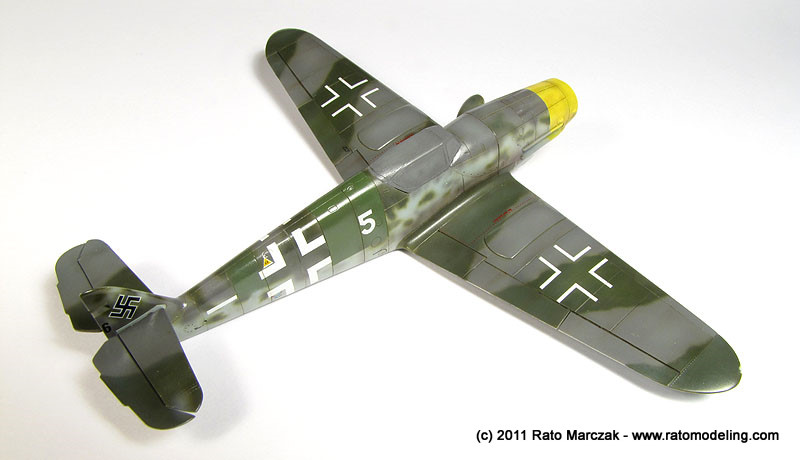
Talking about camouflage, here is the version I've chosen:
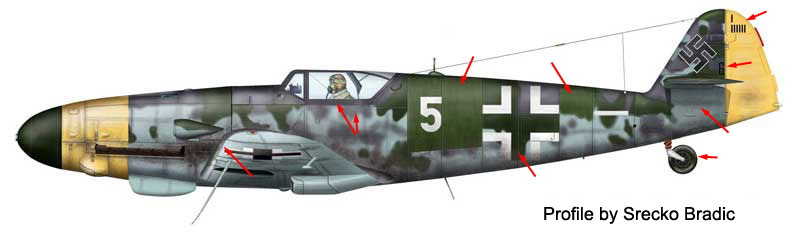
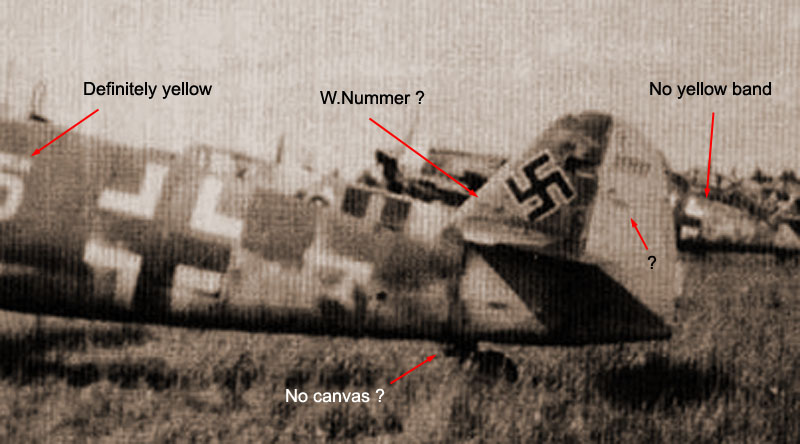
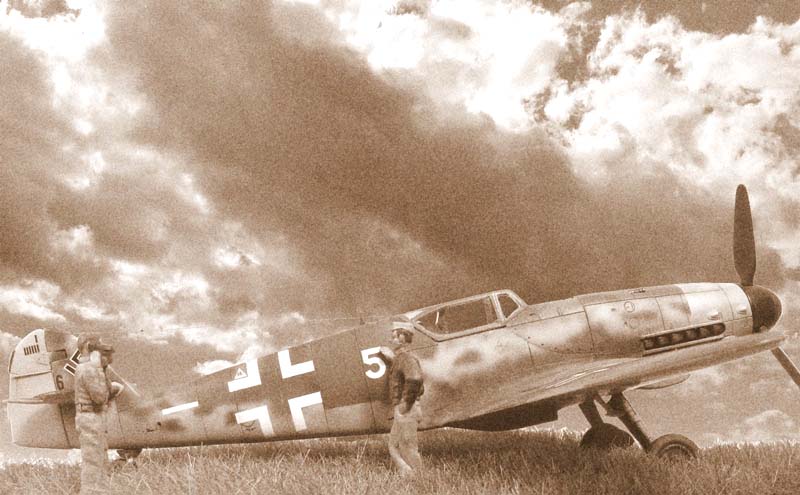
A bit of history about this particular bird: it is a Me-109G-10/U4 W.Nr.611048 from II./JG52, flown to Neubiberg to american hands on May 8, 1945. The pilot is unknown as far as I can say. The fuselage received a hastily applied overpaint in several areas, suggesting it served in another unit before. The G-10/U4 of this batch were produced by WMF (Weiner Neustadt Flugzeugwerke GmbH), also known as DIANA, the only factory which produced 109s in large quantities in Bohemia (it started producing Gustavs in December 1944, and the G-10/U4 was the only sub-type produced there). The series W.Nr.611XXX were manufactured between February and April 1945.
Of interest is the fact that protectorate factories like DIANA commonly employed slave labor, and were for the most part installed in tunnels, so the manufacturing conditions were not the best, to say the least. The Germans developed well known ramified manufacturing methods, so much so that most sub-components were assembled and finished before the final assembly. That resulted in characteristic camouflage patterns for each factory. That is, each factory had its own footprint, allowing experts to identify the manufacturer mostly by the camouflage style. To know more about this fascinating subject, I cannot recommend enough ref.[1]. There you can find details about the typical camouflage patterns followed by WMF, including hard and soft color transitions, common markings styles, stenciling, fuel/engine specs, and other details. On page 47, I found the only known photo of 611048:
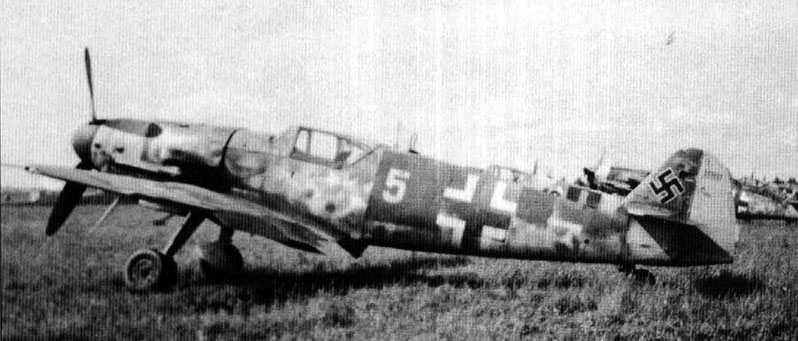
Of note are the seven victory symbols on the rudder and the W.Nr. digit 6 below the Hakenkreuz. Many other details can be found in the above mentioned book. Go read... I still have a lot of doubts about specific details, though, but it was nice to see that my final decisions agreed with other seasoned modelers (for instance, Mike Robertson report on Hyperscale, among others).
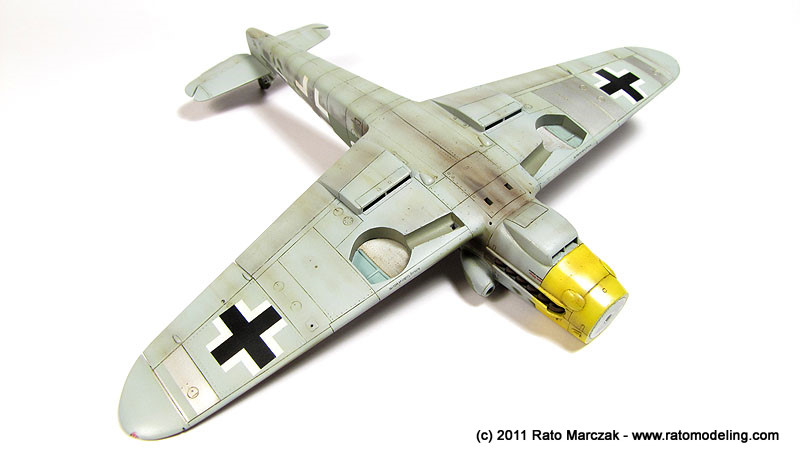
I selected three underwing panels which were painted in Aluminum and masked before airbrushng the RLM 76. They will remain in natural metal, since this was relatively common during the final months of the war. The only photo (see above) of the real thing do not show the underside, therefore probably nobody will ever claim this is not correct. That's one of the things I like in late war Luftwaffe aircraft: unpainted panels, camouflage mismatches, improvised colors and paint retouches. I think this adds a lot of interest to the model and reflects the chaotic situation of the Luftwaffe near the end of the war.
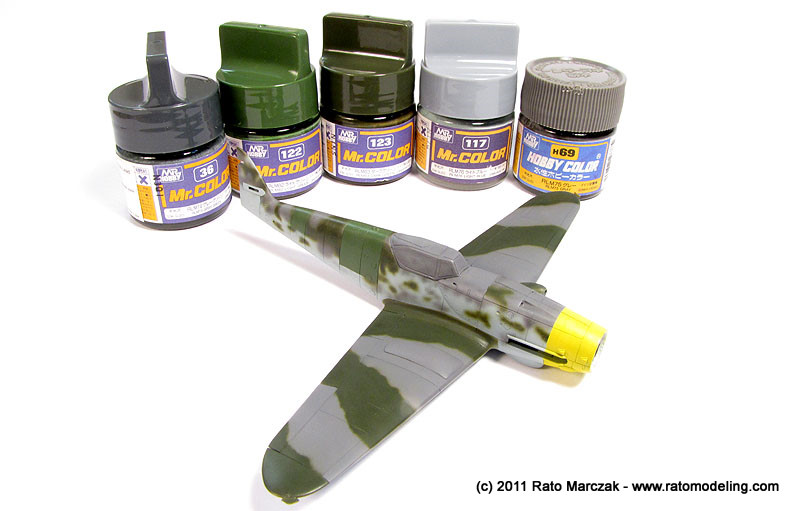
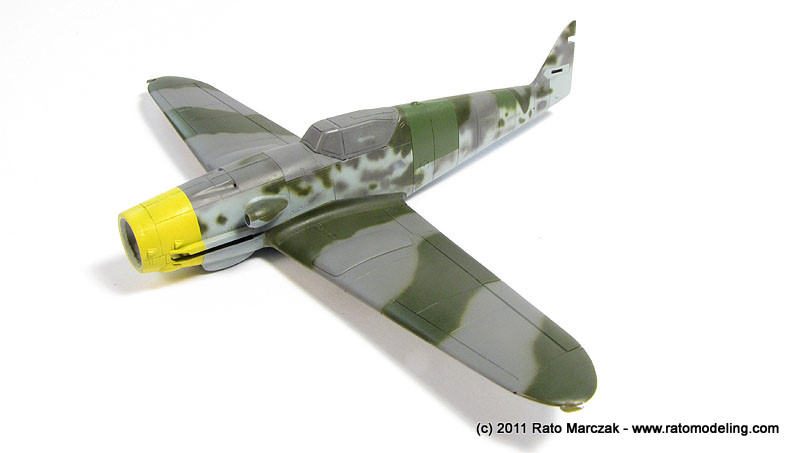
Everything was painted free hand using a Sotar 20/20 airbrush. I had to pay attention to the characteristics of DIANA camouflage pattern, but at some point I was following more the profile above than the photo itself. This rendered some differences when comparing the model against the photo, but you know how difficult is to camouflage a Luftwaffe plane ipsis litteris when a photo is available.
Of course I had to use some artistic licence to guess what the starboard side would look like...
I assumed that most of the overpainted areas were in RLM 82, and used some RLM 74 too for tonal variations of the mottling.
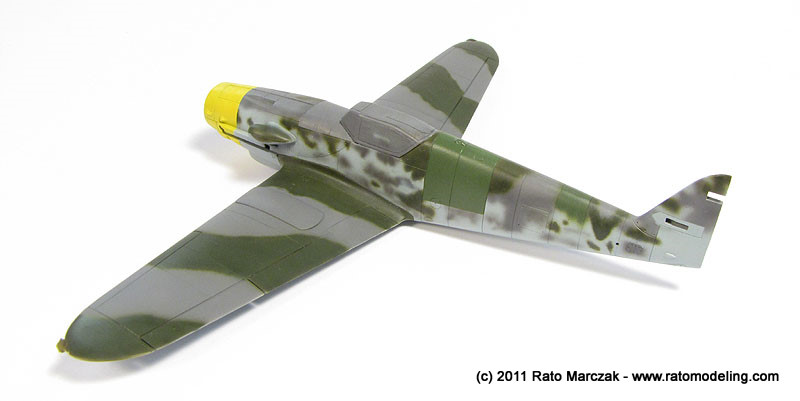
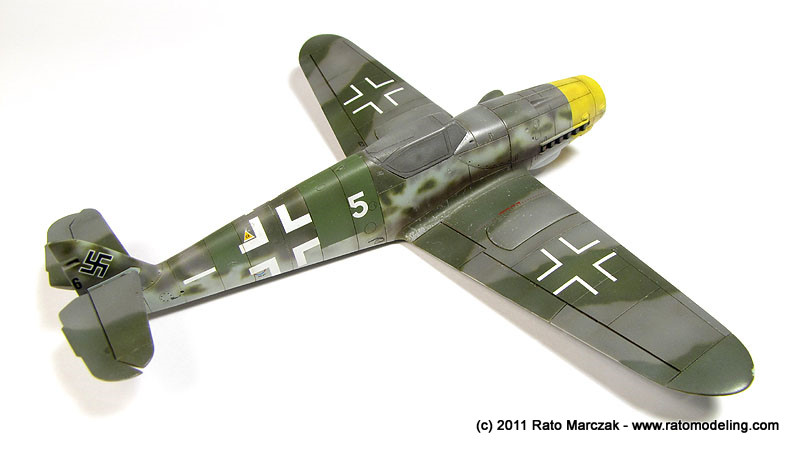
The model received a good coat of clear gloss automotive lacquer in preparation for the decals. All markings were scrounged from several decal sheets, including the kit's sheet. The white 5 on the fuselage is not a perfect match, and it is a bit small, but I couldn't find anything better. I preferred to live with it than try to make my own masks. The wartime photo shows that most stenciling was overpainted, but I left a few of them, some partially overpainted, just for fun. Everything was sealed with automotive clear gloss varnish:

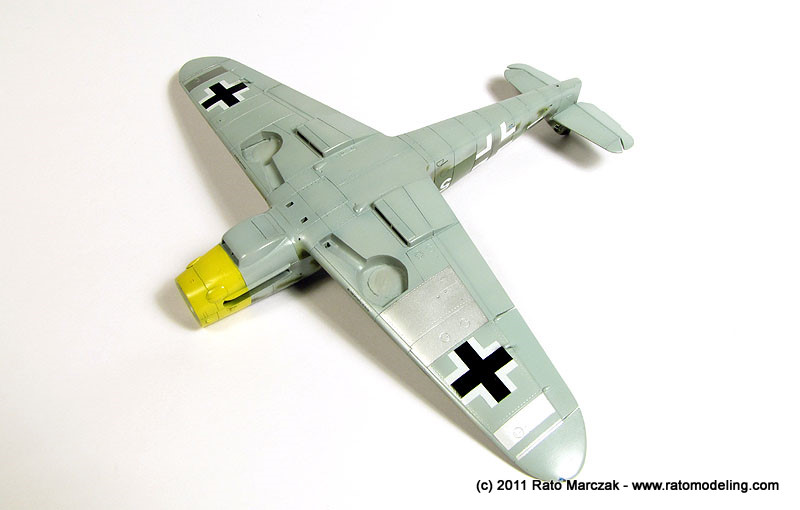
The natural metal areas on the underside are now visible:
About this point of the project another interesting book came to my attention: Wołowski's book (ref.[2]), recently released by MMP Books. This fact added water to my whiskey, as both refs.[1] and [2] differ considerably in many important aspects. Here are their interpretations of W.Nr.611048:
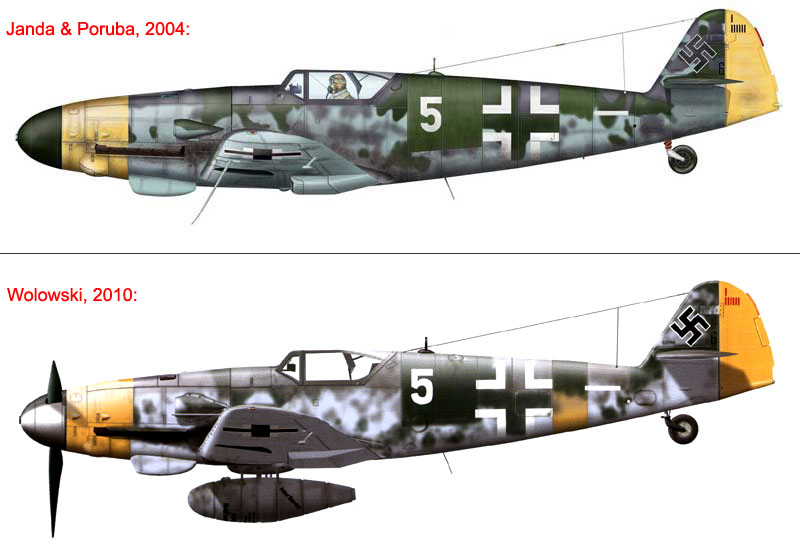
After much thinking, my thoughts are the following:
- Ref.[2] states that this is an ex-II./JG 52. Considering the yellow band around the cowling and the rudder, there may well be an overpainted yellow band on the fuselage. I just found out that it is virtually impossible to distinguish that from the B&W photo above.
- I do not agree with the RLM 74/75/76 camouflage statement in Ref.[2], not for a Diana aircraft.
- Examining the kill markings on the rudder again, I agree it probably should be red. Unfortunately, by then I had already applied those kill markings and I'm not willing to change it now.
- Something apparently missed by both refs.[1] and [2] is the shade of the number 5 on the fuselage. It contrasts with the Balkenkreuz on the fuselage, and I bet it was yellow, not white. I won't change that neither.
- It seems that there is a small W.Nr. stenciled on the fin, below the Hakenkreuz, typical of most Me-109s. It may have scaped the paint retouches...
- Again, having been part of II./JG 52, the spinner of the aircraft probably had a 1/3 painted in white, although not visible from the angle the photo was taken.
- Knowing JaPo books and the arguments they put in their texts, I still trust more on ref.[1] than ref.[2].
I decided to paint the white third on the spinner, but I was making far more concessions on this model than I usually would accept. As I said, I'm no Luftwaffe expert and it seems impossible to be conclusive about all these points. And of course, it was too late to change the white 5 and the kill markings. The tail wheel wouldn't be changed, neither, it was finished by then.
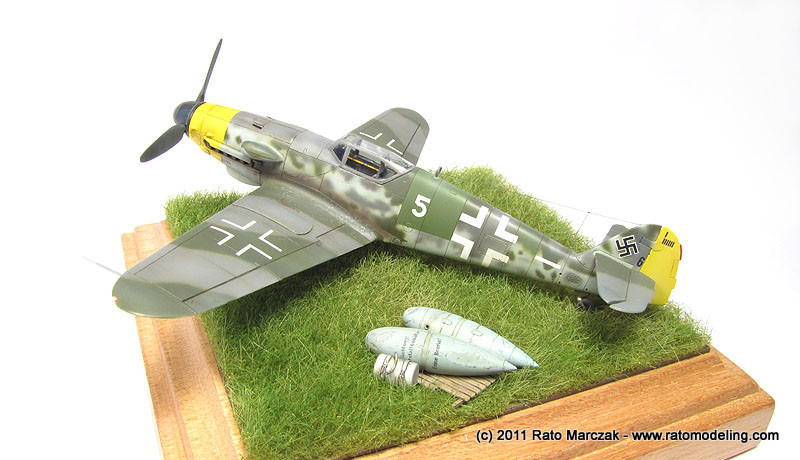
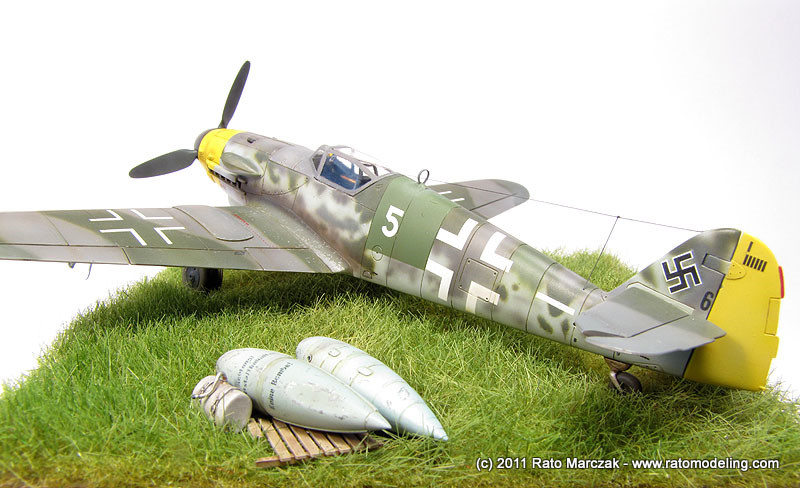
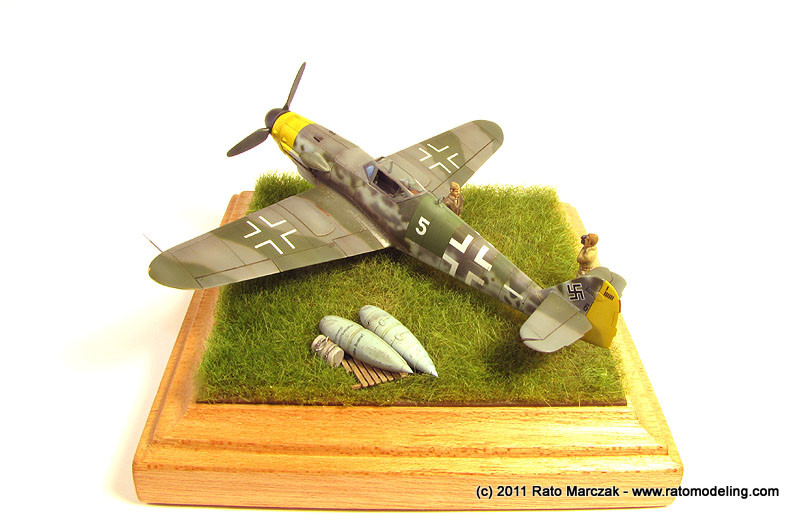
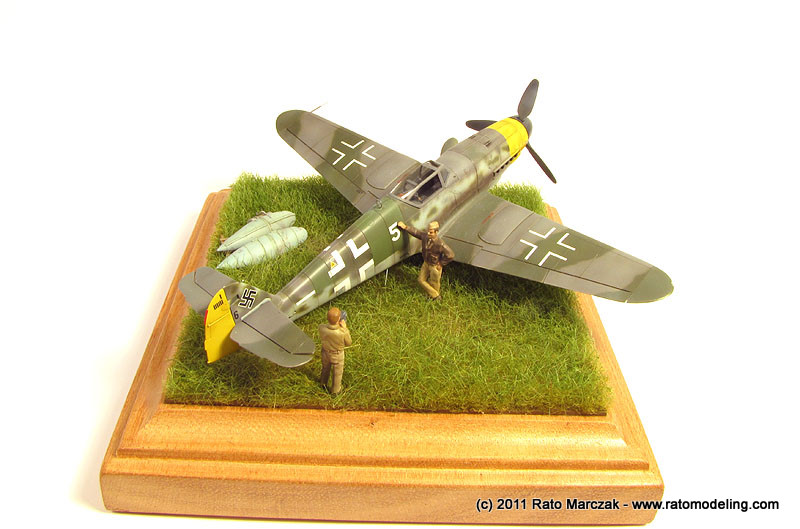
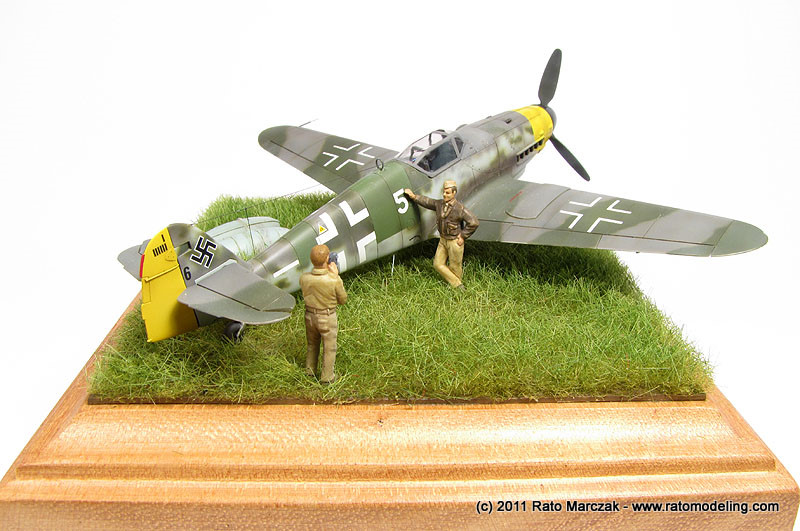
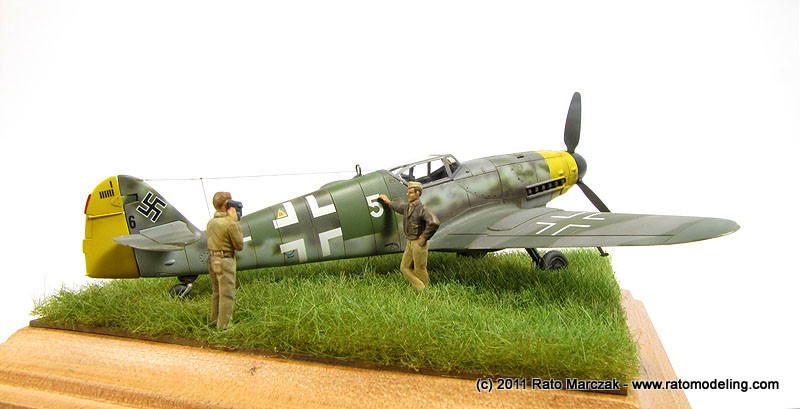
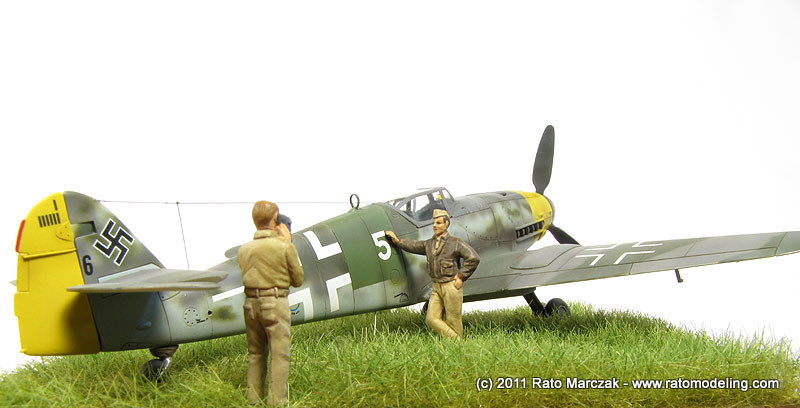
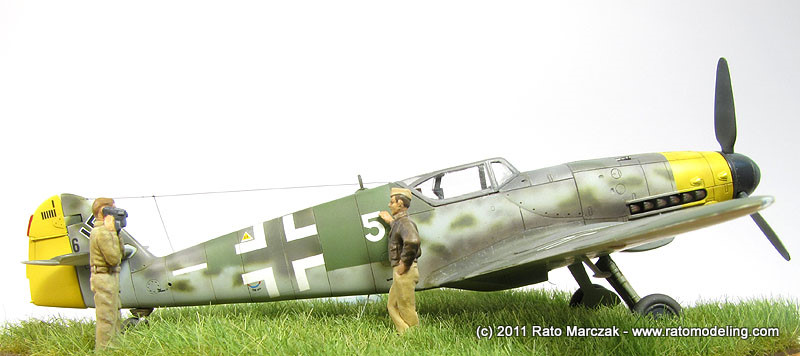
Since the finish seemed close, I started working on the display base. The idea is simple: the White 5 on a tall grass field at Neubiberg, right after falling in American hands. Besides the aircraft, I planned to add some belly tanks scattered around, and a press guy filming an anonymous flying officer. Therefore the name: "Under New Management"...
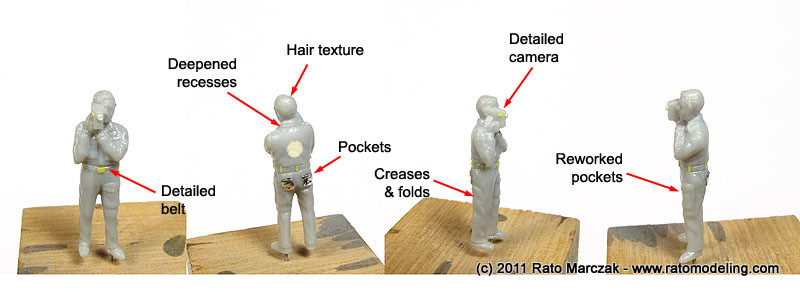
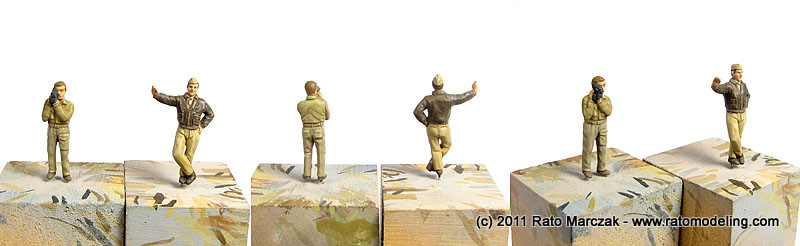
I started working on the photographer figure. I don't remember where it came from (I guess it is from Airfix RAF Control Tower kit), I borrowed it from my friend Flávio Estrella. It is a good figure, but the surface details are too shallow, and I'm tired to paint figures without visible details... So I spent a good time rescribing creases and folds, collar, sleeves, pockets and so on. I used a scriber and a hard steel bristle brush to make new hair texture, added belt features, and detailed the camera. After all this work, I made a rubber mold to make a few copies of it. Here is the finished master:
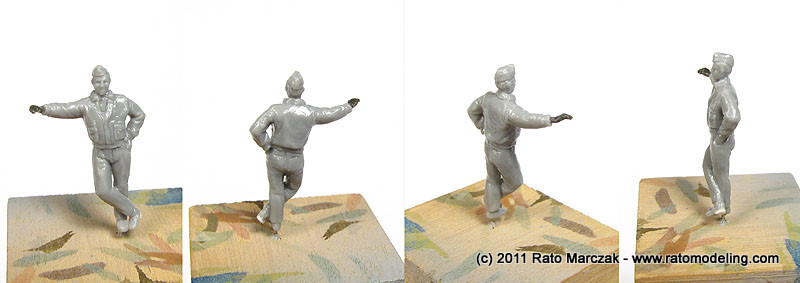
I
followed the same steps for the flying officer. This one came from
Hasegawa's WWII Pilot Figure Set (item X72-8). It is not much better
than the photographer, but the surface details are more defined, and
therefore it was easier to deepen them using a new hobby knife and a
scriber. The right hand was changed for a more detailed one from my
spares box, and all sanding marks and residues were smoothed out with
liquid glue. I also prepared a rubber mold to copy it later:
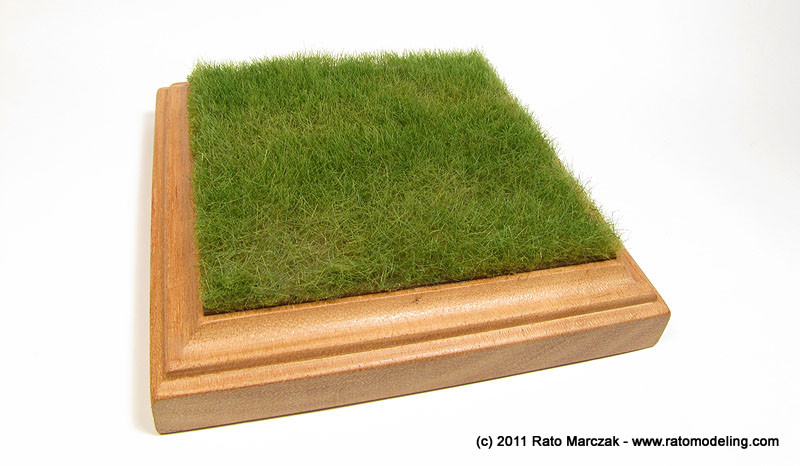
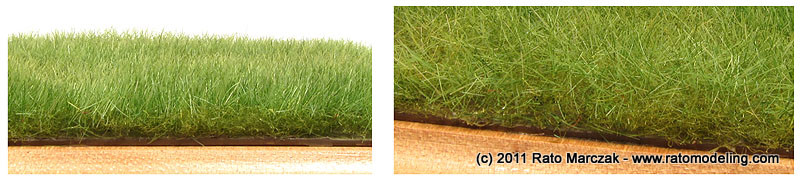
The construction of the display base was actually very simple, and I more or less followed the same steps of my other bases, except that this time I used a tall grass from Noch. It provides a grass height which would be impossible to achieve using static grass. I shot a two-part video showing the main steps in the preparation of the base. By speeding up the glue and paint drying time with a hair dryer, the whole process took less than an hour:
Here are a few of photos showing the finished base:

With the base almost done, I proceeded with the Me-109 weathering. After the sealing the decals, I used dot filtering to produce color variations, but the effect is barely visible in the photos. A wash with oils was applied next, using progressively darker colors around the engine and belly, as well as control surfaces. At this point I started to apply stains and bleeds, concentrating the effect where is seemed more logical. I used exclusively oils for that, since pastel chalks and pigments would probably almost disappear, or at least this has been my experience. After the final semi-gloss coat, I may come back and use them on a few spots. The method I used is a well known one, and I shot a movie showing the basic technique. Just remember that this was done over a clear gloss coat, and I would not recommend to use the same method over flat coats. Well, not for aircraft. Here is the video:
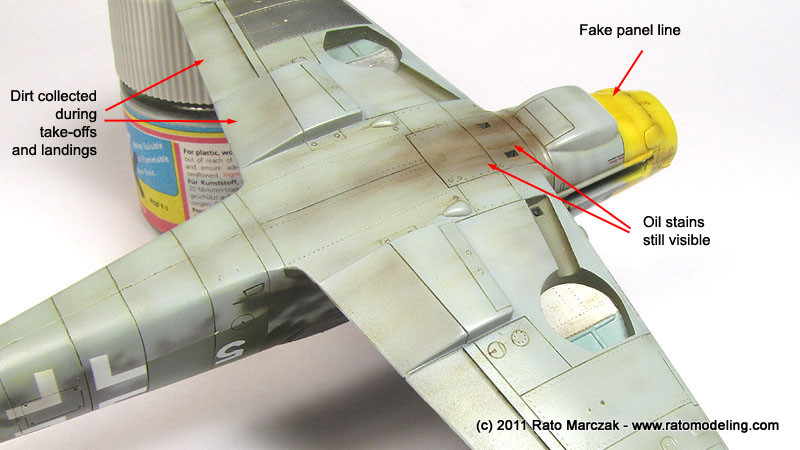
I waited a few days until the oils were completely dry, then I started applying the air-wash. I used a mix of Tamiya XF-1 and XF-9, thinned with 95% of Tamiya X-20A thinner. This was applied along selected panel lines, hatches, control surfaces lines, and also as a base for the exhaust stains. In part, this method helps to recover the pre-shading lost after so many finishing steps, but it also blends the previous weathering steps. Sometimes you may want to produce a fake panel line, showing off only its shadow or dirty around it. Other times this is just a stain. In 1/72 scale, it is important to use a double action airbrush with a fine nozzle. I used a Sotar 20/20, but in larger scales you can use other airbrush/nozzle combinations. It is a matter of personal preference, the important thing here is to be a double action airbrush (in order to control where you start and finish the air-wash application), and use an equipment able to deliver fine lines.
Here is a video showing part of the process:
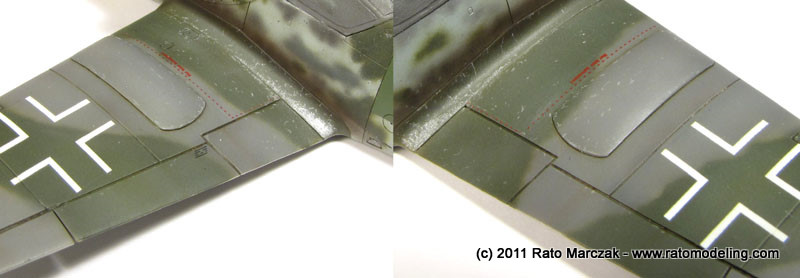
Since the video cannot capture the effect in detail, I took some photos to give you a better idea of the air-wash outcome:


Here are a few areas where the effect was made purposely heavier:
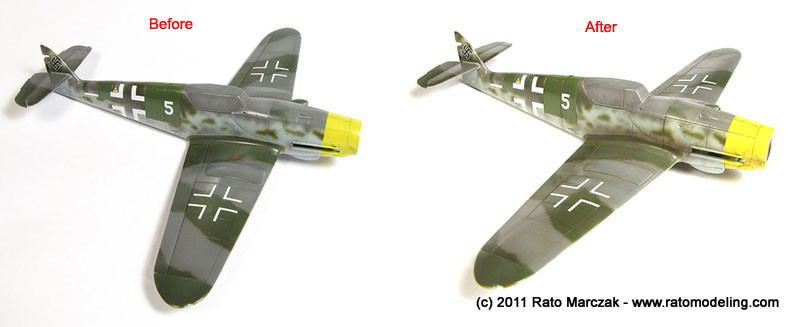
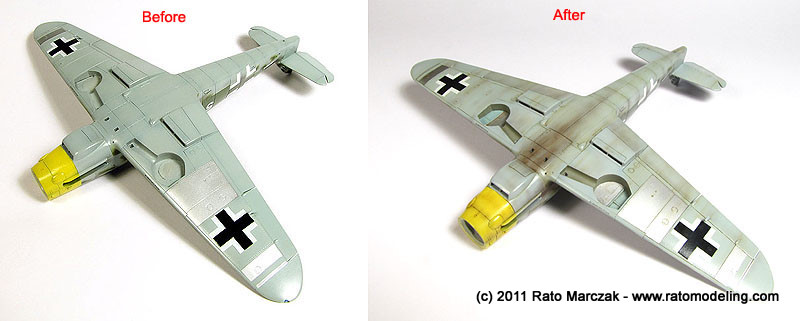
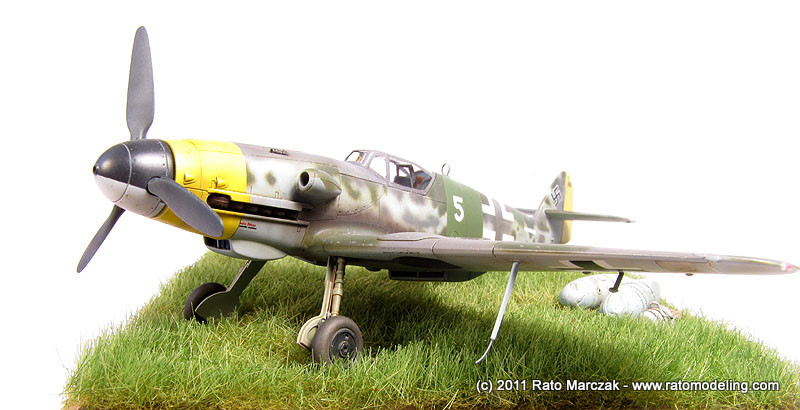
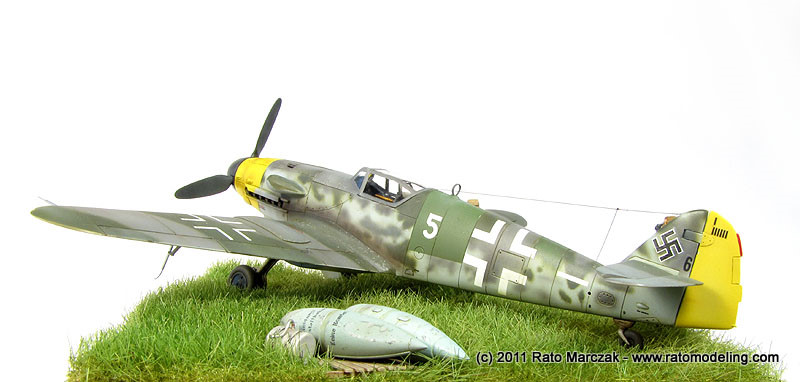
The differences before and after the weathering are dramatic. It may seem a bit too heavy for the scale, but that's the way I wanted it, after all, this was a surrended aircraft, and surely cleaning wasn't a high priority during its last days of combat:
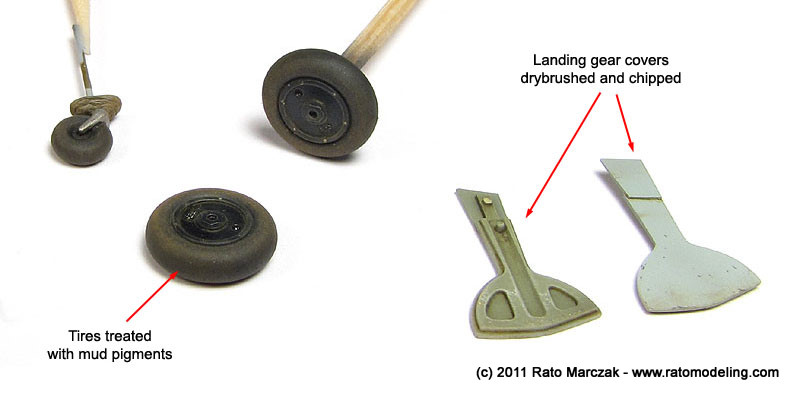
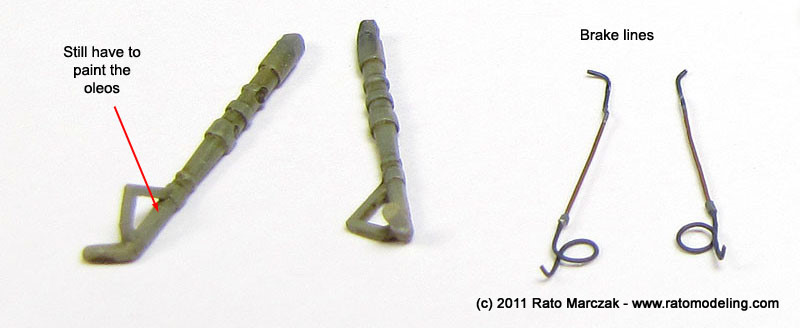
Meanwhile I also was taking care of the smaller details. The landing gear was painted using usual Gustav colors, but I left the tail wheel yoke in natural metal. The main wheel hubs were painted with semi-gloss black, and placard decals from a Techmod sheet were applied on them. I rubbed Tamiya weathering powders on the sides of the tires to make them dirty. The landing gear covers were painted, washed, drybrushed and received their share of scratches and dirt too. The same process was used on the landing gear legs, plus the brake lines made of fuse wire. They were bent to follow the legs and will be installed later on:
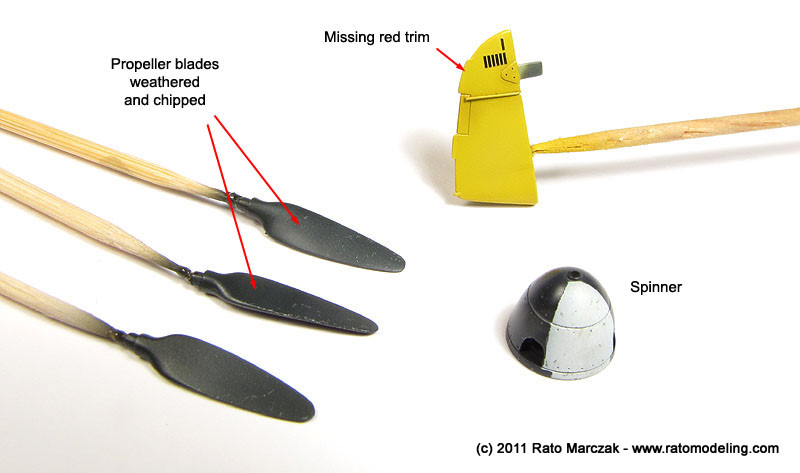
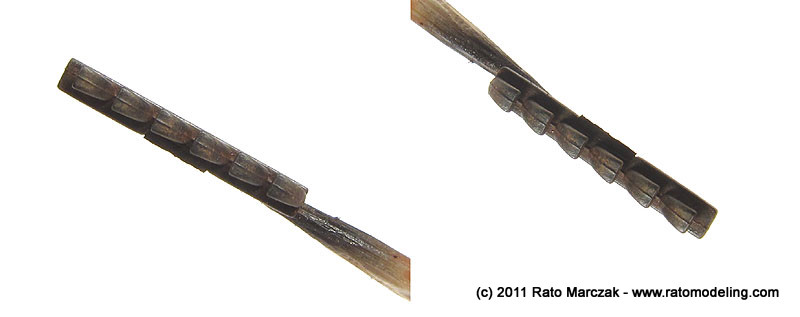
After painting the propeller blades with RLM 70, they were wheathered by airbrushing very thin streaks of gray in the direction of the airflow. Prismacolors gray pencils produced the paint chipping. Pencils were also used to weather the hub after a coat of ProModeller wash:
The exhaust stacks came from a Academy kit. I left the mold seam marks to simulate the welding beads. My recipe to weather exhaust stacks is to paint them with burnt iron, then wash with RustAll, and finish by rubbing black pastels around the stacks openings:
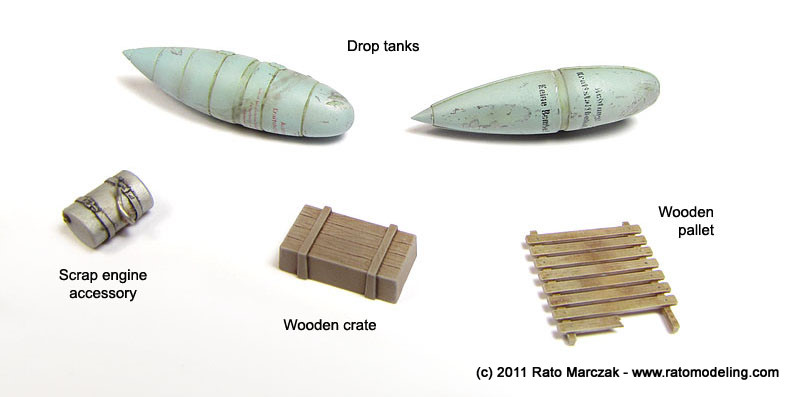
And since I was at it, some addtional items were prepared to decorate the vignette (I wasn't sure which of them to use, by then). Two models of drop tanks were smashed with dental burr bits where it seemed more logical and painted accordingly. I also finished a few leftover items, like an oil tank, a wooden crate and a pallet. I would decite later where they would go, if so:
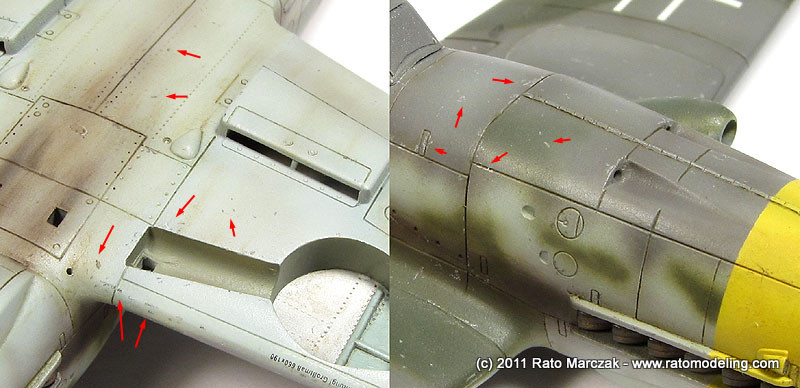
I applied a mix of semi-gloss and flat automotive lacquer to the whole model in preparation for the final weathering. I used a few Prismacolor pencils for that. Greys are my weapons of choice when I want to simulate scratched paint - dark grey for lighter camouflage colors and light grey for darker areas. This way they will be always visible. The silver pencil is used on areas where I want to show heavy chipping, down to the bare aluminum:
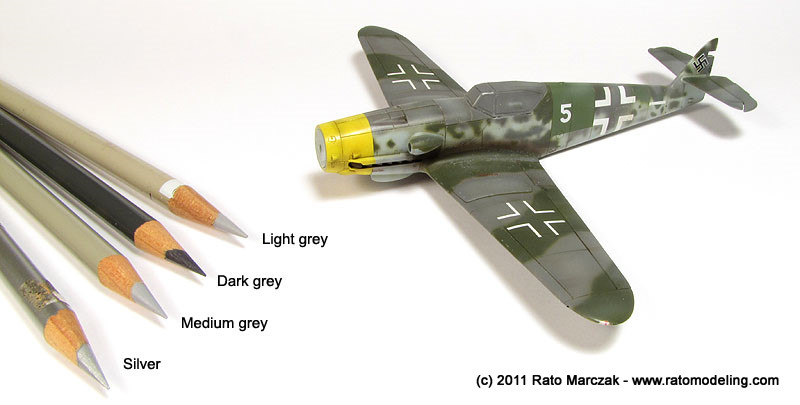
I basically use a stappling movement to make the chipping look random. Of course I played heavier along the wing root fairings:
Small
scratches were done with the grey pencils along access panels and on
the underside, to simulate rock and debris hitting the panels:
The
exhaust stains were made exclusively with brown and black pastels. I
generally use the airbrush for that, but decide to take a shortcut:

After these photos were taken, disaster struck... When I removed the canopy masking, I saw the pilot's armoured glass and the gunsight lenses completely torn, and a lot of debris inside! Trying to understand what happened, I recalled using white glue to fix these parts in place. The many baths in water after each painting section probably softened the glue and the parts moved... badly. After thinking what to do, I took a long breath and started to score the canopy line with a sharp scalpel. I reglued the damaged parts, retouched the paint, and glued the canopy again. This time I made a better job in eliminating the seams along the windscreen (I used Vallejo putty mixed with grey paint and cleaned with a moistened cotton bud before it was dry), but definitely the gap along the starboard hinge line is larger that my first attempt. I hate vacuum formed canopies... Anyway, I guess it is passable. I had to chip the paint again where I retouched the paint.
At this point all smaller details were glued in place. I had some trouble to make the landing gear doors and brake lines to stay in place while I was glueing them. I guess I can't do 1/72 model as I used to...
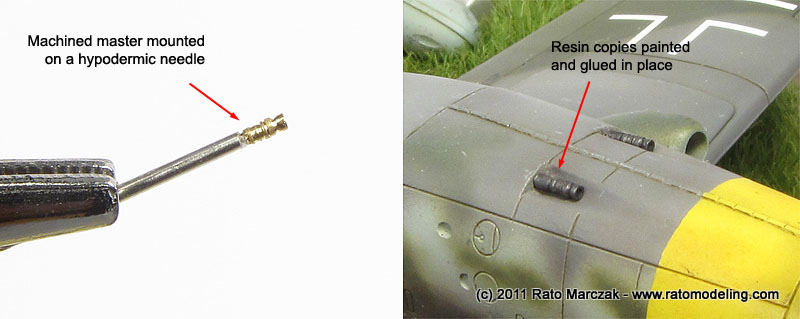
The aerial antenae was made of stretched sprue, while a gun muzzle master was machined and copied in resin. Not perfect, but will do:
Anyhoo, I also glued the fuel tanks and scrap parts on the base, and of course I couldn't resist to test the scene:
To finish it off, I still had to paint the figures... Oh, my old nemesis. I did my best, let's see how they will look on the base later:
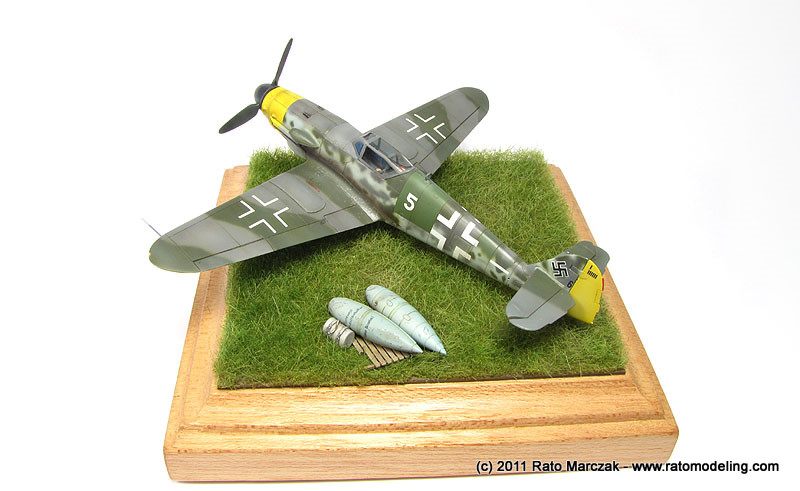
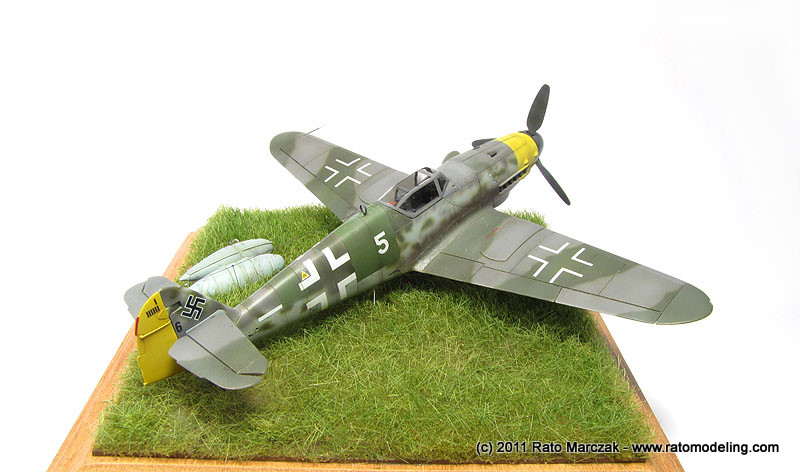
I had to trim the grass in a couple of places to make the Gustav sit properly (the model is not glued to the base). The figures were secured in place through metal pins. Here are the final pics:
References:
[1] A. Janda & T. Poruba: Messerschmitt Bf 109G-10/U4 Production & Operational Service, JaPo Publishing, 2004.
[2] K.W. Wołowski: Bf-109 Late Versions - Camouflage & Markings, MMP Books, 2010.
Postscript: I have to acknowledge the support of modeler Nei Biazetto throughout several personal communications. Nei's expertise in Luftwaffe subjects never fails me. Thanks a lot dude!
| Technical file | |
| Kit:
|
-
Revell AG #04160 |
| Additions:
|
- Falcon canopy - Quickboost propeller - Quickboost gunsight |
| Basic
colors: |
-
Primer: Automotive gray primer |
| Notes: |
- Scratchbuilt details: armoured glass, wingtip lights, pitot tube, pilot's harness. - Break lines made with fuse wire. - Exhaust stacks from Academy Me-109G. - FuG 16ZY antenae from spare box. |
Rato Marczak © 2011
