| November 9th - Hasegawa Grumman F9F-2 Panther diorama in 1/72 |
|
Started: December/2014 Finished: September/2015 |
Ah, we older ones will remember William Holden, Grace Kelly and a young Mickey Rooney in the 1954ish The Bridges at Toko-Ri.
A nice movie, with lots of official US Navy footage starring early jet
fighter bombers performing on WWII deck carriers... Well, there is no
Toko-Ri river, but there is a Koto-Ri valley. I can only guess it is
another case of Vella-Lacava vs. Vella-Lavella. Anyway, the F9F Panther was a major player during Korean War, and I always wanted a model of one...

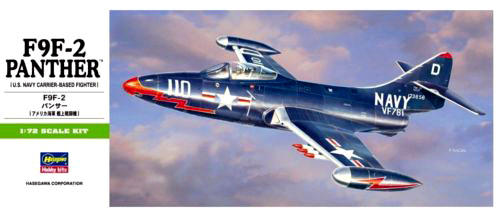
I found a second hand Panther being sold at a modeling show and grabbed it quickly. The Hasegawa kit has been around for a while, and I think my copy is their 1/72 Panther last incarnation:
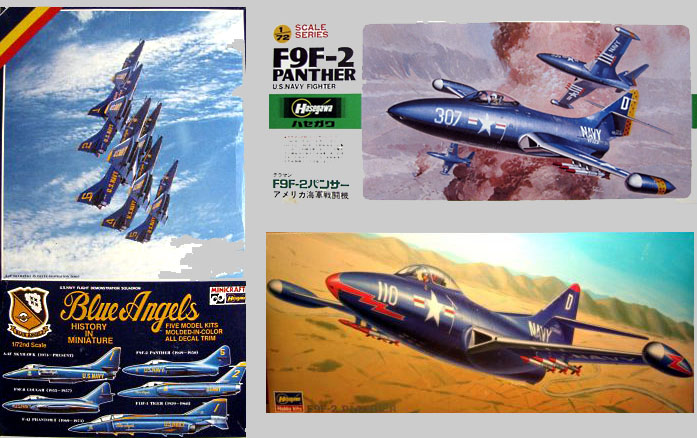
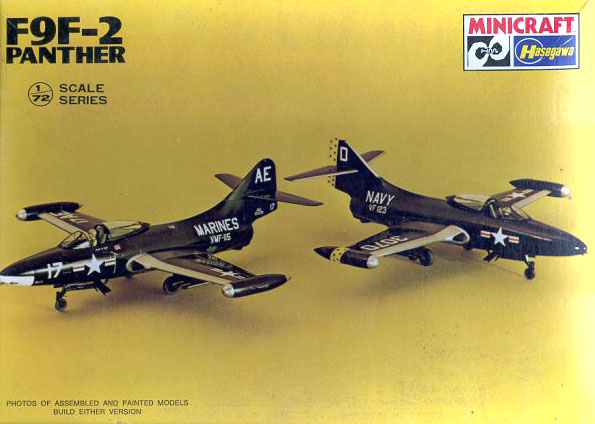
This Hasegawa Panther is, in fact, very old, and has been boxed and re-boxed several times, including Minicraft versions. I don't care about kit genealogy, but here are some boxtops if you are interested:
Back to the kit, it is well molded, as usual from this manufacturer, with consistent recessed panel lines but almost devoid of surface details. It has oversimplified wheel wells and cockpit, typical of Hasegawa kits of this vintage, but the fit is better than many new releases. The parts count is very low, and there are a few errors. I'll discuss some along the text, but there is one which I wouldn't correct: the shape of the nose is off. This is mentioned in Bert Kinzey's Detail & Scale #15: "...The nose centerline is on the aircraft centerline, and it should be below it. Correcting this would be rather difficult since it is the shape of the nose that is wrong and not the angle at which it is molded on the fuselage..." (thanks for the heads up, Flavio). Mr. Kinzey's claim suffices to make me live with that.
There is one thing I love in all Hasegawa kits, they build very easily, without any hurdles, unless you are a masochist. I'm not one, but there is one thing I hate in old Hasegawa kits: their ultra-shallow wheel wells. Sometimes I leave them as is, but they were ridiculously shallow in this case. I had to do something.
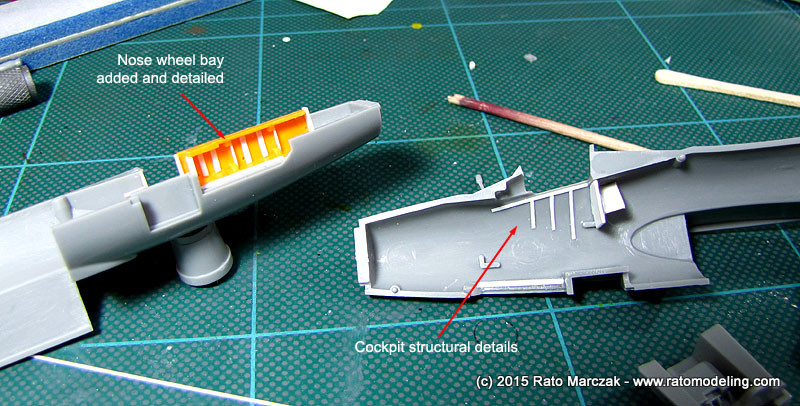
Without thinking twice, I removed the kit's wells and scratchbuilt new ones using plastic sheet. The nose wheel well is still a bit shallow, because I was limited by the cockpit floor height. Still, it is much better than what comes with the kit. And since I was at it, basic structural details were added to the cockpit sidewalls:
The main landing gear wells were much easier to improve since in the Panther the inner undercarriage doors were kept closed when the landing gear was extended. Therefore all I had to do was to make a box extending from the kit wells. Really simple job:
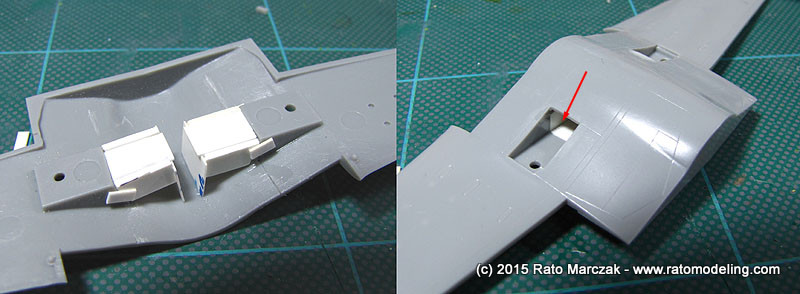
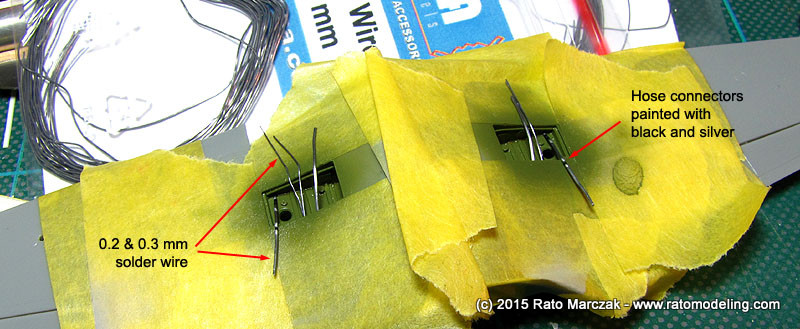
I painted the cockpit parts and finished it using the kit decals for the instruments. Since this would be a diorama, and the pilot would be seated, not much of it would be visible. I left the control column and the pilot's seat out to be glued much later. Plastic bits details were added to the wheel wells and they were painted with Interior Green. At this point, the wings were assembled and the fuselage closed. I drilled holes in the wheel wells to accept solder wires - they would simulate the hydraulic and brake lines. This is a method I've been using for years, because solder wire are quite flexible and easy to conform using a toothpick. All you have to do is to paint hose connectors if you wish so. It is important to apply a clear coat afterwards, as solder wires oxidize with time:
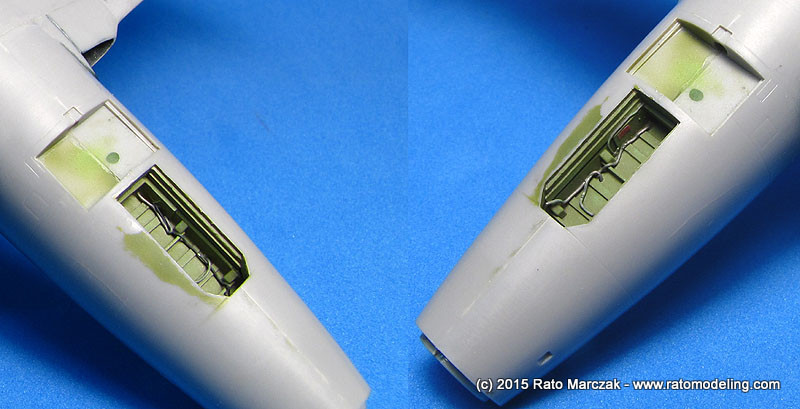
After a dark brown oils wash, the wheel wells were flat coated. They look busy - and deep - enough to trick your eye:

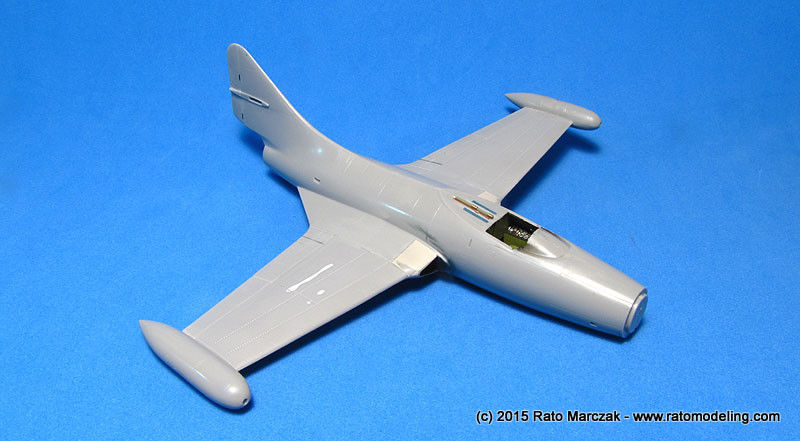
The fuselage was attached to the wings without problems. No filler was harmed during this stage. Just a few brush strokes with Mr.Surfacer here and there, a couple of passes with sandpaper and it started to look like a Panther:
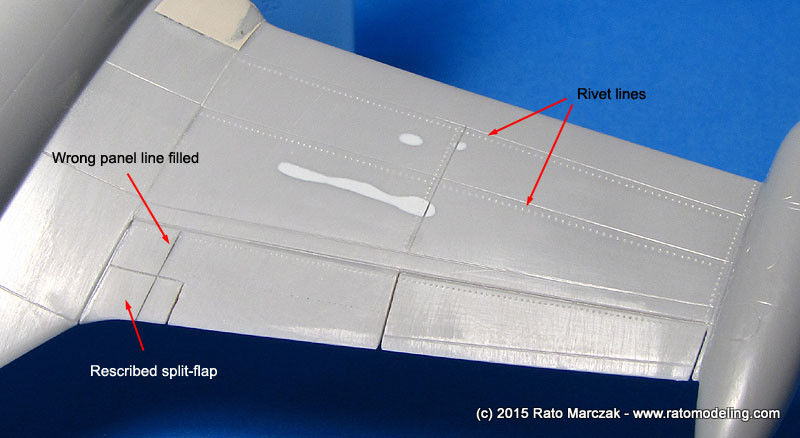
As in my other 1/72 models, I like to add rivet lines, but not on the whole model. I added them along main spar lines, control surfaces and stabilizers, always knocking them down with 600 grade sandpaper. The idea is to leave just a hint of the rivets. Remember, this is 1/72 scale.
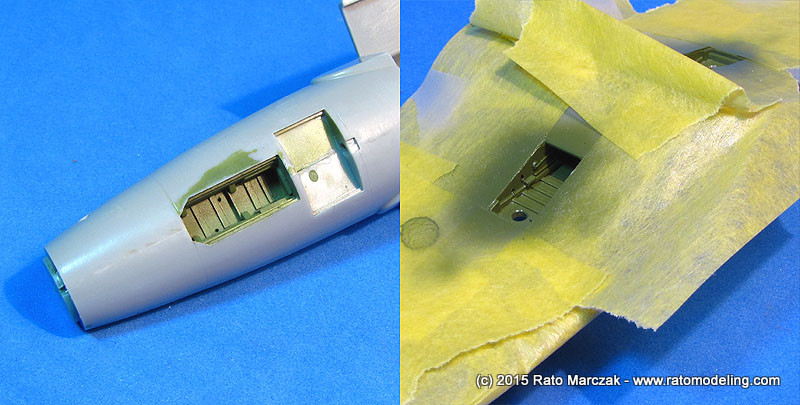
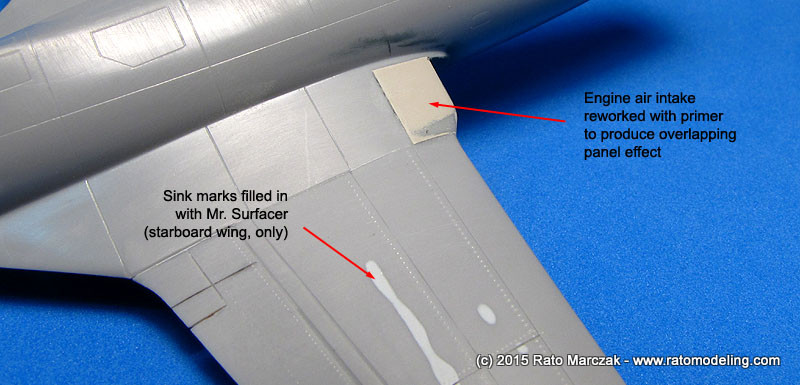
A quick research revealed that this particular Panther had the 'reverse flap', common in the dash 5 version. I will explain why later. I filled in a bogus panel line molded with the flap and scribed the split flap following drawings. The starboard wing had sink marks due to the Hasegawa logo molded on the inner face of it (check part #3). It was treated with Mr.Surfacer and sanded flush. The only parts which didn't fit that well in this kit were the engine air intakes, parts #8 and #9. After gluing them to the wing leading edges, I masked their perimeter and airbrushed a heavy coat of automotive gray primer. Once dry, the area was sanded flush with the masks which, once removed, left a nice step concealing the bad fit. If you are building this kit, remember to paint the interior of the intakes before gluing them in place:
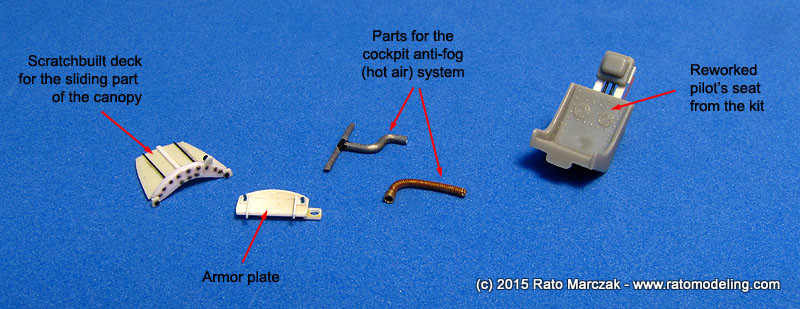
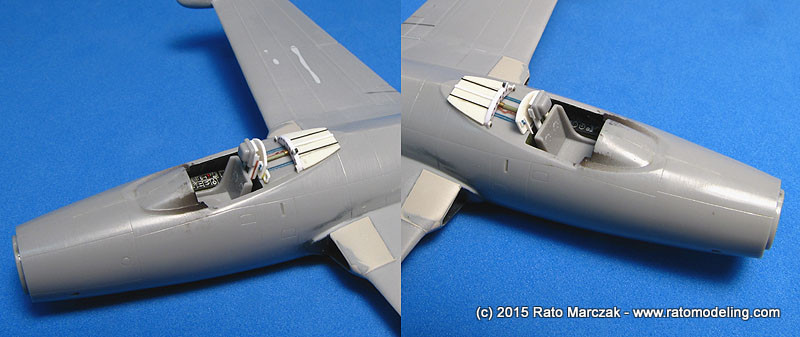
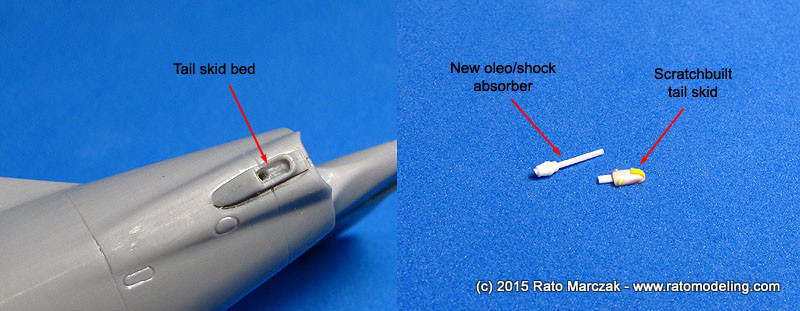
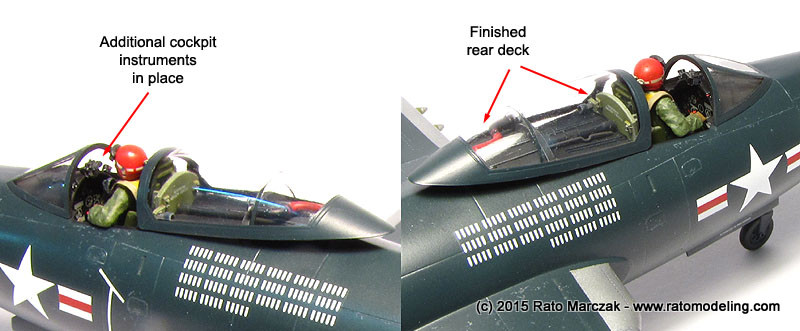
At this point I discovered that the rear cockpit deck was attached to the sliding part of the canopy. Hasegawa not only oversimplified it, but also made the deck molded with the fuselage halves. Since I was going to pose the canopy open, I had to remove the molded on deck. Tamiya flat file did a little miracle here, as I was able to remove the deck with the fuselage closed, and as a bonus I got a perfectly flat bed aft the cockpit. The bad news was that I had to scratchbuild a new rear deck and all associated details:
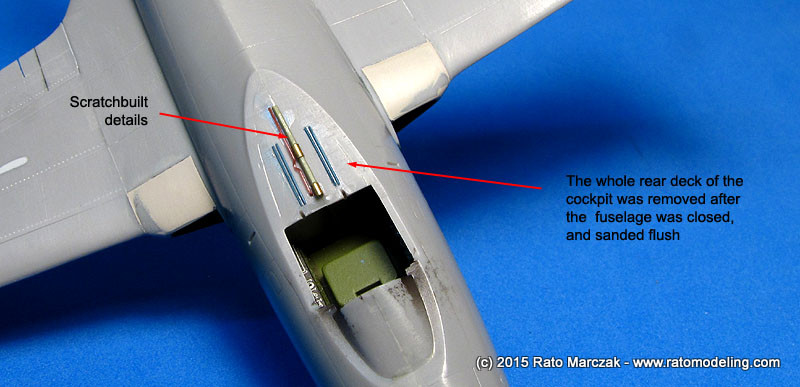
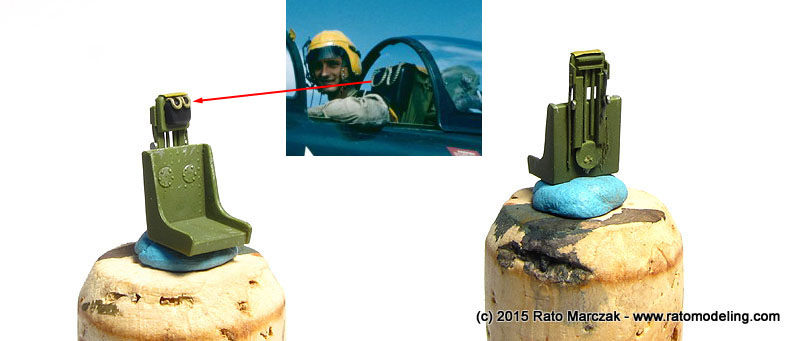
Back to the books, I started to work on the visible cockpit details. I reworked the pilot's seat from the kit, adding details to make it closer to what I saw in the photos, particularly the rails of the ejection system. Using photos as reference, I scratchbuilt the armor plate and the rear deck which goes attached to the sliding canopy. Parts of the canopy's anti-fog ducts were also created from solder wire and guitar string, but these would be trued only after the canopy was painted:
After a careful dry-fitting and the unavoidable adjustments, all details were ready for paint:
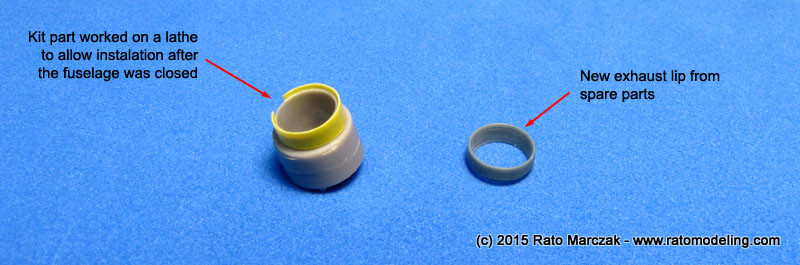
Whenever possible, I like to install jet exhaust pipes after painting my models. It simplifies the masking and provides a good aperture to install a handle to hold the model during the painting phase. I modified part #11 to be installed later on, but failed to thin the lips on a lathe, so I had to make a new one using a left-over part from my MiG-15 project. A typical self-inflicted waste of time...
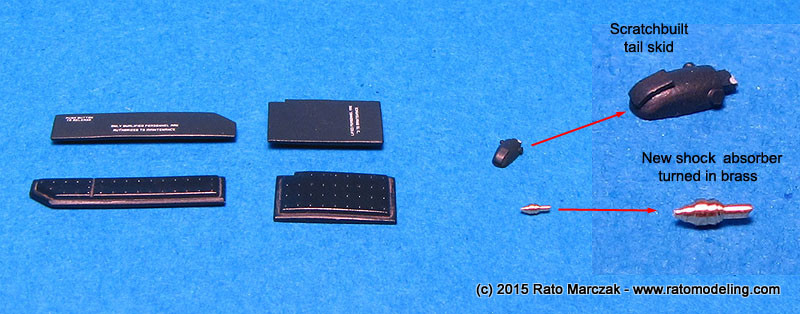
The tail skid was carved off from the fuselage and a new one was thermoformed and detailed. I also turned the internal dumper, but later I discovered that it was over scaled and would be replaced:
The opening for the engine exhaust had several details added to blank the ugly empty space above the tail skid, leaving room to insert the pipe later, and a narrow slot through which the arrestor hook would be pushed later. The nose cone was cemented in place, and the front and rear cockpit decks painted and dry-brushed. The air brakes were also glued shut. The windshield was masked and installed in place, then painted black. The sliding part of the canopy was wrapped with Parafilm and set in closed position with Blue-Tack to act as a cockpit mask. The model was primed with automotive gray primer and pre-shaded. Since this would be a Dark Sea Blue bird, I pre-shaded it with white paint, using Post-It notes to leave a hard edge along the panel lines:
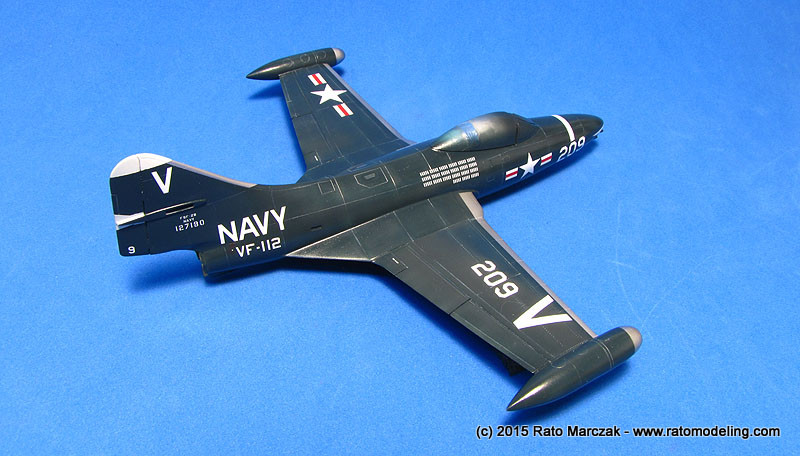
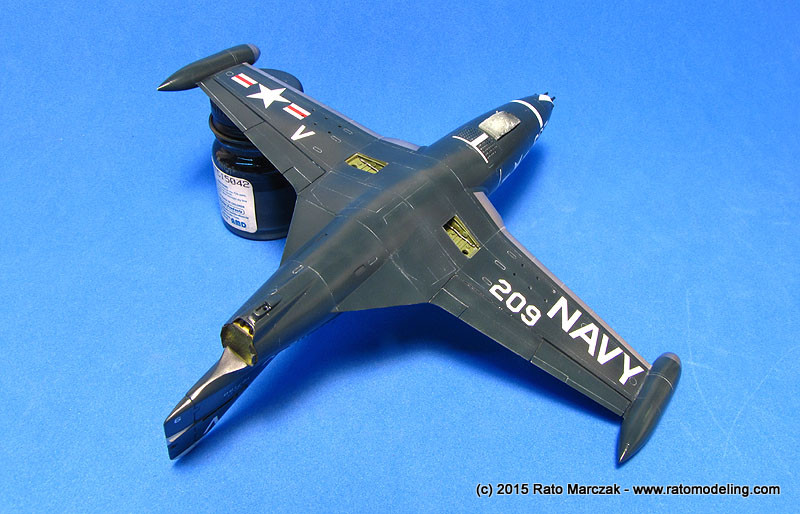
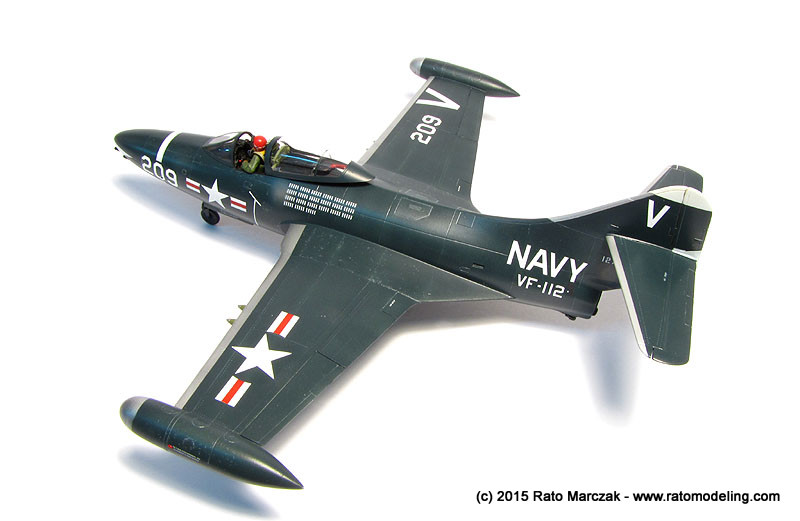
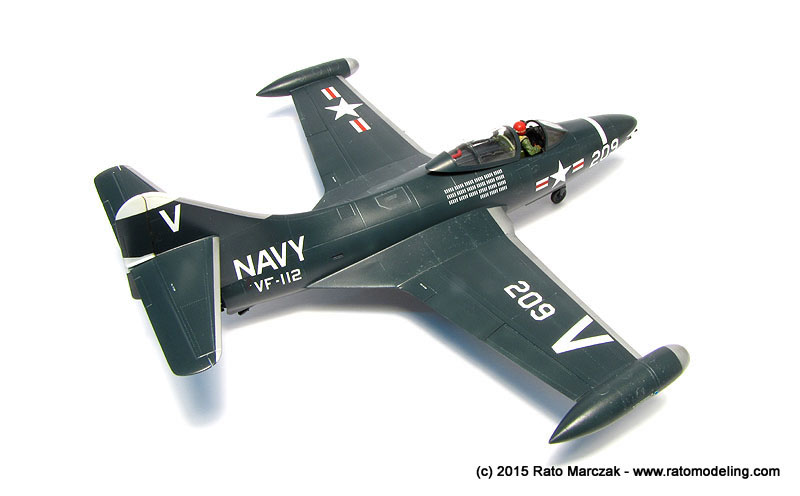
Painting was easy. Just let some gloss Dark Sea Blue flow from your airbrush... I used the now defunct Aeromaster Warbirds enamels because I still have a good stock of them. I shot it very thin at low pressure, trying to preserve a hint of the pre-shading.
These enamels take much longer to dry than I got used to with lacquers, but that's ok. A coat of Pledge Future wax prepared the model for the decals:
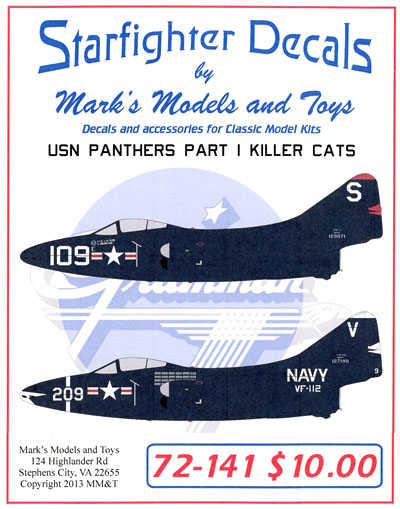
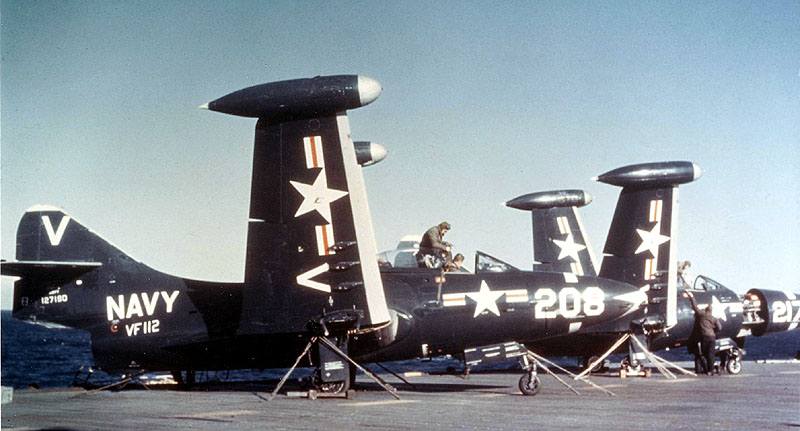
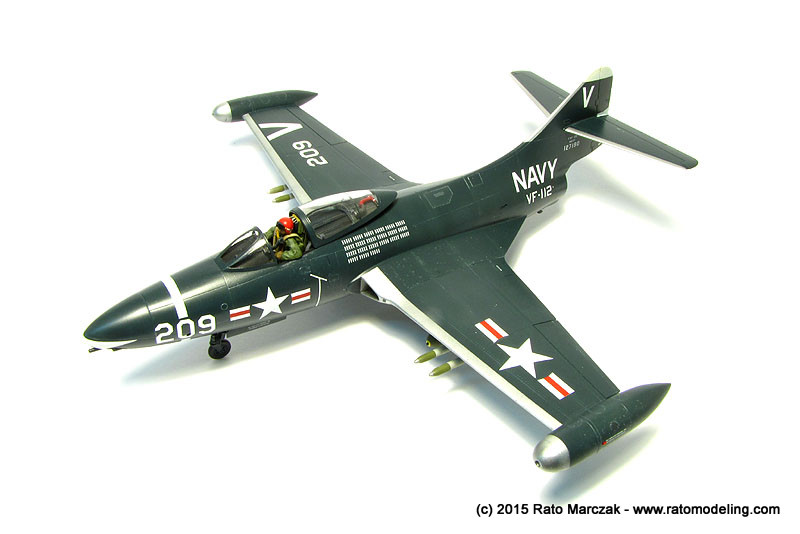
At this point, I had to choose the markings I wanted. After thinking on a few possibilities, I settled with #209, VF-112 aboard USS Philippine Sea (CV-47) in 1950. Starfighter Decals has a nice sheet with this aircraft along with other interesting ones, including a Panther flew by Ens. Neil Armstrong and the aircraft from VF-51 which had the first USN aerial kill of the Korean War.
Why #209? Well, if you are not familiar with this particular piece of history, here it is in a nutshell:
November 9, 1950. In escort for a combined strike against the Sinuiju Bridge that was being carried out by a group of USN Corsairs and Skyraiders, the F9F-2B Panthers from VF-111 aboard CV-47 (USS Philippine Sea) and VF-51 aboard CV-45 (USS Valley Forge) engaged the MiGs of the 139th GIAP. As the flight flew inbound toward the target, five MiG-15s closed in rapidly — it was an important intercept since Antung was just across the border from Sinuiju. Lt. Cmdr. William T. 'Bill' Amen, CO of the VF-111, issued the order to his flight to intercept and they turned toward the MiG-15s, into a head-on pass before they could reach the F4Us and AD-4s. The flights were low, under a layer of thick and high cloud. Lt. Cmdr. Amen closed the distance rapidly by cutting to the inside of the turn and lined up for a shot, using the excellent maneuverability of the F9F Panther to his advantage. He put his Panther in a dive in the 6 o'clock behind the MiG of Capt. Grachev and, accelerating to his Mach limit number, succeeded in scoring some good hits with his 20mm in the MiG. Lt. Amen pulled up of his dive at just 200 feet and his wingman saw how the MiG-15 crashed into the ground. Later, Lt. Amen himself commented, “He was either psycho or could not leave the aircraft.”

A Skyraider on one bombing attacks on the bridges across the Yalu River at Sinuiju - possibly the mission on November 9.
Photo Credit: US Navy
This version is admitted by both sides, but there remains some dispute whether this was the first jet vs. jet kill in history, or just the first US Navy jet vs. jet kill.
Flying from a Chinese airbase at Antung, Manchuria, the MiGs first entered combat on November 1, 1950, with an inconclusive engagement against a group of F-51 Mustangs. On November 8, USAF 1st.Lt. Russell Brown claimed a MiG-15 after a diving air battle in his F-80 Shooting Star - later Russian records would reveal that the MiG, probably flown by Soviet Senior Lt. Kharitonov, actually had escaped. Given that there is no record of other combats against jets until November 9, I think it is indeed the first jet vs. jet kill in history...
Now if you look carefully, you will note that Starfighter decals indicate VF-112, not VF-111. It happens, though, that Lt. Amen's aircraft was unserviceable that day, so he borrowed #209 from VF-112 just to enter to aviation history.
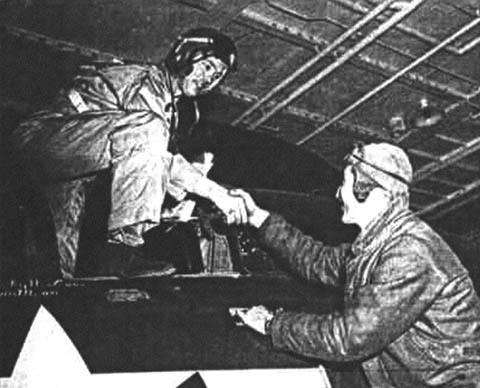
Lt. Cmdr. William T. Amen, USN, climbs out of his F9F-2B Panther after scoring his victory against the MiG-15.
Photo Credit: US Navy
Once decided about the version, I masked and painted the NM leading edges of wings, stabilizers and fin using Gunze's Mr.Color #8. Starfighter decals gives you decals for the white ring around the nose, but I rather opted to paint it. After measuring the 209 digits from the decal sheet, it was a simple masking job:

Here I had to spend some time doing more research. Starfighter Decals gives you BuNo 127190 for Amen's Panther, but this was the BuNo of #208, also from VF-112, not #209. Modeler Rodger Kelly claims that #209 was a F9F-2B BuNo 127094 (provisional). Both numbers put the Panther in a late -2 batch (source: Elward, B.: Grumman F9F Panther/Cougar - First Grumman Cat of the Jet Age, Specialty Press, 2010., app.C - F9F Production , page 160). I used the BuNo from Starfighter decal sheet anyway.
The other question refers to the 'reverse flap' that I mentioned earlier. Digging TailHook Topics (Oct/2009), readers claimed that the small "reverse flap" on the wing flap was installed on F9F-5s BuNo 125083 and subsequent. But BuNo 125083 is a F9F-2! This "reverse flap" was first presented on F9F-2, as shown on the "Handbook Structural Repair Instructions for F9F-2, -4, -5, 5P", AN 01-85FG-3, Dec. 1950.
Therefore, Lt.Cmdr. Amen's Panther was a late F9F-2 with the split flap. And since most -2 and -3 were converted to bomber capabilities, it is generally correct to say that all deployed F9F-2 became F9F-2B. That's why I rescribed the "reverse flap" and would later use the bomb pylons... Got it?
Back to the model, I painted the tail and nose white markings of VF-112, and proceeded with the decals. The Starfighter decals worked like a charm, but I had to resource the stencils from my spare decals. Hasegawa decals are too thick to be usable. Of course I didn't have all the stencils, and had to improvise a bit.
A gray oils wash was cautiously applied over the model to highlight the panel lines and rivets. A dark gray was was used along the leading edges of the wings to emphasize the rivets there. After cleaning the excess wash, the model was set to dry and then coated with Model Master semi-gloss acrylic clear to seal everything.
The landing gear doors were also painted and decaled at this stage, along with the tail skid. When dry-fitting my first attempt at the tail skid shock absorber, I found out it was way over scaled. So I turned a new one on a mini-lathe from a brass rod, and it resulted much better:
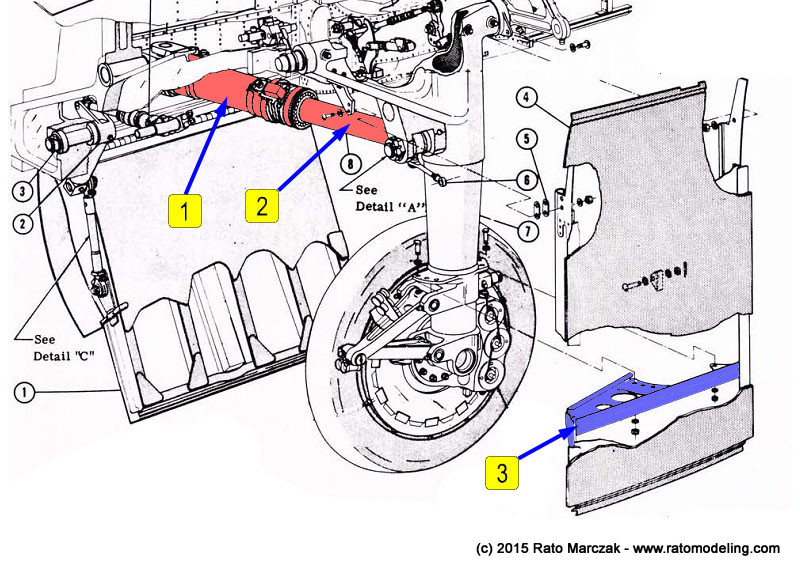
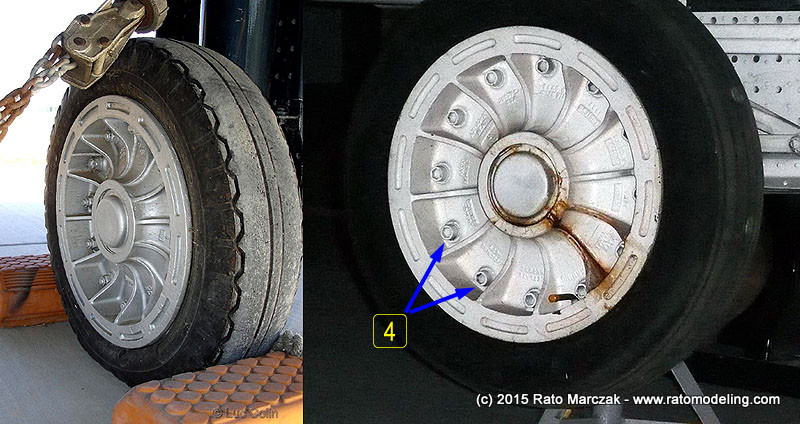
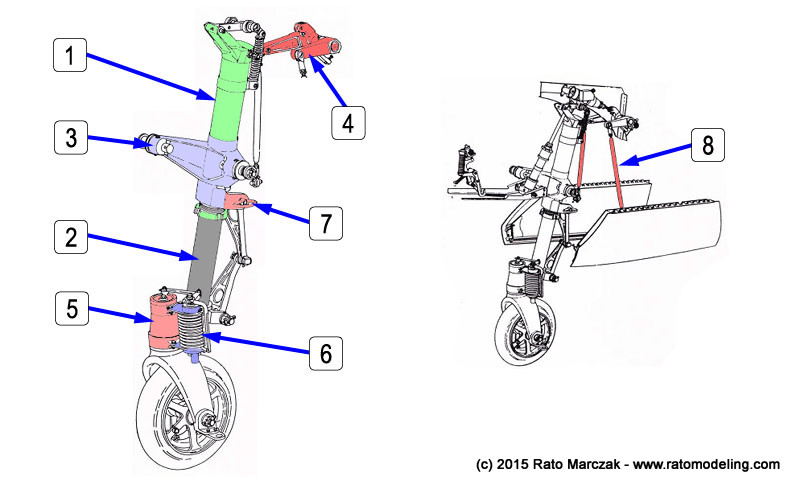
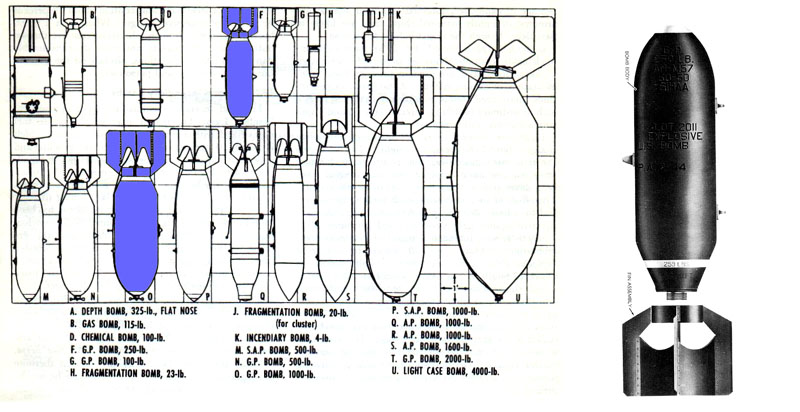
Not counting the wheels, the kit parts for the main landing gear struts are very simple, and the retraction oleos (parts #23 and #24) look terrible. Referring the drawings and photos below, I worked on 4 tasks:
1. New oleos (details 1+2) were scratchbuilt from brass tubing. The retracting arm was made from an Aluminum rod polished and coated with Future to avoid oxidation
2. Main strut detailed with brake lines.
3. Main strut received an anchor plate to secure the wheel well door (detail 3).
4. Wheels received bolts around the rim (detail 4).

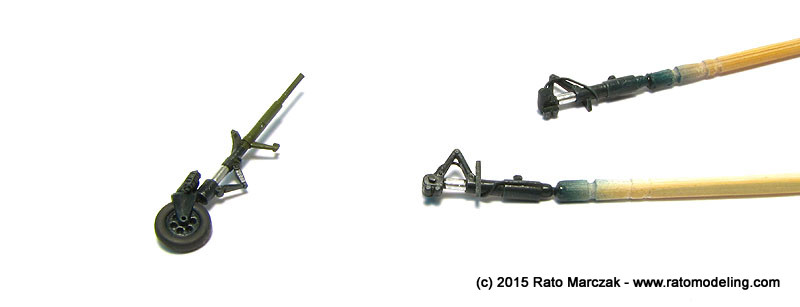
Moving to the front gear, it was designed to fit the original wheel well. Since I made a new, deeper one, most of the front landing gear had to be rebuilt. After studying drawings and photos, I divided the strut in 8 basic components. Starting with a new brass column, I worked with plastic bits and left over parts to recreate the basic look of a Panther's nose wheel.
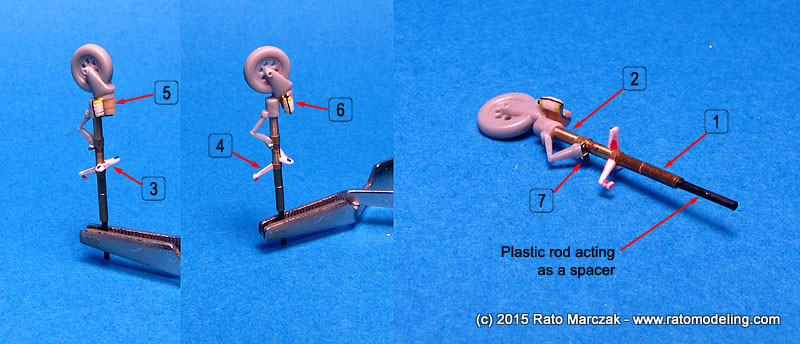
The assembly was designed to be inserted in a hole previously drilled in the well, stopping at the cockpit floor. This resulted a sturdy mounting. I used the kit's wheel, drilled the holes along the rim and replaced the details mounted atop the fork by scratchbuilt ones:
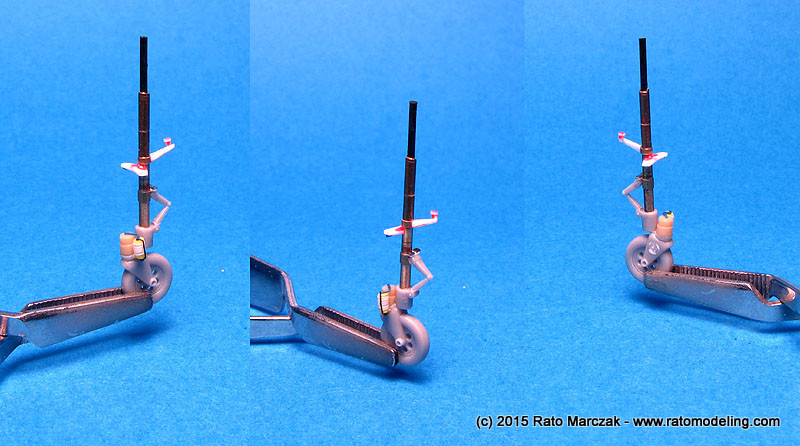
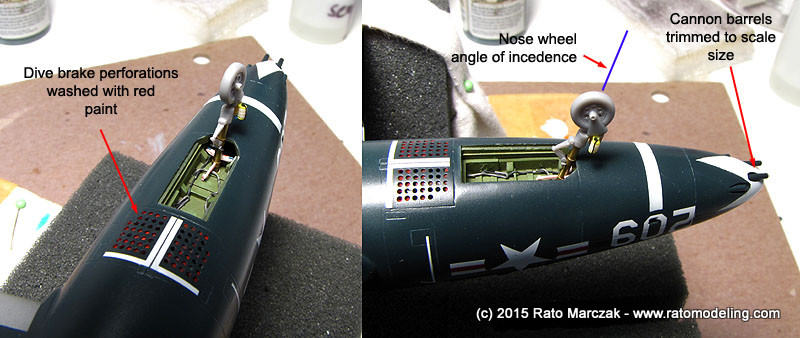
The nose wheel was dry-fitted to ensure its incidence angle. The 20 mm gun muzzles are molded with the nose cone - they were trimmed as they were originally too long. I applied a red smudge prepared with acrylics over the air brakes. After cleaning the excess with a cotton swab, they look the part:
All landing gear parts were painted and dry brushed. The innermost part of the front leg was painted interior green, though, while the oleos were treated with Model Master Silver Chrome Trim:
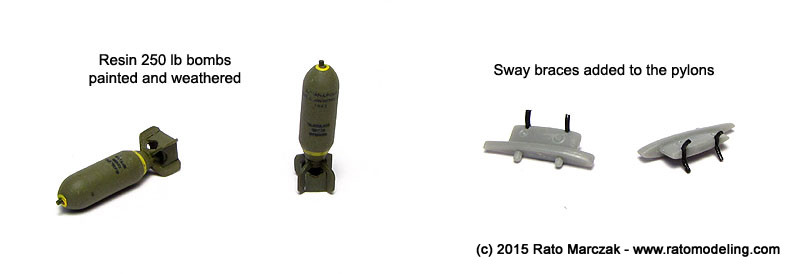
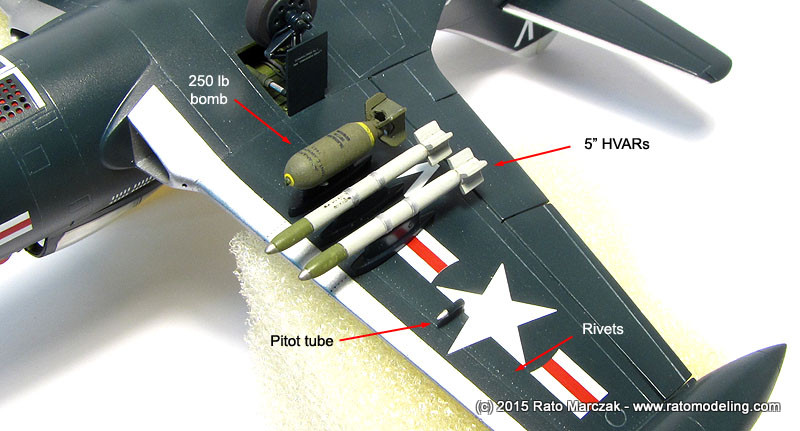
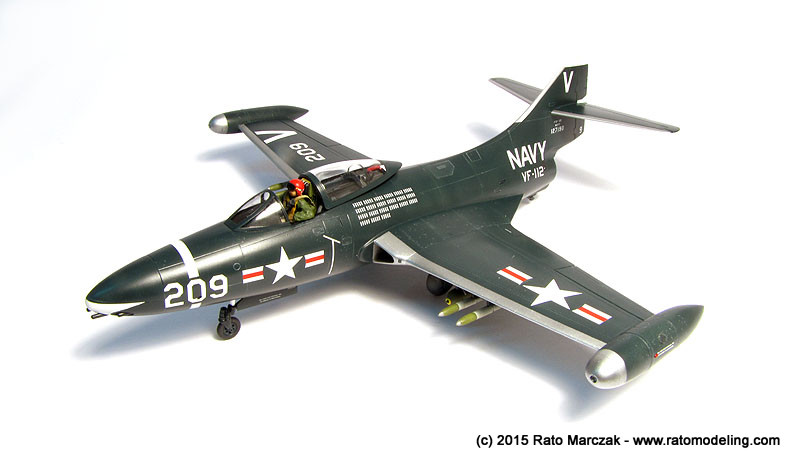
With many small parts laying around on my workbench, I thought it was a good time to start working on the ordnance as well. Having decided early on to equip the pylons with a mix of 250 lb bombs 5 in HVAR (a typical load of fighter bomber Panthers), soon I discovered that I would need the bombs, new HVAR (the ones in the kit were not good), and that even the pylons were incorrect for a F9F-2B...
I have 200+ kits at home, most of them 1/72 scale, but I couldn't find a single 250 lb bomb in any kit, accessory or resin set. Nothing, not one miserable 250 lb bomb. I could order some, but things in Brazilian Federal Post Office take months to arrive... Sad but true. So I gathered some references and decided to scratchbuilt mine...
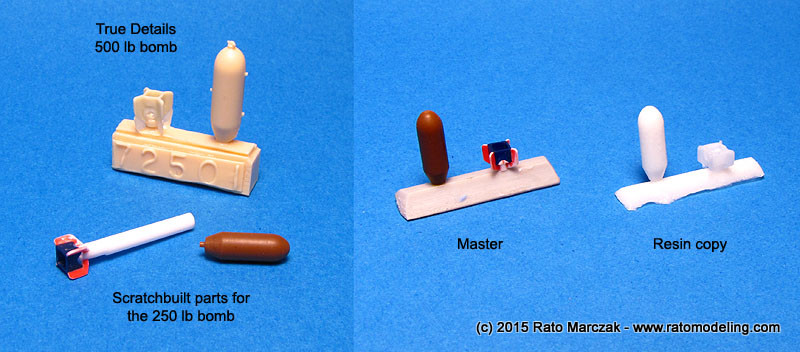
I started with a length of sprue, plugged it on my lathe and turned the basic contour, purposely omitting small details. The bomb fin had to be made of plastic card. Once I was glad with the result, I prepared silicone molds and poured epoxy resin to make a few copies of my 250 lb bombs:
The resin copies were painted, decaled and weathered, ready to be installed under the pylons. Talking about the pylons, the ones of the kit (parts #32) are wrong either for a bomb load or for the HVAR rockets. Most HVAR equipped Panthers were installed on Mk 9 Mod 2 or Aero 143 rocked launchers. The kit parts hardly look like a crossing of both, but at this point I was focusing on finishing the diorama, and decided to live with them. I just added the sway braces on the pair which would receive the bombs:
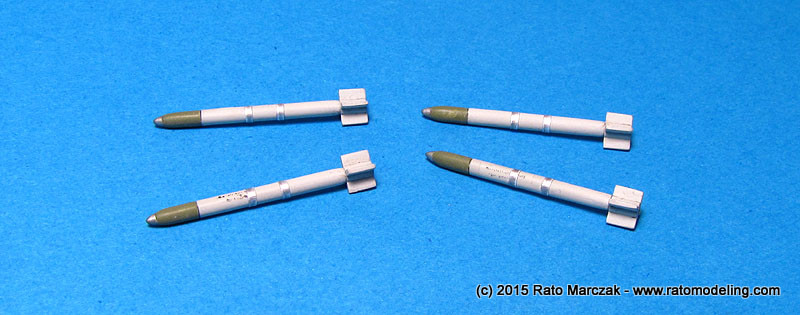
The HVAR rockets were stolen from a Tamiya's F4U-1D kit, and all I added were the plug braces using heavy Aluminum foil, so they matched the kit pylons accordingly:
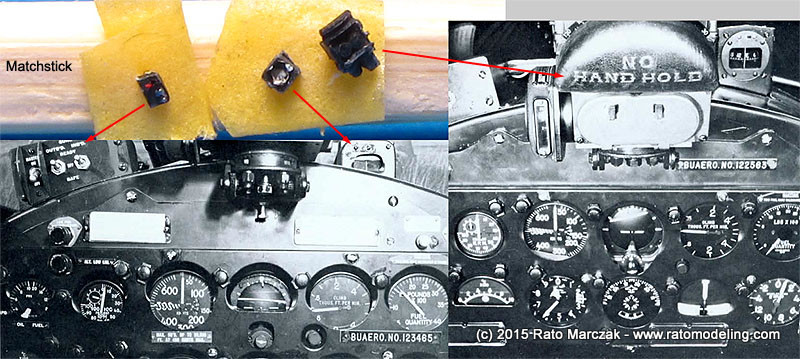
Still on small details, I scratchbuilt the gun switch panel to go on the left of the gun sight, and the stand-by compass to be installed on the right side of the gun sight. The K-14 gun sight is a Quickboost resin item. These parts would be installed before gluing the pilot to the seat:
The sliding part of the canopy received a seal made of semi-round plastic strips, glued along the curved edge. The clear part was masked and painted, and you will note that I have not painted any white Plexiglass seal, so common in many Panthers. After studying several photos of VF-51, 111 and 112, it was clear that they didn't have the white sealing:

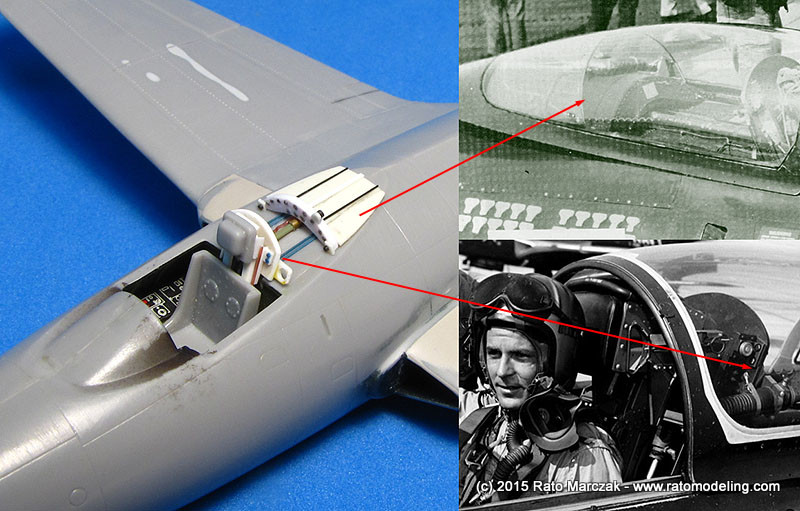
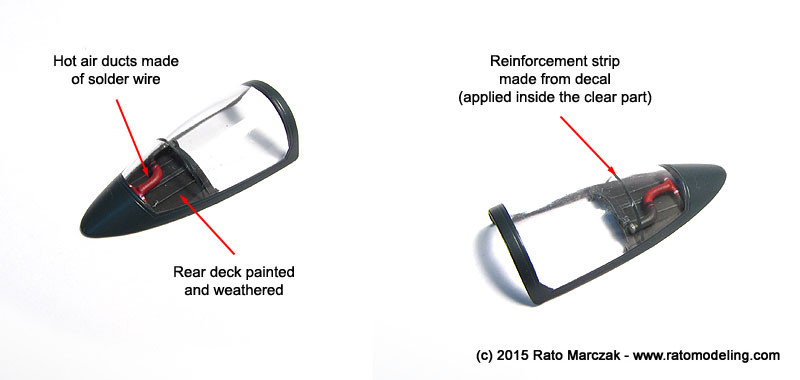
I made the reinforcement strip with a DSB decal applied inside the clear part. The canopy deck was detailed with the hot air (anti-fog) pipes made of solder wire, bent to shape and glued in place (the end of the piping should fit the socket on the left side of the pilot's seat, scratchbuilt earlier). A walk around of a F9F-5 by Don Hilton was a tremendous help to make these details, as they were the same of the -2:
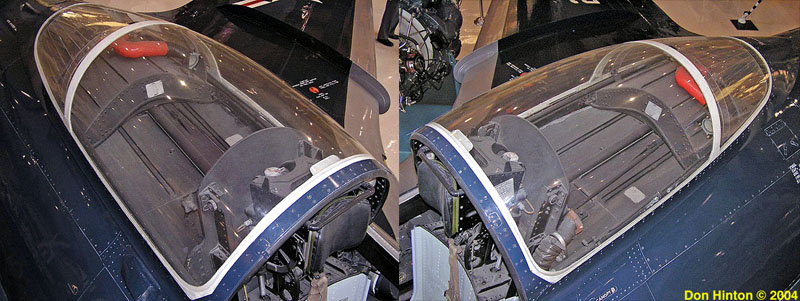
Photo credit: Don Hilton
The improved seat was painted and weathered - not much, as the pilot would block the view there. I added the bang cords using solder wire, rolled on a flat file to add some texture so it looks more like a rope:
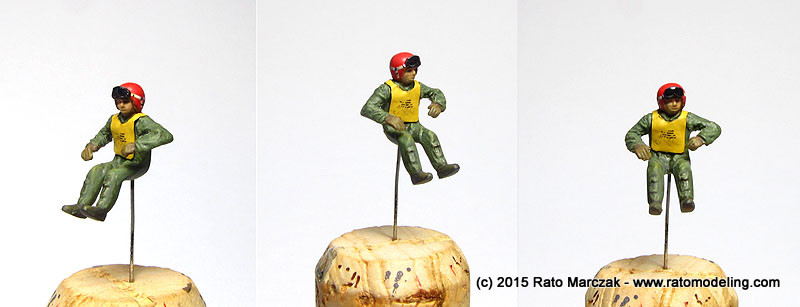
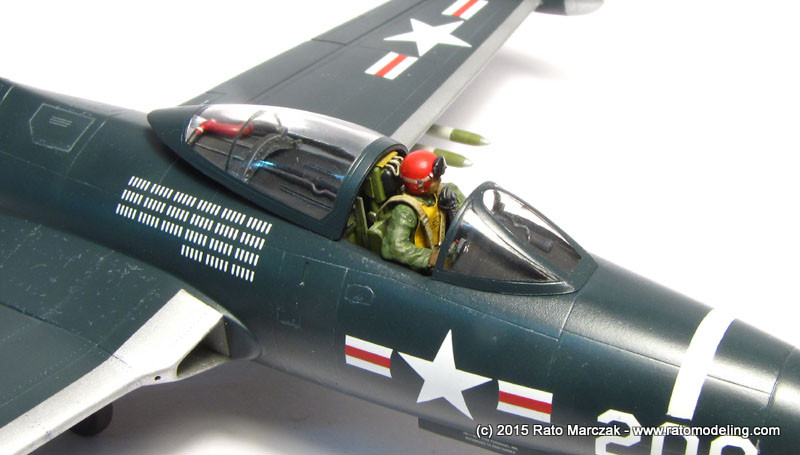
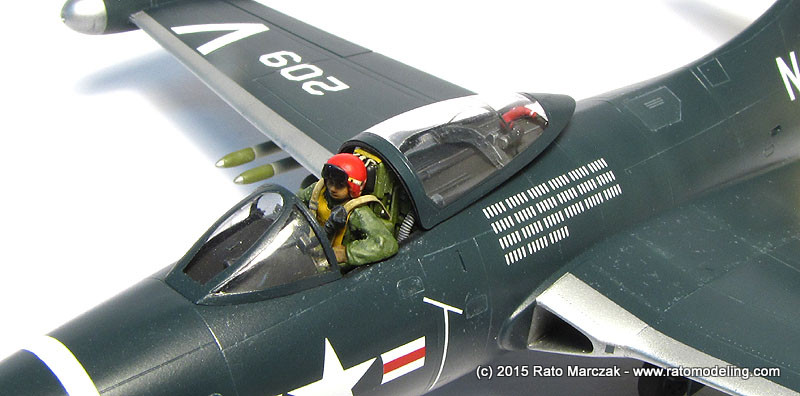
I cemented the pilot's seat, the armour plate, and the hot air connector in place. Talking about the pilot, I used the kit's one, but refined the helmet's shape, replaced both arms and added a goggle. The arms were a pain, as one is resin and the other soft vinyl. The mae west life jacket was cut from thick lead foil, painted yellow and decorated with spare decals. The red helmet was a guess, just because VF-111 had red noses painted on their Panthers. I made an oxygen mask carved from a piece of plastic, a guitar string for the hose, and glued the pilot to the seat. Once the glue has dried, I added photoetched harness. Not perfect, but the pilot looks comfortable in his office:
At this point I started to assemble all the remaining parts. The landing gear was glued, along with the doors and the tail skid. The pylons were also installed and the ordnance cemented in place. Then the model was flipped over: canopy, arrestor hook and Pitot tube came next.
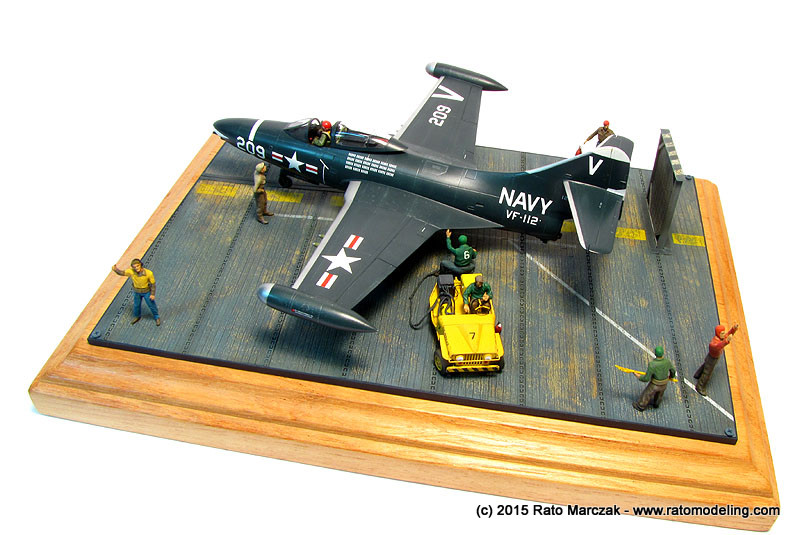
Having built the USS Philippine Sea carrier deck section and the NC-1A started unit before, it was time to take care of the deck crew to finish the diorama. Although we modelers are plenty of options in 1/72 scale regarding troops, deck crew, maintenance personel, mechanics and alike is a different story. It is really difficult to find good items to decorate carrier decks and airfields, even more for Korea and Vietnam wars... Anyway, I used mostly Preiser figures. Some of them had their caps sanded off, as I would paint the characteristic bonnets afterwards. I made red (armament/explosives/fuel), green (plane handlers), yellow (flight officers) and generic brown shirts. A few got utility belts, others had their jerseys stenciled with names/rank/numbers, and also I stole a fire extinguisher from a Fujimi figure set. I'm not particularly good at painting figures, just followed the base color/light/shadow recipe. One or two of my figures were molded with very soft details, making painting even more difficult - or less convincing:

Finishing off the Panther, the nose landing gear doors had detail 8 added (doors' retraction arms), and the wheel bay really looks busy, now. I wish I had a photo of the original kit part:
Moving a bit back, the retraction arms were assembled and glued to the main landing gear struts. The idea of using telescoping polished Aluminum rods as oleos gave a nice touch to an otherwise overall IG/DSB area, and it was much simpler than painting it with chrome silver of covering with bare metal foil. I definitely will be using the method again:
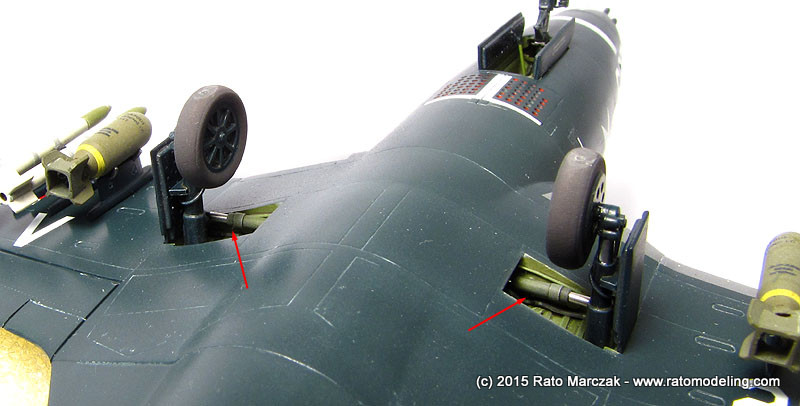
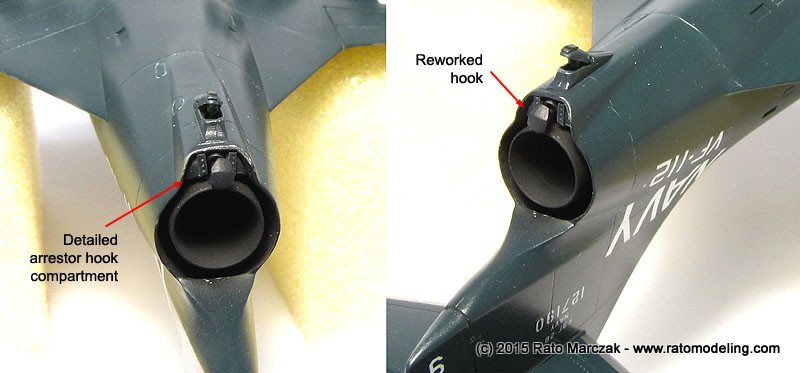
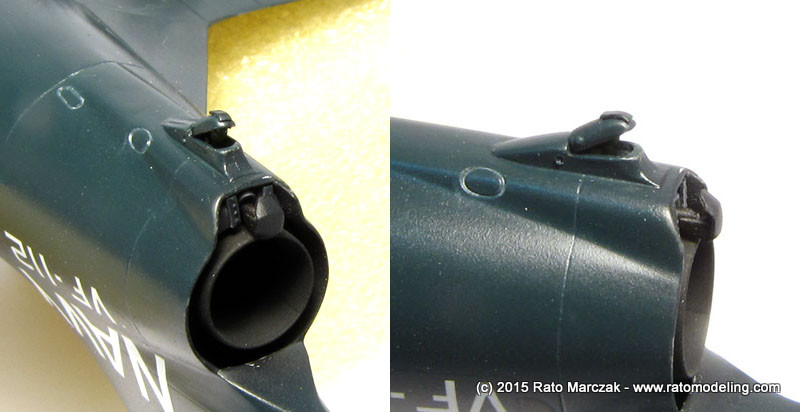
I forgot to mention that this kit has the arrestor hook compartment, just under the exhaust pipe, empty. In order to add some detail there, earlier during the project I made exact cross sections of the aperture using Tamiya Light Curing Putty. The putty was removed after drying and sliced to privide a 'wall', which was detailed with plastic bits. A slot was open in the middle allowed me to slide the arrestor hook in:
The arrestor hook was sanded to create the flat faces of the hook and inserted in its place. The last parts installed there were the tail skid and bumper:
Next, the ordnance was cemented on the pylons. It wasn't a simple task, as I had no positive alignment aid. Next time I'll add some pins... Test fitting the Pitot tube, I found out that its opening under the right wing was oversized. I solved the issue using a thick mix of carpenter's glue and DSB acrylic paint to fix it in the hole and fill the gaps at the same time:
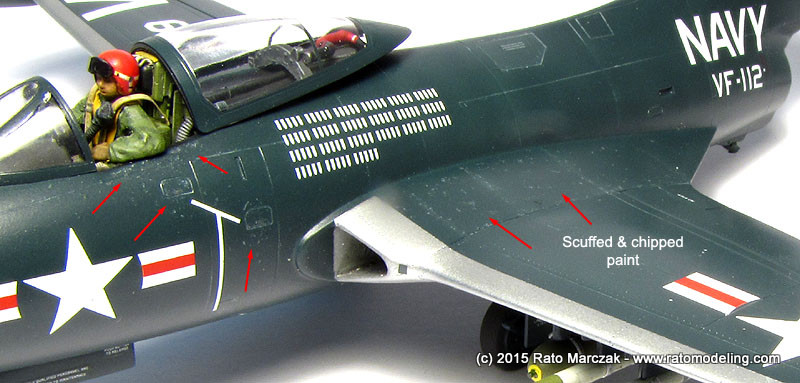
Adding a convincing weathering in a DSB aircraft is never an easy task, but without it, they tend to look too much toy like. I alternated gray and silver Prismacolor pencils to try to reproduce that scuffed paint effect, mainly over three areas: cockpit entrance (port side, only), wing roots, and wingtip tanks. The cockpit entrance is obvious - I simulated the effect along the path a pilot does when entering the aircraft, that is, cockpit edges and kick in steps. When studying photos of operational Panthers, you will see that it was refueled with the wings folded, using the characteristic ladder hooked on the wingtip tanks. That is why most of the paint chipping concentrate on the wing roots and around the tanks.

The wingtip lights were removed earlier in the project to make sanding easier. They were replaced using a well known technique:

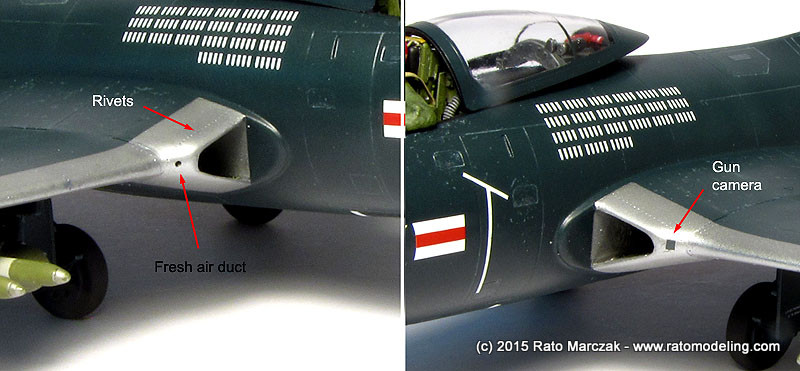
The rivets pressed along the wings leading edges could be more visible, had I applied a dark wash, but I left them clean. The gun camera beside the port engine air intake was simulated using a square piece of dark grey decal previously coated with high gloss varnish. Simple and effective in this scale:
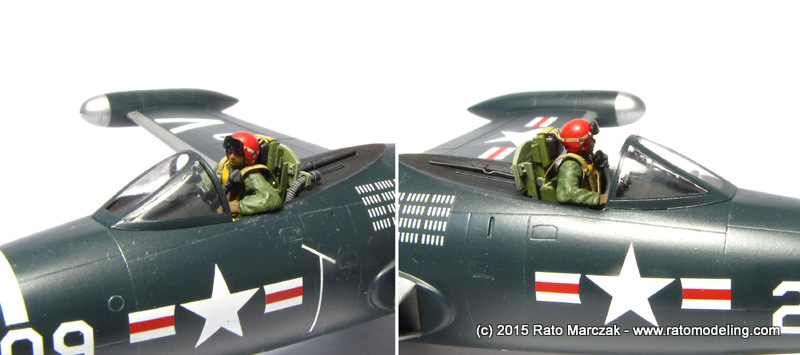
The additional instruments and the gunsight were glued over the control panel, so the sliding part of the canopy could be finally installed. I had to use a plastic shim under the deck to angle the canopy properly. After all the work improving the cockpit and the rear deck, I'm happy with the results, particularly if I think about the original parts. And the pilot figure gave a lot of life to the office, of course:
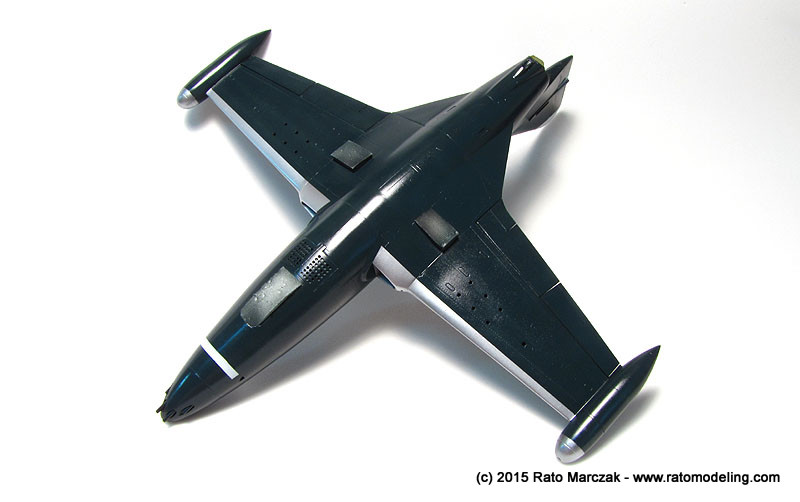
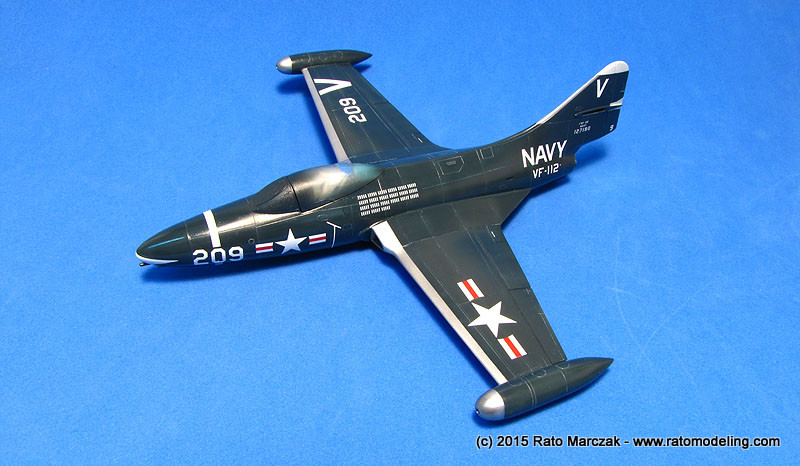
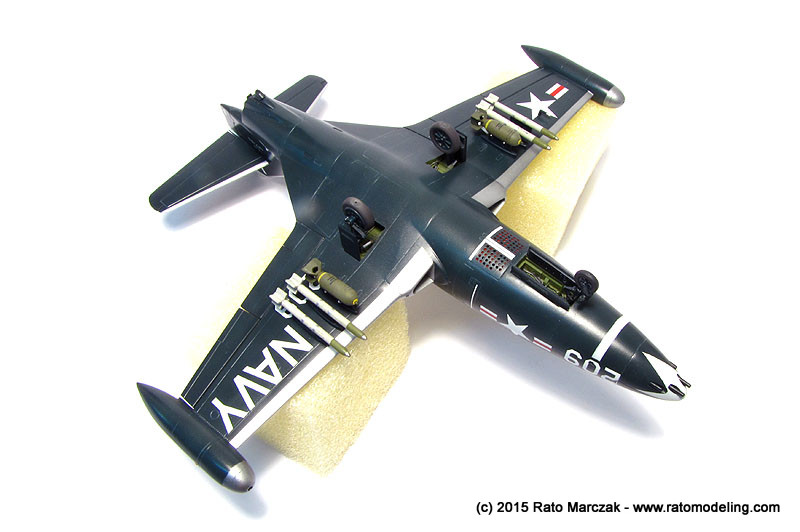
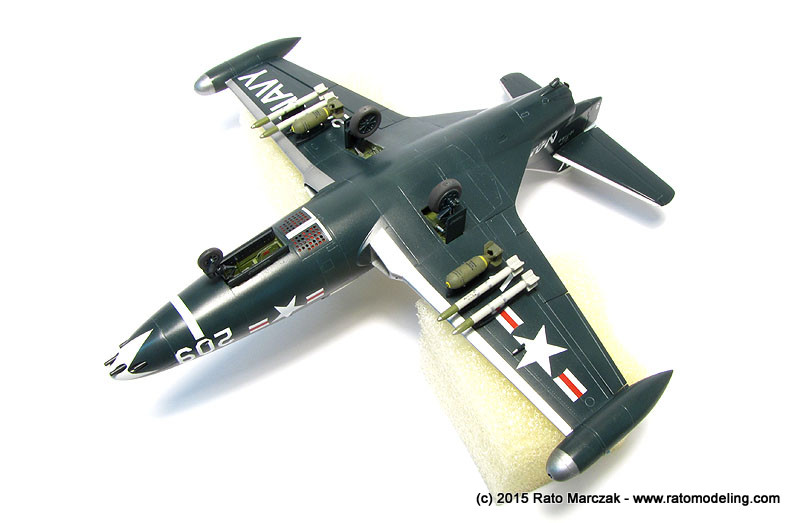
And I chalked this one up for me. My Panther was done. Yeah, I know nothing of the landing gear wells will be visible in the diorama, so here is a couple of photos:
And some archival pictures before finishing the diorama:
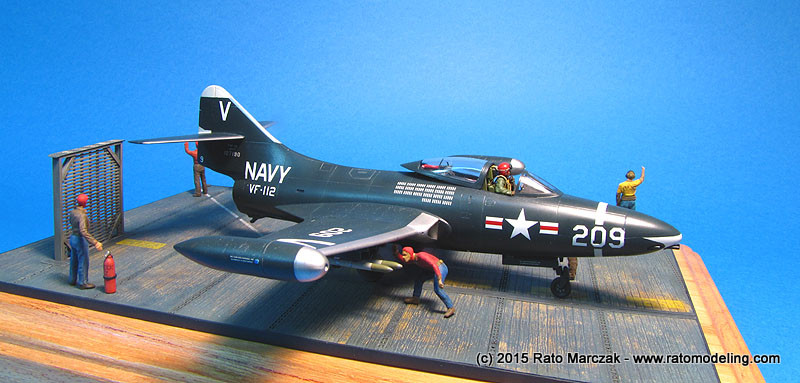
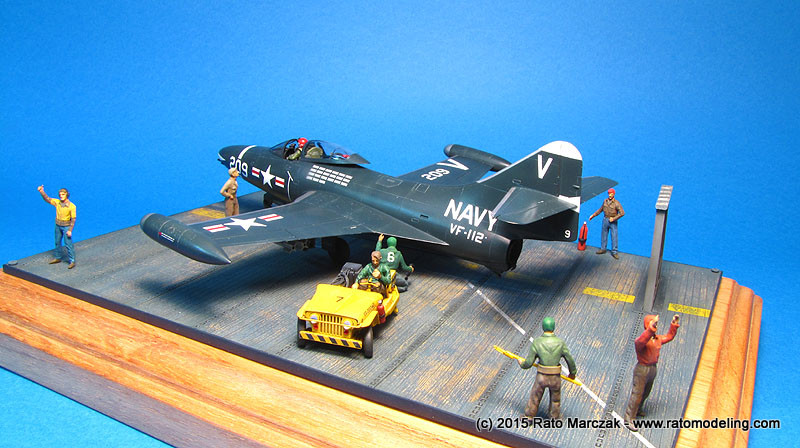
The last step, obviously, was the easiest one: to study the best balance for all elements in the diorama and gluing everything in place. I can't claim I'm completely satisfied with the final result, but most of the feeling lies on my own shortage of more interesting figures.
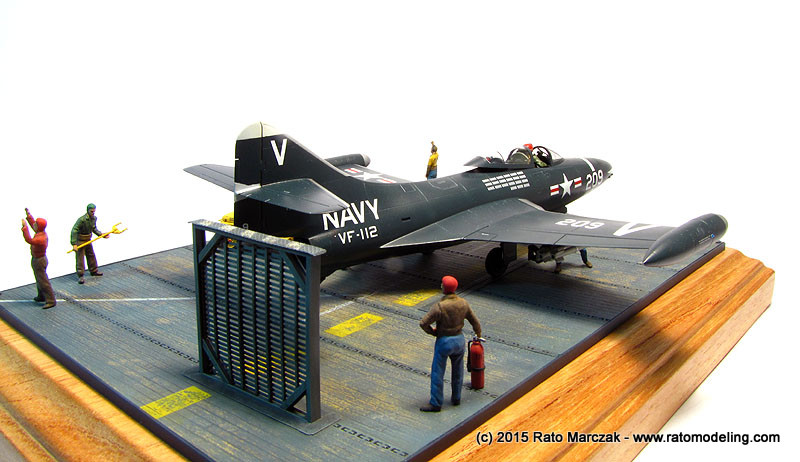
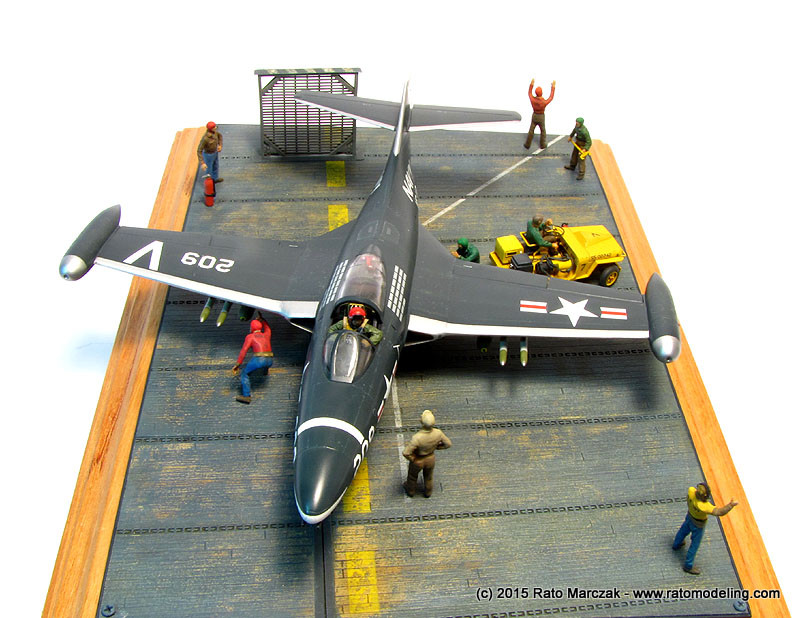
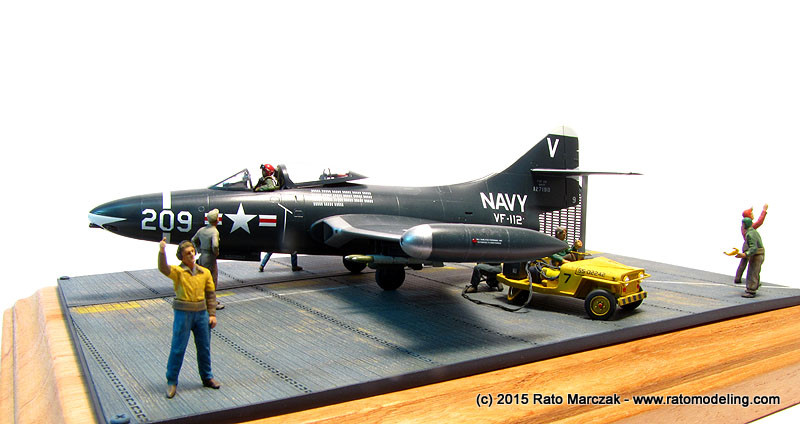

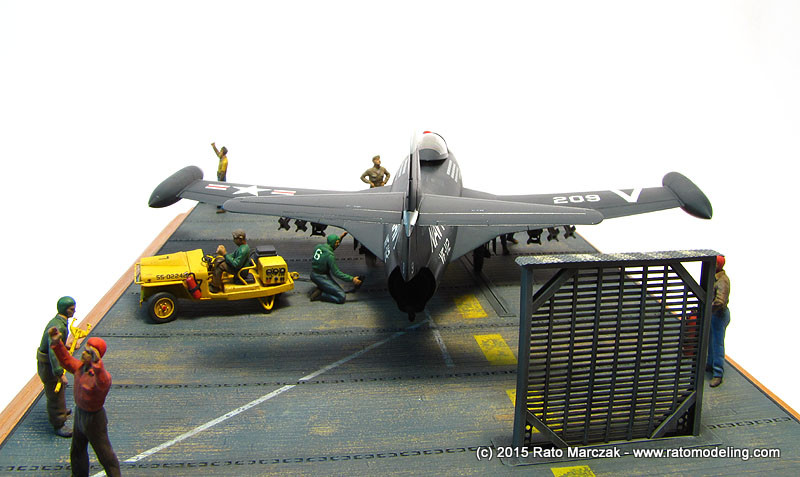
These old 1/72 Hasegawa kits are still a joy to build, pretty much like what the 1/48 guys say about Monogram models. And if you put them on a display base, I bet nobody will care about the age of the kit...

I found a second hand Panther being sold at a modeling show and grabbed it quickly. The Hasegawa kit has been around for a while, and I think my copy is their 1/72 Panther last incarnation:
This Hasegawa Panther is, in fact, very old, and has been boxed and re-boxed several times, including Minicraft versions. I don't care about kit genealogy, but here are some boxtops if you are interested:
Back to the kit, it is well molded, as usual from this manufacturer, with consistent recessed panel lines but almost devoid of surface details. It has oversimplified wheel wells and cockpit, typical of Hasegawa kits of this vintage, but the fit is better than many new releases. The parts count is very low, and there are a few errors. I'll discuss some along the text, but there is one which I wouldn't correct: the shape of the nose is off. This is mentioned in Bert Kinzey's Detail & Scale #15: "...The nose centerline is on the aircraft centerline, and it should be below it. Correcting this would be rather difficult since it is the shape of the nose that is wrong and not the angle at which it is molded on the fuselage..." (thanks for the heads up, Flavio). Mr. Kinzey's claim suffices to make me live with that.
There is one thing I love in all Hasegawa kits, they build very easily, without any hurdles, unless you are a masochist. I'm not one, but there is one thing I hate in old Hasegawa kits: their ultra-shallow wheel wells. Sometimes I leave them as is, but they were ridiculously shallow in this case. I had to do something.
Without thinking twice, I removed the kit's wells and scratchbuilt new ones using plastic sheet. The nose wheel well is still a bit shallow, because I was limited by the cockpit floor height. Still, it is much better than what comes with the kit. And since I was at it, basic structural details were added to the cockpit sidewalls:
The main landing gear wells were much easier to improve since in the Panther the inner undercarriage doors were kept closed when the landing gear was extended. Therefore all I had to do was to make a box extending from the kit wells. Really simple job:
I painted the cockpit parts and finished it using the kit decals for the instruments. Since this would be a diorama, and the pilot would be seated, not much of it would be visible. I left the control column and the pilot's seat out to be glued much later. Plastic bits details were added to the wheel wells and they were painted with Interior Green. At this point, the wings were assembled and the fuselage closed. I drilled holes in the wheel wells to accept solder wires - they would simulate the hydraulic and brake lines. This is a method I've been using for years, because solder wire are quite flexible and easy to conform using a toothpick. All you have to do is to paint hose connectors if you wish so. It is important to apply a clear coat afterwards, as solder wires oxidize with time:
After a dark brown oils wash, the wheel wells were flat coated. They look busy - and deep - enough to trick your eye:
The fuselage was attached to the wings without problems. No filler was harmed during this stage. Just a few brush strokes with Mr.Surfacer here and there, a couple of passes with sandpaper and it started to look like a Panther:
As in my other 1/72 models, I like to add rivet lines, but not on the whole model. I added them along main spar lines, control surfaces and stabilizers, always knocking them down with 600 grade sandpaper. The idea is to leave just a hint of the rivets. Remember, this is 1/72 scale.
A quick research revealed that this particular Panther had the 'reverse flap', common in the dash 5 version. I will explain why later. I filled in a bogus panel line molded with the flap and scribed the split flap following drawings. The starboard wing had sink marks due to the Hasegawa logo molded on the inner face of it (check part #3). It was treated with Mr.Surfacer and sanded flush. The only parts which didn't fit that well in this kit were the engine air intakes, parts #8 and #9. After gluing them to the wing leading edges, I masked their perimeter and airbrushed a heavy coat of automotive gray primer. Once dry, the area was sanded flush with the masks which, once removed, left a nice step concealing the bad fit. If you are building this kit, remember to paint the interior of the intakes before gluing them in place:
At this point I discovered that the rear cockpit deck was attached to the sliding part of the canopy. Hasegawa not only oversimplified it, but also made the deck molded with the fuselage halves. Since I was going to pose the canopy open, I had to remove the molded on deck. Tamiya flat file did a little miracle here, as I was able to remove the deck with the fuselage closed, and as a bonus I got a perfectly flat bed aft the cockpit. The bad news was that I had to scratchbuild a new rear deck and all associated details:
Back to the books, I started to work on the visible cockpit details. I reworked the pilot's seat from the kit, adding details to make it closer to what I saw in the photos, particularly the rails of the ejection system. Using photos as reference, I scratchbuilt the armor plate and the rear deck which goes attached to the sliding canopy. Parts of the canopy's anti-fog ducts were also created from solder wire and guitar string, but these would be trued only after the canopy was painted:
After a careful dry-fitting and the unavoidable adjustments, all details were ready for paint:
Whenever possible, I like to install jet exhaust pipes after painting my models. It simplifies the masking and provides a good aperture to install a handle to hold the model during the painting phase. I modified part #11 to be installed later on, but failed to thin the lips on a lathe, so I had to make a new one using a left-over part from my MiG-15 project. A typical self-inflicted waste of time...
The tail skid was carved off from the fuselage and a new one was thermoformed and detailed. I also turned the internal dumper, but later I discovered that it was over scaled and would be replaced:
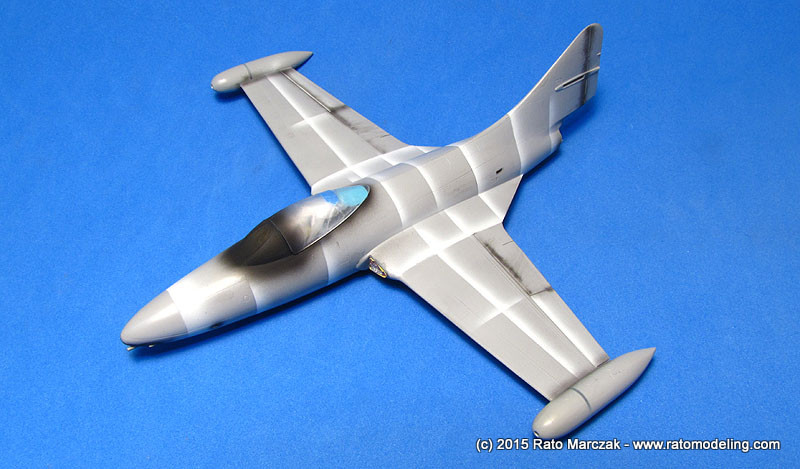
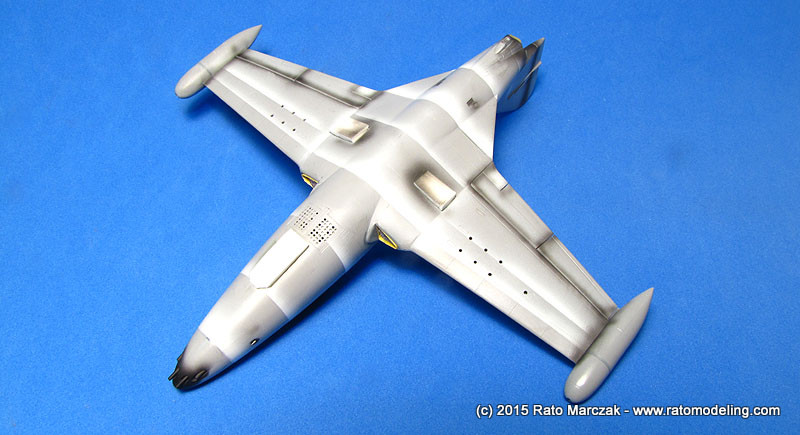
The opening for the engine exhaust had several details added to blank the ugly empty space above the tail skid, leaving room to insert the pipe later, and a narrow slot through which the arrestor hook would be pushed later. The nose cone was cemented in place, and the front and rear cockpit decks painted and dry-brushed. The air brakes were also glued shut. The windshield was masked and installed in place, then painted black. The sliding part of the canopy was wrapped with Parafilm and set in closed position with Blue-Tack to act as a cockpit mask. The model was primed with automotive gray primer and pre-shaded. Since this would be a Dark Sea Blue bird, I pre-shaded it with white paint, using Post-It notes to leave a hard edge along the panel lines:
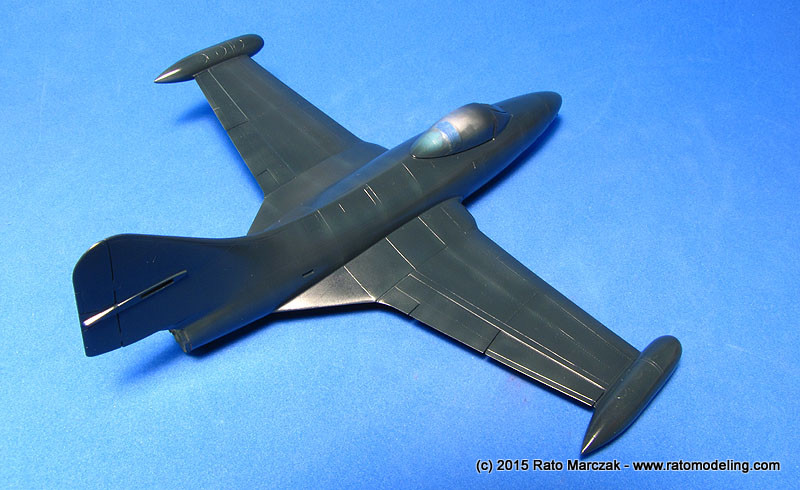
Painting was easy. Just let some gloss Dark Sea Blue flow from your airbrush... I used the now defunct Aeromaster Warbirds enamels because I still have a good stock of them. I shot it very thin at low pressure, trying to preserve a hint of the pre-shading.
These enamels take much longer to dry than I got used to with lacquers, but that's ok. A coat of Pledge Future wax prepared the model for the decals:
At this point, I had to choose the markings I wanted. After thinking on a few possibilities, I settled with #209, VF-112 aboard USS Philippine Sea (CV-47) in 1950. Starfighter Decals has a nice sheet with this aircraft along with other interesting ones, including a Panther flew by Ens. Neil Armstrong and the aircraft from VF-51 which had the first USN aerial kill of the Korean War.
Why #209? Well, if you are not familiar with this particular piece of history, here it is in a nutshell:
November 9, 1950. In escort for a combined strike against the Sinuiju Bridge that was being carried out by a group of USN Corsairs and Skyraiders, the F9F-2B Panthers from VF-111 aboard CV-47 (USS Philippine Sea) and VF-51 aboard CV-45 (USS Valley Forge) engaged the MiGs of the 139th GIAP. As the flight flew inbound toward the target, five MiG-15s closed in rapidly — it was an important intercept since Antung was just across the border from Sinuiju. Lt. Cmdr. William T. 'Bill' Amen, CO of the VF-111, issued the order to his flight to intercept and they turned toward the MiG-15s, into a head-on pass before they could reach the F4Us and AD-4s. The flights were low, under a layer of thick and high cloud. Lt. Cmdr. Amen closed the distance rapidly by cutting to the inside of the turn and lined up for a shot, using the excellent maneuverability of the F9F Panther to his advantage. He put his Panther in a dive in the 6 o'clock behind the MiG of Capt. Grachev and, accelerating to his Mach limit number, succeeded in scoring some good hits with his 20mm in the MiG. Lt. Amen pulled up of his dive at just 200 feet and his wingman saw how the MiG-15 crashed into the ground. Later, Lt. Amen himself commented, “He was either psycho or could not leave the aircraft.”
A Skyraider on one bombing attacks on the bridges across the Yalu River at Sinuiju - possibly the mission on November 9.
Photo Credit: US Navy
This version is admitted by both sides, but there remains some dispute whether this was the first jet vs. jet kill in history, or just the first US Navy jet vs. jet kill.
Flying from a Chinese airbase at Antung, Manchuria, the MiGs first entered combat on November 1, 1950, with an inconclusive engagement against a group of F-51 Mustangs. On November 8, USAF 1st.Lt. Russell Brown claimed a MiG-15 after a diving air battle in his F-80 Shooting Star - later Russian records would reveal that the MiG, probably flown by Soviet Senior Lt. Kharitonov, actually had escaped. Given that there is no record of other combats against jets until November 9, I think it is indeed the first jet vs. jet kill in history...
Now if you look carefully, you will note that Starfighter decals indicate VF-112, not VF-111. It happens, though, that Lt. Amen's aircraft was unserviceable that day, so he borrowed #209 from VF-112 just to enter to aviation history.
Lt. Cmdr. William T. Amen, USN, climbs out of his F9F-2B Panther after scoring his victory against the MiG-15.
Photo Credit: US Navy
Once decided about the version, I masked and painted the NM leading edges of wings, stabilizers and fin using Gunze's Mr.Color #8. Starfighter decals gives you decals for the white ring around the nose, but I rather opted to paint it. After measuring the 209 digits from the decal sheet, it was a simple masking job:
Here I had to spend some time doing more research. Starfighter Decals gives you BuNo 127190 for Amen's Panther, but this was the BuNo of #208, also from VF-112, not #209. Modeler Rodger Kelly claims that #209 was a F9F-2B BuNo 127094 (provisional). Both numbers put the Panther in a late -2 batch (source: Elward, B.: Grumman F9F Panther/Cougar - First Grumman Cat of the Jet Age, Specialty Press, 2010., app.C - F9F Production , page 160). I used the BuNo from Starfighter decal sheet anyway.
The other question refers to the 'reverse flap' that I mentioned earlier. Digging TailHook Topics (Oct/2009), readers claimed that the small "reverse flap" on the wing flap was installed on F9F-5s BuNo 125083 and subsequent. But BuNo 125083 is a F9F-2! This "reverse flap" was first presented on F9F-2, as shown on the "Handbook Structural Repair Instructions for F9F-2, -4, -5, 5P", AN 01-85FG-3, Dec. 1950.
Therefore, Lt.Cmdr. Amen's Panther was a late F9F-2 with the split flap. And since most -2 and -3 were converted to bomber capabilities, it is generally correct to say that all deployed F9F-2 became F9F-2B. That's why I rescribed the "reverse flap" and would later use the bomb pylons... Got it?
Back to the model, I painted the tail and nose white markings of VF-112, and proceeded with the decals. The Starfighter decals worked like a charm, but I had to resource the stencils from my spare decals. Hasegawa decals are too thick to be usable. Of course I didn't have all the stencils, and had to improvise a bit.
A gray oils wash was cautiously applied over the model to highlight the panel lines and rivets. A dark gray was was used along the leading edges of the wings to emphasize the rivets there. After cleaning the excess wash, the model was set to dry and then coated with Model Master semi-gloss acrylic clear to seal everything.
The landing gear doors were also painted and decaled at this stage, along with the tail skid. When dry-fitting my first attempt at the tail skid shock absorber, I found out it was way over scaled. So I turned a new one on a mini-lathe from a brass rod, and it resulted much better:
Not counting the wheels, the kit parts for the main landing gear struts are very simple, and the retraction oleos (parts #23 and #24) look terrible. Referring the drawings and photos below, I worked on 4 tasks:
1. New oleos (details 1+2) were scratchbuilt from brass tubing. The retracting arm was made from an Aluminum rod polished and coated with Future to avoid oxidation
2. Main strut detailed with brake lines.
3. Main strut received an anchor plate to secure the wheel well door (detail 3).
4. Wheels received bolts around the rim (detail 4).
Moving to the front gear, it was designed to fit the original wheel well. Since I made a new, deeper one, most of the front landing gear had to be rebuilt. After studying drawings and photos, I divided the strut in 8 basic components. Starting with a new brass column, I worked with plastic bits and left over parts to recreate the basic look of a Panther's nose wheel.
The assembly was designed to be inserted in a hole previously drilled in the well, stopping at the cockpit floor. This resulted a sturdy mounting. I used the kit's wheel, drilled the holes along the rim and replaced the details mounted atop the fork by scratchbuilt ones:
The nose wheel was dry-fitted to ensure its incidence angle. The 20 mm gun muzzles are molded with the nose cone - they were trimmed as they were originally too long. I applied a red smudge prepared with acrylics over the air brakes. After cleaning the excess with a cotton swab, they look the part:
All landing gear parts were painted and dry brushed. The innermost part of the front leg was painted interior green, though, while the oleos were treated with Model Master Silver Chrome Trim:
With many small parts laying around on my workbench, I thought it was a good time to start working on the ordnance as well. Having decided early on to equip the pylons with a mix of 250 lb bombs 5 in HVAR (a typical load of fighter bomber Panthers), soon I discovered that I would need the bombs, new HVAR (the ones in the kit were not good), and that even the pylons were incorrect for a F9F-2B...
I have 200+ kits at home, most of them 1/72 scale, but I couldn't find a single 250 lb bomb in any kit, accessory or resin set. Nothing, not one miserable 250 lb bomb. I could order some, but things in Brazilian Federal Post Office take months to arrive... Sad but true. So I gathered some references and decided to scratchbuilt mine...
I started with a length of sprue, plugged it on my lathe and turned the basic contour, purposely omitting small details. The bomb fin had to be made of plastic card. Once I was glad with the result, I prepared silicone molds and poured epoxy resin to make a few copies of my 250 lb bombs:
The resin copies were painted, decaled and weathered, ready to be installed under the pylons. Talking about the pylons, the ones of the kit (parts #32) are wrong either for a bomb load or for the HVAR rockets. Most HVAR equipped Panthers were installed on Mk 9 Mod 2 or Aero 143 rocked launchers. The kit parts hardly look like a crossing of both, but at this point I was focusing on finishing the diorama, and decided to live with them. I just added the sway braces on the pair which would receive the bombs:
The HVAR rockets were stolen from a Tamiya's F4U-1D kit, and all I added were the plug braces using heavy Aluminum foil, so they matched the kit pylons accordingly:
Still on small details, I scratchbuilt the gun switch panel to go on the left of the gun sight, and the stand-by compass to be installed on the right side of the gun sight. The K-14 gun sight is a Quickboost resin item. These parts would be installed before gluing the pilot to the seat:
The sliding part of the canopy received a seal made of semi-round plastic strips, glued along the curved edge. The clear part was masked and painted, and you will note that I have not painted any white Plexiglass seal, so common in many Panthers. After studying several photos of VF-51, 111 and 112, it was clear that they didn't have the white sealing:
I made the reinforcement strip with a DSB decal applied inside the clear part. The canopy deck was detailed with the hot air (anti-fog) pipes made of solder wire, bent to shape and glued in place (the end of the piping should fit the socket on the left side of the pilot's seat, scratchbuilt earlier). A walk around of a F9F-5 by Don Hilton was a tremendous help to make these details, as they were the same of the -2:
Photo credit: Don Hilton
The improved seat was painted and weathered - not much, as the pilot would block the view there. I added the bang cords using solder wire, rolled on a flat file to add some texture so it looks more like a rope:
I cemented the pilot's seat, the armour plate, and the hot air connector in place. Talking about the pilot, I used the kit's one, but refined the helmet's shape, replaced both arms and added a goggle. The arms were a pain, as one is resin and the other soft vinyl. The mae west life jacket was cut from thick lead foil, painted yellow and decorated with spare decals. The red helmet was a guess, just because VF-111 had red noses painted on their Panthers. I made an oxygen mask carved from a piece of plastic, a guitar string for the hose, and glued the pilot to the seat. Once the glue has dried, I added photoetched harness. Not perfect, but the pilot looks comfortable in his office:
At this point I started to assemble all the remaining parts. The landing gear was glued, along with the doors and the tail skid. The pylons were also installed and the ordnance cemented in place. Then the model was flipped over: canopy, arrestor hook and Pitot tube came next.
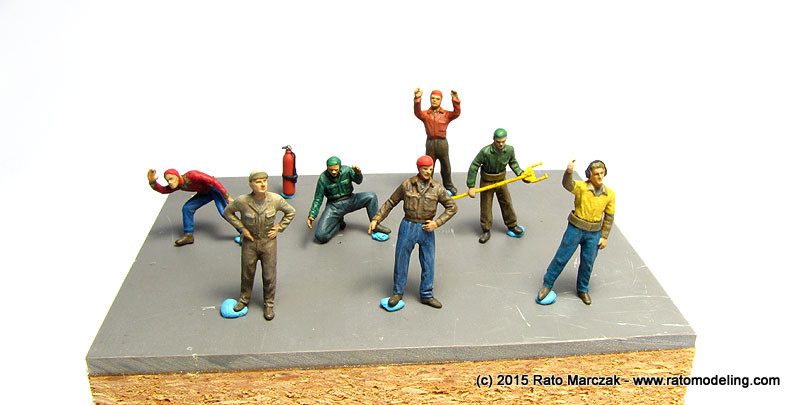
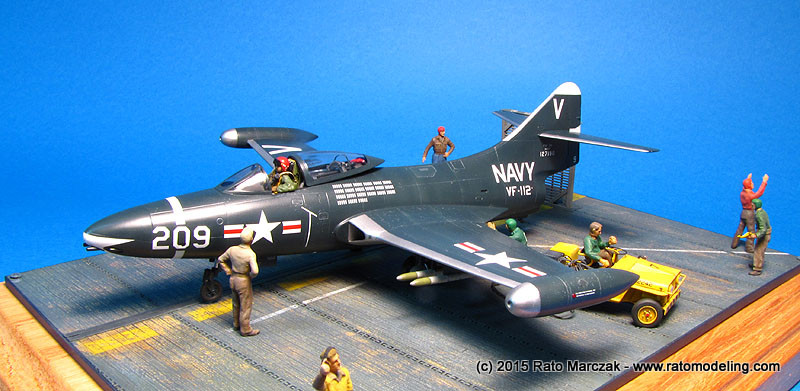
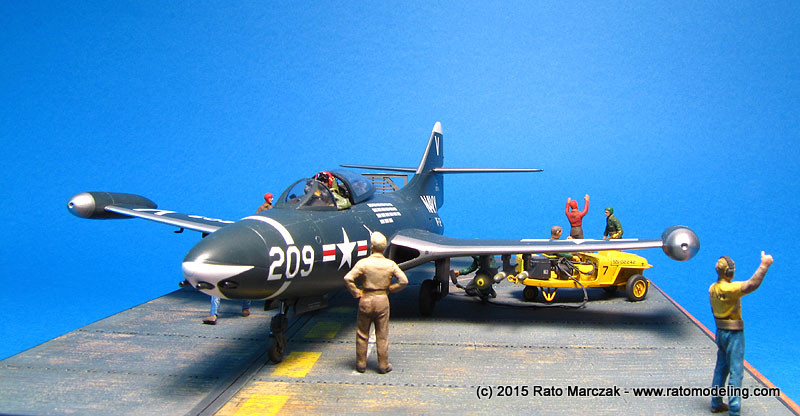
Having built the USS Philippine Sea carrier deck section and the NC-1A started unit before, it was time to take care of the deck crew to finish the diorama. Although we modelers are plenty of options in 1/72 scale regarding troops, deck crew, maintenance personel, mechanics and alike is a different story. It is really difficult to find good items to decorate carrier decks and airfields, even more for Korea and Vietnam wars... Anyway, I used mostly Preiser figures. Some of them had their caps sanded off, as I would paint the characteristic bonnets afterwards. I made red (armament/explosives/fuel), green (plane handlers), yellow (flight officers) and generic brown shirts. A few got utility belts, others had their jerseys stenciled with names/rank/numbers, and also I stole a fire extinguisher from a Fujimi figure set. I'm not particularly good at painting figures, just followed the base color/light/shadow recipe. One or two of my figures were molded with very soft details, making painting even more difficult - or less convincing:
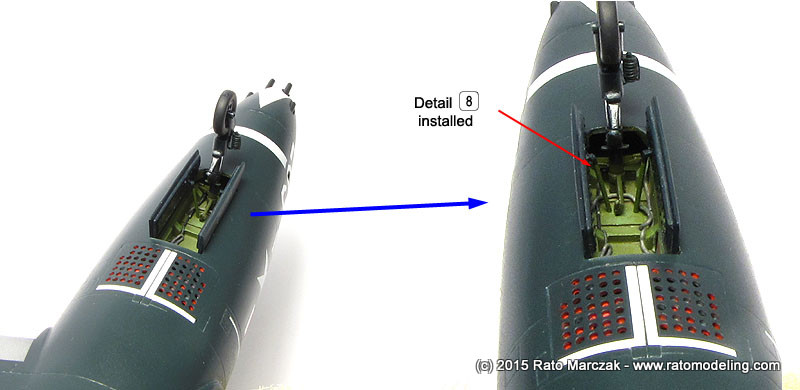
Finishing off the Panther, the nose landing gear doors had detail 8 added (doors' retraction arms), and the wheel bay really looks busy, now. I wish I had a photo of the original kit part:
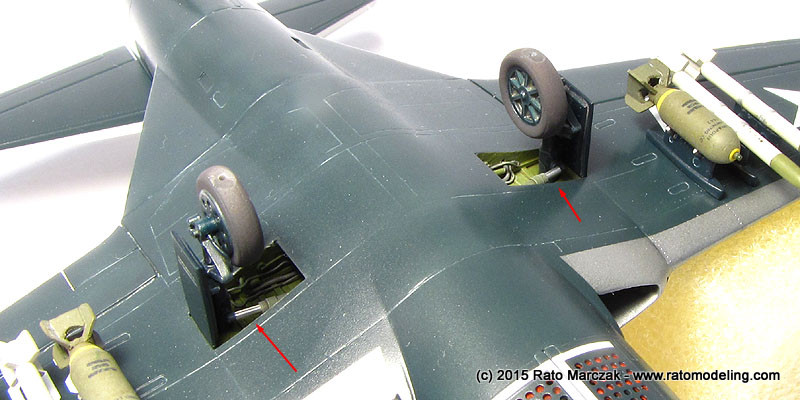
Moving a bit back, the retraction arms were assembled and glued to the main landing gear struts. The idea of using telescoping polished Aluminum rods as oleos gave a nice touch to an otherwise overall IG/DSB area, and it was much simpler than painting it with chrome silver of covering with bare metal foil. I definitely will be using the method again:
I forgot to mention that this kit has the arrestor hook compartment, just under the exhaust pipe, empty. In order to add some detail there, earlier during the project I made exact cross sections of the aperture using Tamiya Light Curing Putty. The putty was removed after drying and sliced to privide a 'wall', which was detailed with plastic bits. A slot was open in the middle allowed me to slide the arrestor hook in:
The arrestor hook was sanded to create the flat faces of the hook and inserted in its place. The last parts installed there were the tail skid and bumper:
Next, the ordnance was cemented on the pylons. It wasn't a simple task, as I had no positive alignment aid. Next time I'll add some pins... Test fitting the Pitot tube, I found out that its opening under the right wing was oversized. I solved the issue using a thick mix of carpenter's glue and DSB acrylic paint to fix it in the hole and fill the gaps at the same time:
Adding a convincing weathering in a DSB aircraft is never an easy task, but without it, they tend to look too much toy like. I alternated gray and silver Prismacolor pencils to try to reproduce that scuffed paint effect, mainly over three areas: cockpit entrance (port side, only), wing roots, and wingtip tanks. The cockpit entrance is obvious - I simulated the effect along the path a pilot does when entering the aircraft, that is, cockpit edges and kick in steps. When studying photos of operational Panthers, you will see that it was refueled with the wings folded, using the characteristic ladder hooked on the wingtip tanks. That is why most of the paint chipping concentrate on the wing roots and around the tanks.
The wingtip lights were removed earlier in the project to make sanding easier. They were replaced using a well known technique:
The rivets pressed along the wings leading edges could be more visible, had I applied a dark wash, but I left them clean. The gun camera beside the port engine air intake was simulated using a square piece of dark grey decal previously coated with high gloss varnish. Simple and effective in this scale:
The additional instruments and the gunsight were glued over the control panel, so the sliding part of the canopy could be finally installed. I had to use a plastic shim under the deck to angle the canopy properly. After all the work improving the cockpit and the rear deck, I'm happy with the results, particularly if I think about the original parts. And the pilot figure gave a lot of life to the office, of course:
And I chalked this one up for me. My Panther was done. Yeah, I know nothing of the landing gear wells will be visible in the diorama, so here is a couple of photos:
And some archival pictures before finishing the diorama:
The last step, obviously, was the easiest one: to study the best balance for all elements in the diorama and gluing everything in place. I can't claim I'm completely satisfied with the final result, but most of the feeling lies on my own shortage of more interesting figures.
These old 1/72 Hasegawa kits are still a joy to build, pretty much like what the 1/48 guys say about Monogram models. And if you put them on a display base, I bet nobody will care about the age of the kit...
| Technical file | |
| Kit:
|
- Revell #04193 |
| Additions:
|
- Quickboost 72066 - Preiser and Revell figures |
| Basic
colors: |
-
Primer: automotive acrylic gray primer - FS15042: Aeromaster Warbirds Colors #9057 Gloss Sea Blue - Gloss clear: Pledge Future floor was - Semi-gloss finish: Testors Model Master Acryl flat + gloss (50/50%) |
| Notes: |
-
Many scratchbuilt details (see text). |
Rato Marczak © 2015
