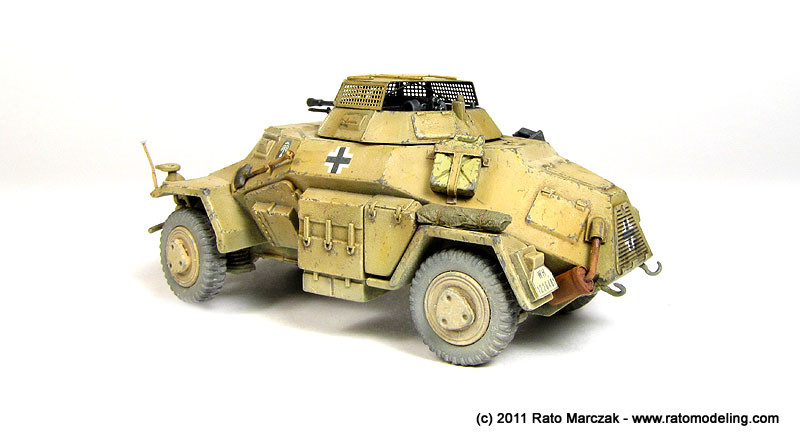
| ICM Sd.Kfz. 222 in
1/72 |
| Start: December / 2010 Finish: July/2011 |
Here
is
my
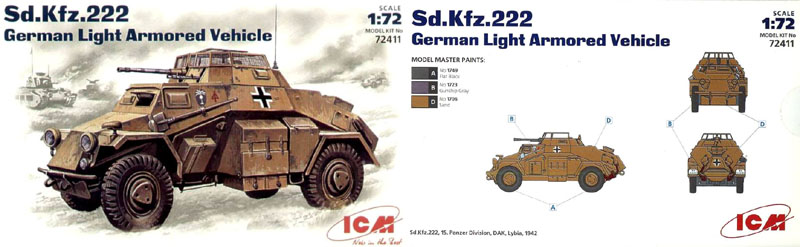
ICM's
Sd.Kfz.222
in
1/72
scale. I got this kit at Hobbycraft
a while ago for
very
cheap, and decided to start right after.
This is another case of "Sure I can build this one quickly...". The word quick has a broad spectrum of meanings in my modeling life, but to be honest this little model has progressed fairly fast in comparison to my other projects. I've always been fond of Wermatch light armored vehicles, and this one could help to keep me busy while I was stuck in challenges from other projects. It is a good recipe, and it really works to revitalize interest in halted projects, as far as you don't start a new project every time you face a difficulty in the others. And besides, I'm since a long time wanting to add something from North Africa theater of operations to my collection. When I found this photo on the internet I got the necessary inspiration:
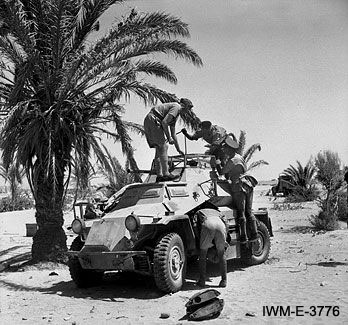
British soldiers inspecting a captured German SdKfz 222
armoured car, 24 June 1941 (Imperial War Museum)
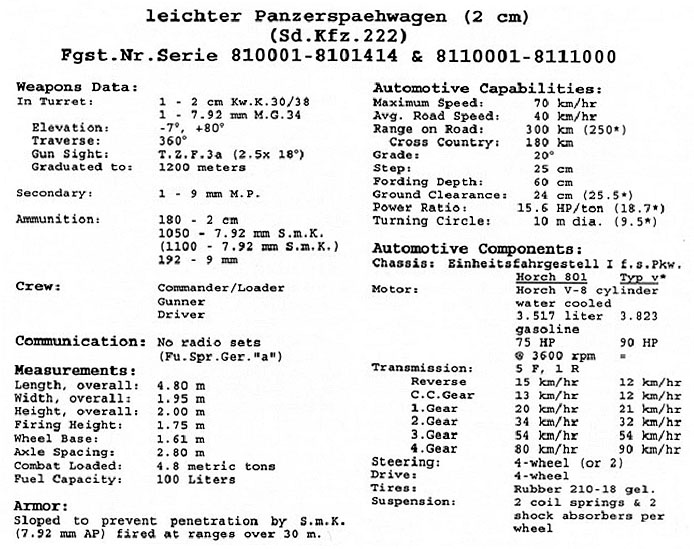
These little beasts don't have the same appeal than Tigers and Panthers among modelers, but they are interesting and historically important subjects, nonetheless. In case you are interested, here is a short spec:
Well, this is a little nice kit. I found almost no flash to clean up and only a few ejector pin parks to fill. The quality of the injection is good, but the surface is a bit rough in places. The parts count is low, and you won't need an electronic microscope to attach them as in some Dragon kits. A nice touch is the photoetched fret containing the turret mesh and the upper hull grille. I won't go into the pros and cons or accuracy of this kit. Please refer to the excellent reviews of Al Magnus and Rob Haelterman on On The Way website for that.
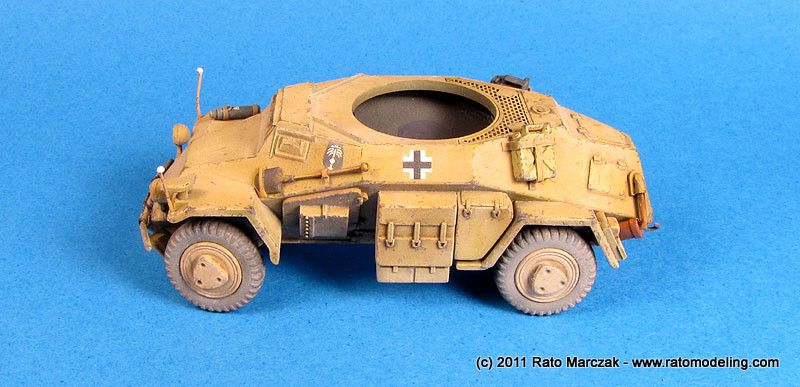
After a quick research on the type, I finished the basic assembly in a Saturday afternoon. My first concern was the rough surface of the the upper hull. Having decided to make a factory finished Panzer Grey vehicle which was overpainted in African Brown (Belb Brun - RAL 8020), I coated the whole model with Tamiya German Grey (XF-63). This allowed me to inspect the surfaces and sand the most problematic ones. Note that this Panzer Grey layer is necessary because , for obvious reasons, Afrika Korps personnel wouldn't bother to overpaint the underside of their vehicles, in most cases.
At this point I added a few external details. A jerry can stack was added to each side of the hull. This was a common field modification, and I made them using Aluminum stripes shaped to hold resin cans from my spares box. I also refined the exhaust stacks and improved the various door hinges with short pieces of stretched sprue. Stretched sprue was also used to simulate stowage locking clamps:
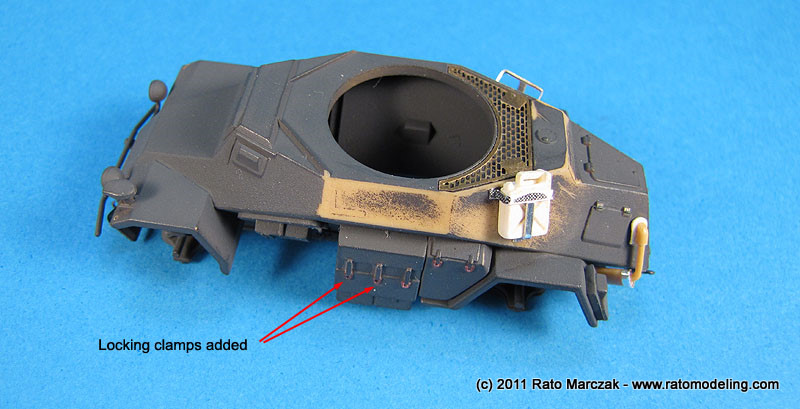
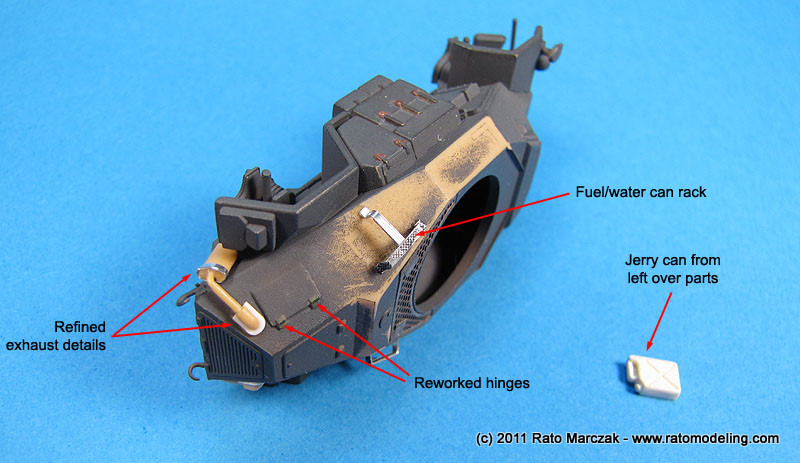
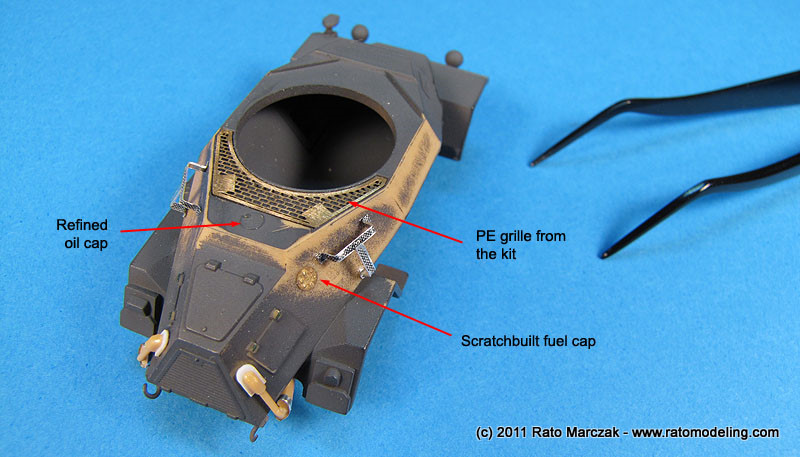
Other details added at this stage include a refined oil tank cap
(behind the turret) and a fuel cap made by punching a smal disk of
brass. I embossed bolts to the cap and glued it in place.
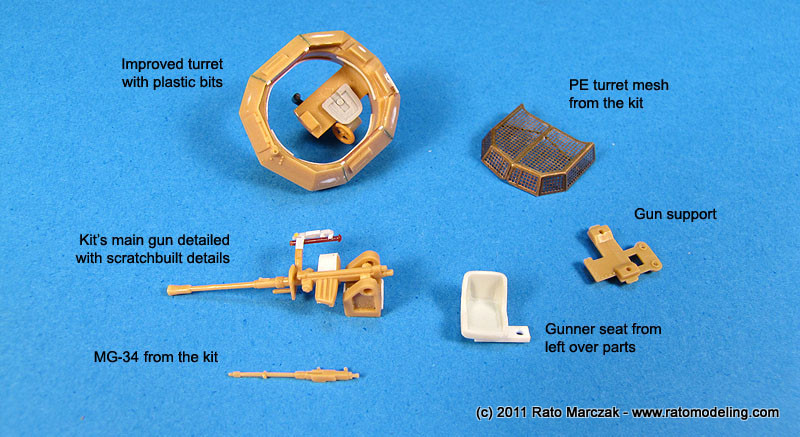
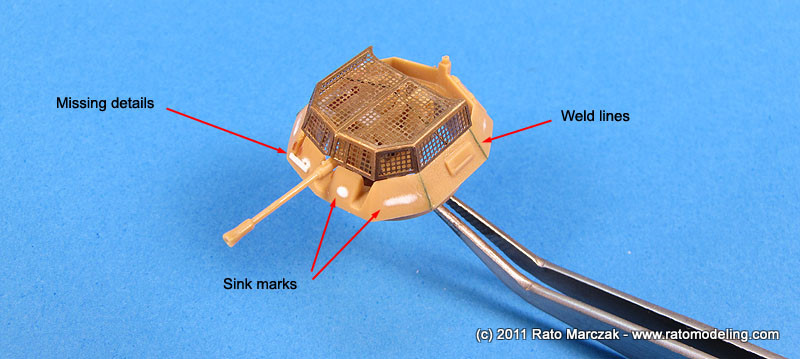
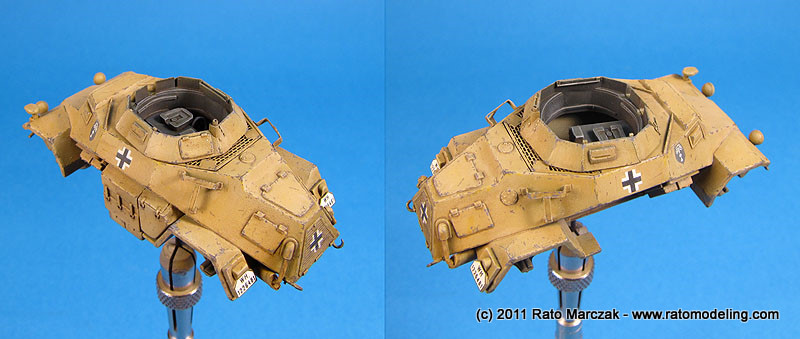
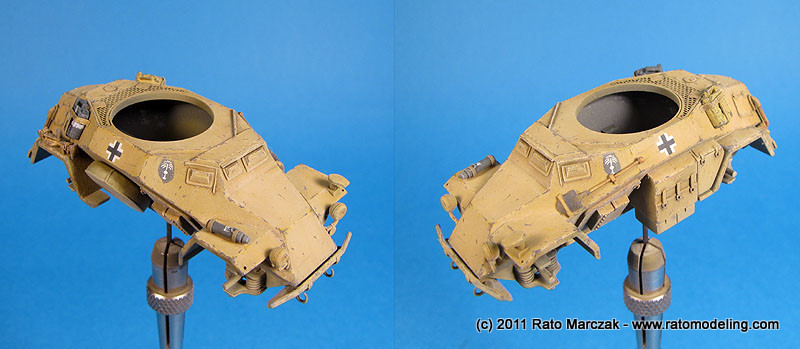
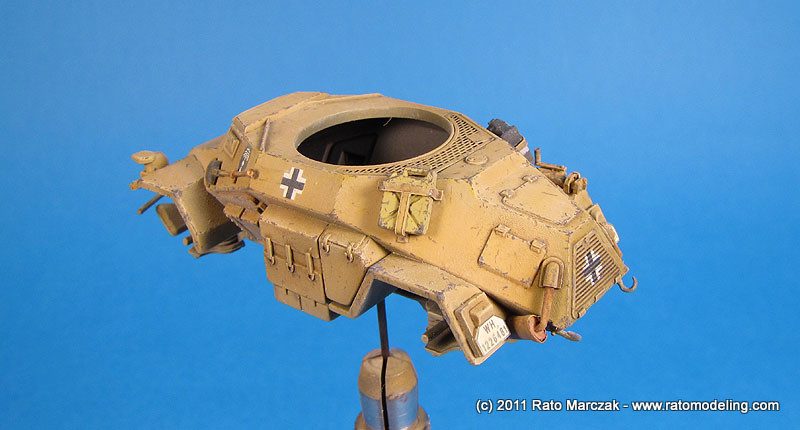
With the hull done, I started to work on the turret details. The turret itself had a few sink marks to fill. I added weld lines with stretched sprue in some places, and did my best to add the missing details to the interior, using what I had in my spares box. The 2 cm gun received a gun sight and some bits of plastic. The turret interior (which is inaccurate, by the way) benefited from some gizmology. A dry fit of the parts revealed that the turret traveling wheel and the gunner's seat would be visible from the top, so I added these too using parts from old 1/76 models. The kit's provided turret mesh was folded and supporting arms added on the inside.
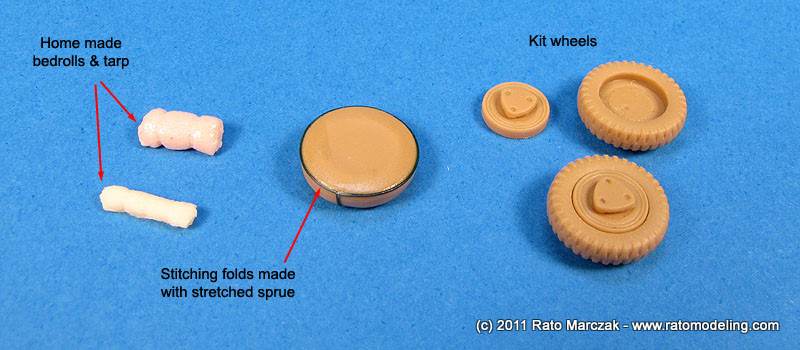
The kit bring the wheel hubs separated from the tires, making painting a breeze. The spare wheel on the Sd.Kfz.222 had a canvas cover. I used the kit part but glued stretched sprue along the perimeter to simulate sewing folds. I also simulated some crimps to make it look more like canvas (not one yet in the photo below). A couple of bedrolls were reserved from my own prodution to use later.
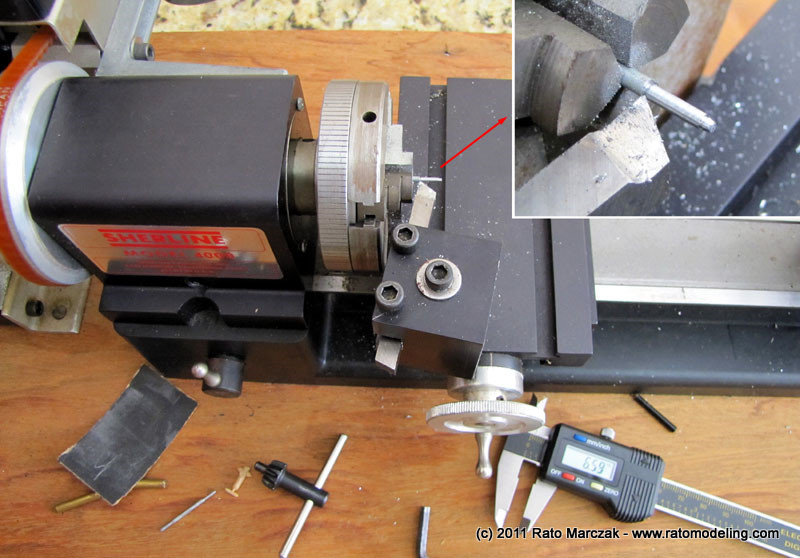
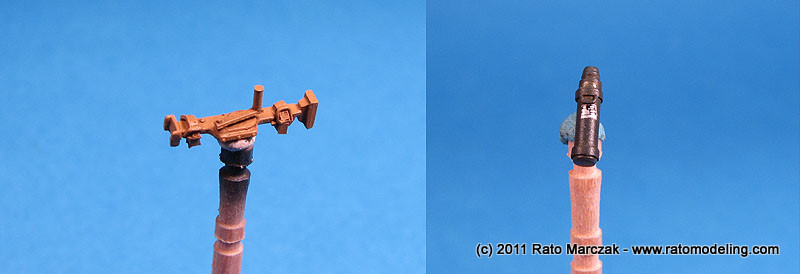
Two vehicle accessories poorly detailed in the kit are the jack and a small cylinder clamped on the right front fender (I guess it is a compressed air bottle). Always looking for an excuse to use my mini-lathe, the cylinder was turned in Aluminum...
... and detailed with foil straps and fine wire. For the jack, I used the kit part, but replaced the shoe, added a crank handle, bolts, and the clamping locks - all with plastic. The jack was painted in African Brown while the cylinder was finished with Panzer Grey to emulate a piece replaced from another vehicle. A nice touch was a Mike Grant's data plate decal on the cylinder (I wish I could apply these things straight). Don't think in AMS, these little details make all the difference in 1/72:
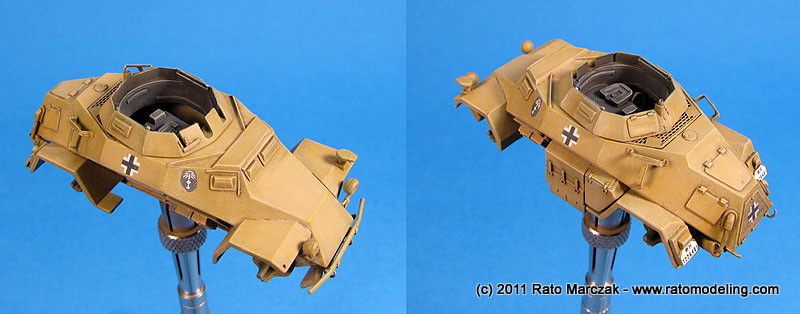
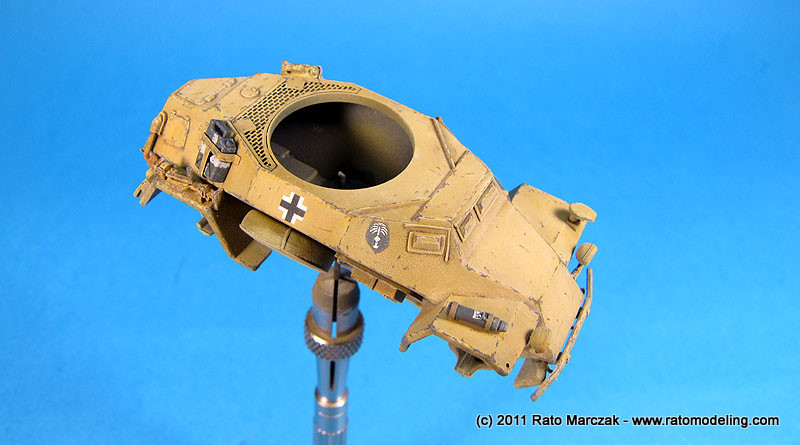
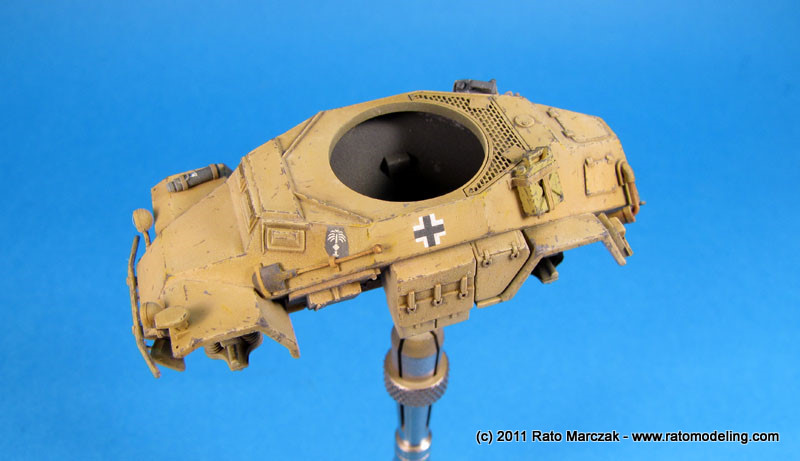
As I said, the lower hull as well as the turret interior were painted in Panzer Grey. Then it was time to overpaint the final camouflage. After checking my paint rack, I settled with Revell Ochre Brown (#88). Revell lists #17 as Africa Brown (they don't have RAL 8020 in their enamel line), but I think #88 is closer. Besides, I don't care anymore about exact matches. Screw it, let alone after filters, washes, pigments, chipping, and clear coats.
The color was airbrushed "from the top", to avoid overspraying the underside. This left the areas behind the wheels and under the fenders in Panzer Grey, as I wanted. A bit of white was added to the color remaining in the airbrush cup and reapplied over horizontal surfaces to simulate fading. I also masked a small area where the Afrika Korps logo would go (measured from the decal). After waiting what seemed an eternity the Revell enamel to dry completely, I sealed the paint job with Testors Metalizer Sealer and applied de decals in preparation for the long weathering process ahead of the project. It is worth to mention that the ICM decals worked flawlessly, contrary to my previous experiences with this brand. Here is my working sequence:
A. Camouflage colors
B. Gloss coat & decals
C. Dot filtering with artists oils
D. Detail wash
E. Flat coat
F. Drybrushing corners and details
Of note is my insistence in using drybrushing, in spite of it being considered a severe sin these days. I just think that not all 1/35 AFV modeling techniques can be directly transported to 1/72. In fact, that would be a mistake. When used (and applied) with care, drybrushing is still a unique method to obtain certain effects. Furthermore, I'm not a big fan of the Spanish style.
I don't have in-progress photos of these stages, sorry. After these steps, the basic color was substantially shifted to represent fading and sun exposition, particularly the horizontal surfaces, but still too clean. Then I had to impart the effect of an object exposed to desert environment for a long time: sand trapped in the smallest crevices and folds, and dirt accumulated on the underside. That was an opportunity to try a new method for me: artists oils instead of pigments. As I see it, you have a lot of freedom to play with pigments in 1/35 scale, but in 1/72 it may be too risky to apply pigments in the conventional way unless you want to simulate mud. That's not the case here. Most of the times desert vehicles are essentially covered with a "dust cloud" progressively heavier as you go from the top to the bottom, plus some build up on horizontal surfaces.
Well, I opted for this method after first seeing it in action on an article by master modeler Spencer Pollard. The idea is to use diluted artists oils to make it flow into small spaces (trapped sand) and spread it over large surfaces (like fenders). So I mixed two or three light sand tones thinned white spirit, less thinned than what you woud do for a wash, however. I applied the oils on corners and folds with a small brush, and stippled it with a round brush on the undersurfaces, alternating the tones and avoiding leaving brush marks. This is the result, and I guess I wouldn't obtain the same result with pastels or pigments, at least not as easily as I did:
Remember, this was a "coarse sand" effect. Fine sand dusting will be applied later. Next, the paint chipping. To me, an Aflika Korps equipment without serious paint chipping is simply inconceivable. My weapons of choice for this job are shown in the photo below:
The accessories shown are as follows:
1. Yellow Faber Castell pencil
2. Ochre Falber Castell pencil
3. Light Brown Supracolor pencil
4. Cool Grey Prismacolor pencil
5. Graphite
6. Charcoal diffuser
7. Pencil eraser
I started by using 1, 2 and 3 along edges and corners, to simulate freshly scrubbed paint and scratches over the hull, those which didn't go deep enough to show de dark grey underneath:
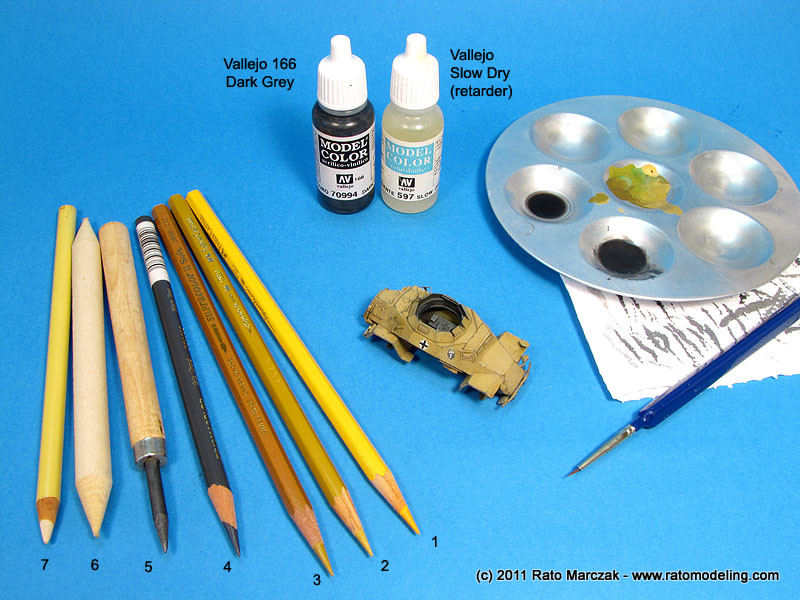
Then, using a fine pointed brush, I used Vallejo Dark Grey (#166) to produce the larger paint chips. Remember to add some paint retarder to allow you plenty of time to work. When applied over the yellow/brown pencilled areas, the result is a realistic "fresh" paint chipping, with the original Africa Brown showing through.
When simulating smaller paint chips and scratchs, I feel more confortable using high quality artist's pencils (4). It is a more controllable method to do it. You can use the pencil eraser to remove unwanted chipping or the diffuser to make it more subtle:
For those heavy paint chipping which went through the brown and grey colors, exposing the metal underneath, I used a graphite lead. Remeber to use this only on high traffic areas, or points recently hit by something. In fact, I used it only on the hull and mud guards corners, rear towing hooks, and on the front bumper:
And of course, try to keep the effect as random as possible, not forgetting the physics: higher spots get chipped, recessed spots get dirty. Here is the outcome so far:
Meanwhile, I was also working on the small parts. One of jerry cans was painted Dark Yellow, as well as the spare wheel canvas, to provide some contrast. The other jerry can was painted Dark Grey, with the characteristic white bands to differentiate it as a water can. A tip I like to use when painting these (crudely applied) bands is to mask them and apply off-white with a sponge. This method delivers chipped white bands, minimizing your work and sparing you some airbrush time. It also adds some randomness to the final aspect. The jack was weathered and the leather bands around the compressed air cylinder were painted accordingly. The shovel probably started its life in Africa Brown, but after several weeks of hard work, it lost most of its paint... The handle was painted with acrylics and the wood grain was simulated with Raw Umber artist's oils. All these parts were then glued in place:
... and then over the lower body of vehicle. The stuff was applied in several passes along the lower hull, rear, front, and under the chassis. I'm quite pleased with the results, although my photos this time are not making justice to the real model. In order to simulate blobs of dried mud and heavier sand accumulation under the fenders, Tamiya weathering pastels (set A) was rubbed there. Some detail shots of the work so far:

 .
.
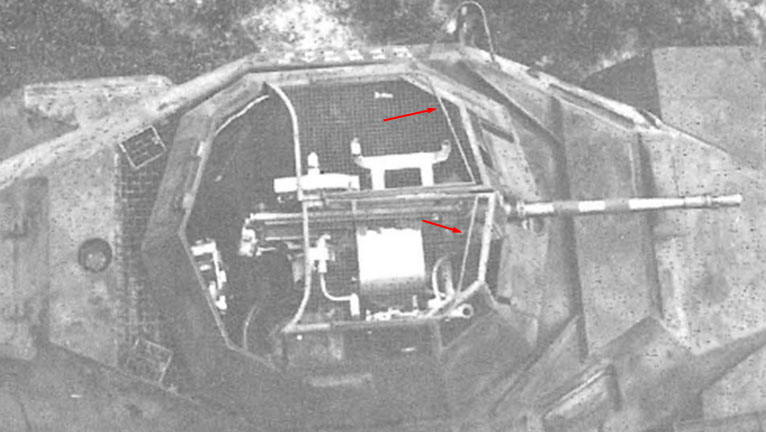
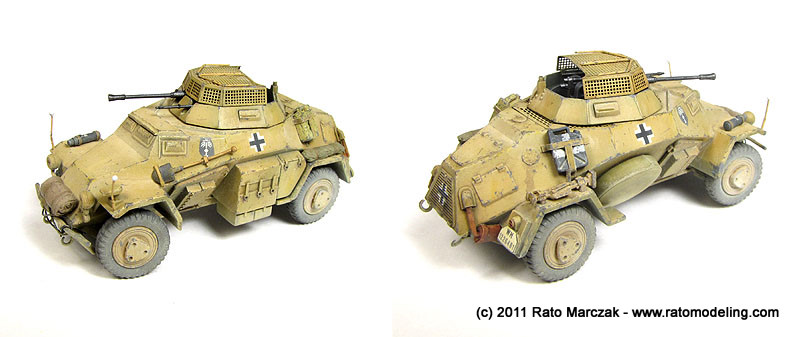
At this point I started to assemble the remaining parts, and I noted from the photos that the turret mesh had a couple of strange bars. These were probably folded back to support the rider sitting on the turret. They were not present in all photos I saw, and in some cases were heavily bent, but I decided to add them. This stuff is u-shaped, roughly following the contour of the mesh frame:
I made a rough drawing of the contour of the turret mesh and transfered the corner points to a piece of acrylic. The acrylic was drilled in those places and pins were inserted the to guide the bending of pieces of wire.
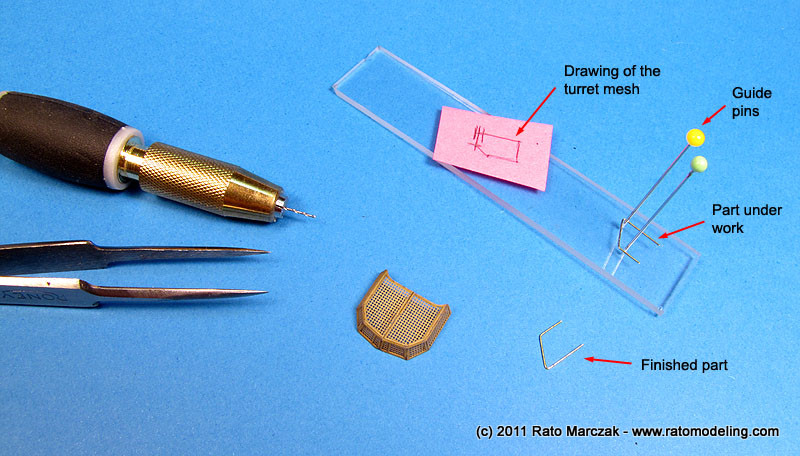
The resulting parts were trimmed to the correct size, painted and glued to the top of the mesh. By then I had almost everything painted and assembled:

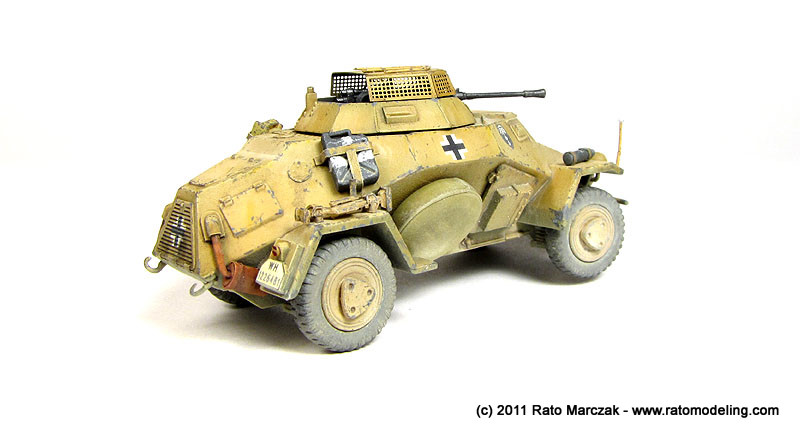
The final touches to the hull consisted of adding fuel and oil stains running from the caps. I used Life Color Tensochrom inks for that - worked like a charm, and dries in seconds. The exhaust stacks/mufflers were covered with two coats of Rustall to simulate rust.
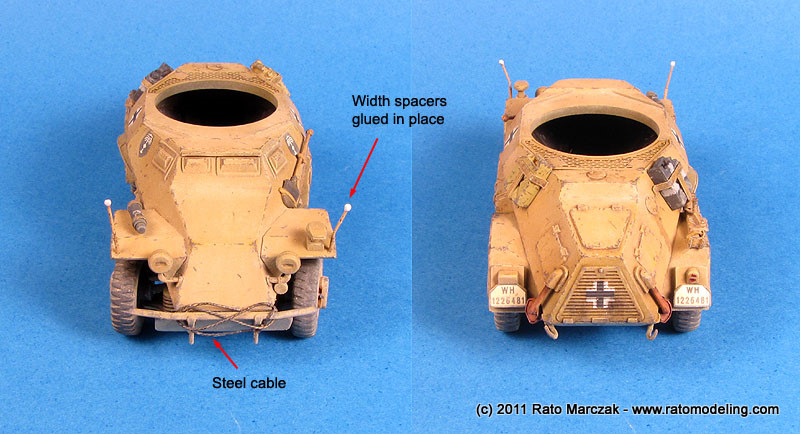
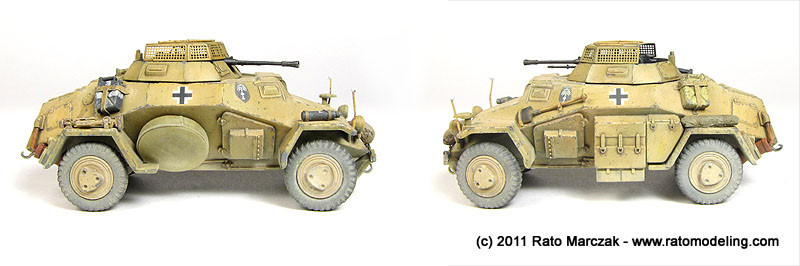
The kit doesn't provide the width indicators commonly found in most Wermatch trucks. I made mine with 0.3 mm steel wire bent to shape and applied drops of superglue/accelerator to make the round ends. They were glued on the front fenders as well as the wheels. I left the front wheels slightly turned to add interest. A towing cable made of fine cooper wire was tied to the front bumper. Here is the outcome so far:
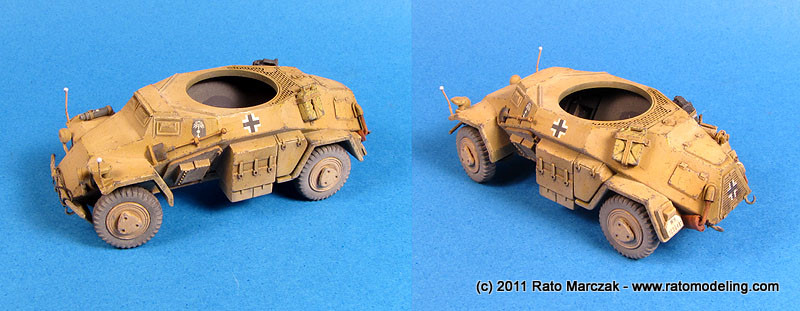

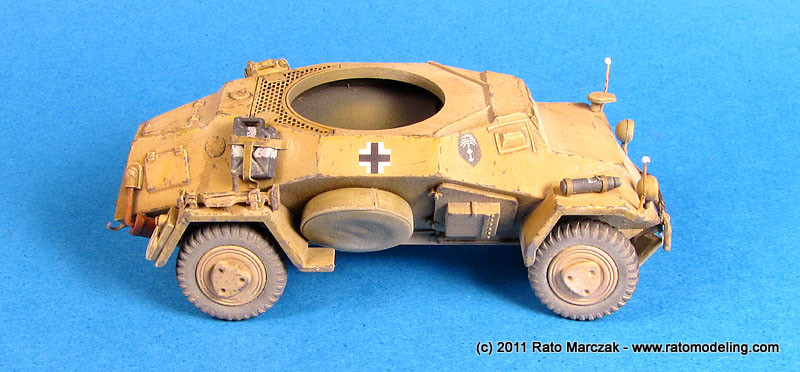
Once satisfied with everything, I assembled the remaining items. Except for the radio antenae, I declared it done.

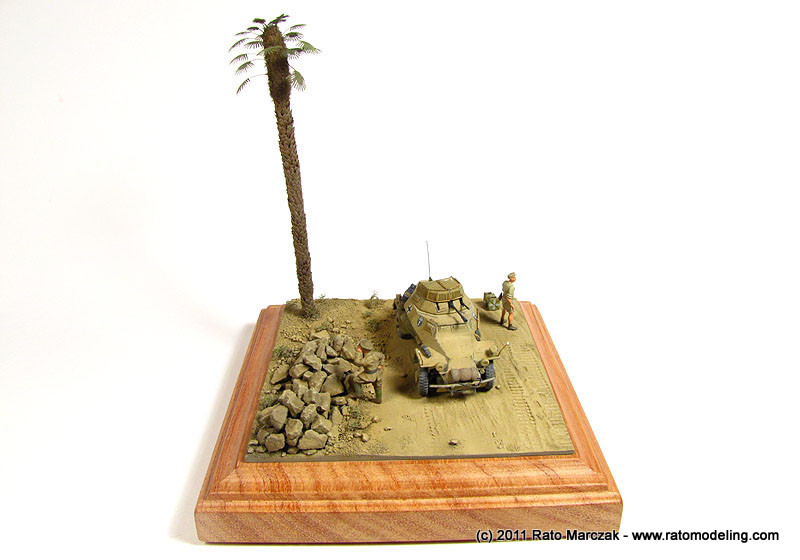
After a break, I started to think about the display base. I went through many photos of Afrika Korps in action in the African desert and settled with an image in my mind. It would be the Sd.Kfz.222 parked alongside the ruins of a rock revetment, possibly built by natives, and a desert palm tree. The idea was to show the crew looking for a water source, or just taking a break... I don't know.
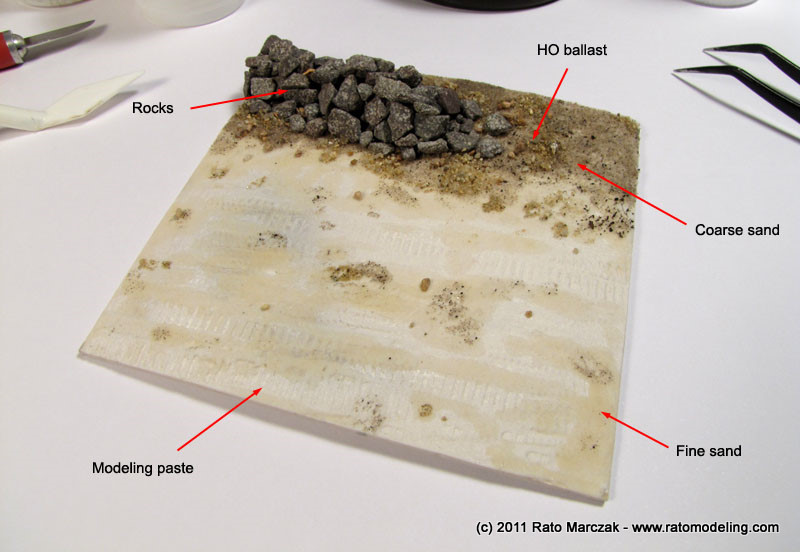
Anyway, the base started as my other bases, but this time I chose the same cardboard used in my 1/72 Polikarpov Il-400. I used to use plastic, but cardboard has better adherence to the wood block. On the other hand, it is more suscetible to moisture. I applied an irregular layer of modeling paste, and over it I impressed several track/tire marks, as well as footprints. I then sprinkled fine, medium and coarse sand over the surface previously dampened with diluted carpenters' glue.
The fine sand was concentrated on the traffic area, with random spots of coarse sand here and there. I then used small rocks individually glued to form the ruins of the revetment:
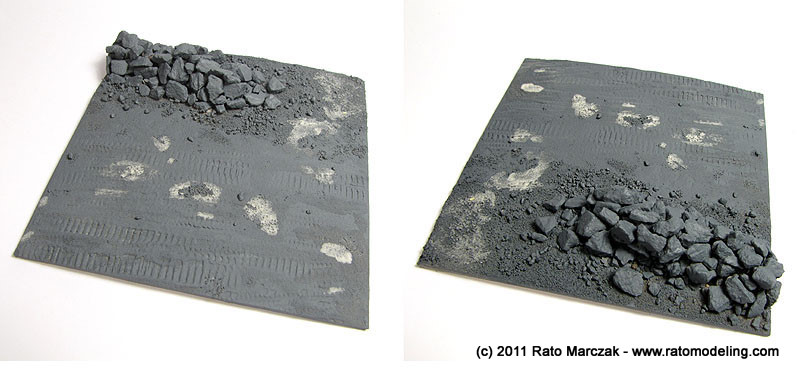
Once dry, the whole base was primed with Krylon's grey primer and the terrain was retouched wherever necessary:
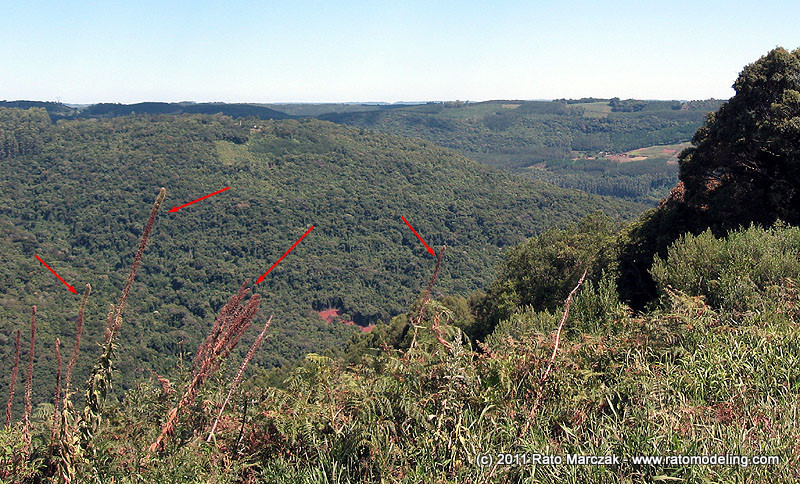
The palm tree was a problem - no commercial item seemed to look right. A while ago, walking in the hills nearby the town, I found a kind of tall grass which during the summer produces a long spike (roughly resembling wheat). When still green, that spike matches very well a desert palm tree in scale. Don't ask me what it is:
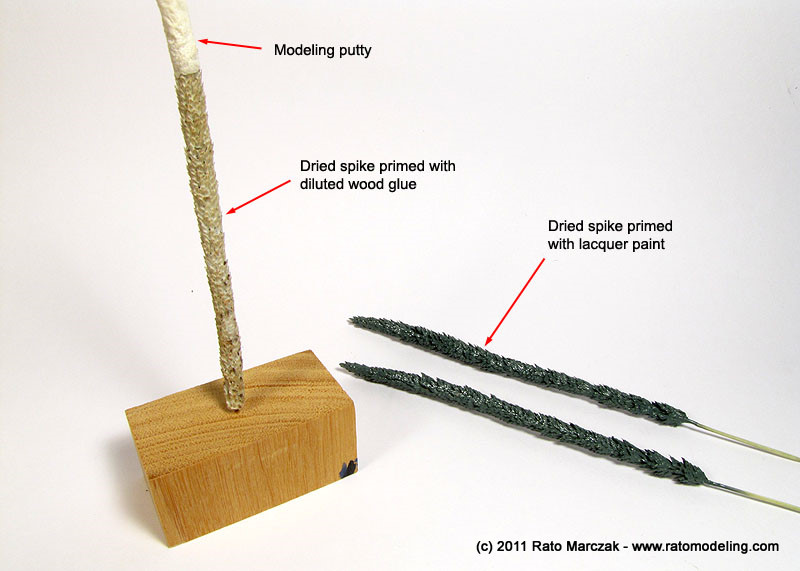
All I know is that I had my harvest. I collected many of them long before this project started. When I thought about using them, they were all completely dry. So I primed a few with lacquer paint to made resin copies, but for this project I just coated one of them with wood glue diluted in water and waited it to dry completely. I made a crown following the photos of one of many types of these trees, using putty, just to make it fatter than the rest of the trunk:
And then I covered the crown with static grass. Everything was painted with brown and drybrushed. I added a bit of green to the color applied over the crown. The leaves would be attached to it later, but by then I didn' know how to make them:

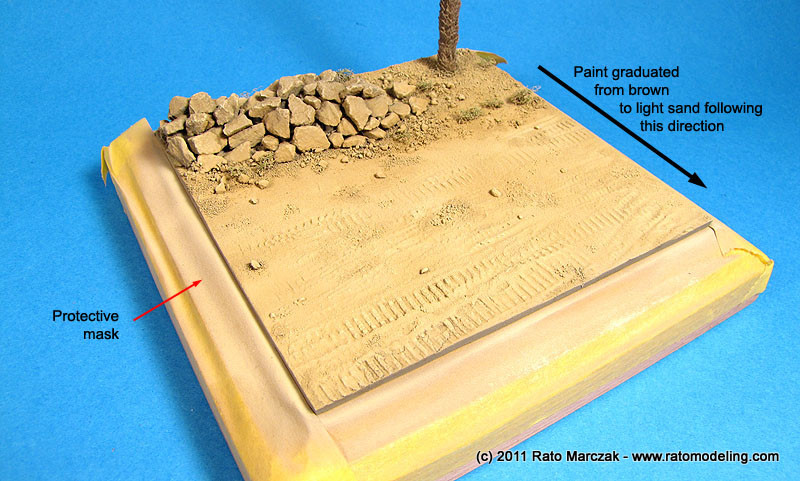
Next, the base was painted in a long single airbrushing section, using acrylic paints. I started with an overall coat of dark brown. The paint was applied with the airbrush perpendicular to the base. That would preserve a bit of the grey primer on recesses and shadowed areas. The same color was progressively whitened and airbrushed, concentrating the lighter tones on the traffic areas. That would leave the revetment darker. In the end, I airbrushed a sand color almost exclusively on the traffic area and around the revetment to simulate dust. All this was made keeping the airbrush perpendicular to the surface of the base:
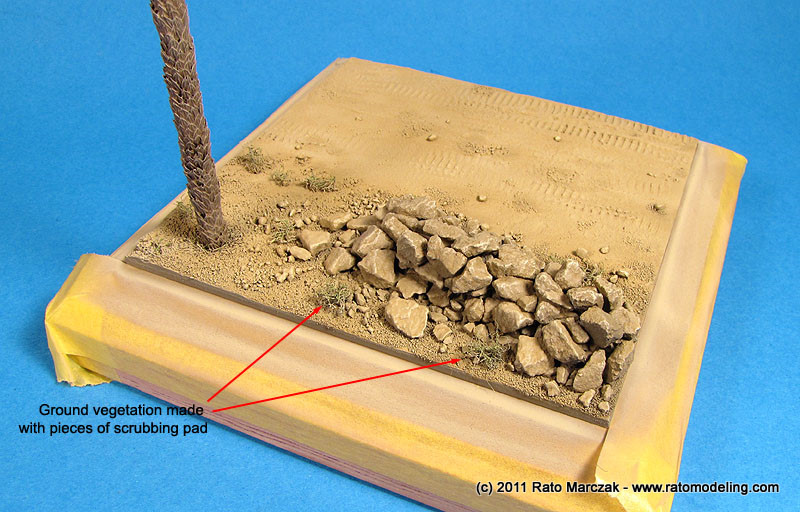
Once the paint was dry, I glued small pieces of scrubbin pad to simulate ground vegetation. A wash of artists oils followed, and then a strong drybrushing with a very light sand color. Heavily thinned green paint was brushed over the small bushes:
And this was the result by then:
Since I moved to a new place, I wasn't in prepared to photoetch my own parts. Therefore I ordered a PE set of palm leaves from Voyager (see review here) to make my life easier. After a while waiting the package to arrive, I resumed the project. As I mentioned in the review, it would be far more easy to paint the leaves after installing them on the trunk. I didn't, and the painting section took longer than expected, not to mention the mess:

The photo below gives you an idea of my pain - the leaves are tiny, and the paint chips off easily if you don't use a metal primer (I didn't, again). Basically, the leaves were removed from the fret, bent by pressing them over a round pen cap, and painted in two or three shades of green acrylics paint. Taking advantage of the relief etched on the upper side of the leaves, I also applied a wash of brownish colors, particularly on the leaves intended to be glued lower along the palm crown. The only advantage of painting them separately is the possibility to shade the leaves with an airbrush, depicting accumulated sand:
Glueing the fronds one by one was difficult. I ended up using super glue, but this meant that I had to retouch some spots with paint to remove the shine. Yes, I'm still cross-eyed:
In retrospect, the fronds are too small to my eye. Or maybe the trunk is too large, I don't know. Although the final aspect is good, there is something definitely strange with my desert palm tree. I guess it is a very rare specimen which grows only in this area of Lybia...
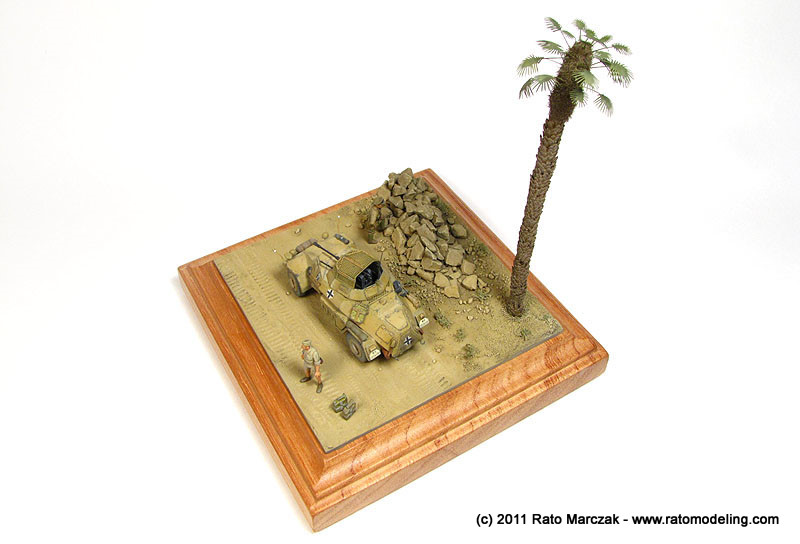
It is passable, but next time I will use a slightly smaller trunk, and photoetch my own leaves. Of course, I cound't resist to check the little 222 on its base:
After a long wait for the resin figures to arrive, I had another of those painful (for me) figure painting section. I think I'm improving, but definitely that's something I'll never perfect. I used only one of the CMK radio set figures. The other is the 1/76 Rommel (as another officer here) from an old Matchbox Wespe kit. Not bad, but we really do need good figures for vignettes and dioramas in the small scale. Anyway, here are the results:
And so I started the final sprint. I glued the figures to their spots, trying to keep the balance. One day I'll add the little lizzard baking over a rock, and that will name of the vignette: "The Lizzard"...
This is another case of "Sure I can build this one quickly...". The word quick has a broad spectrum of meanings in my modeling life, but to be honest this little model has progressed fairly fast in comparison to my other projects. I've always been fond of Wermatch light armored vehicles, and this one could help to keep me busy while I was stuck in challenges from other projects. It is a good recipe, and it really works to revitalize interest in halted projects, as far as you don't start a new project every time you face a difficulty in the others. And besides, I'm since a long time wanting to add something from North Africa theater of operations to my collection. When I found this photo on the internet I got the necessary inspiration:
British soldiers inspecting a captured German SdKfz 222
armoured car, 24 June 1941 (Imperial War Museum)
These little beasts don't have the same appeal than Tigers and Panthers among modelers, but they are interesting and historically important subjects, nonetheless. In case you are interested, here is a short spec:
Well, this is a little nice kit. I found almost no flash to clean up and only a few ejector pin parks to fill. The quality of the injection is good, but the surface is a bit rough in places. The parts count is low, and you won't need an electronic microscope to attach them as in some Dragon kits. A nice touch is the photoetched fret containing the turret mesh and the upper hull grille. I won't go into the pros and cons or accuracy of this kit. Please refer to the excellent reviews of Al Magnus and Rob Haelterman on On The Way website for that.
After a quick research on the type, I finished the basic assembly in a Saturday afternoon. My first concern was the rough surface of the the upper hull. Having decided to make a factory finished Panzer Grey vehicle which was overpainted in African Brown (Belb Brun - RAL 8020), I coated the whole model with Tamiya German Grey (XF-63). This allowed me to inspect the surfaces and sand the most problematic ones. Note that this Panzer Grey layer is necessary because , for obvious reasons, Afrika Korps personnel wouldn't bother to overpaint the underside of their vehicles, in most cases.
At this point I added a few external details. A jerry can stack was added to each side of the hull. This was a common field modification, and I made them using Aluminum stripes shaped to hold resin cans from my spares box. I also refined the exhaust stacks and improved the various door hinges with short pieces of stretched sprue. Stretched sprue was also used to simulate stowage locking clamps:
With the hull done, I started to work on the turret details. The turret itself had a few sink marks to fill. I added weld lines with stretched sprue in some places, and did my best to add the missing details to the interior, using what I had in my spares box. The 2 cm gun received a gun sight and some bits of plastic. The turret interior (which is inaccurate, by the way) benefited from some gizmology. A dry fit of the parts revealed that the turret traveling wheel and the gunner's seat would be visible from the top, so I added these too using parts from old 1/76 models. The kit's provided turret mesh was folded and supporting arms added on the inside.
The kit bring the wheel hubs separated from the tires, making painting a breeze. The spare wheel on the Sd.Kfz.222 had a canvas cover. I used the kit part but glued stretched sprue along the perimeter to simulate sewing folds. I also simulated some crimps to make it look more like canvas (not one yet in the photo below). A couple of bedrolls were reserved from my own prodution to use later.
Two vehicle accessories poorly detailed in the kit are the jack and a small cylinder clamped on the right front fender (I guess it is a compressed air bottle). Always looking for an excuse to use my mini-lathe, the cylinder was turned in Aluminum...
... and detailed with foil straps and fine wire. For the jack, I used the kit part, but replaced the shoe, added a crank handle, bolts, and the clamping locks - all with plastic. The jack was painted in African Brown while the cylinder was finished with Panzer Grey to emulate a piece replaced from another vehicle. A nice touch was a Mike Grant's data plate decal on the cylinder (I wish I could apply these things straight). Don't think in AMS, these little details make all the difference in 1/72:
As I said, the lower hull as well as the turret interior were painted in Panzer Grey. Then it was time to overpaint the final camouflage. After checking my paint rack, I settled with Revell Ochre Brown (#88). Revell lists #17 as Africa Brown (they don't have RAL 8020 in their enamel line), but I think #88 is closer. Besides, I don't care anymore about exact matches. Screw it, let alone after filters, washes, pigments, chipping, and clear coats.
The color was airbrushed "from the top", to avoid overspraying the underside. This left the areas behind the wheels and under the fenders in Panzer Grey, as I wanted. A bit of white was added to the color remaining in the airbrush cup and reapplied over horizontal surfaces to simulate fading. I also masked a small area where the Afrika Korps logo would go (measured from the decal). After waiting what seemed an eternity the Revell enamel to dry completely, I sealed the paint job with Testors Metalizer Sealer and applied de decals in preparation for the long weathering process ahead of the project. It is worth to mention that the ICM decals worked flawlessly, contrary to my previous experiences with this brand. Here is my working sequence:
A. Camouflage colors
B. Gloss coat & decals
C. Dot filtering with artists oils
D. Detail wash
E. Flat coat
F. Drybrushing corners and details
Of note is my insistence in using drybrushing, in spite of it being considered a severe sin these days. I just think that not all 1/35 AFV modeling techniques can be directly transported to 1/72. In fact, that would be a mistake. When used (and applied) with care, drybrushing is still a unique method to obtain certain effects. Furthermore, I'm not a big fan of the Spanish style.
I don't have in-progress photos of these stages, sorry. After these steps, the basic color was substantially shifted to represent fading and sun exposition, particularly the horizontal surfaces, but still too clean. Then I had to impart the effect of an object exposed to desert environment for a long time: sand trapped in the smallest crevices and folds, and dirt accumulated on the underside. That was an opportunity to try a new method for me: artists oils instead of pigments. As I see it, you have a lot of freedom to play with pigments in 1/35 scale, but in 1/72 it may be too risky to apply pigments in the conventional way unless you want to simulate mud. That's not the case here. Most of the times desert vehicles are essentially covered with a "dust cloud" progressively heavier as you go from the top to the bottom, plus some build up on horizontal surfaces.
Well, I opted for this method after first seeing it in action on an article by master modeler Spencer Pollard. The idea is to use diluted artists oils to make it flow into small spaces (trapped sand) and spread it over large surfaces (like fenders). So I mixed two or three light sand tones thinned white spirit, less thinned than what you woud do for a wash, however. I applied the oils on corners and folds with a small brush, and stippled it with a round brush on the undersurfaces, alternating the tones and avoiding leaving brush marks. This is the result, and I guess I wouldn't obtain the same result with pastels or pigments, at least not as easily as I did:
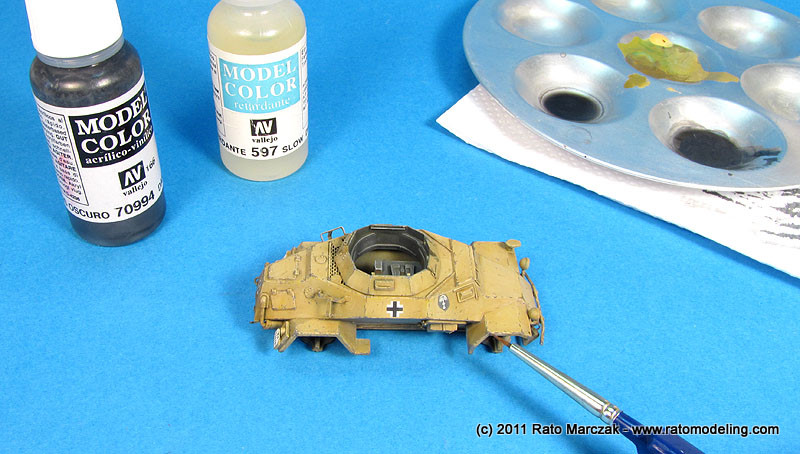
Remember, this was a "coarse sand" effect. Fine sand dusting will be applied later. Next, the paint chipping. To me, an Aflika Korps equipment without serious paint chipping is simply inconceivable. My weapons of choice for this job are shown in the photo below:
The accessories shown are as follows:
1. Yellow Faber Castell pencil
2. Ochre Falber Castell pencil
3. Light Brown Supracolor pencil
4. Cool Grey Prismacolor pencil
5. Graphite
6. Charcoal diffuser
7. Pencil eraser
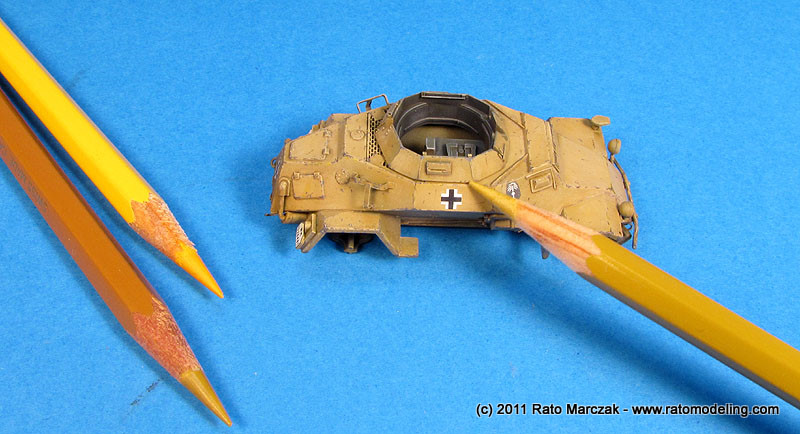
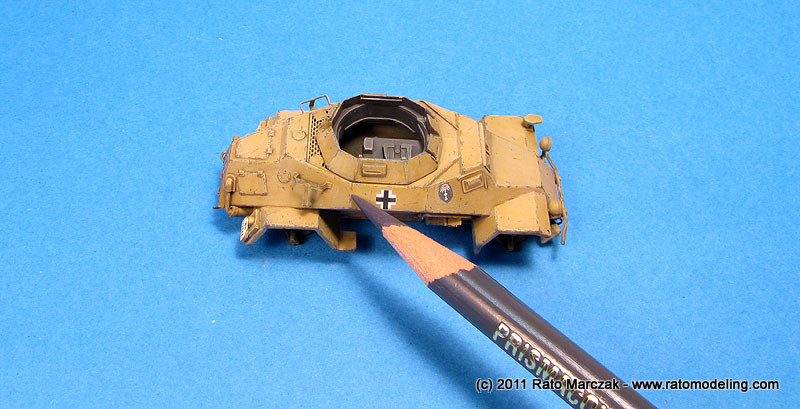
I started by using 1, 2 and 3 along edges and corners, to simulate freshly scrubbed paint and scratches over the hull, those which didn't go deep enough to show de dark grey underneath:
Then, using a fine pointed brush, I used Vallejo Dark Grey (#166) to produce the larger paint chips. Remember to add some paint retarder to allow you plenty of time to work. When applied over the yellow/brown pencilled areas, the result is a realistic "fresh" paint chipping, with the original Africa Brown showing through.
When simulating smaller paint chips and scratchs, I feel more confortable using high quality artist's pencils (4). It is a more controllable method to do it. You can use the pencil eraser to remove unwanted chipping or the diffuser to make it more subtle:
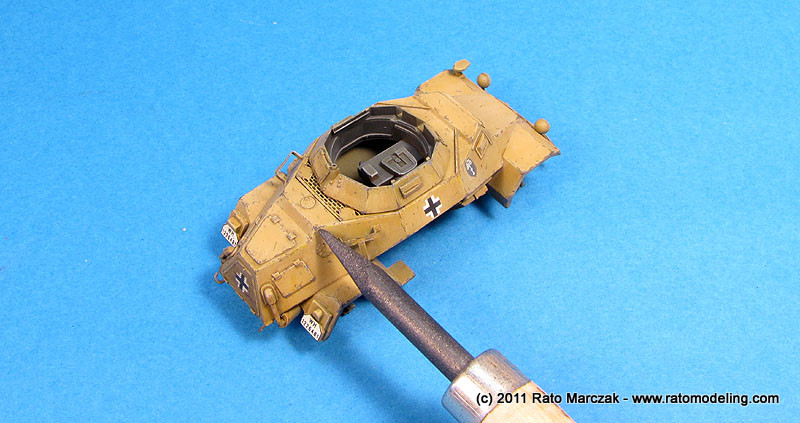
For those heavy paint chipping which went through the brown and grey colors, exposing the metal underneath, I used a graphite lead. Remeber to use this only on high traffic areas, or points recently hit by something. In fact, I used it only on the hull and mud guards corners, rear towing hooks, and on the front bumper:
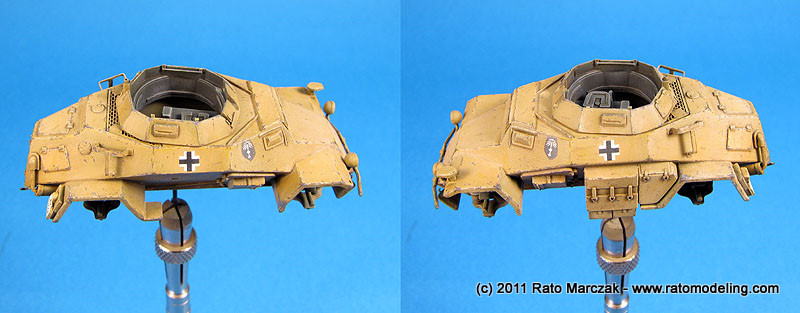
And of course, try to keep the effect as random as possible, not forgetting the physics: higher spots get chipped, recessed spots get dirty. Here is the outcome so far:
Meanwhile, I was also working on the small parts. One of jerry cans was painted Dark Yellow, as well as the spare wheel canvas, to provide some contrast. The other jerry can was painted Dark Grey, with the characteristic white bands to differentiate it as a water can. A tip I like to use when painting these (crudely applied) bands is to mask them and apply off-white with a sponge. This method delivers chipped white bands, minimizing your work and sparing you some airbrush time. It also adds some randomness to the final aspect. The jack was weathered and the leather bands around the compressed air cylinder were painted accordingly. The shovel probably started its life in Africa Brown, but after several weeks of hard work, it lost most of its paint... The handle was painted with acrylics and the wood grain was simulated with Raw Umber artist's oils. All these parts were then glued in place:
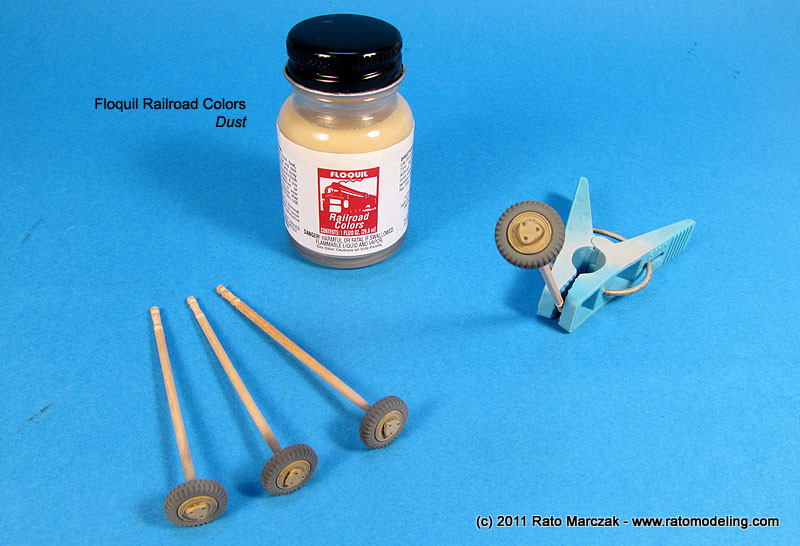
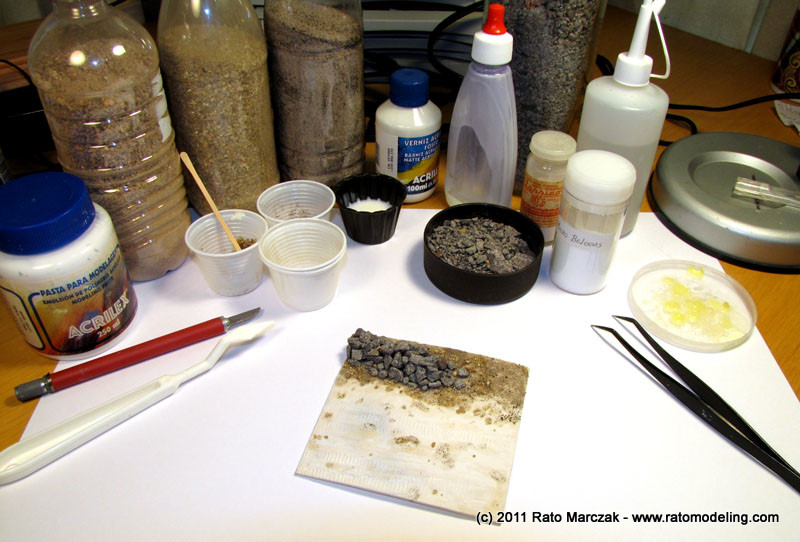
To produce the dusted sand
effect, I decided to try Floquil Dust
for my first time. I'm hooked. It comes ready for use - just load your
gun and shoot away. I stated trying it on the wheels (they will be more
weathered later)...
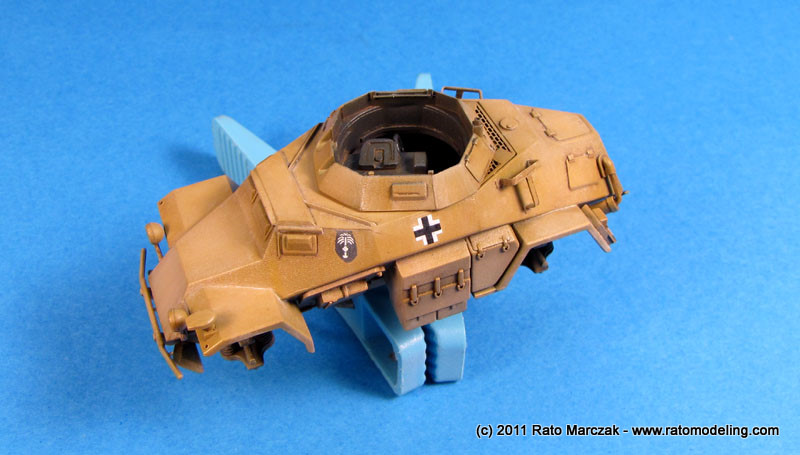
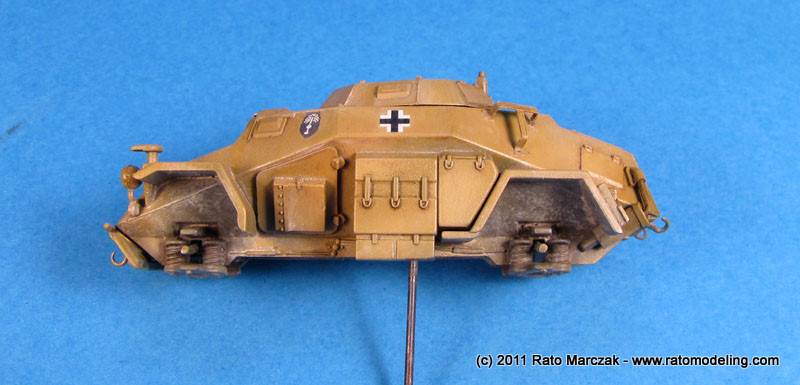
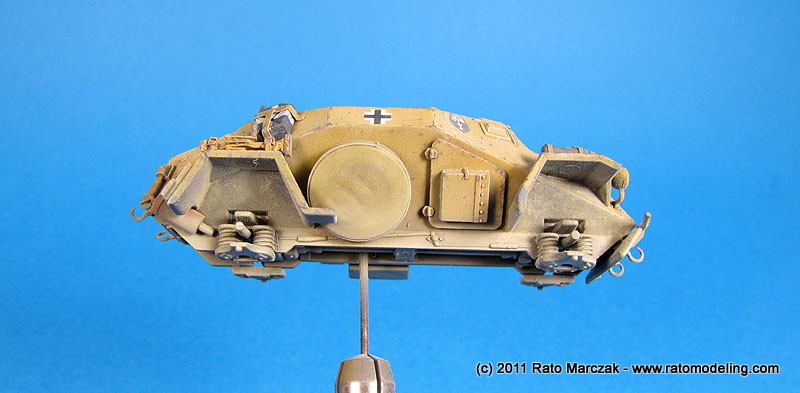
... and then over the lower body of vehicle. The stuff was applied in several passes along the lower hull, rear, front, and under the chassis. I'm quite pleased with the results, although my photos this time are not making justice to the real model. In order to simulate blobs of dried mud and heavier sand accumulation under the fenders, Tamiya weathering pastels (set A) was rubbed there. Some detail shots of the work so far:
.At this point I started to assemble the remaining parts, and I noted from the photos that the turret mesh had a couple of strange bars. These were probably folded back to support the rider sitting on the turret. They were not present in all photos I saw, and in some cases were heavily bent, but I decided to add them. This stuff is u-shaped, roughly following the contour of the mesh frame:
I made a rough drawing of the contour of the turret mesh and transfered the corner points to a piece of acrylic. The acrylic was drilled in those places and pins were inserted the to guide the bending of pieces of wire.
The resulting parts were trimmed to the correct size, painted and glued to the top of the mesh. By then I had almost everything painted and assembled:
The final touches to the hull consisted of adding fuel and oil stains running from the caps. I used Life Color Tensochrom inks for that - worked like a charm, and dries in seconds. The exhaust stacks/mufflers were covered with two coats of Rustall to simulate rust.
The kit doesn't provide the width indicators commonly found in most Wermatch trucks. I made mine with 0.3 mm steel wire bent to shape and applied drops of superglue/accelerator to make the round ends. They were glued on the front fenders as well as the wheels. I left the front wheels slightly turned to add interest. A towing cable made of fine cooper wire was tied to the front bumper. Here is the outcome so far:
Once satisfied with everything, I assembled the remaining items. Except for the radio antenae, I declared it done.
After a break, I started to think about the display base. I went through many photos of Afrika Korps in action in the African desert and settled with an image in my mind. It would be the Sd.Kfz.222 parked alongside the ruins of a rock revetment, possibly built by natives, and a desert palm tree. The idea was to show the crew looking for a water source, or just taking a break... I don't know.
Anyway, the base started as my other bases, but this time I chose the same cardboard used in my 1/72 Polikarpov Il-400. I used to use plastic, but cardboard has better adherence to the wood block. On the other hand, it is more suscetible to moisture. I applied an irregular layer of modeling paste, and over it I impressed several track/tire marks, as well as footprints. I then sprinkled fine, medium and coarse sand over the surface previously dampened with diluted carpenters' glue.
The fine sand was concentrated on the traffic area, with random spots of coarse sand here and there. I then used small rocks individually glued to form the ruins of the revetment:
Once dry, the whole base was primed with Krylon's grey primer and the terrain was retouched wherever necessary:
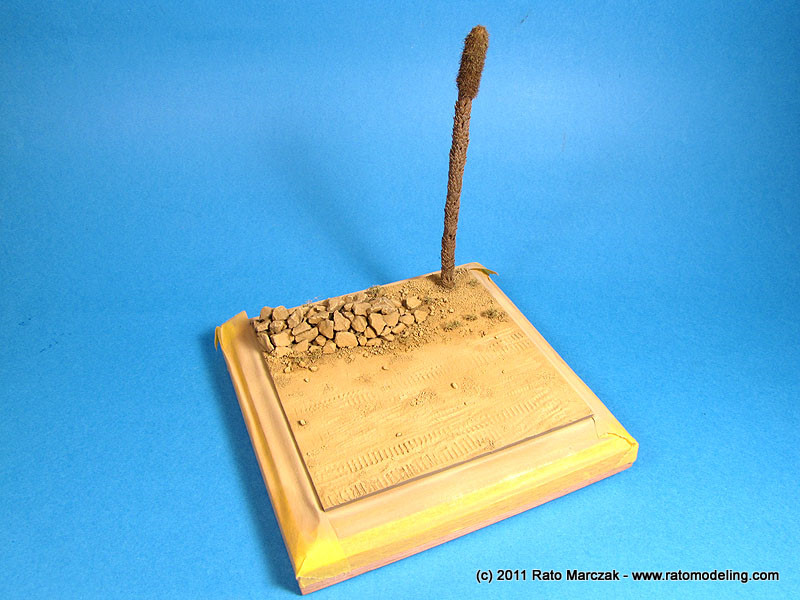
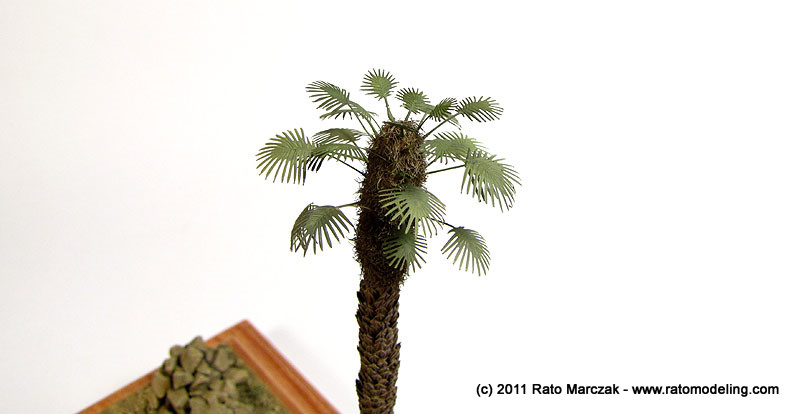
The palm tree was a problem - no commercial item seemed to look right. A while ago, walking in the hills nearby the town, I found a kind of tall grass which during the summer produces a long spike (roughly resembling wheat). When still green, that spike matches very well a desert palm tree in scale. Don't ask me what it is:
All I know is that I had my harvest. I collected many of them long before this project started. When I thought about using them, they were all completely dry. So I primed a few with lacquer paint to made resin copies, but for this project I just coated one of them with wood glue diluted in water and waited it to dry completely. I made a crown following the photos of one of many types of these trees, using putty, just to make it fatter than the rest of the trunk:
And then I covered the crown with static grass. Everything was painted with brown and drybrushed. I added a bit of green to the color applied over the crown. The leaves would be attached to it later, but by then I didn' know how to make them:
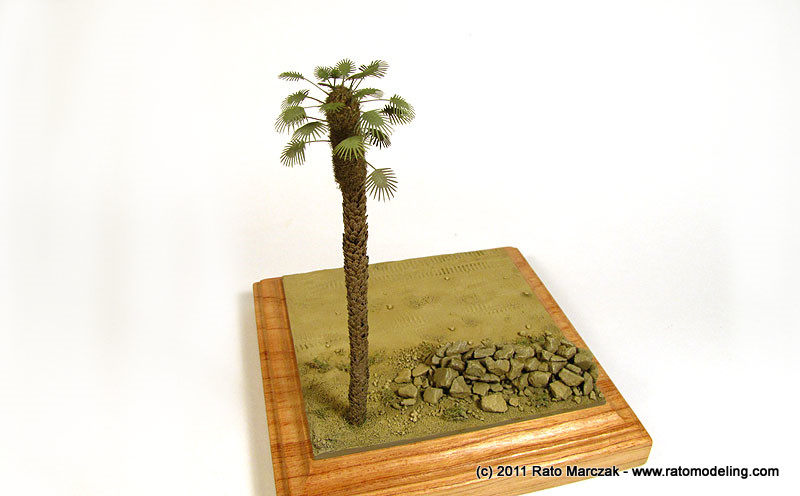
Next, the base was painted in a long single airbrushing section, using acrylic paints. I started with an overall coat of dark brown. The paint was applied with the airbrush perpendicular to the base. That would preserve a bit of the grey primer on recesses and shadowed areas. The same color was progressively whitened and airbrushed, concentrating the lighter tones on the traffic areas. That would leave the revetment darker. In the end, I airbrushed a sand color almost exclusively on the traffic area and around the revetment to simulate dust. All this was made keeping the airbrush perpendicular to the surface of the base:
Once the paint was dry, I glued small pieces of scrubbin pad to simulate ground vegetation. A wash of artists oils followed, and then a strong drybrushing with a very light sand color. Heavily thinned green paint was brushed over the small bushes:
And this was the result by then:
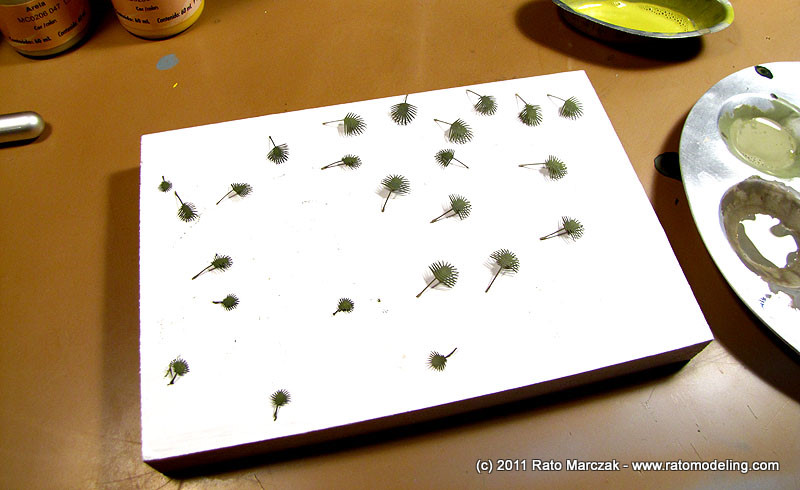
Since I moved to a new place, I wasn't in prepared to photoetch my own parts. Therefore I ordered a PE set of palm leaves from Voyager (see review here) to make my life easier. After a while waiting the package to arrive, I resumed the project. As I mentioned in the review, it would be far more easy to paint the leaves after installing them on the trunk. I didn't, and the painting section took longer than expected, not to mention the mess:
The photo below gives you an idea of my pain - the leaves are tiny, and the paint chips off easily if you don't use a metal primer (I didn't, again). Basically, the leaves were removed from the fret, bent by pressing them over a round pen cap, and painted in two or three shades of green acrylics paint. Taking advantage of the relief etched on the upper side of the leaves, I also applied a wash of brownish colors, particularly on the leaves intended to be glued lower along the palm crown. The only advantage of painting them separately is the possibility to shade the leaves with an airbrush, depicting accumulated sand:
Glueing the fronds one by one was difficult. I ended up using super glue, but this meant that I had to retouch some spots with paint to remove the shine. Yes, I'm still cross-eyed:
In retrospect, the fronds are too small to my eye. Or maybe the trunk is too large, I don't know. Although the final aspect is good, there is something definitely strange with my desert palm tree. I guess it is a very rare specimen which grows only in this area of Lybia...
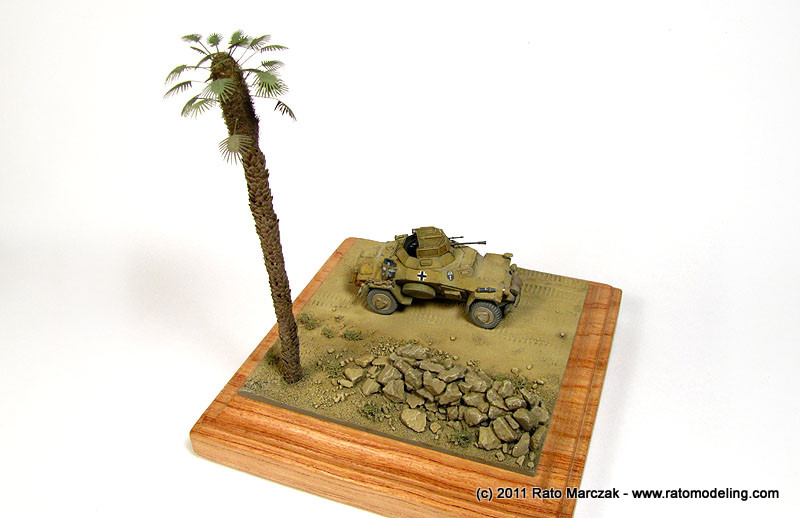
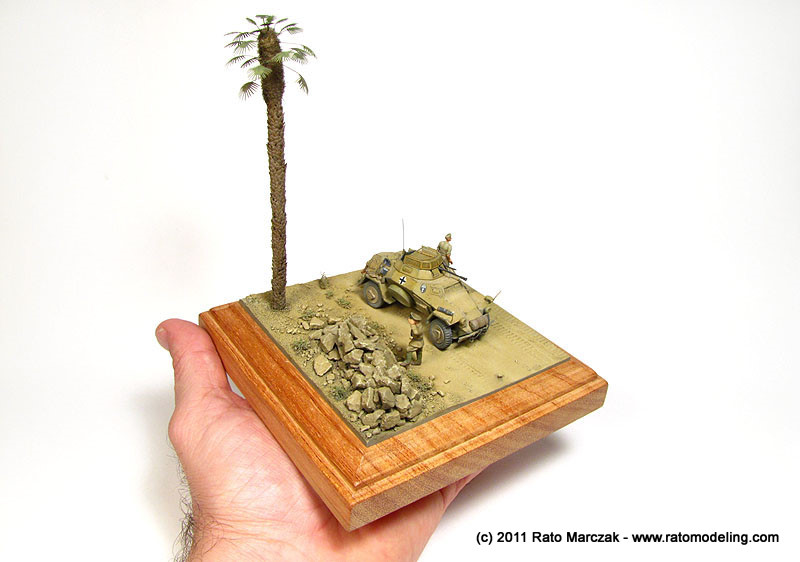
It is passable, but next time I will use a slightly smaller trunk, and photoetch my own leaves. Of course, I cound't resist to check the little 222 on its base:
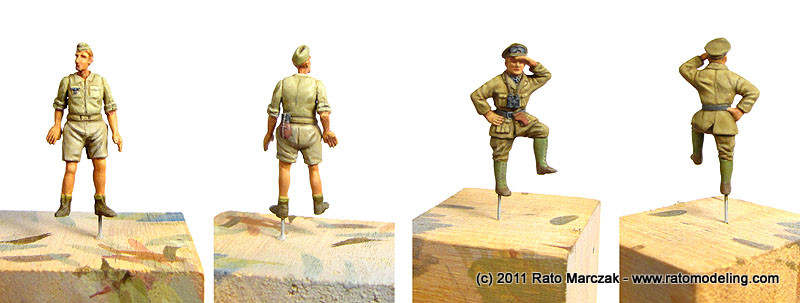
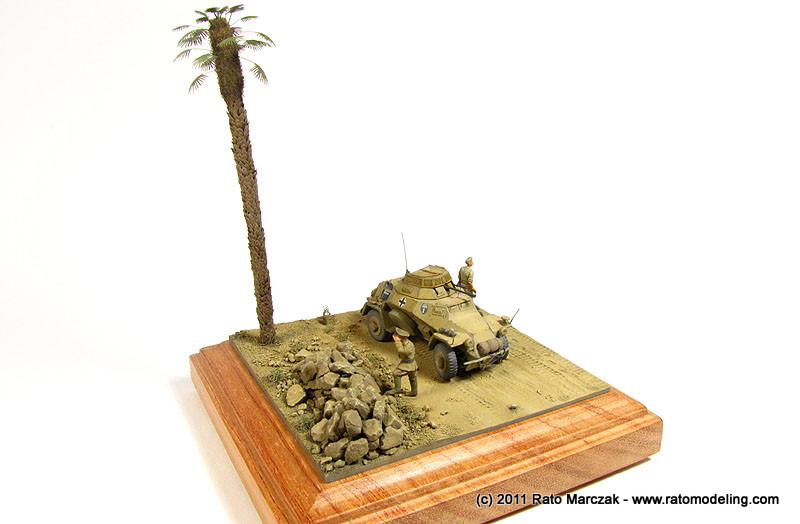
After a long wait for the resin figures to arrive, I had another of those painful (for me) figure painting section. I think I'm improving, but definitely that's something I'll never perfect. I used only one of the CMK radio set figures. The other is the 1/76 Rommel (as another officer here) from an old Matchbox Wespe kit. Not bad, but we really do need good figures for vignettes and dioramas in the small scale. Anyway, here are the results:
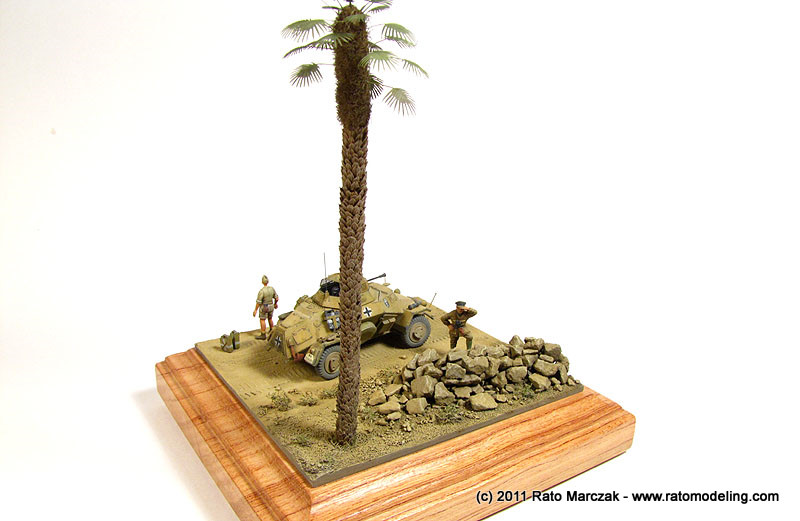
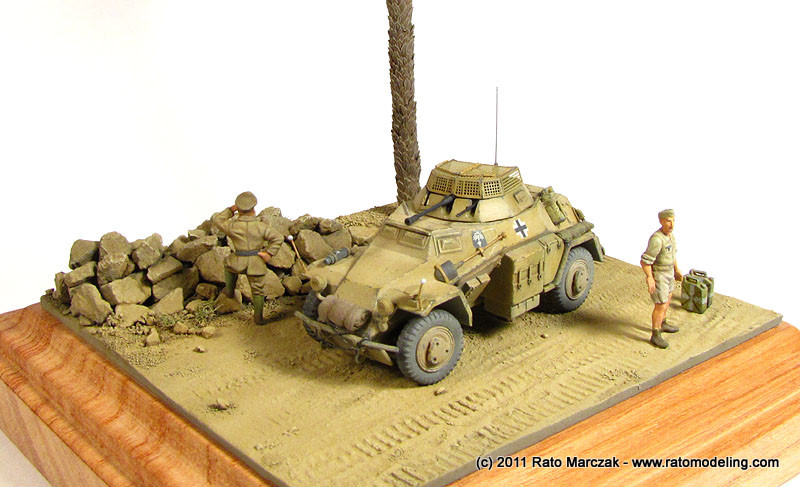
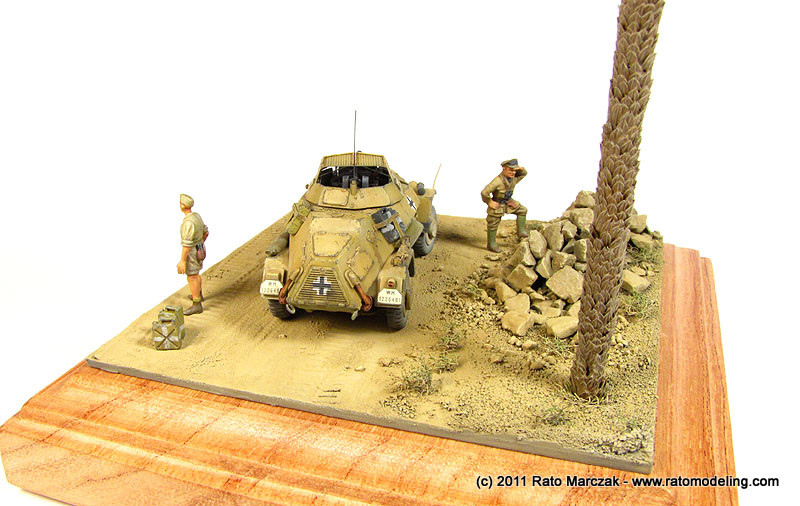
And so I started the final sprint. I glued the figures to their spots, trying to keep the balance. One day I'll add the little lizzard baking over a rock, and that will name of the vignette: "The Lizzard"...
Some close ups:
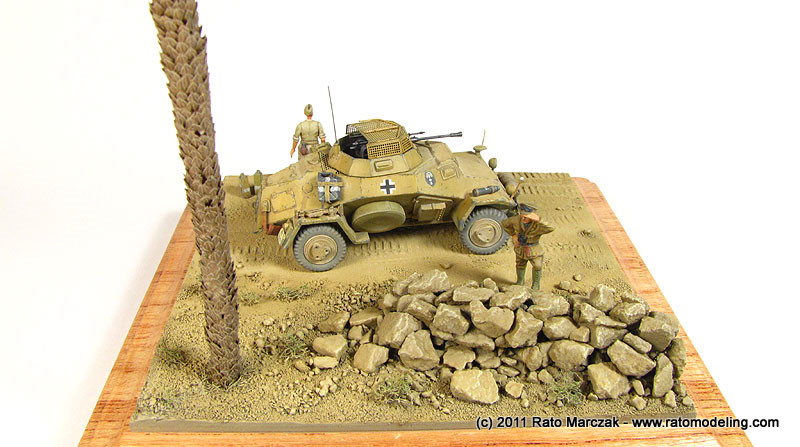
Somehow,
I managed to make the Officer kind of disappear in the colors. Not my
first time at this mistake, but I guess that's why they used to wear
camouflaged uniforms...

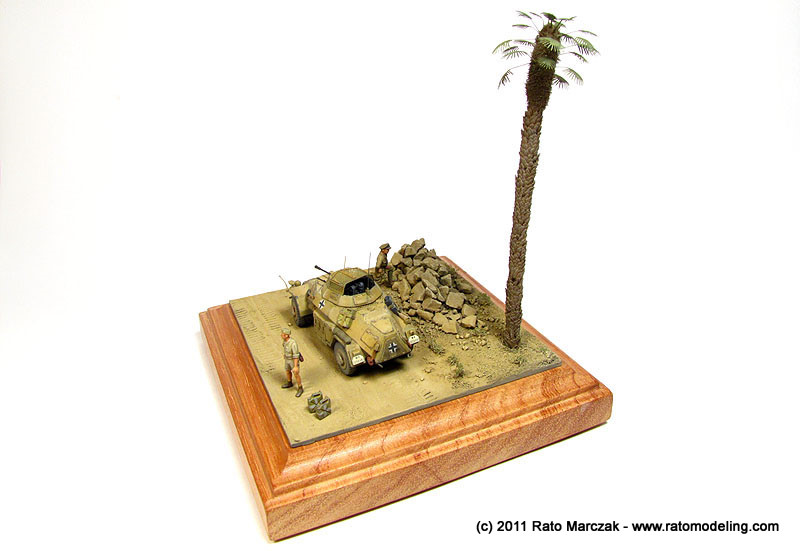

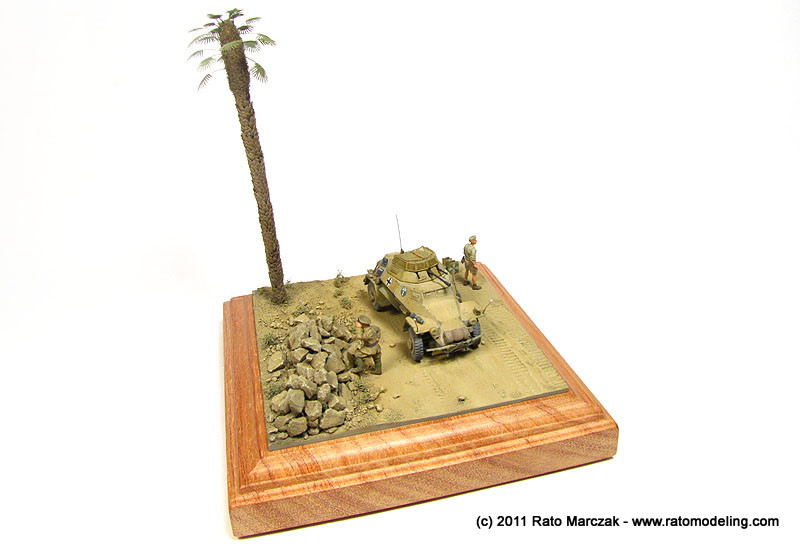
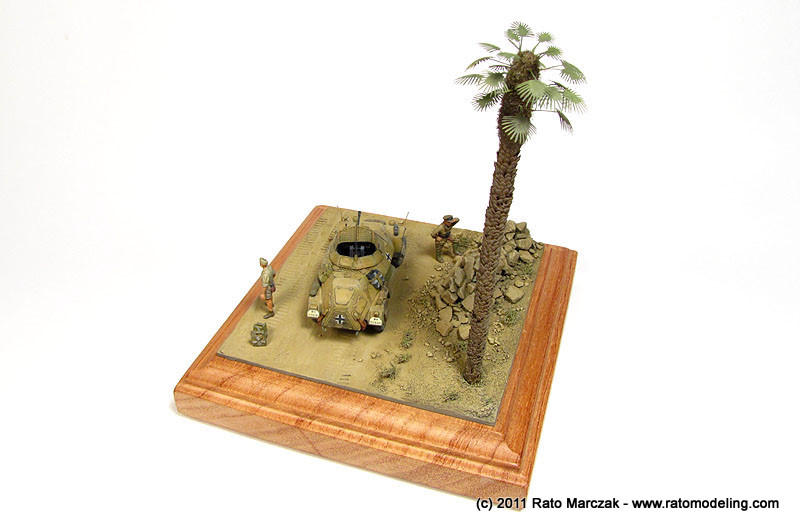
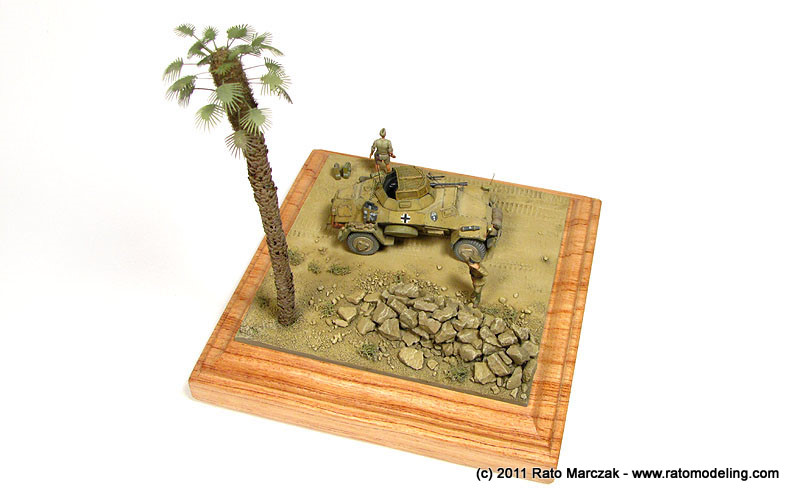
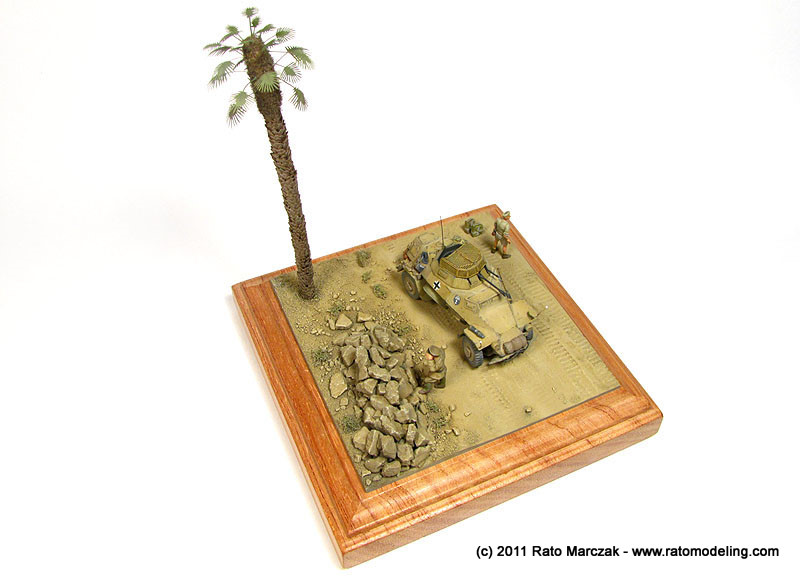
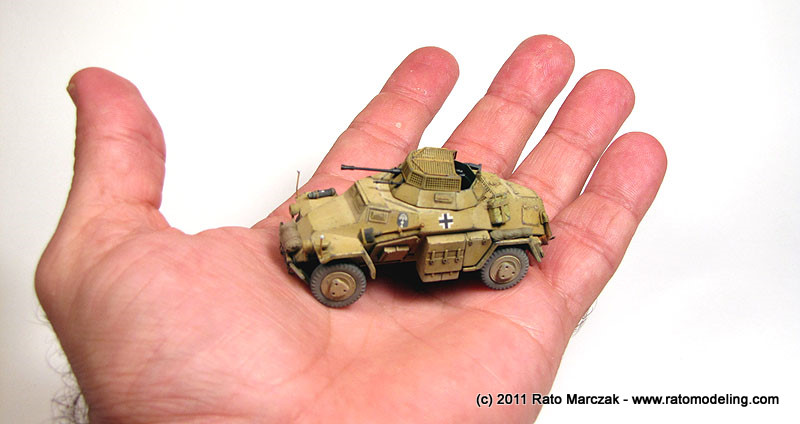
Like I always say: it's small, but fun:
| Technical
file |
|
| Kit:
|
-
ICM
#72411 |
| Additions:
|
- Voyager Palm Leaves in 1/72 |
| Basic
colors:
|
-
Panzer
grey:
Tamiya
XF-63
acrylic and Vallejo #166 - Africa brown: Revell #88 enamel - Dark yellow: Aerotech Dark Yellow lacquer - Gloss coat: Model Master Metalizer Sealer - Flat coat: Testors Dullcote |
| Notes: |
- Scratchbuilt details inside the turret, guns, and vehicle accessories (see text). |
Rato Marczak © 2011
