| Airfix Spitfire F Mk.22 in 1/72 |
| Started: November / 2015 Finished: February / 2016 |
The 1/72 scale Airfix Spitfire F.22 is one kit of their new
line. Being disappointed by the PR.19, I was surprised to see a much
better kit in the F.22 - better panel lines, landing gear legs
separated from the well doors, good fit, and a finesse that is not in
any Airfix kit of the latest catalogs.
My fascination for the F.22 dates way back to my teen years, right after Matchbox released their F.22/24 in 1/32 scale. That particular kit had been in my want list until not long ago, when I finally realized that it would need a lot of work to be brought to a good standard. I needed a replacement in my collection, so when Airfix released the F.22 in 1/72 I decided that it would suffice. And a coincidence: since the F.22/24 was the last of the line (not counting the FR.47, essentially a navalized F.22, and neither the Spitful), I would end up with the first (K5054) and the last Spitfires in my collection. Having covered the whole family, I would not need to build any other Spitfire in my life. Ok, that was a bad joke (with faint traces of truth, I must confess)...
Back to modeling, this is the boxart:
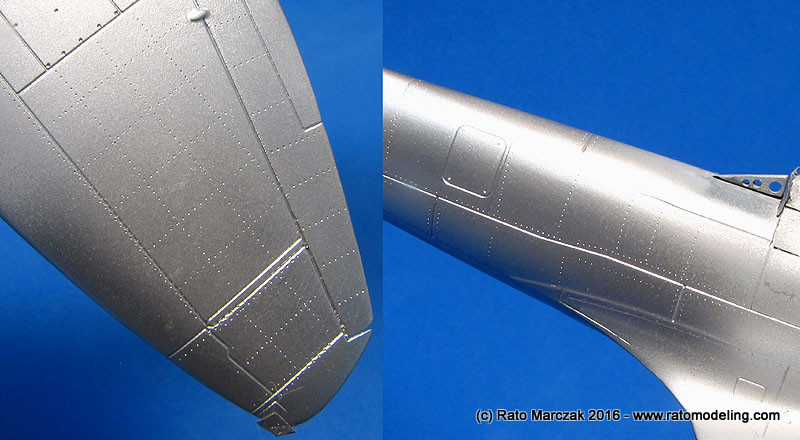
My first task with the kit was to rivet the whole airframe. By then I was hooked by the boxart version, and a silver finished aircraft devoid of any rivets never looks ok. Airfix provided fasteners, but all those access hatches without any rivet/fastener just don't look right. Let me add that I personally dislike the styrene Airfix is using in their latest models. It is too soft - good for riveting, but an agony for scribing...
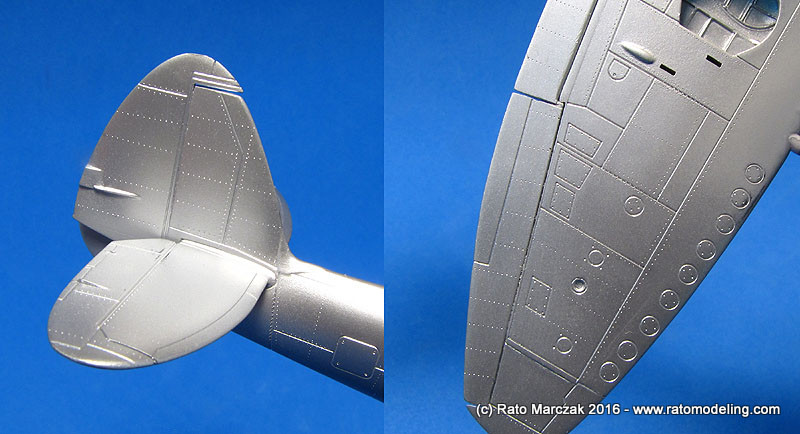
Well, I used comercial and homemade riveters wherever possible, occasionally switching to needles of various gauges an beading tools to make fasteners. I primed the model with automotive primer but hat to apply a silver coat on top of it to make the riveting job visible, so that the unavoidable corrections could be done.
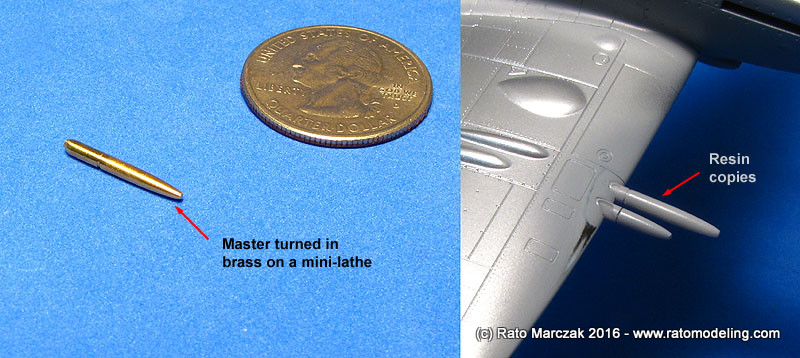
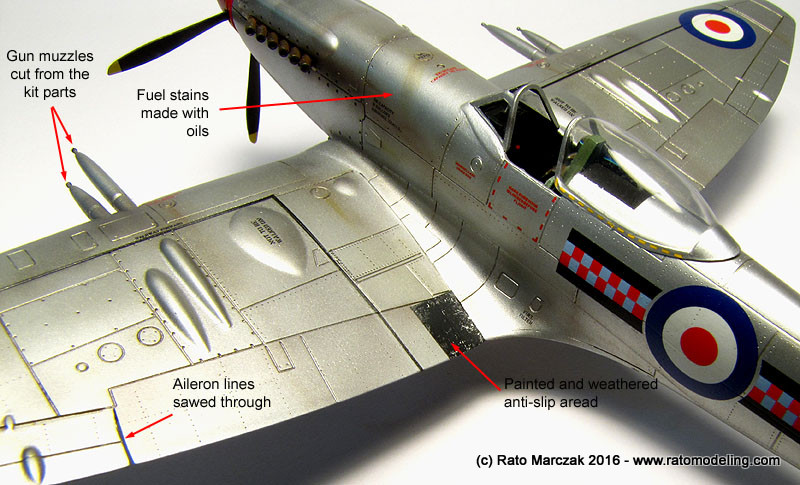
My sample had a serious problem, the wing gun mounts were only partially molded. I opted for drilling openings in the wing leading edges to receive new muzzels. I turned a master in brass and made resin copies of it. Instead of making another master for the short muzzle, I just scribed new lines on a long muzzle resin copy and inserted it further inside the wing:
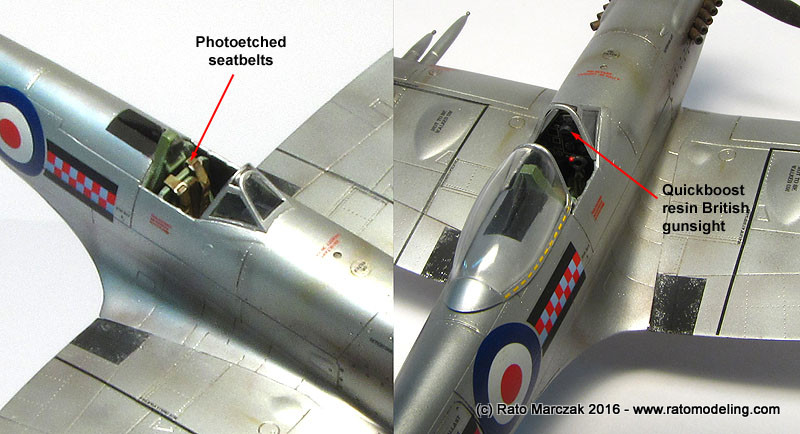
I forgot to mention (and to take pictures): there is nothing fancy in the cockpit. The kit parts are really nice and all I added were seatbelts from an old PE set, a guitar string to play oxygen hose and a Quickboost British gunsight which was glued in place only at the end (the kit's one is really bad - part D1). My eyes are not what they used to be, and I hope yours neiter (just kidding), because I'm a bit tired of detailing 1/72 cockpits... I even used the control panel decal of the kit:
My fascination for the F.22 dates way back to my teen years, right after Matchbox released their F.22/24 in 1/32 scale. That particular kit had been in my want list until not long ago, when I finally realized that it would need a lot of work to be brought to a good standard. I needed a replacement in my collection, so when Airfix released the F.22 in 1/72 I decided that it would suffice. And a coincidence: since the F.22/24 was the last of the line (not counting the FR.47, essentially a navalized F.22, and neither the Spitful), I would end up with the first (K5054) and the last Spitfires in my collection. Having covered the whole family, I would not need to build any other Spitfire in my life. Ok, that was a bad joke (with faint traces of truth, I must confess)...
Back to modeling, this is the boxart:
My first task with the kit was to rivet the whole airframe. By then I was hooked by the boxart version, and a silver finished aircraft devoid of any rivets never looks ok. Airfix provided fasteners, but all those access hatches without any rivet/fastener just don't look right. Let me add that I personally dislike the styrene Airfix is using in their latest models. It is too soft - good for riveting, but an agony for scribing...
Well, I used comercial and homemade riveters wherever possible, occasionally switching to needles of various gauges an beading tools to make fasteners. I primed the model with automotive primer but hat to apply a silver coat on top of it to make the riveting job visible, so that the unavoidable corrections could be done.
My sample had a serious problem, the wing gun mounts were only partially molded. I opted for drilling openings in the wing leading edges to receive new muzzels. I turned a master in brass and made resin copies of it. Instead of making another master for the short muzzle, I just scribed new lines on a long muzzle resin copy and inserted it further inside the wing:
I forgot to mention (and to take pictures): there is nothing fancy in the cockpit. The kit parts are really nice and all I added were seatbelts from an old PE set, a guitar string to play oxygen hose and a Quickboost British gunsight which was glued in place only at the end (the kit's one is really bad - part D1). My eyes are not what they used to be, and I hope yours neiter (just kidding), because I'm a bit tired of detailing 1/72 cockpits... I even used the control panel decal of the kit:
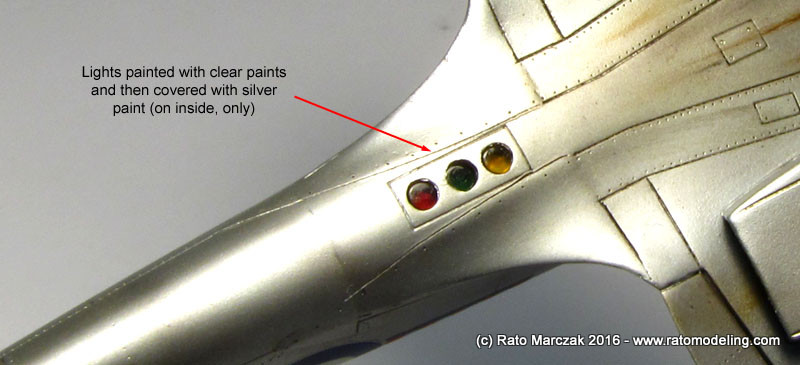
The wingtip lights were made using the traditional colored clear plastic method. One item that must be prepared before attaching the wings to the fuselage are the recognition lights, provided as a clear part (part D3). The instructions call for red, orange and yellow colors (front to back), but after a quick research I found amber, green and red. I painted the inside of part D3 with these colors using Tamiya clear paints, and once dry I top coated them with silver paint. Worked like a charm. Before painting started, I masked the lights with tape disks of the correct diameter:
As you probably noted, I'm becoming a bit lazy in taking in-progress photos of my latest models. It is true, and this one is no exception. So, many of the photos you are going to see ahead were taken after the model was finished, or about to be finished. I hope this can work as a proof of my good will!
This was a quick project, and I didn't have any serious trouble. The only problematic area was the top of the cowling, where Airfix seems to have used slide molding, making the fasteners inconsistent and sanding necessary to make ghost lines disappear.
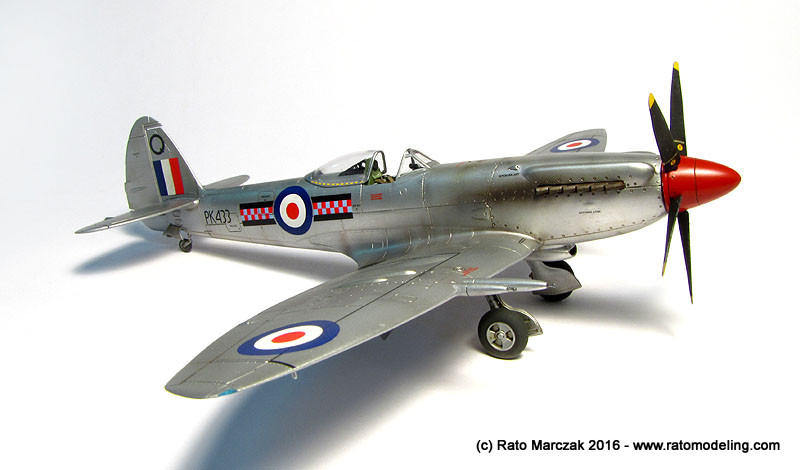
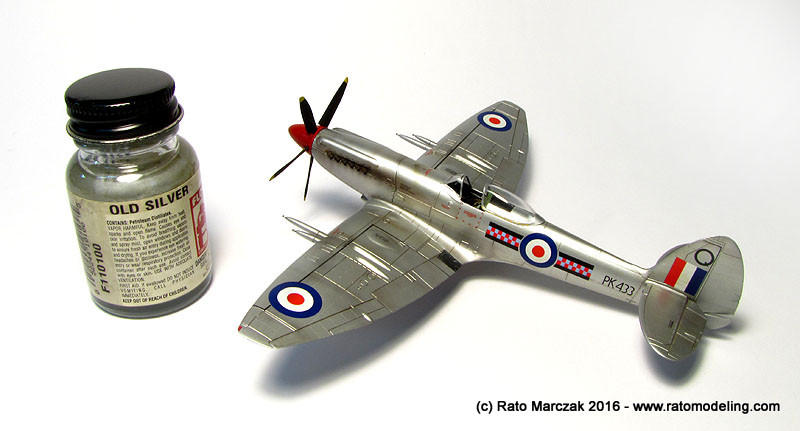
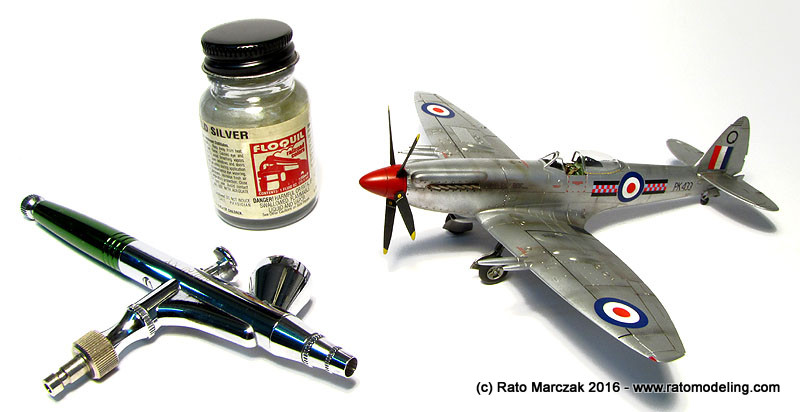
The paint used was the (now defunct) Floquil Old Silver. I cannot emphasize enough how I like these paints, and how I found them superior to all those crap acrylic metalics around. The pigment is the finest, it airbrushes perfectly - even in retouches, and they can be mixed with other enamels for tonal variations. I honestly think Old Silver and Bright Silver are on par with Alclad, except that they are enamels, and therefore the protective coat before washes is mandatory. And so I did, after applying the kit decals. And then came the weathering.
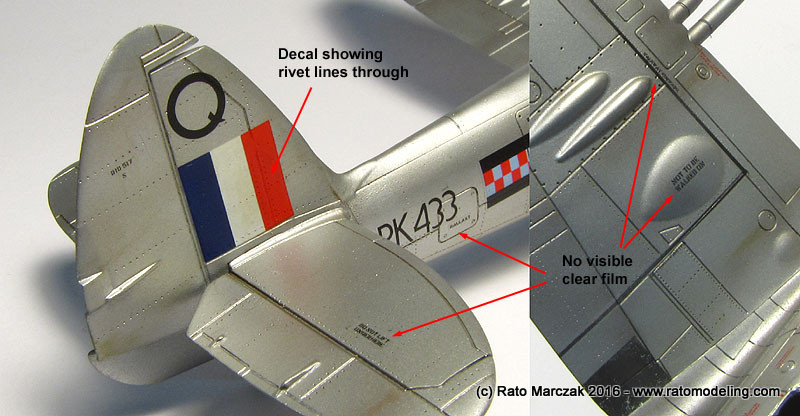
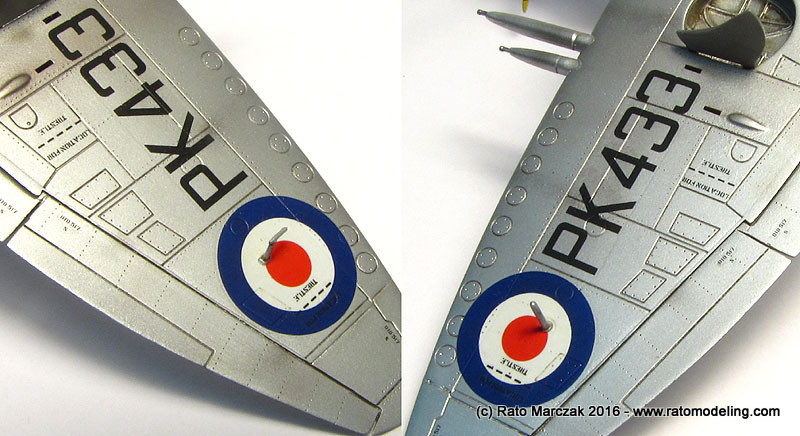
Ok, ok. Slow down. Let me start by the decals. As I said, the decals provided with the kit were used. Airfix decals are really great lately, and you don't need aftermarket ones unless you dislike the versions in the kit. I used the standard MicroSet/MicroSol method, and the decals settled perfectly over the panel lines. You can even see the rivets conformed under them. A protective clear coat was airbrushed to seal de decals and prepare the model for the weathering stage, and you really have to struggle to find traces of the clear film, even on the many stencils provided:
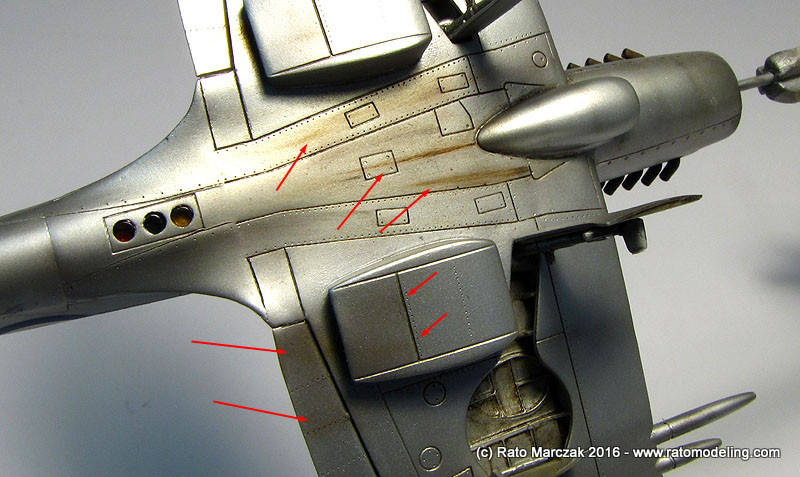
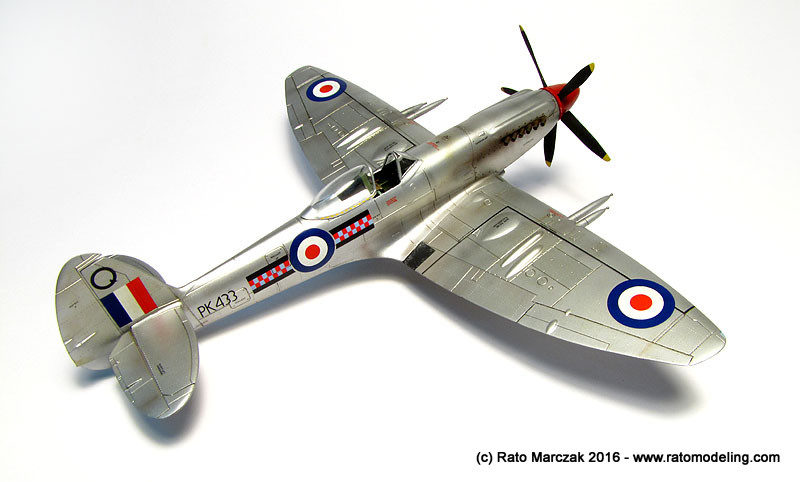
The weathering consisted of selective oils wash along control surfaces, engine panels and underside. I simulated fluid streaks using black and brown oils, mostly on the belly, where Spitfires were notorious for leak marks. The effect was also used aft trailing hinges and other movable parts.
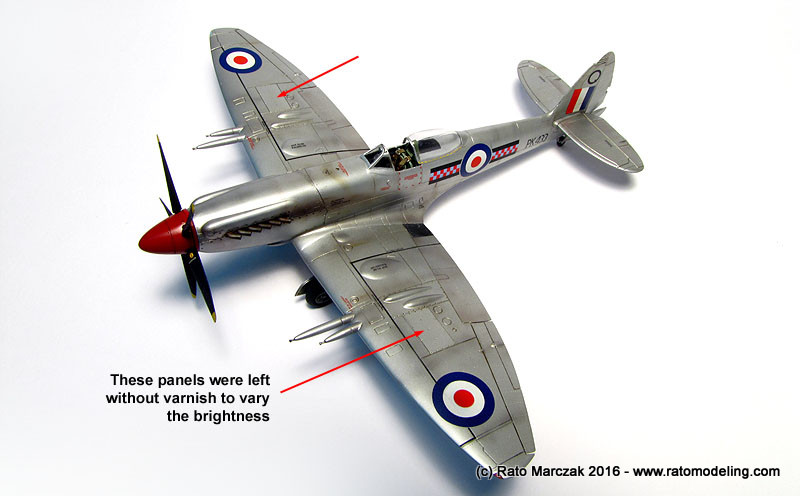
With the basic weathering done, it was time to dull the shine down a tad. This was done using an overall coat of Testors Acryl Semi-Gloss Clear. I could not use different variations because the F.22s had their silver painted - it is not natural metal. I did, however, mask the ammunition covers on the wings before applying the varnish, just to add interest:
I also used oils to simulate the stains on both sides of the fuselage tank. The black anti-slip area under the cockpit is provided as decals, but I preferred to paint it instead. Grey and silver Prismacolor pencils did the paint chipping there. The flash supressors of the guns were sliced off from the kit parts and glued at the end of my scratchuilt replacements:
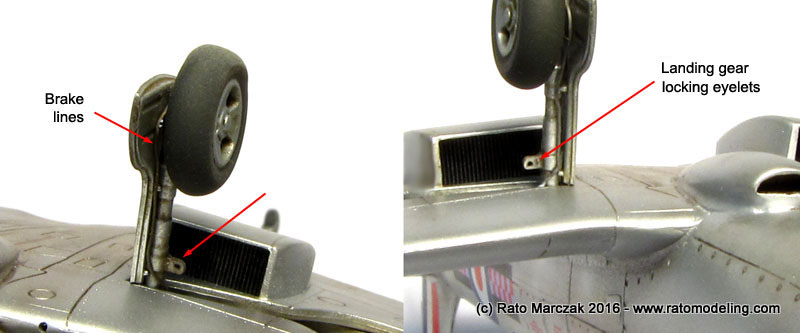
The wheels are beautifully molded, and include the weighted effect - nice touch, Airfix. The landing gear doors (parts A6 & A7) are also very nice, and fully detailed on the inner side. The landing gear legs (parts A15 & A16), however, have very soft detail, and the locking eyelets were missing. I made new ones from plastic card and glued them in place. These things leave little doubt that the new Airfix line is directed more to young and occasional modelers than serious hobbyists. The brake lines were made from 0,2mm solder wire:
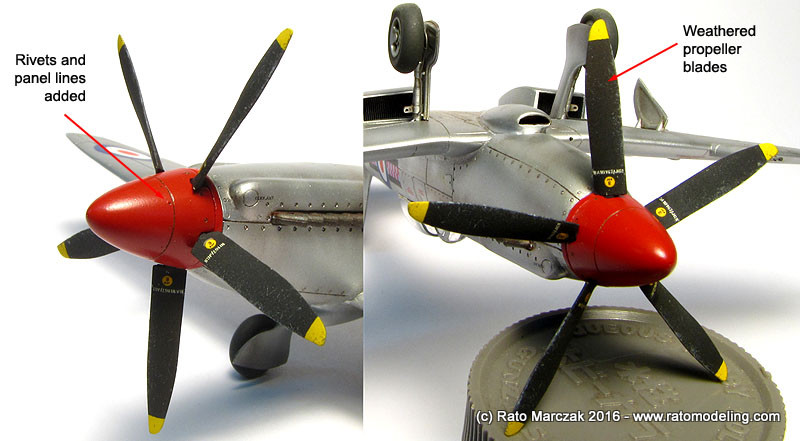
The spinner is designed, like in aircraft models of many other manufacturers, to be assembled sandwiching the propeller blades. I don't like this approach because it prevents you from working on the backplate/spinner joint. Usually, I remove the propeller blades and re-install them individually once the work on the spinner assembly is done, against the odds of misalignment. But five blades is too many, and the statistics were against me, so I just followed the instructions. I added missing panel lines and screws to the spinner (part A12), though. The propeller blades (part B7) were painted but weathered only in the final stages, using the sponge method to simulate scuffed paint:
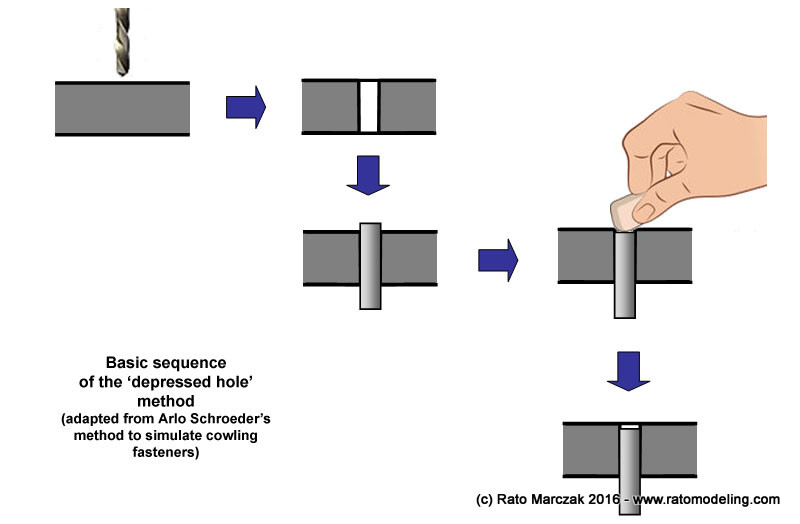
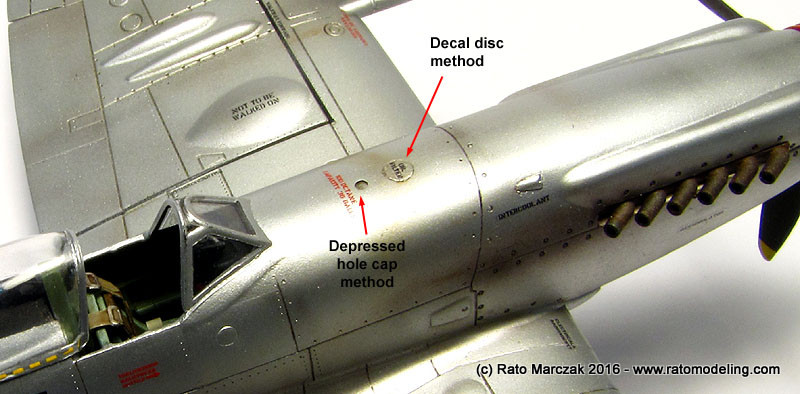
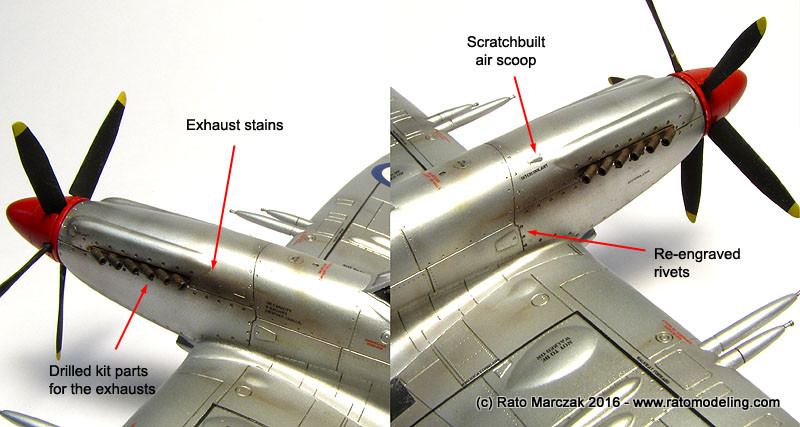
As I said before, the worst area in the kit was the upper cowling. Not only it had nasty mold marks, but the fit leaves something to be desired. After sanding the area I spent a lot of time rescribing the panel lines and re-engraving the rivets/fasteners. Two common detail in all Spitfires are the oil filter/fuel caps in front of the windscreen. Both are circular, the first is larger and slightly raised with the latter smaller and recessed. The oil filter cap was simulated by punching a disk out of a decal previously painted with the same silver paint of the airframe and applied as a regular decal. The fuel opening should be simple, but to make a cylinder slightly depressed in a trued hole is not just a matter of making a shallow hole. I adapted a method learned from John Alcorn's book Scratchbuilders, used by the late Arlo Schroeder in his scratchbuilt 1/24 Grumman Avenger. First, a hole is drilled all the way through the plastic. Next, a rod of the same diameter of the bit used to drill is inserted. It is important that the end of the rod is perfectly squared. If the fit is tight, apply some pressure with an eraser just enough to make the rod sit recessed instead of flush with the surface. I hope my diagram below is clearer than my text. I call it depressed hole method, but it is essentially the same thing described by Paul Budzik when doing pin rivets, except that we don't want the pin raised, but recessed:
The small air scoop on the top of the cowling was sanded off and replaced. The kit's exhaust stacks were used, but I drilled each opening with an appropriate bit, and painted them with a secret indian recipe:
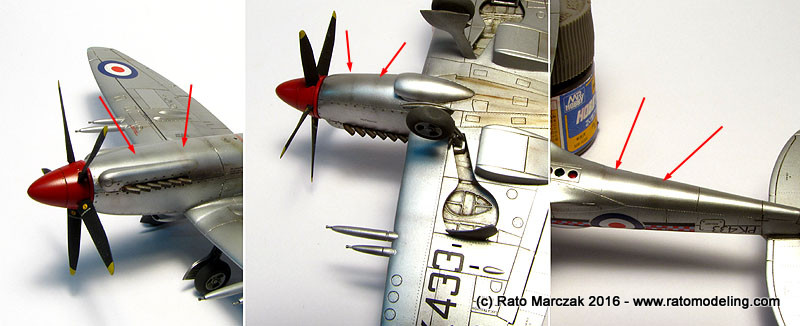
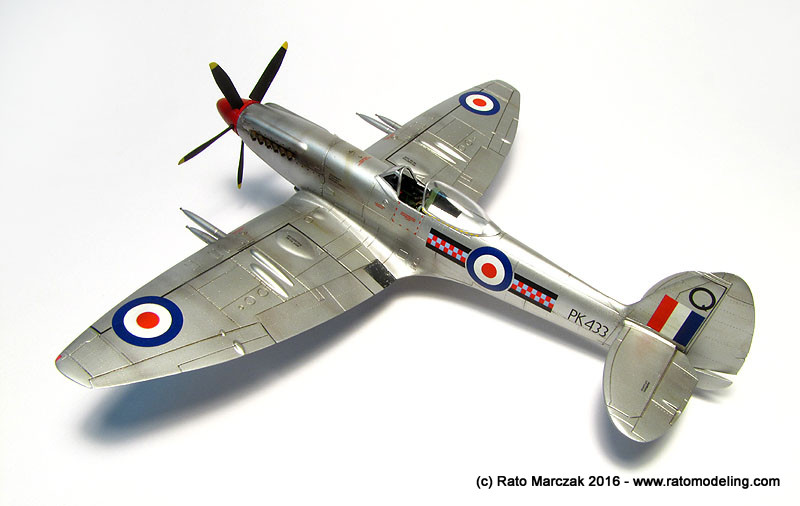
The last step was to apply the airwash (highly diluted black+brown mixture) on selected places. I love to use this method to make false shadows and simulate stressed skin, like in the spots below:
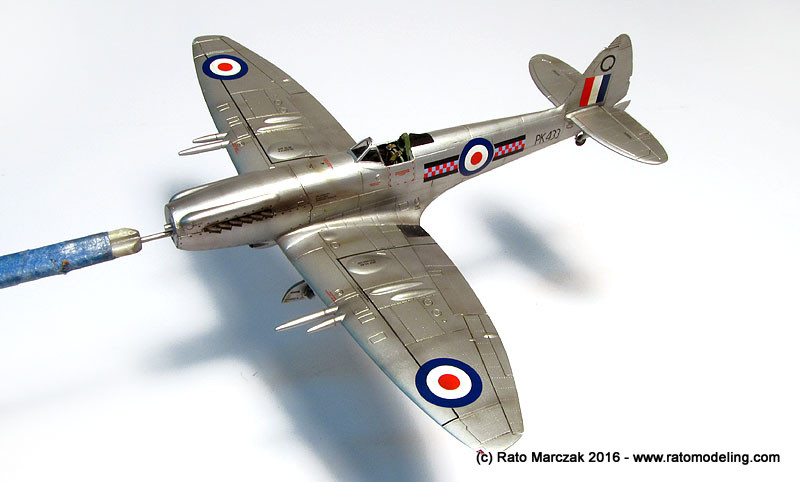
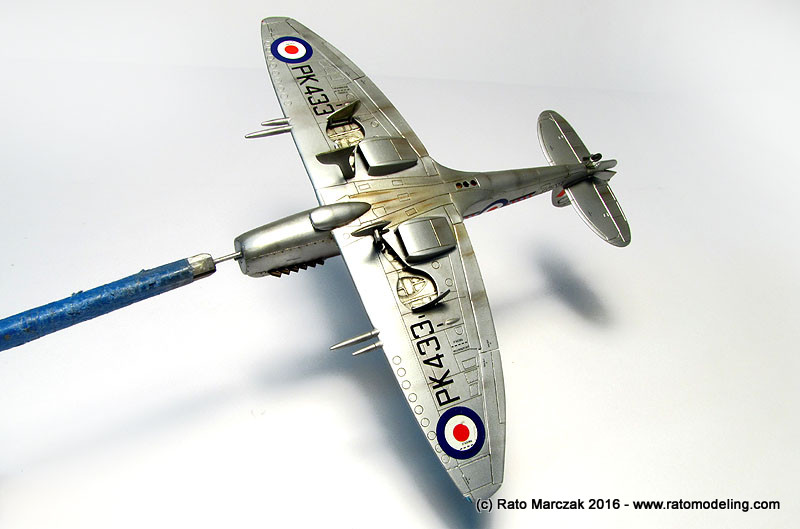
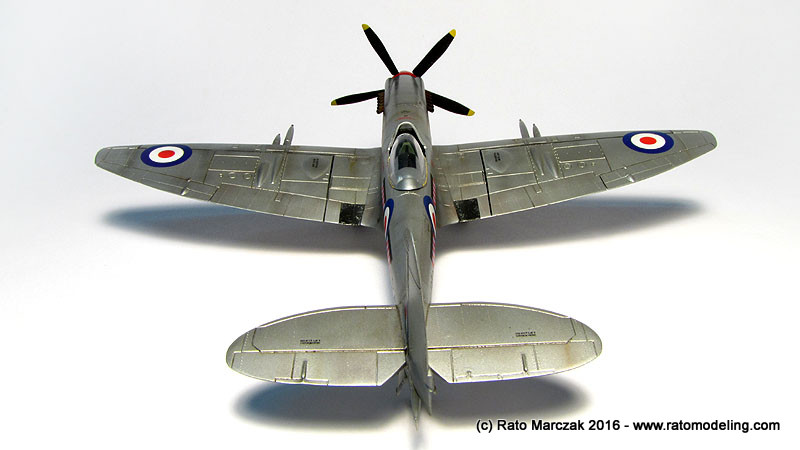
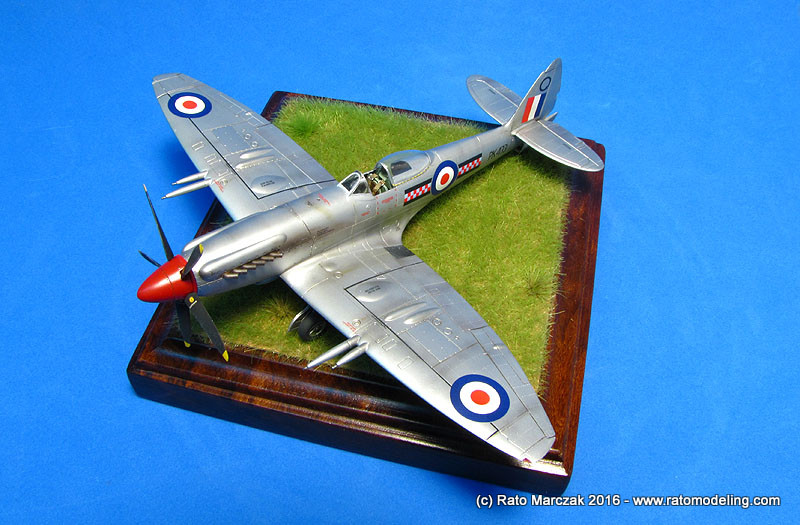
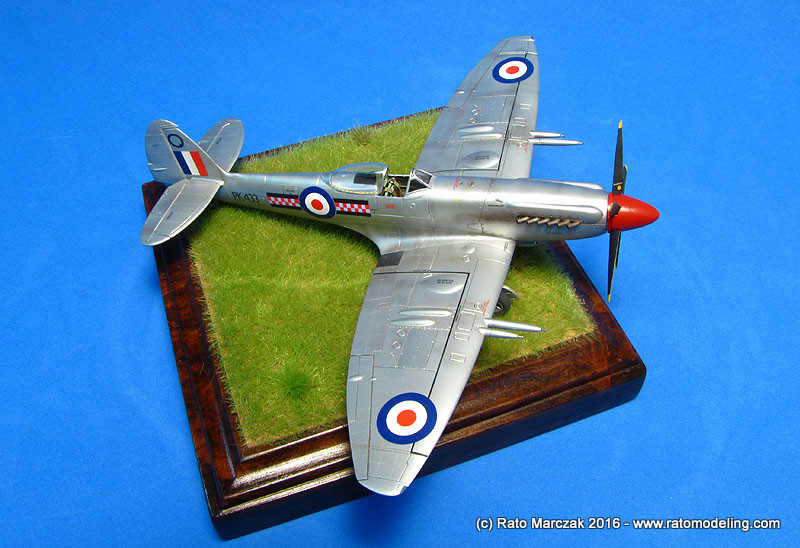
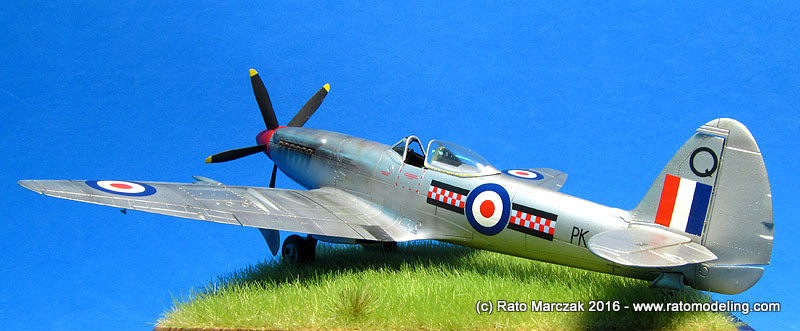
After gluing the main wheels, tailwheel and Pitot tube an interesting Spitfire model was born:
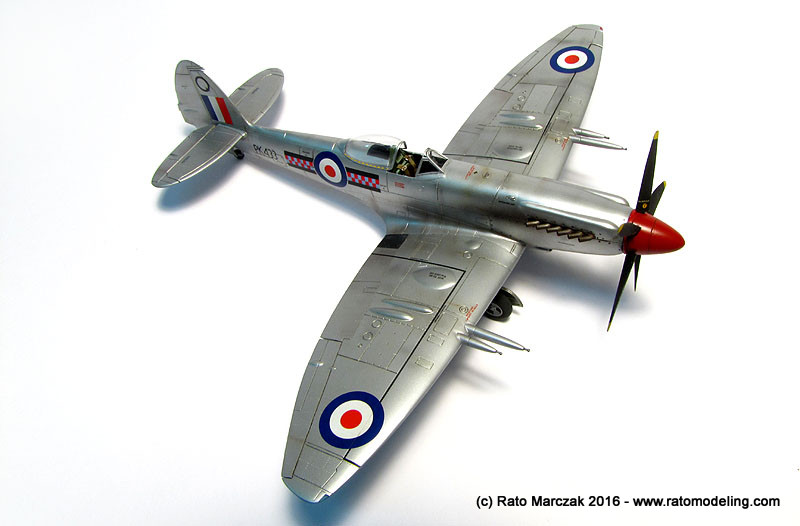
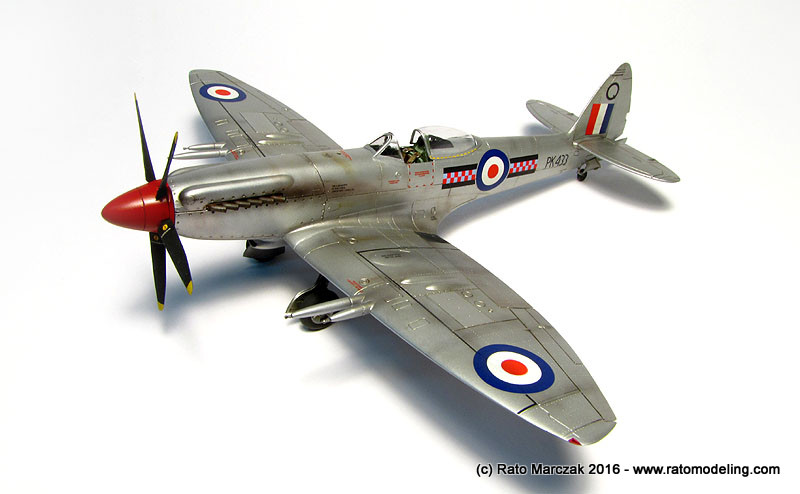
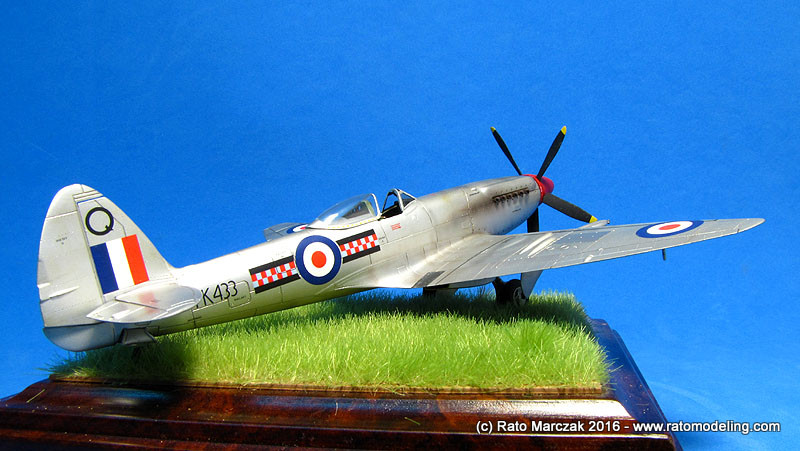
I'm glad that I have chosen the silver finish. For some reason, late marquee Spitfires just don't look good to me when camouflaged:

This model showed two big lessons to me. First, modeling community was already well served of products back in the 90's, so don't be dragged by all this propaganda about new and suppposedly better products that replaced them, because sometimes it is simply not true. Make your tests and draw your own conclusions.
I forgot the second lesson...
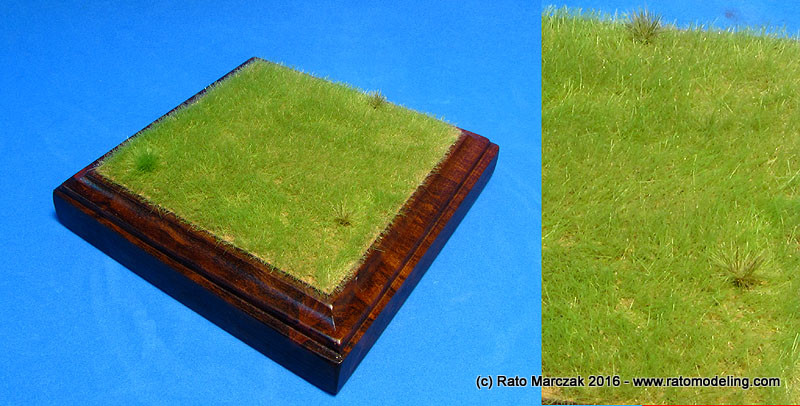
While I was thinking in the second misterious lesson, I prepared a display base for the F.22. Just poured a mix of long (6 mm) and short (3 mm) static grass over one of my standard wood bases and glued two or three tufts of tall grass. After sifting some fine dirt and blowing off the excess my base was done:
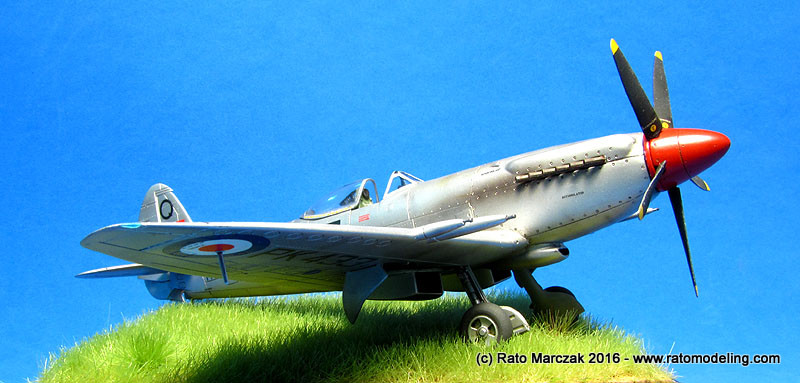
And here is my new model on its base, with a blue background:
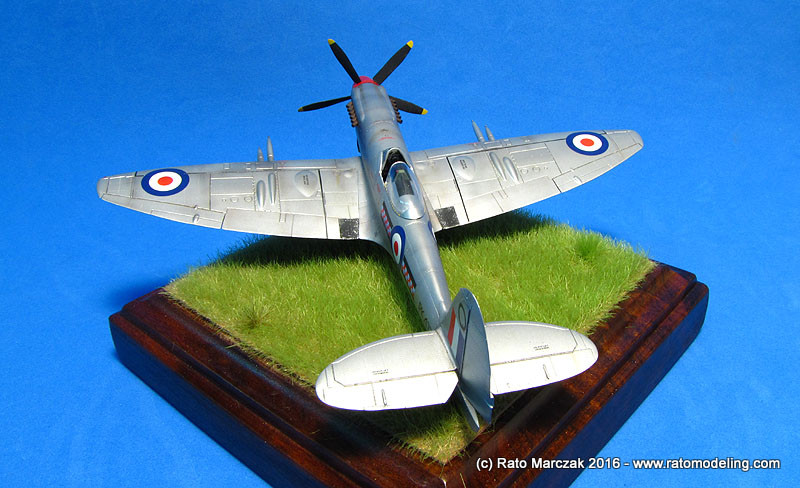
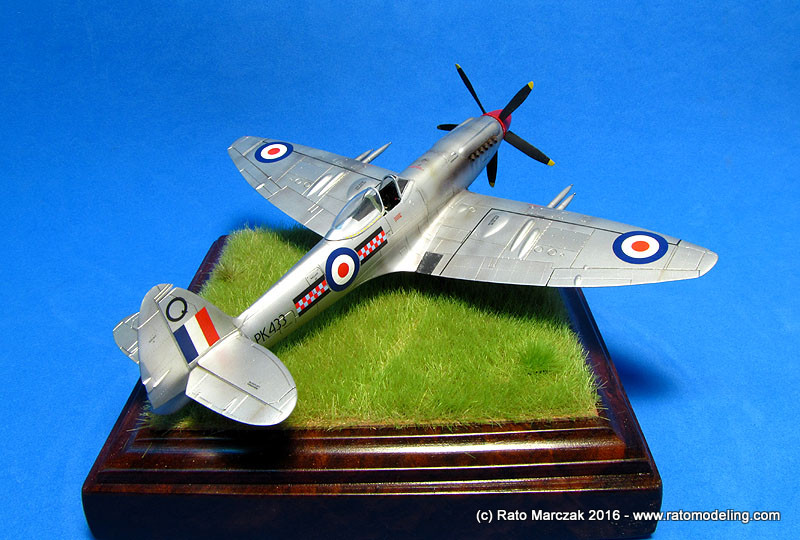
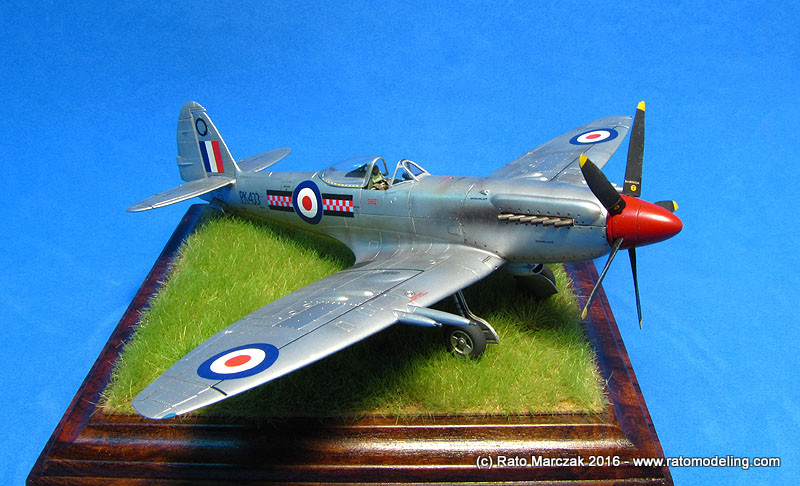
I really enjoyed the weathering I achieved on this model, and it was a landmark of sorts to me (aha, I guess this was the second lesson!), for it is too heavy not to be seen or regard the aircraft as new, and not too light that couldn't be seen, neither (done that before). Like I always say, in 1/72 scale the good weathering has a very gentle balance - it is easy to go overboard, it is easy to make it invisible.
I'm currently considering going back to my original scale, the 1/32. But constantly building 1/72 models gave me an accuracy and control that larger scales can't give. It is just a matter of picking a good model and never using the excuse of the small scale to short cut challenges. Overcoming modeling challenges is exactly what make us a better modeler after each model...
So there you have it. If there is a third lesson, I'd put it this way: do your best to make a 1/72 model look like a larger scale model.
Uh? 1/48 scale? What the heck is that?
| Technical file | |
| Kit:
|
- Airfix A02033 |
| Additions:
|
- Quickboost British gunsights in 1/72 - Eduard generic British seatbelts (out of production). |
| Basic
colors: |
-
Primer: Acrylic automotive primer - Interior green: Humbrol #78 RAF interior green - Silver: Floqui Old Silver (F110100) - Satin varnish: Testors Acryl Semi-Gloss Clear (#2016) |
| Notes: |
-
A few scratchbuilt details (see text). |
Rato Marczak © 2016
