| Dragon T-34/76 mod. 1940 in 1/72 |
| Started: January / 2009 Finished: July / 2009 |
I'm
not a bit fan of Russian AFVs. However, the T-34 - and all it
represents by helping to hold the Wermatch in its East Campaign -
remains as a mythical weapon, as a book title says. Being not much
sure about how to proceed with the weathering of my Sd.Kfz.253 in the small
scale, I decided to try a few techniques in another model. So I pulled
the Dragon T-34 model 1940 from my stash, and a quick examination
revealed a very good kit with excellent molding and detail level.
Except for the flexible tracks (Dragon's DS, which can be glued with
regular styrene cements), the little tank convinced me that it could be
a fast project, and yet provide a useful proving ground for new
weathering techniques without having to push the finished model to the
trash can. I wish I had some link and length tracks, but that is the
only negative point of the kit. On the plus side, Dragon used sliding
molds to produce one piece roller wheels, saving me a lot of time. On
the other hand, the driving sprockets and idler wheels came with
recessed holes, so it is a good idea to drill them all the way through
for a more realistic appearance. I will not review the model here, but
believe me, it is a very good model for its (relatively low) price.
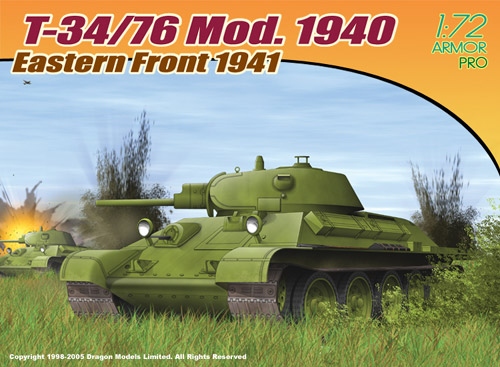
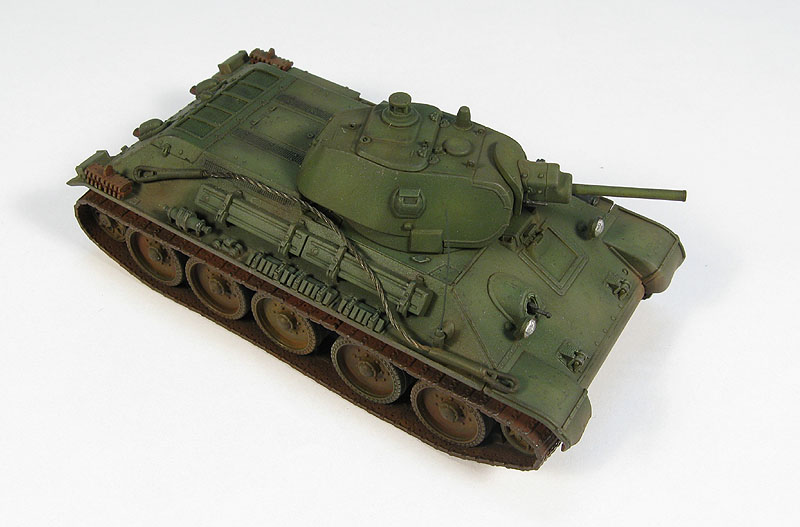
The T-34 model 1940 is probably the less known type of the famous tank, and the one which saw less combat, too. The model 1940 had some unique characteristics. In particular, a T-34 with the SPKO commander's periscope in the (non-circular) roof hatch, the early type periscope, the L-11 gun and the welded early-type turret most probably will be a model 1940. All these details are accurately captured by Dragon. Only 117 (115?) of these vehicles were produced by KhPZ No.183 factory in 1940, plus 1540 in 1941. They were responsible for fighting the with the Wermatch in the beginning of the war in the East, but are curiously not very well documented in comparison to the other versions of the tank.
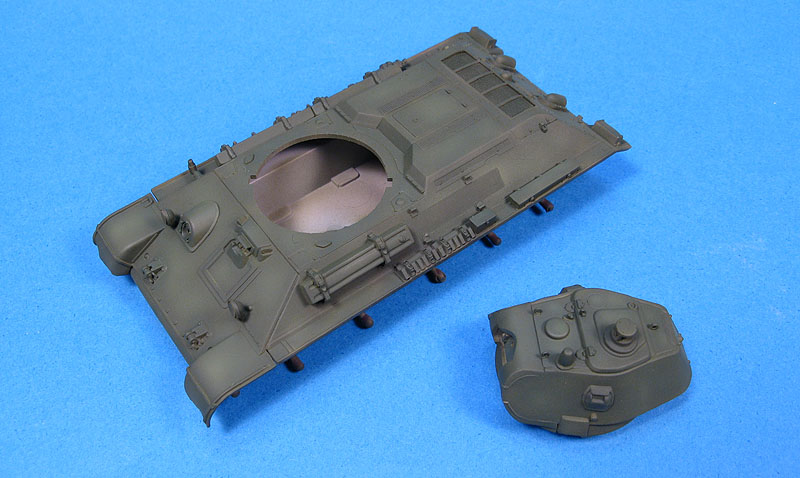
1. Basic assembly
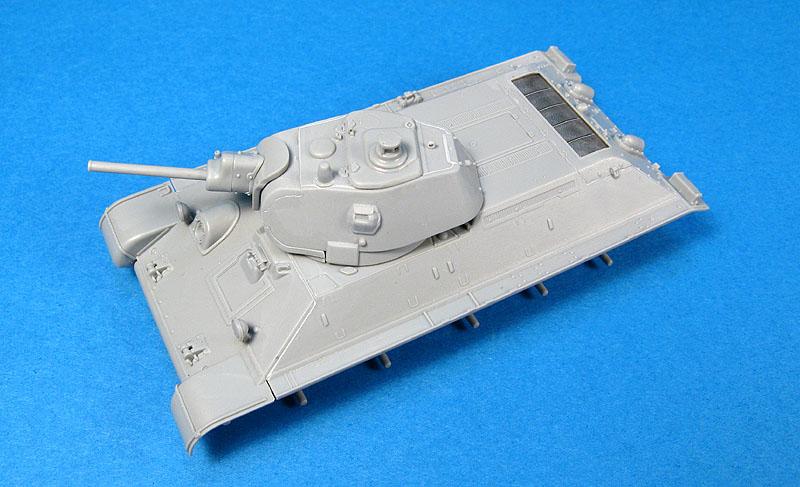
I started by assembling the model after the instructions, finding absolutely no problem in fitting the parts together. Only the accessories, roller elements and the exhaust stacks were left out at this stage. Small seams were filled with Mr. Surfacer 500 and the excess removed with a cotton swab and Mr.Color Thinner.
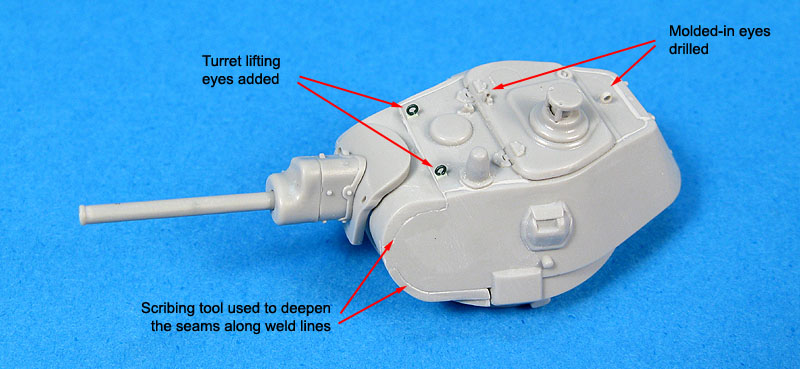
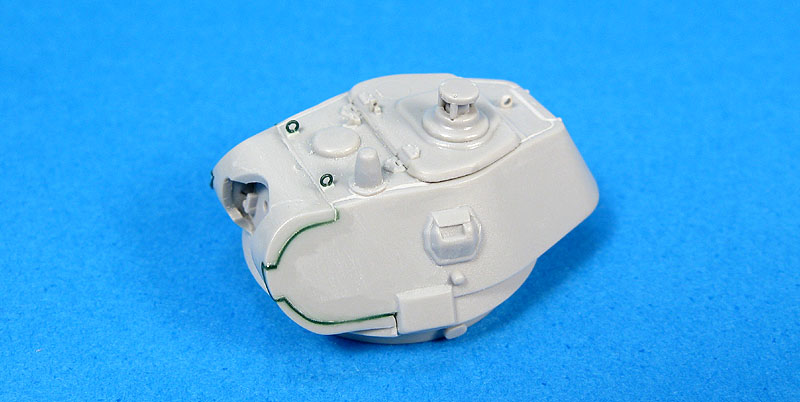
To finish off with the turret, I added the missing lifting eyes on the top of it (see the tip for making them). Interestingly, Dragon has depicted them on the box art, but not in the kit. Anyway, now I see that I installed them aft of their correct position - they should go slightly ahead of the edge of the curved plate behind the mantlet. I put them aft of that edge... ces't la vie. I also drilled the two eyes molded with the turret for more realism.
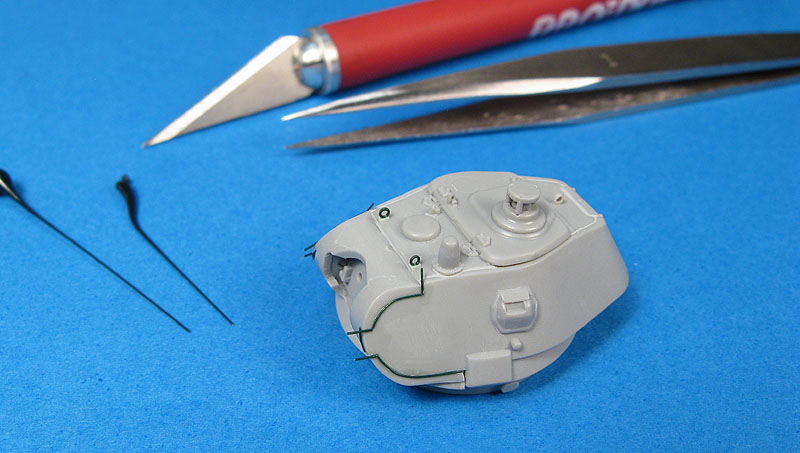
Next, the seams left after assembling the turret were deepened using a needle, and these were used as guides to glue pieces of stretched sprue. These will simulate the prominent weld lines of the early T-34 turrets:
At this stage, since the basic assembly was finished, I added the accessories to the hull sides (jack, toolboxes, etc.). The shovel and the spare tracks were left out for easy painting.
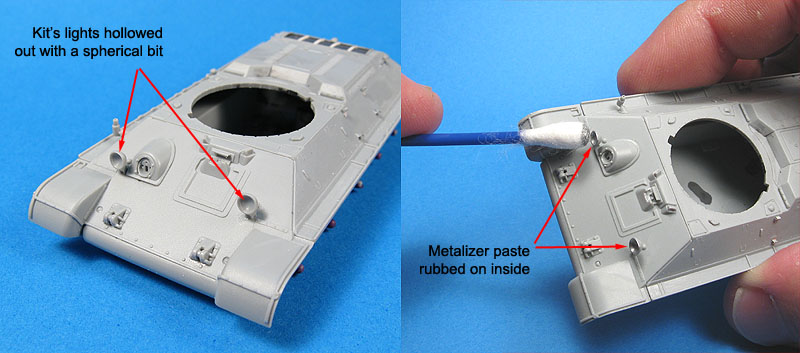
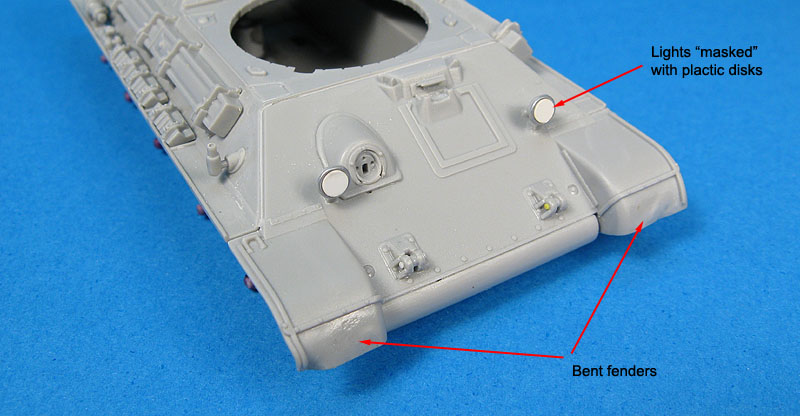
The last job before loading my airbrush with paint was to improve the aspect of the headlights. After checking several photos, I found out that these are very sparkling items in early T-34s. Apparently, no type of cover was usually used to conceal them. So I hollowed the lights using a spherical blur tip. Then the inside of the lights were rubbed with Rub'n Buff metalizer using a cotton swab to simulate the reflexive shell:
I also added a few bolt heads here and there:
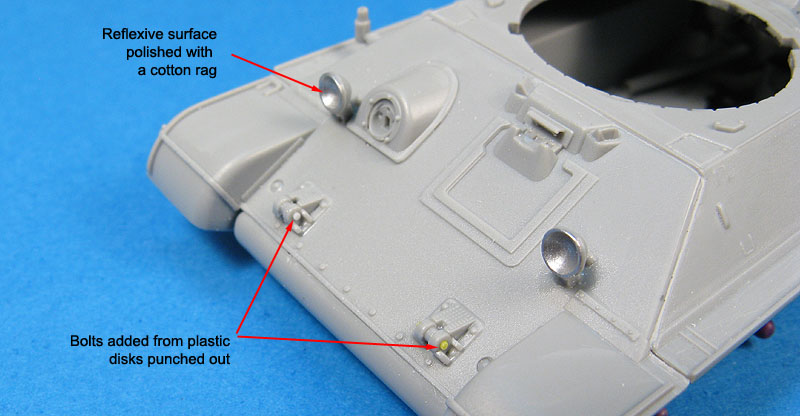
And the lights were masked using small disks of plastic temporarily attached with Microscale Adhesive Foil. The final details will be added after painting and weathering. The final touches consisted of adding some damage to the front and rear fenders. I simply abused of them using round tip pliers, and smoothed the final result with gentle sanding and liquid glue:
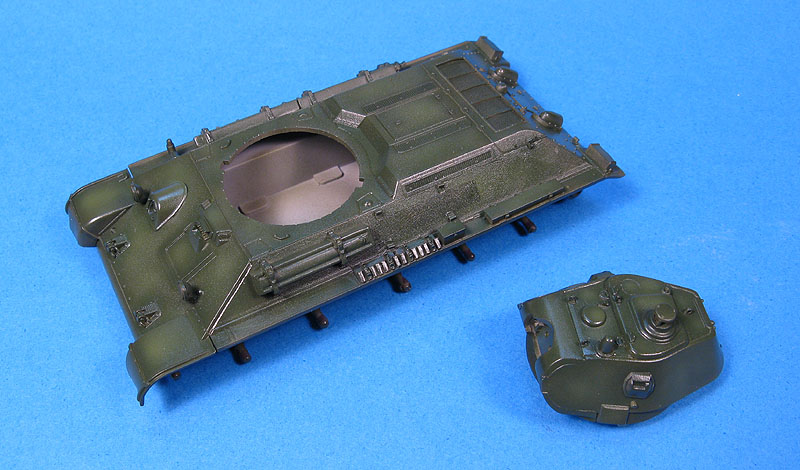
2. Painting
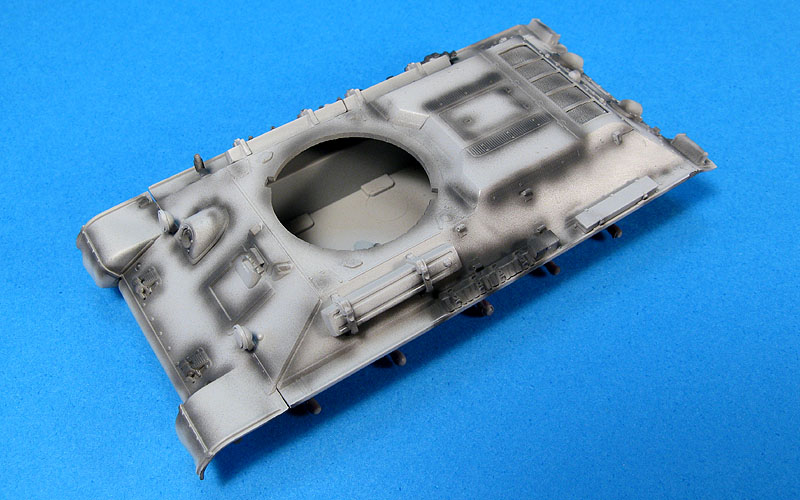
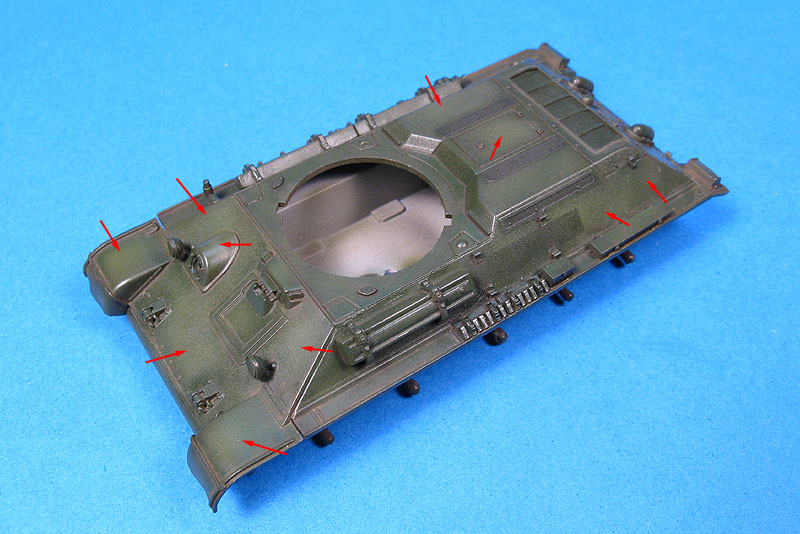
Painting time... finally. It started pre-shading the whole model with Tamiya XF-1. Pre-shading is barely effective in weathered AFV models. The main objective was to assure that all recesses and tight corners received some dark paint to act as false shadows, and making easier the overall coverage with the main camouflage colors:
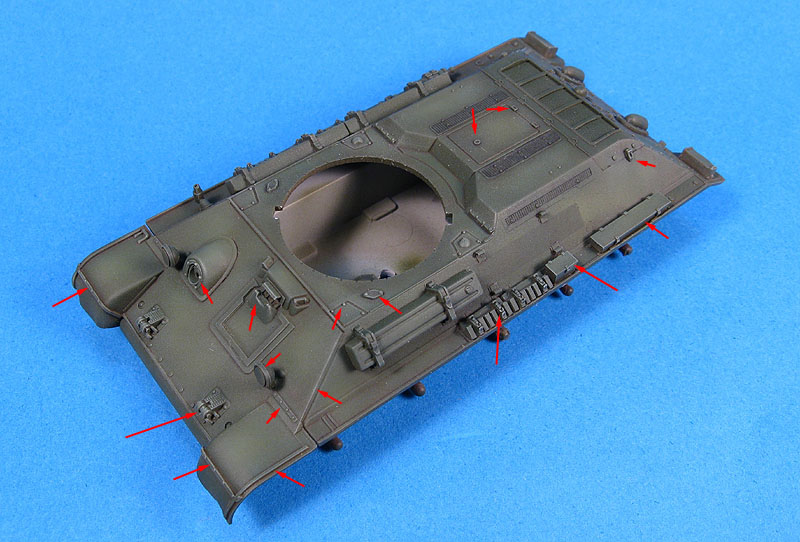
After that I coated the hull undersurfaces and track spaces with a dark green mix of Tamiya acrylics. I also applied this color sparingly on the upper surfaces to provide some color variation after the final color was applied:
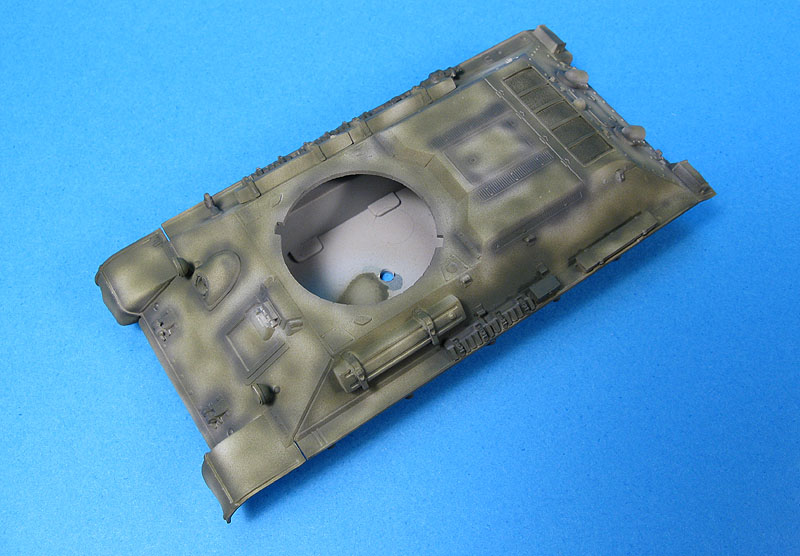
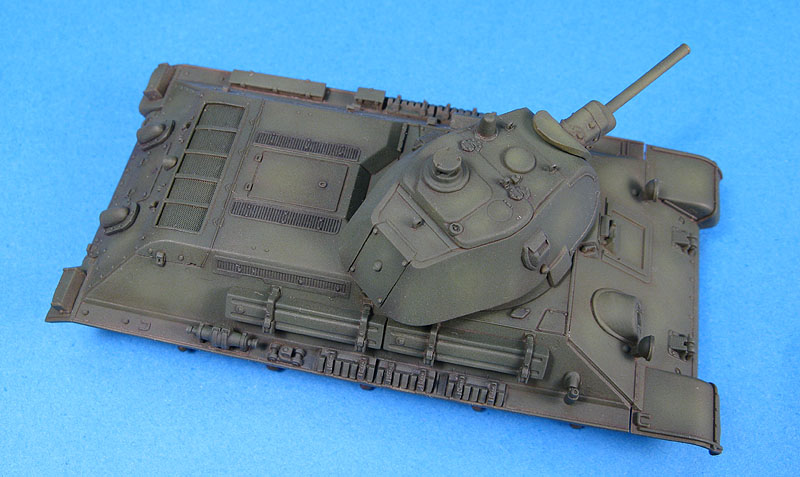
Next the overall camouflage color was airbrushed. The olive green 4BO oil paint used on the T-34s seemed to vary with the amount of fading, dust, etc. accumulated over the vehicle. I simply mixed Tamiya acrylics XF-13 and XF-5 to produce a basic color, and airbrushed it very thinned to cover all areas:
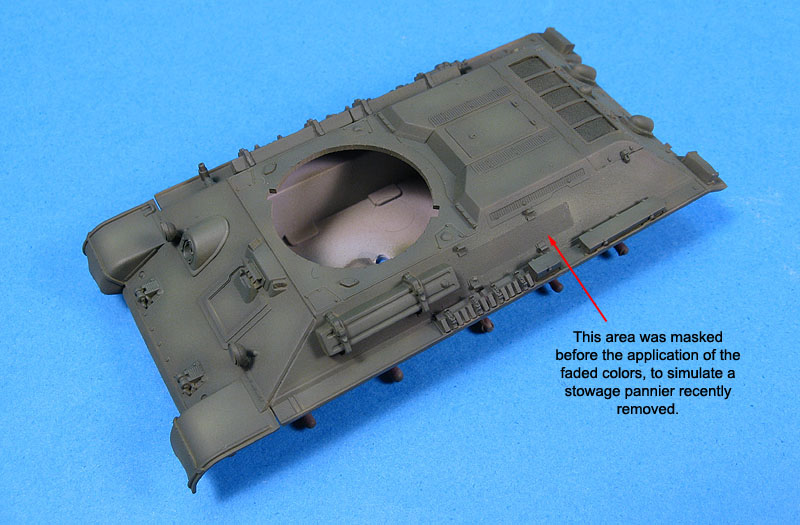
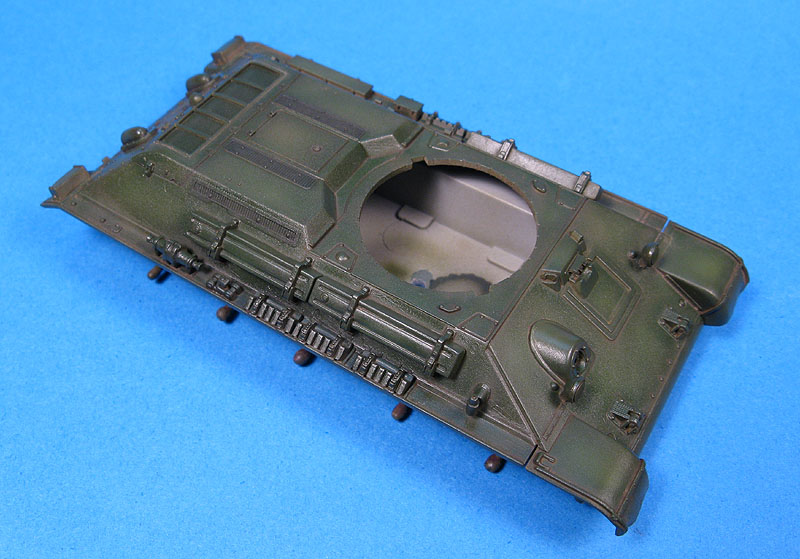
The basic color was then lightened with the addition of XF-59 Desert Yellow and misted over the areas more exposed to the sun. This mix was further lightened with XF-59 and applied again, even more thinly, on selected panels. The same treatment was used on the turret and the main gun.
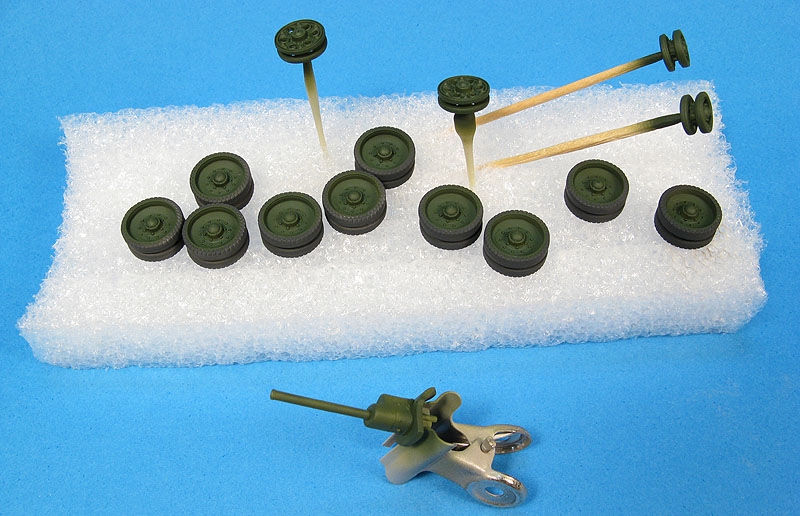
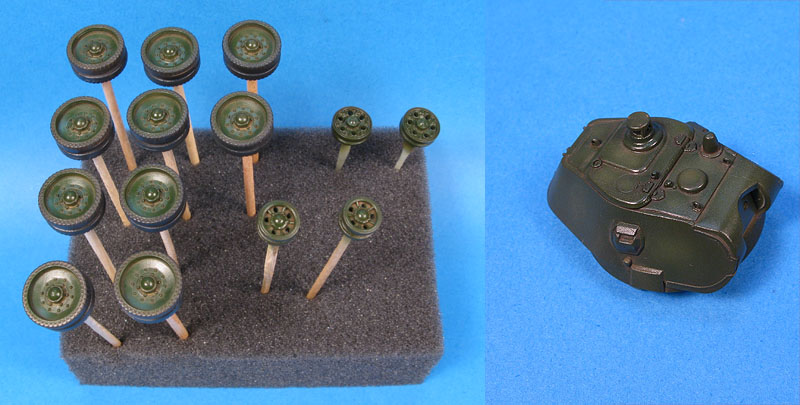
The wheels were painted dark gray, and I was fortunate to find a drafting template that matched precisely the inner diameter of the rubber bands, making the painting of the road wheels a breeze. Note that the idler wheels and driving sprockets were already drilled at this stage:
In order to protect the basic painting from the abuse that would come during the next steps, a good coat of Model Master Metalizer Sealer lacquer was applied over all painted parts. I like to use this product as a gloss coat because of its durability and fast drying properties, and... Well, the truth is that I still have a half dozen bottles of the stuff in my stash.
3. Washes
Next came the washes. I used the usual recipe of artists oils thinned with white spirit. Raw umber, burnt sienna and natural shadow were the basic colors used. I used almost pure black on the engine vents, and a lighter brown tone along corners and recesses to simulate accumulated dust:

The same treatment was applied on the wheels and the turret:
4. Filters
The next step was somewhat new to me: dot filtering. I do not think enamel filters are effective in small scales as they are in 1/35. Therefore, I jumped the wet filtering and applied random dots of oils in various colors over the turret and the hull, concentrating the effect on flat areas. Using a flat brush wet (but not flooded) with white spirit, the oils were spread with vertical strokes of the brush until they faded almost completely. During this step, it is necessary to clean the brush from times to times so that the different colors blend only partially between each other, preserving the different hues from one area to another.

Although this was the first time I tried the technique in an armor model, I am satisfied with the effect obtained, and like any good method, it is easy:

I found the method more difficult to be used on some areas of the hull due to the limited space to work with the brush, but in the end, I managed to produce visible color variations on the glacier, fenders and hatches:
In retrospect, I think I could go over again with some even lighter filters, but decided not to overdo the effect. After all, I would be using use pigments later...
5. Dry-brushing
The final flat coat was airbrushed over all part using Humbrol Matt Cote for a dead flat finish. Contrary to what I have read about this product, it does dry, it is just a matter of shaking the bottle until your arms fall from your body. From my own experience, if you do not stir the stuff very well, it will remain tacky for years. Another hint: since this is lacquer paint, it is possible to add some shine afterwards by scrubbing a toothbrush or a piece of paper over the desired areas. More on that later...

The flat coat prepared the model for a very gentle dry-brushing. This old technique seems to be relegated to a secondary place in plastic modeling, but I still think it is an important step for detail highlighting. To me, the secret of this technique is not to overdo it by failing to leave the correct amount of pigment in the brush or by using too bright colors like pure white or yellow. Another hint I learned just recently: never use a flat brush for dry-brushing - use a round one with short, smooth bristles. In the present case, I used a light green color applied over corners, bolt heads, lockers and other details. Much of the effect will be lost after the application of pigments, but not all of it. The photos below show some spots highlighted after dry-brushing:
6. Paint chipping
With the model flat coated and dry-brushed, I started to add chipping effects to the model. Older, oxidized chippings were added using a fine brush and a mix of Hull Red and Black from Vallejo vinyl paints. Recent paint chipping and scratches were simulated using 2B and 2H pencils:
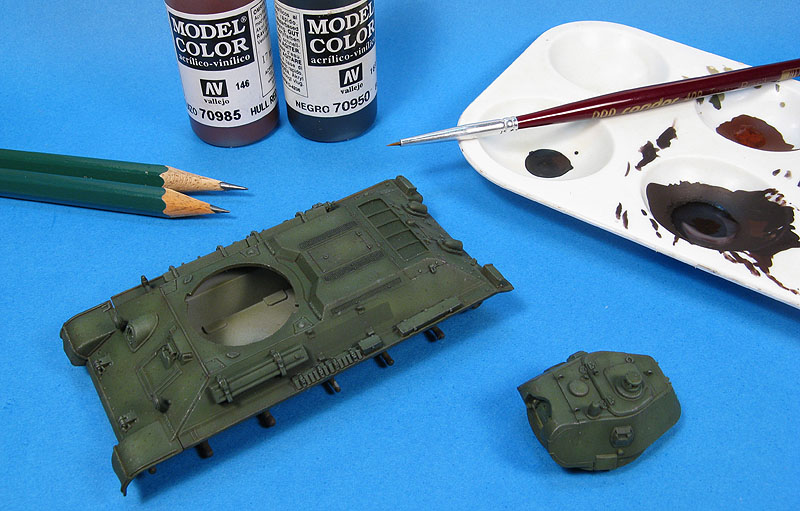
The use of water-based paints (or vinylic, in our case) provides a safe method to simulate paint chipping, since you can remove it easily before it dries. Sometimes, rubbing it down with your finger produces interesting effects and, being a dark brown color, it really looks like dark rust accumulated over old scratches. As for the pencils, to me it provides the most controllable way to simulate paint chipping. Scoring the lead over the edges and round corners allow you to obtain very realistic high contact areas. Note that the chippings produced with the pencils are still bright in the photos below, what is not strictly correct. Another, very thin coat of flat varnish will be applied later to dull more or less the effect in each area:
For instance, the lifting eyes on the top of the turret can remain relatively shiny, since it would be under constant contact with crew boots etc.
I then reloaded my airbrush with Humbrol Matt Cote highly diluted with lacquer thinner and went over the chipped areas to cut the shine. On a few particular spots, I intentionally left some shine to depict recent wear. Time to proceed to the weathering:
The T-34 model 1940 is probably the less known type of the famous tank, and the one which saw less combat, too. The model 1940 had some unique characteristics. In particular, a T-34 with the SPKO commander's periscope in the (non-circular) roof hatch, the early type periscope, the L-11 gun and the welded early-type turret most probably will be a model 1940. All these details are accurately captured by Dragon. Only 117 (115?) of these vehicles were produced by KhPZ No.183 factory in 1940, plus 1540 in 1941. They were responsible for fighting the with the Wermatch in the beginning of the war in the East, but are curiously not very well documented in comparison to the other versions of the tank.
1. Basic assembly
I started by assembling the model after the instructions, finding absolutely no problem in fitting the parts together. Only the accessories, roller elements and the exhaust stacks were left out at this stage. Small seams were filled with Mr. Surfacer 500 and the excess removed with a cotton swab and Mr.Color Thinner.
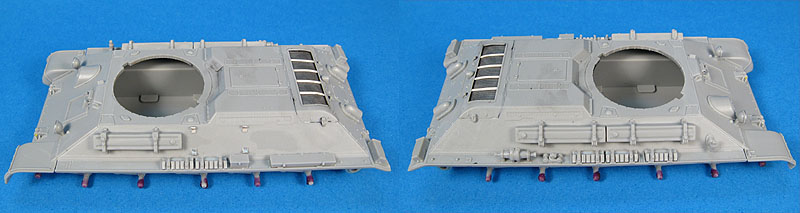
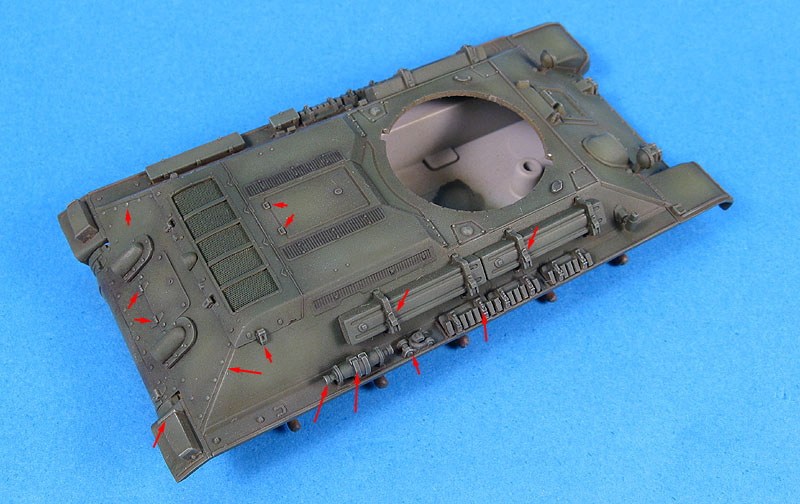
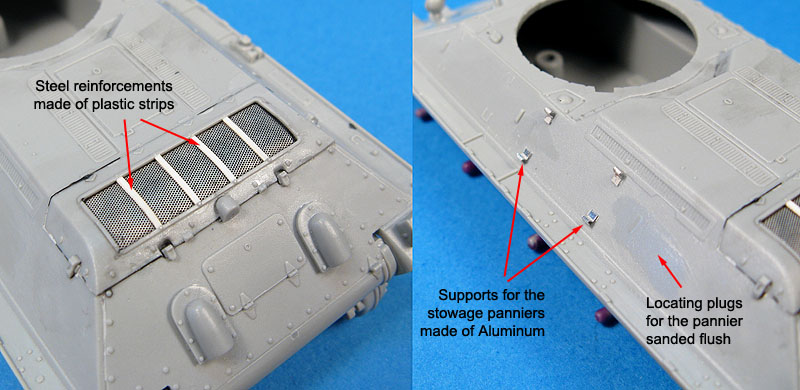
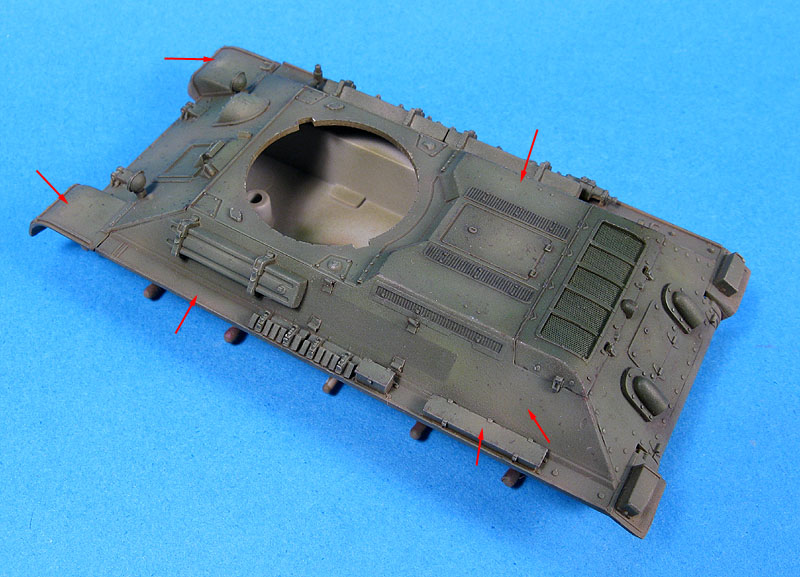
I followed the instructions
and installed the photo-etched grille of the engine compartment. It fit
nicely in its slots inside the hull. However, photos T-34
in combat show clearly that the grille should sit over the hull. If you
are going to build this model, consider sanding the raised details on
the grille perimeter and installing the photo-etched grille atop the
hull, ignoring the instructions. Another suggestion is to glue a couple
of vents before the grille to avoid the see-through. I didn't do it,
and it is virtually impossible to correct it without damaging the
photo-etched part. What I did was to install plastic strips to make the
grille frame flush with the hull. I planned to not install one of the
stowage panniers on the left side of the hull to add a different touch
to the model. So the corresponding locating plugs were sanded flush
with the hull, and new supports were made using small pieces of
Aluminum sheet (the supports are molded-in with the kit panniers, not
on the hull - hence the new ones):
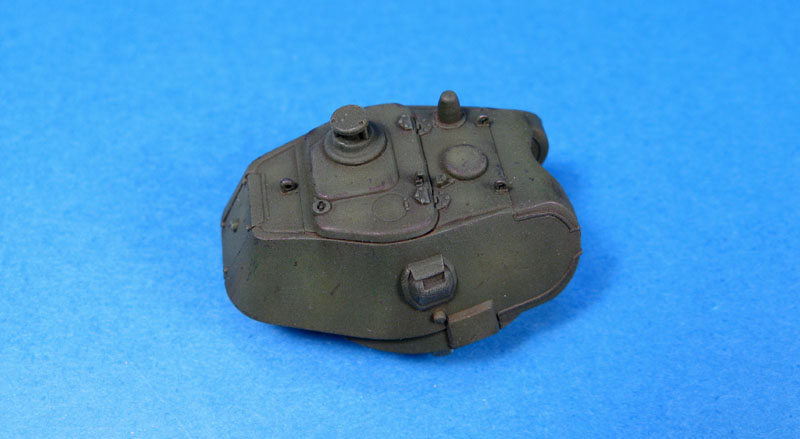
To finish off with the turret, I added the missing lifting eyes on the top of it (see the tip for making them). Interestingly, Dragon has depicted them on the box art, but not in the kit. Anyway, now I see that I installed them aft of their correct position - they should go slightly ahead of the edge of the curved plate behind the mantlet. I put them aft of that edge... ces't la vie. I also drilled the two eyes molded with the turret for more realism.
Next, the seams left after assembling the turret were deepened using a needle, and these were used as guides to glue pieces of stretched sprue. These will simulate the prominent weld lines of the early T-34 turrets:
Using good amounts of liquid
glue, the stretched sprues were glued along the seams and pressed with
the blind edge of a hobby knife to simulate the weld texture. Once dry,
the excess was trimmed and the welds were gently sanded with fine
graded sandpaper:
At this stage, since the basic assembly was finished, I added the accessories to the hull sides (jack, toolboxes, etc.). The shovel and the spare tracks were left out for easy painting.
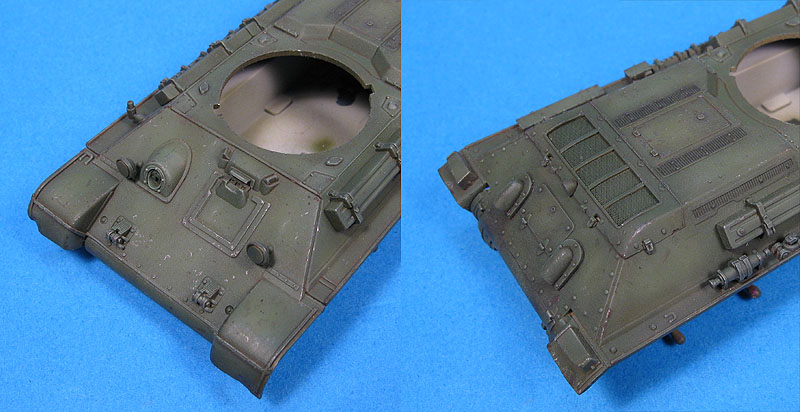
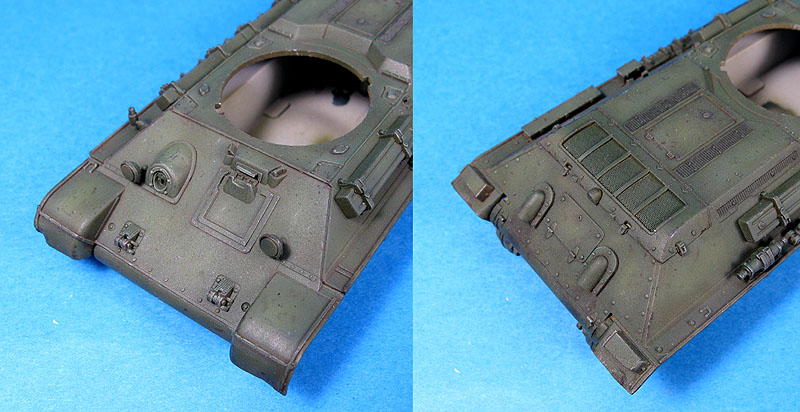
The last job before loading my airbrush with paint was to improve the aspect of the headlights. After checking several photos, I found out that these are very sparkling items in early T-34s. Apparently, no type of cover was usually used to conceal them. So I hollowed the lights using a spherical blur tip. Then the inside of the lights were rubbed with Rub'n Buff metalizer using a cotton swab to simulate the reflexive shell:
I also added a few bolt heads here and there:
And the lights were masked using small disks of plastic temporarily attached with Microscale Adhesive Foil. The final details will be added after painting and weathering. The final touches consisted of adding some damage to the front and rear fenders. I simply abused of them using round tip pliers, and smoothed the final result with gentle sanding and liquid glue:
2. Painting
Painting time... finally. It started pre-shading the whole model with Tamiya XF-1. Pre-shading is barely effective in weathered AFV models. The main objective was to assure that all recesses and tight corners received some dark paint to act as false shadows, and making easier the overall coverage with the main camouflage colors:
After that I coated the hull undersurfaces and track spaces with a dark green mix of Tamiya acrylics. I also applied this color sparingly on the upper surfaces to provide some color variation after the final color was applied:
Next the overall camouflage color was airbrushed. The olive green 4BO oil paint used on the T-34s seemed to vary with the amount of fading, dust, etc. accumulated over the vehicle. I simply mixed Tamiya acrylics XF-13 and XF-5 to produce a basic color, and airbrushed it very thinned to cover all areas:
The basic color was then lightened with the addition of XF-59 Desert Yellow and misted over the areas more exposed to the sun. This mix was further lightened with XF-59 and applied again, even more thinly, on selected panels. The same treatment was used on the turret and the main gun.
The wheels were painted dark gray, and I was fortunate to find a drafting template that matched precisely the inner diameter of the rubber bands, making the painting of the road wheels a breeze. Note that the idler wheels and driving sprockets were already drilled at this stage:
In order to protect the basic painting from the abuse that would come during the next steps, a good coat of Model Master Metalizer Sealer lacquer was applied over all painted parts. I like to use this product as a gloss coat because of its durability and fast drying properties, and... Well, the truth is that I still have a half dozen bottles of the stuff in my stash.
3. Washes
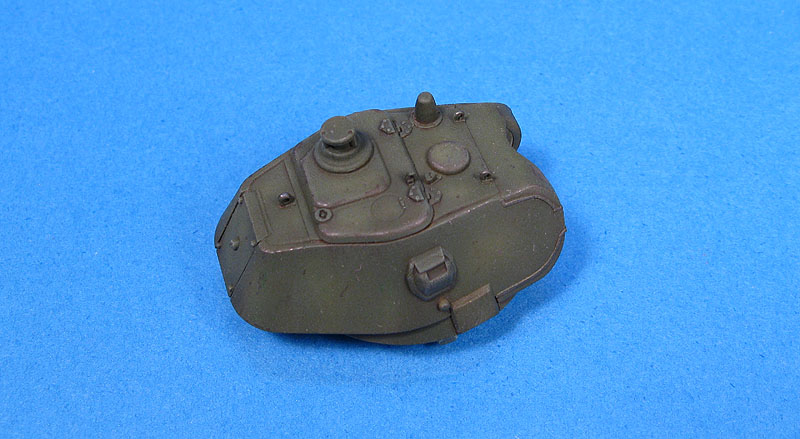
Next came the washes. I used the usual recipe of artists oils thinned with white spirit. Raw umber, burnt sienna and natural shadow were the basic colors used. I used almost pure black on the engine vents, and a lighter brown tone along corners and recesses to simulate accumulated dust:
The same treatment was applied on the wheels and the turret:
4. Filters
The next step was somewhat new to me: dot filtering. I do not think enamel filters are effective in small scales as they are in 1/35. Therefore, I jumped the wet filtering and applied random dots of oils in various colors over the turret and the hull, concentrating the effect on flat areas. Using a flat brush wet (but not flooded) with white spirit, the oils were spread with vertical strokes of the brush until they faded almost completely. During this step, it is necessary to clean the brush from times to times so that the different colors blend only partially between each other, preserving the different hues from one area to another.
Although this was the first time I tried the technique in an armor model, I am satisfied with the effect obtained, and like any good method, it is easy:
I found the method more difficult to be used on some areas of the hull due to the limited space to work with the brush, but in the end, I managed to produce visible color variations on the glacier, fenders and hatches:
In retrospect, I think I could go over again with some even lighter filters, but decided not to overdo the effect. After all, I would be using use pigments later...
5. Dry-brushing
The final flat coat was airbrushed over all part using Humbrol Matt Cote for a dead flat finish. Contrary to what I have read about this product, it does dry, it is just a matter of shaking the bottle until your arms fall from your body. From my own experience, if you do not stir the stuff very well, it will remain tacky for years. Another hint: since this is lacquer paint, it is possible to add some shine afterwards by scrubbing a toothbrush or a piece of paper over the desired areas. More on that later...
The flat coat prepared the model for a very gentle dry-brushing. This old technique seems to be relegated to a secondary place in plastic modeling, but I still think it is an important step for detail highlighting. To me, the secret of this technique is not to overdo it by failing to leave the correct amount of pigment in the brush or by using too bright colors like pure white or yellow. Another hint I learned just recently: never use a flat brush for dry-brushing - use a round one with short, smooth bristles. In the present case, I used a light green color applied over corners, bolt heads, lockers and other details. Much of the effect will be lost after the application of pigments, but not all of it. The photos below show some spots highlighted after dry-brushing:
6. Paint chipping
With the model flat coated and dry-brushed, I started to add chipping effects to the model. Older, oxidized chippings were added using a fine brush and a mix of Hull Red and Black from Vallejo vinyl paints. Recent paint chipping and scratches were simulated using 2B and 2H pencils:
The use of water-based paints (or vinylic, in our case) provides a safe method to simulate paint chipping, since you can remove it easily before it dries. Sometimes, rubbing it down with your finger produces interesting effects and, being a dark brown color, it really looks like dark rust accumulated over old scratches. As for the pencils, to me it provides the most controllable way to simulate paint chipping. Scoring the lead over the edges and round corners allow you to obtain very realistic high contact areas. Note that the chippings produced with the pencils are still bright in the photos below, what is not strictly correct. Another, very thin coat of flat varnish will be applied later to dull more or less the effect in each area:
For instance, the lifting eyes on the top of the turret can remain relatively shiny, since it would be under constant contact with crew boots etc.
I then reloaded my airbrush with Humbrol Matt Cote highly diluted with lacquer thinner and went over the chipped areas to cut the shine. On a few particular spots, I intentionally left some shine to depict recent wear. Time to proceed to the weathering:
7. Mud and dirt
Then I started with the dirty part: adding dust and mud to the lower hull areas and wheels. I must confess that this is something new to me, as the last time I did something similar was back in the 80's, when pigments and all where simply non existent. The lessons learned with this T-34 will be applied on my Sd.Kfz.253 diorama, which will also refer to Russian battlefield.
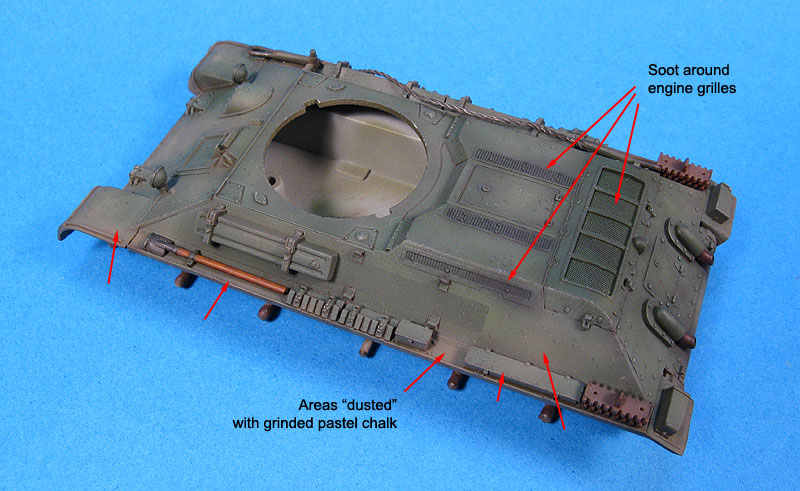
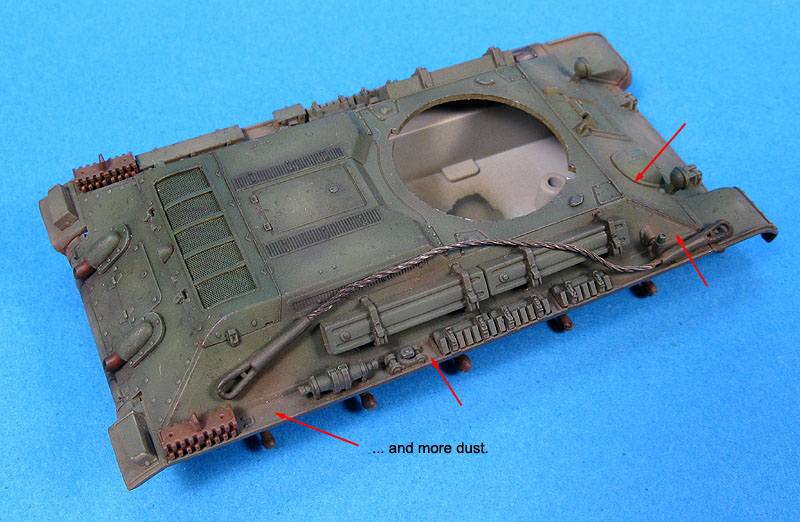
I started by applying a very thin mist of Tamiya Buff (XF-57) along the front, rear and sides of the hull. This first step had the objective of simulating fine dry dust accumulated all over the vehicle. Next, I had to consider that Russian earth is a very dark one, so I had to give some identity to the dirt. This was acomplish by overspraying Tamiya Flat Earth (XF-52) randomly over the areas previously painted with Buff color.

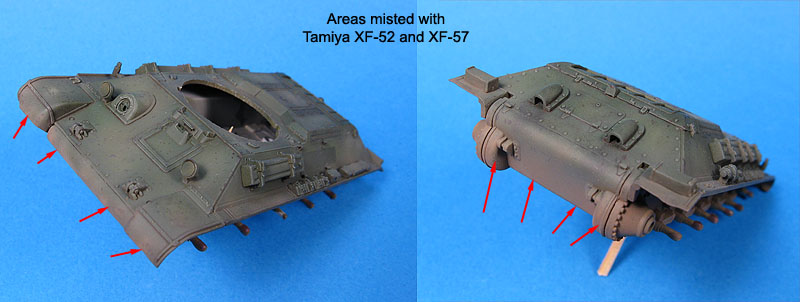
I used the Buff color on a few selected places on the upper hull too, but taking care to make the effect more constrained:
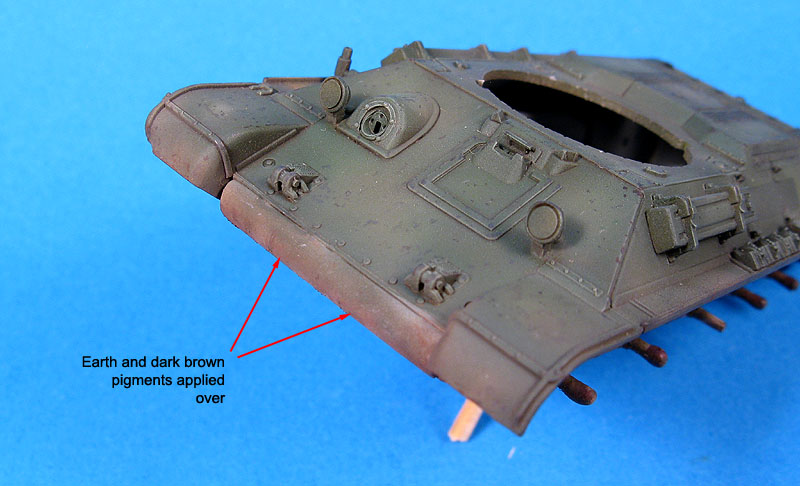
Ok. I postponed the next moment as long as I could. Muddy time... My feeling that I could scrap all the work so far due to my lack of knowledge on this technique rapidly fade away. I started by mixing flat acrylic varnish, fine sand and various pigments to produce a moderately thick dark brown medium. This mixture was applied by dabbing it over the surfaces using an old brush.
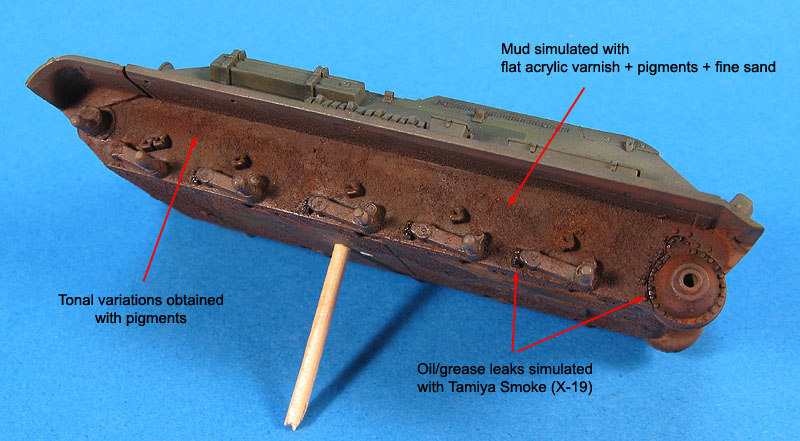
While the mud mix was still wet, I went over and applied two or three brown and dark earth pigments. Some spots of the suspension and transmission received a touch of Tamiya Smoke (X-19) to simulate oil and grease runs.
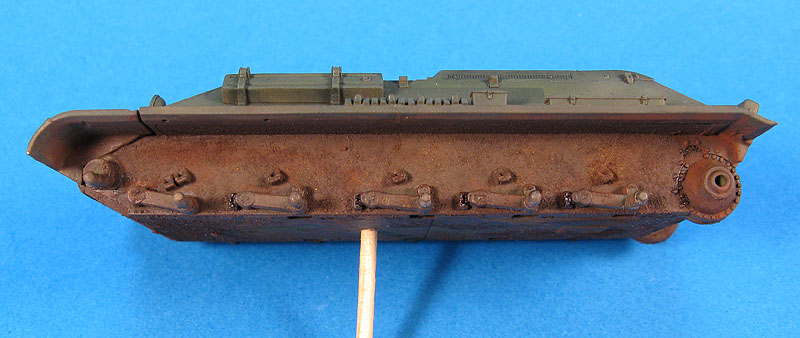
The only place where I really had to take my time was the transition between the upper and lower hull in the front and the rear of the vehicle. In those areas, you can not have a hard edge transition, but at the same time the dry/fresh mud spots must be clearly visible, hinting that the lower hull is much more dirt.
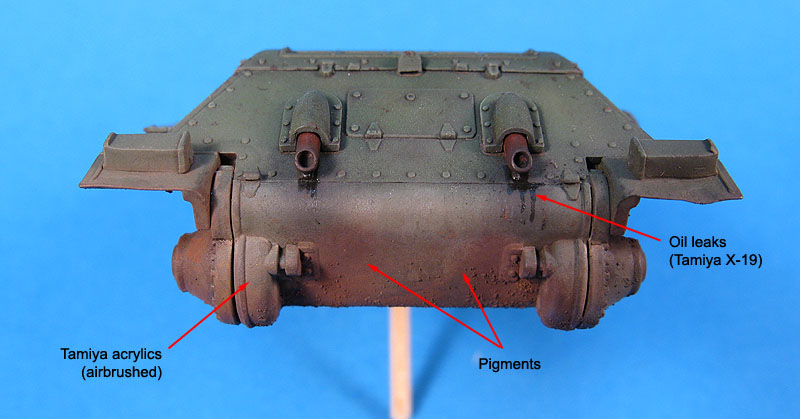
On the aft area, behind the engine, I made soot marks using black pigments, subtly blended with the mud below the exaust pipes. Some oil leaks were added under the pipes by brushing small streaks of Tamiya Smoke:
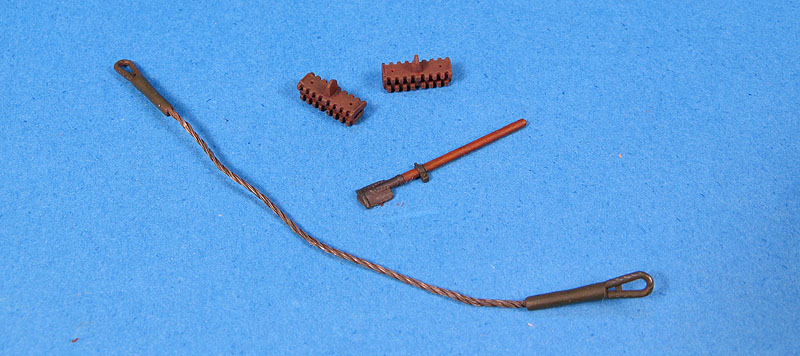
While the hull was set aside to dry, I finished with the smaller items: towing cable, shovel, spare tracks and the machine guns (not shown here):
The running stuffs alse received their share of dust and mud. This time I wasn't much shy, as these worked closer to the ground. Sometimes I overdid the effect, but instead of removing the pigments (something I found pretty difficult to do), I just went over with some green pastel chalk to retrieve some of the original camouflage:
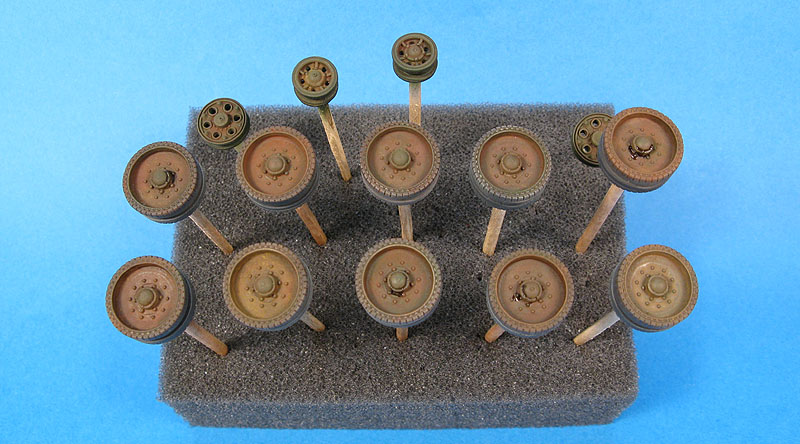
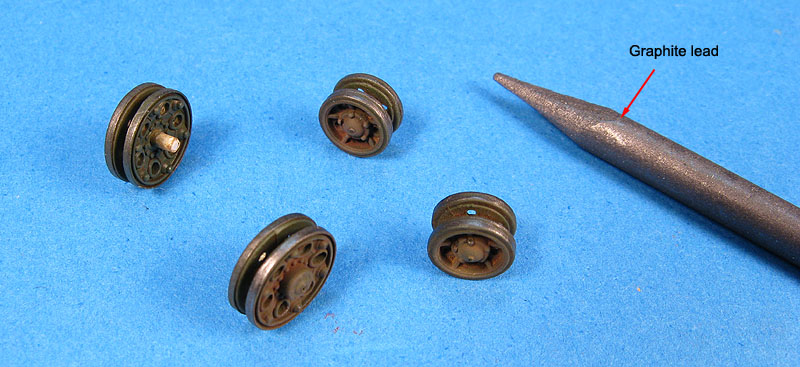
The idler and driving wheels didn't have rubber bands, so I metalized the outer rims using a piece of graphite lead and rubbed the wheels with my thumb afterwards. Way easier than painting with metalizer paints:
At this point I cemented the missing details to their positions around the hull and retouched the dust with more pigments.
When cementing the rear end of the towing cable to its position (right ahead the spare tracks), the part slipped from my tweezers and landed on the side of the hull. Of course, the superglue followed the Murphy's law and dried immediately (something I never get when I want to!). Definitely this is not the standard position of the cable. I could remove it, but sanding and repainting would be needed on a critical area with the model almost finished... Noooooo way. I'll live with that. Field modifications were not common at this first stages of the war in the east, but to my favor, I have at least a photo of an early T-34 with the cable stowed in that position. Anyway, I'm considering adding a small length of chain to help to conceal the fault.
8. Tracks
The tracks were painted next. Being of the vinyl type, I decided not to run any risks and painted them with acrylics thinned with rubbing alcohol, avoiding more agressive products. I'm still not convinced about the durability of this type of tracks. The years to come will tell. Unfortunately, I have no photos of the tracks being painted or installed. Everything was carried out in a single modeling section, and the only chance of me removing them from the model is to replace the tracks for a link-by-link one. More on that later...
Anyway, the tracks were painted with a very dark gray color, than misted with rust color in random patterns. After an acrylic black wash, I applied four coats of pigments. Dark rust was the first one, followed by light rust. I then applied a heavy coat of dark earth tone to match the color of the tracks with what I planned to be the terrain color. The last pigment step was to mark the inner track area where the road wheels run using black pigment. I will return to the tracks for touch ups once the terrain is done to make everything matching better.
Once the tracks were fully dry, I started to install them. In my first attempt, I installed the driver wheel and all the road wheels, expecting that I would easily fit the idler wheel in place, tensioning the track in its final position. To my horror, I discovered that this would be impossible, even after heating the vinyl parts with a hair dryer. Switching to plan B, I glued the driver and idler wheels, and installed the tracks. The stuff barely could make it, applying an excessive stress on both wheels. So I removed the driver wheels and replaced their locating pins for brass rods and repeated the assembly. The idler wheels were clearly over stressed, but this time I heated up the tracks and left the model resting for 48 hours. Being a viscoelastic material, the vinyl track would relax enough so I could install the remaining wheels.
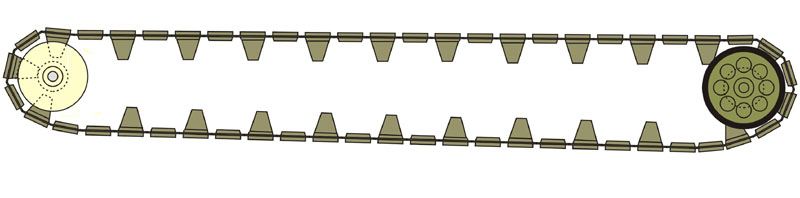
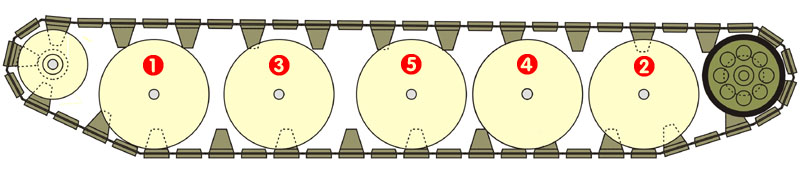
Two days later I returned to the model and carefully installed the road wheels in the sequence below. By installing the first and last road wheels first, they naturally provided room to install the inner ones comfortably afterwards. It worked, but in retrospect, I should have added a brass rod to the front wheels, too. God knows if I won't wake up and see them broken one of these mornings...
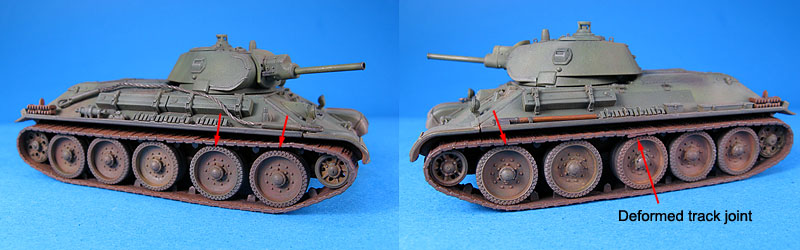
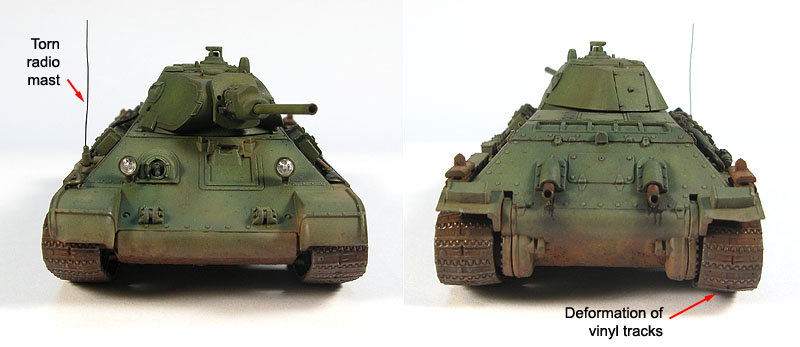
I still have to deal with my Sd.Kfz. 253, which also has vinyl tracks. But these will be my last tracks of this type. I hated to install them. In addition, if you look carefully you will notice that they bent transversally over the idler and driver wheels (which are narrower than the track) - something unacceptable in any track, in any scale.
Another bad thing is that the area where the track ends were connected deformed in a strange shape under the tensile load. I will conceal the problem later on with mud and grass. On the other hand, after a few days, I noted that most of the ugly spots have diminished, proving that the tracks actually relaxed (or it was just me getting used to them?).
If Dragon will insist in their DS tracks, they could at least make a good use of slide molding and make their vinyl track in a single piece. Another suggestion, this time for the modeler using these tracks, is to subject them to a tensile stress, by leaving the tracks hanging suitable weights during several days. This would result a slightly longer piece to work with, and more straight too. Well, enough complaining, on to the photos. As you can see in the photo below, there is no sagging, as expected. This can be corrected by applying tiny spots of glue on the top of the road wheels and pressing the tracks against them. It will be done only after the base is painted, in order to use the same paint mix of the terrain in the inevitable touch-ups. I will also add bright metal spots here and there.
Except for these too many problems, the final aspect is acceptable. I know that most Braille scale AFV modelers prefer to install the tracks and wheels before painting. I must add that it is ok, but my sequence gives more freedom to paint and weather the tracks, wheels, and the lower hull as well.
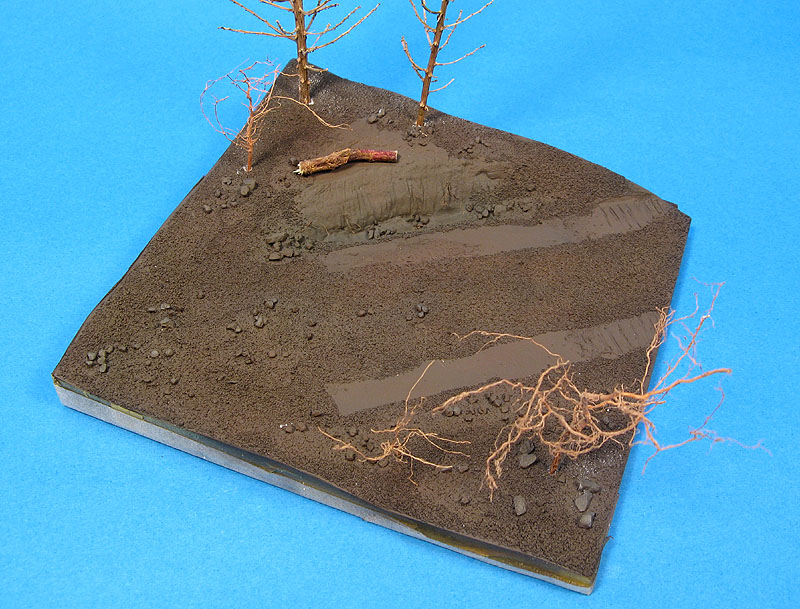
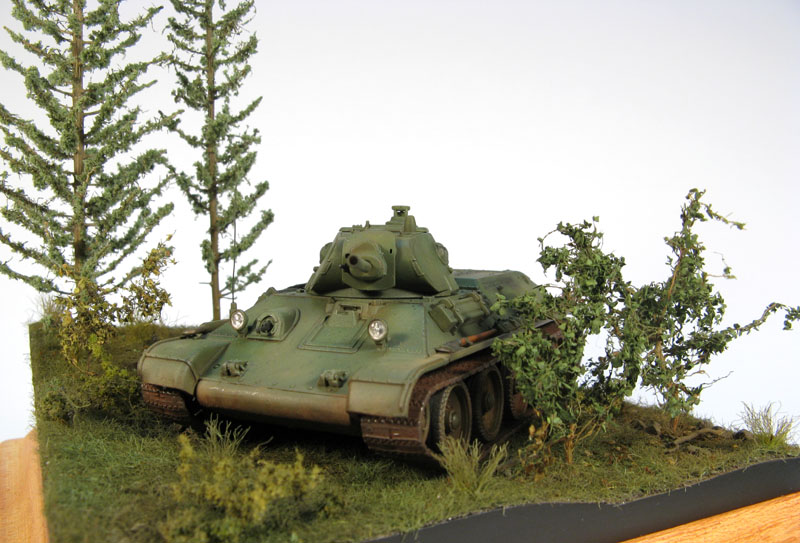
9. The base
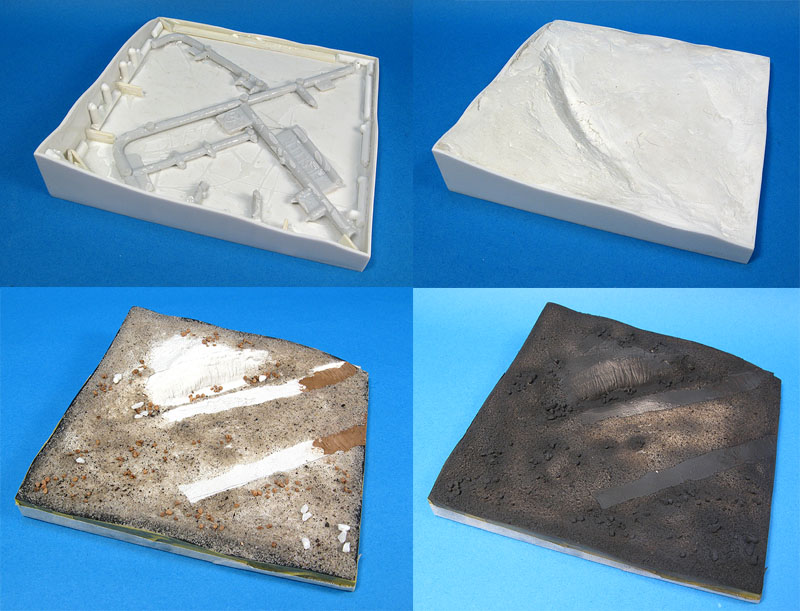
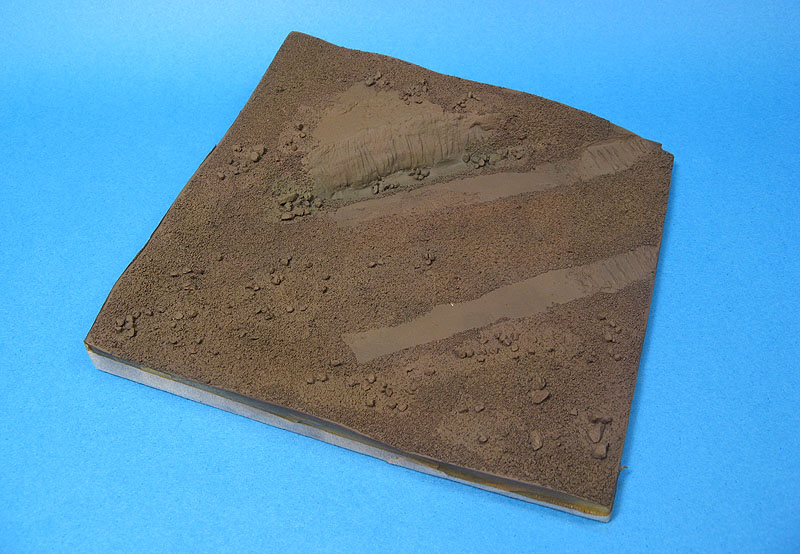
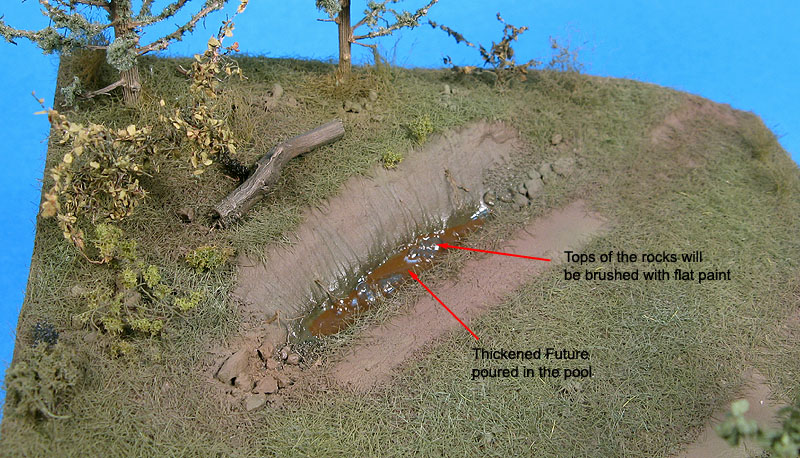
Meanwhile, I started working on the display base. Everything started with a box made of plastic sheet, and reinforced on the inside with pieces of sprue. The sides of the box were trimmed in an irregular shape, following the terrain relief I had planned. The relief itself was obtained by stuffing plaster soaked newspaper strips inside the box. It wasn't made all at once. It is better to work in layers, adjusting the terrain profile with your fingers and a spatula. Once finished, everything was set aside to dry for a couple of days. Small imperfections were corrected by sanding or adding small blobs of plaster. In my case, since some areas would not be covered by grass, so I sculpted the relief on these areas directly on the plaster using a knife. In particular, I planned a small pool collecting rain water pouring from the higher area of the terrain, so I had to carve the pool and make the corresponding erosion marks on the earth.
Once satisfied, track marks were made with a thin layer of wood putty, and the base was covered with sand and small rocks. This step was finished with a coat of flat black to shadow everything. Here are the basic steps so far:
Of course, everything was measured during the process, using the T-34 model to check track aspacing and to assure that nothing would be floating in the air:

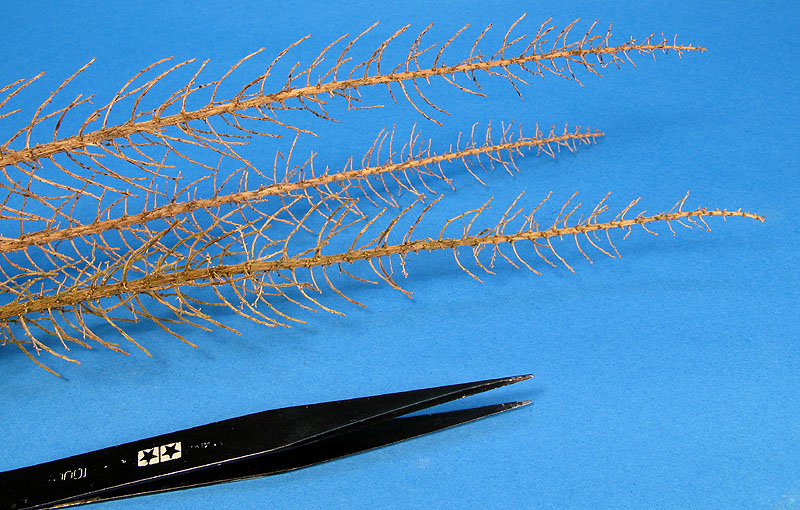
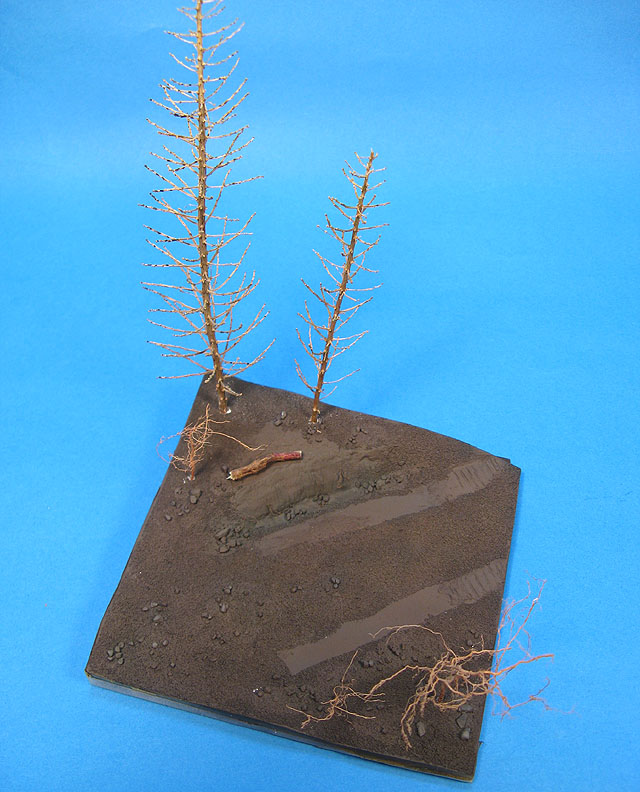
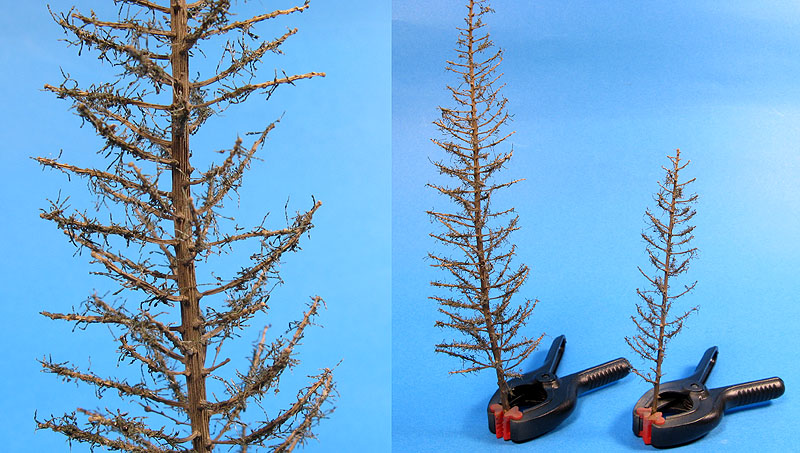
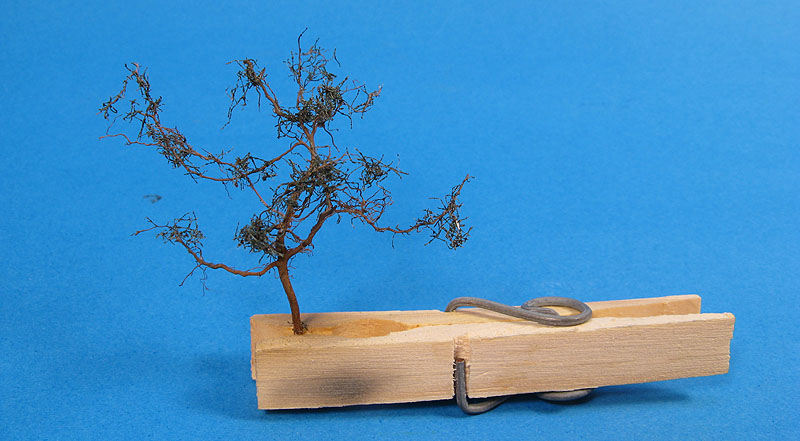
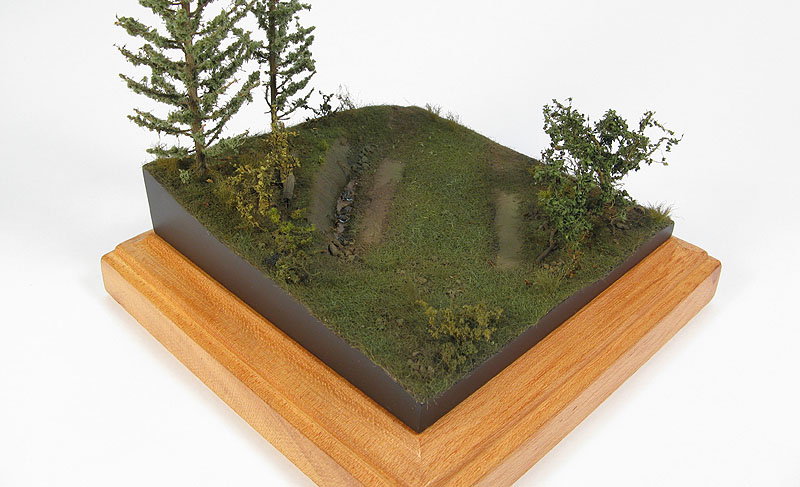
The plan was to insert a couple of small pines on the upper side of the base, plus some small trees and bushes here and there. The idea was to try to achieve a somewhat dark spot of a forest. For the pines, I decided to use an interesting type of plant I've been collecting over the years. Don't ask me what it is, all I know is that it makes an interesting type of conifer. It is already dehidrated, but I painted it anyway in order to seal everything. Here is the stuff:
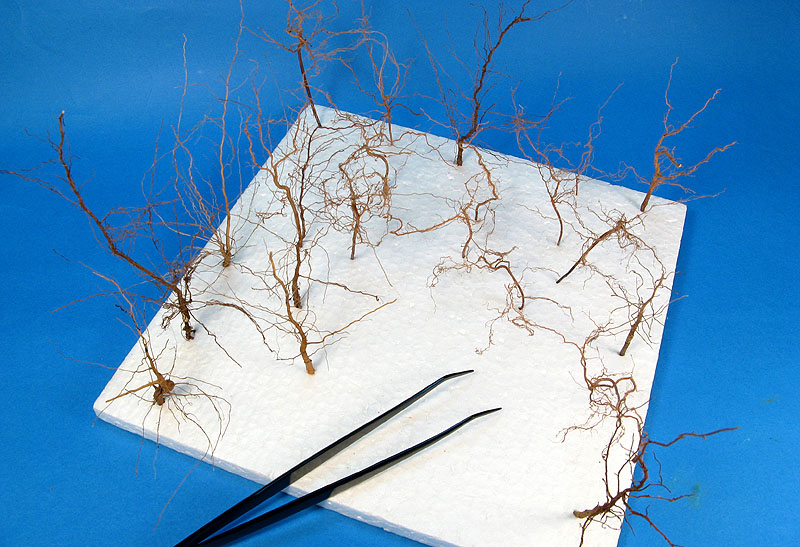
As for the trees and bushes, I used my dried root stock, and selected some. Of course, they would be trimmed and adjusted accordingly to their size:
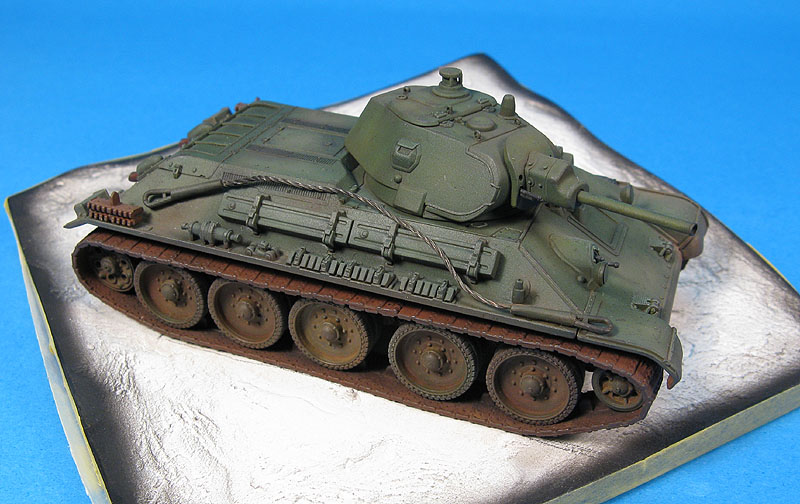
A small trunk was added to add interest, and it is worth to note that the vegetation here will be more dense than the photos below suggest now. This is just a layout check:
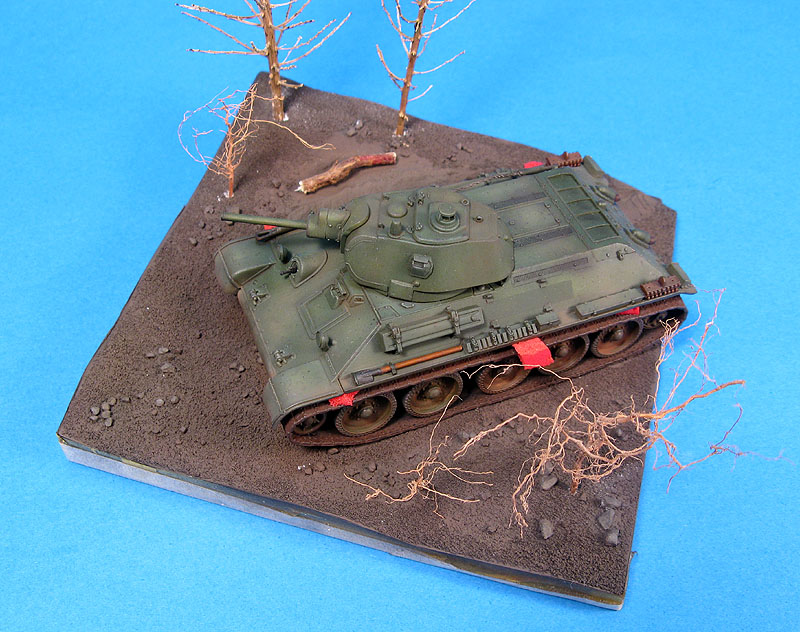
And, of course, I couldn't resist to put the small tank in action (those red things you see in the photo below are rubber foam pieces stuffed over the tracks to keep them in position while the glue sets):
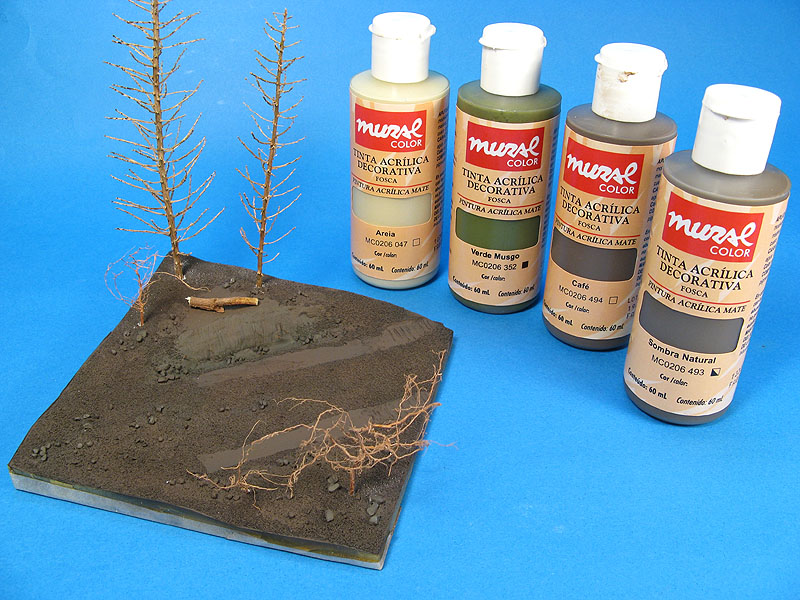
Another point before proceeding: I've tried Mural acrylic colors for the first time in a serious modeling project. Let me tell you that everything up to this point was painted using this brand. I cannot recommend enough these paints. They are cheap (around R$7.00), come in 60 ml (that's a lot of paint!) squeeze-type plastic bottles, and leaves nothing to be desired in comparison to other imported brands. Interestingly, they cannot be thinned with isopropyl alcohol, just like Vallejo - that's why I suspect they are not exacly acrylic, but vinylic paints. I thinned mine with Vidrex (Windex) and they performed ok in both, airbrushing and hand brushing. Instead of wasting a lot of money in Tamiya paints, try Mural colors next time. You will not regret.
The pine and tree armatures were looking a bit skinny to my eyes. I could add some more roots to the trees, but that would not work with the pines. After looking at Jerônimo's dioramas, it became clear that the problem was that I was trying to use the wrong type of scenic material. Unfortunately, I didn't have the correct type (or size) of foliage, nor the correct color (conifer green). So I had to improvise. In fact, much of what I did here was the result of much experimentation. Here is the list of materials used during this step:
- Noch© grass glue: One of the best glues for grass and foliage. It is water soluble and dryes flat. I like to thin it in water and spray using those small trigger spray bottles.
- Noch
leaves: I love the sense of scale this product gives to small scales.
- Tinted Noch leaves: Since I had Noch foliage in only a couple of colors, I tinted small amounts of it using dyes with varying shades of green and brown to avoid monochromatic tone .
- Scrubbing pad: I used an industrial type, but any Scotch-Brite type would do.
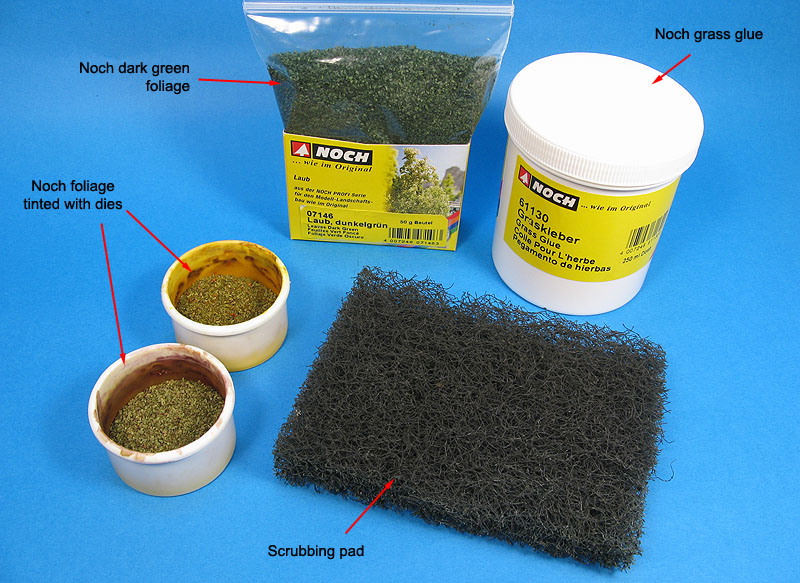
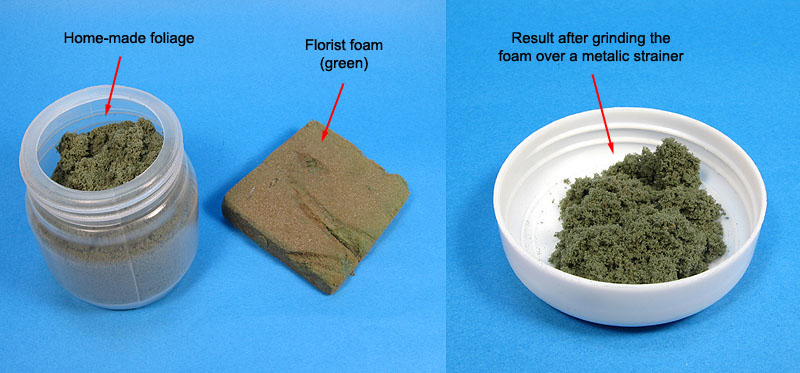
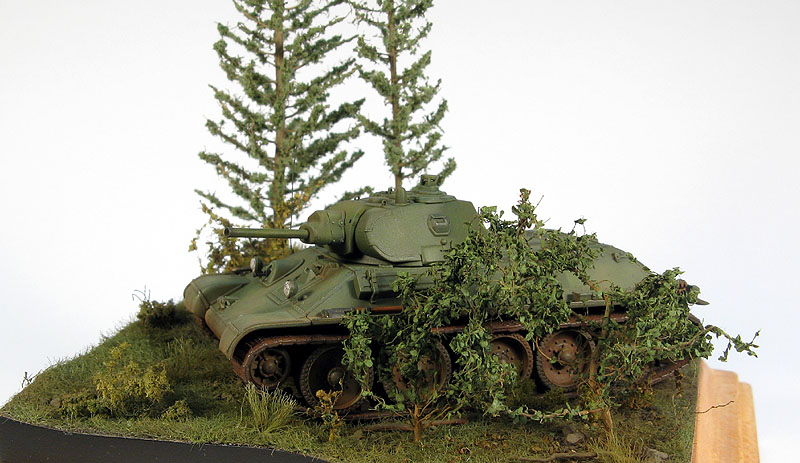
The Noch leaves would be used for the trees. As for the pines foliage, I made my own by scrubbing small blocks of florist's foam (green color) over a metalic strainer. The result is a flocked material which rivals any Woodland Scenics stuff for making foliage and bushes - anf for a fraction of the price:
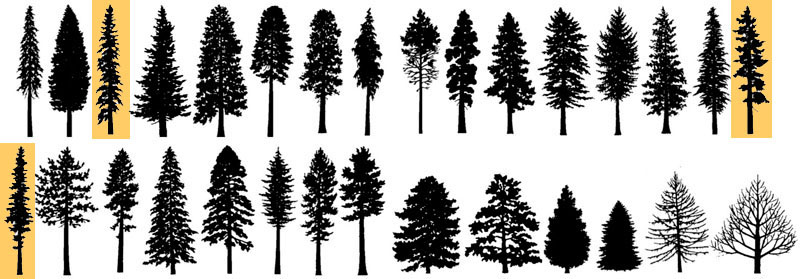
Next I had to visualize the type of pine trees I was looking for. After consulting reference photos on Russian battle ground during spring/summer, I checked my previous article on making trees from wire and decided to depict pines more or less like the ones highlighted in the catalog below:
That is where the scrubbing pad enters. I chopped a good amount of it into small pieces (1 to 2 or 3 mm) and glued it on the pine branches. This would give some volume to the foliage that would be impossible to achieve glueing the foam stuff directly over the branches:
I applied the same method to add small twigs to the trees, but used slightly larger pieces of chopped pad:
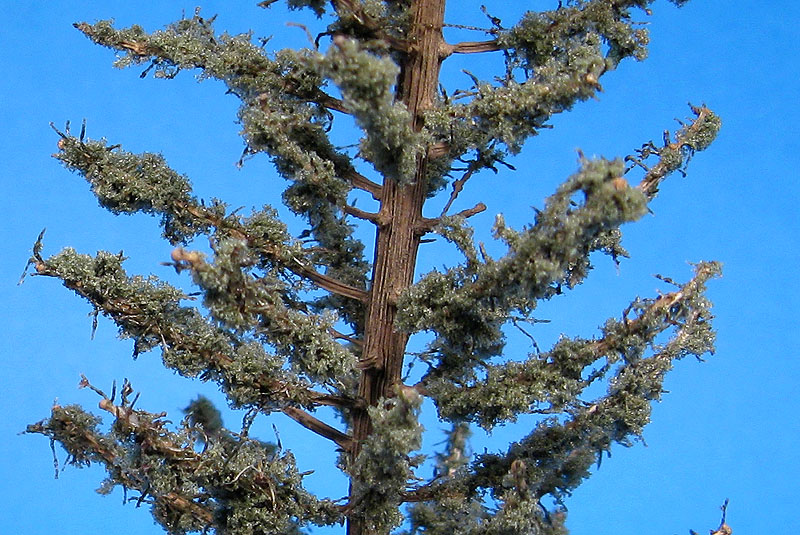
A very thin wash was applied over the pine trunks before proceeding, followed by a gentle drybrushing with light gray artists oils. This highlighted the already nice texture of the plants used. The foam foliage was applied next. I intentionally left some twigs almost empty of foliage, following what I saw in the photos:
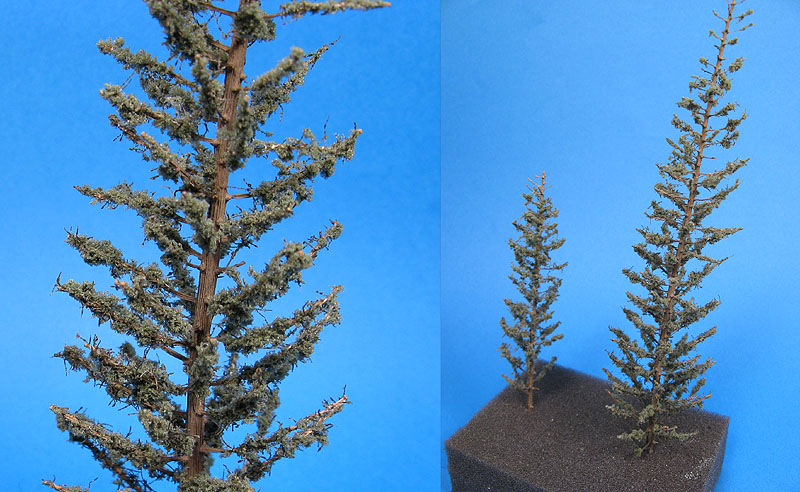
The final effect is quite convincing, particularly taking into account the scale:
And the small trees were decorated with the Noch leaves. They are still too monochromatic for my taste, but this would be corrected later by misting light colors with an airbrush:
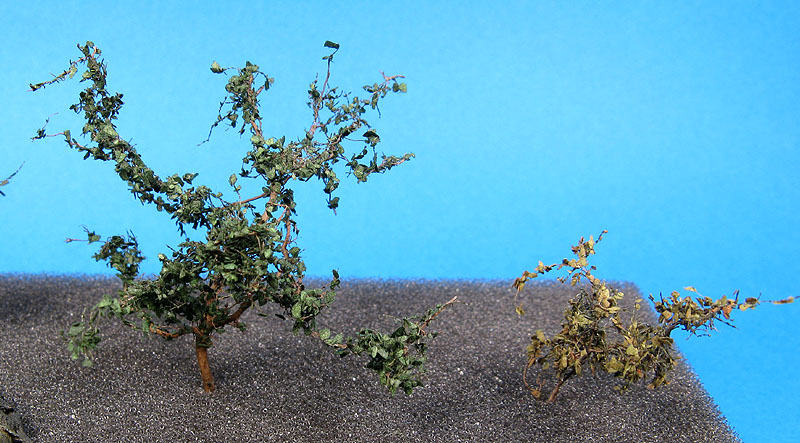
This finishes the work with large vegetation. Small stuffs would be added later... Time for another check:
Once satisfied with the general layout, I used my usual method to reduce much of the sintetic brightness of the static grass by airbrushing light mists of greens and browns after the grass glue was dry. This is a very fun step, as you can control the shadow desired on each area by using darker or lighter tones of each color. No special recipe here... just mix the colors right into the airbrush cup and shoot away:
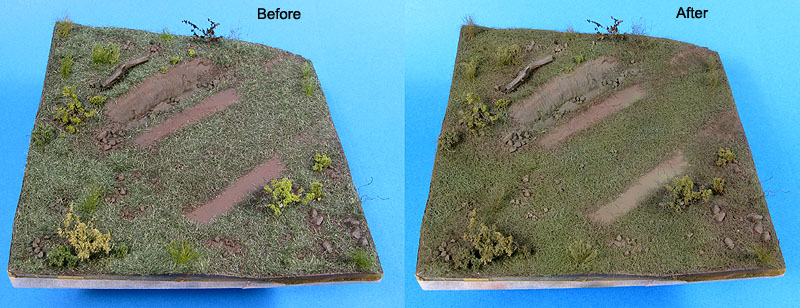
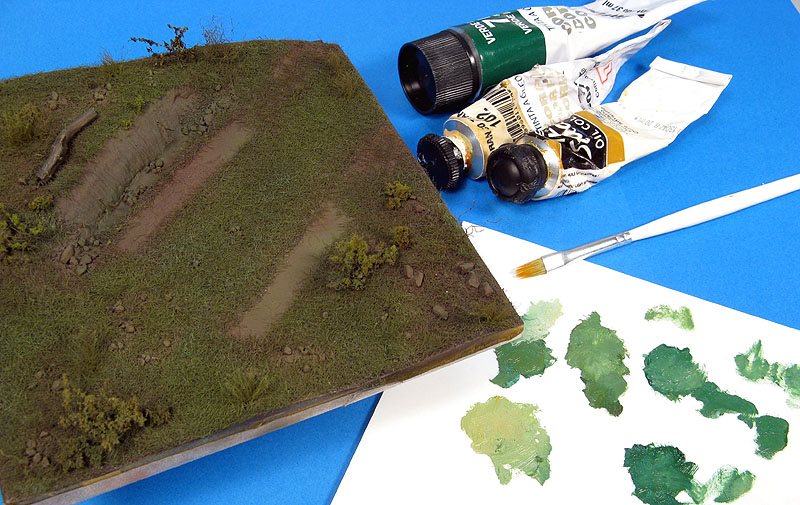
Further, localized regulation of the colors is achieved by drybrushing artists oils over selected areas. This also helps to recover subtle tone differences in places leveled by airbrushing:
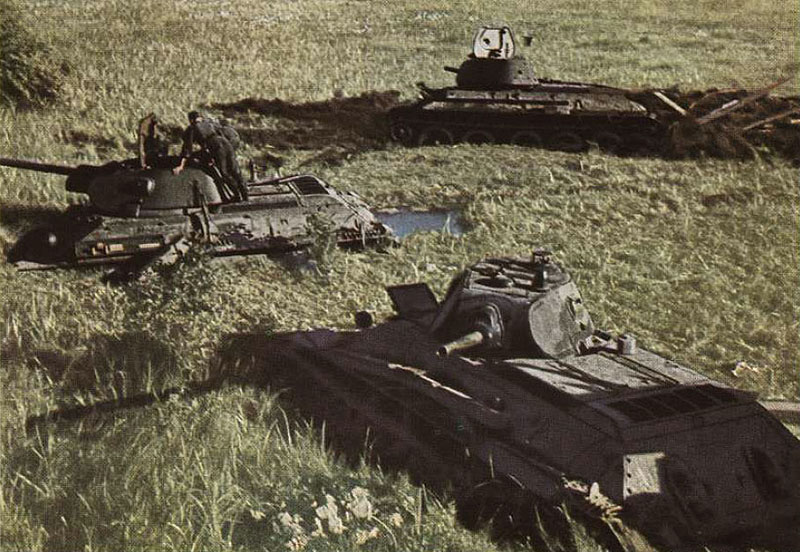
After posting a couple of photos on internet modelng forums, I received some constructive criticism regarding an excessive monochromatic aspect of the base. However, I must disagree that this is wrong. One of the photos I have used show how too glaring tone variations are not necessarily correct. The photo below show captured T-34s in a marshy quagmire near Tolotshin, on the Drut River, circa summer 1941. This scan does not show yellow and red flowers as in the original photo, but helps me to make the point. Also worth to note is how excessive paint chipping can be wrong in this case, particularly in 1/72 scale:
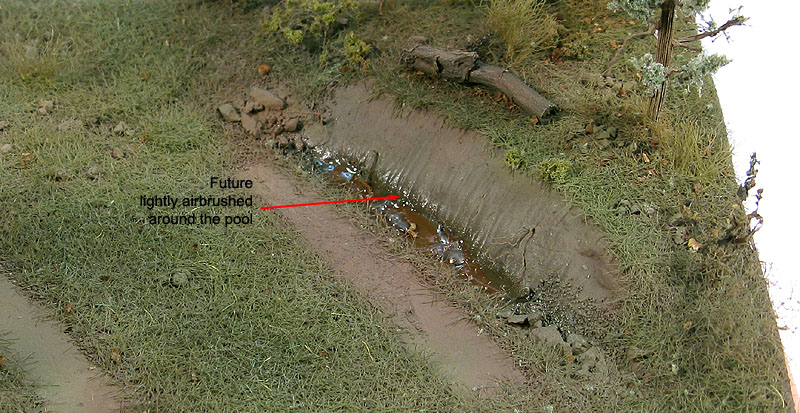
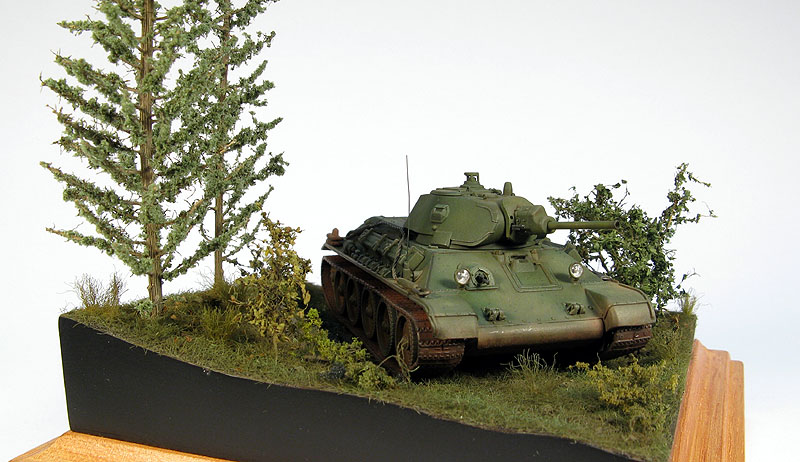
The pines were then finally glued to the base, as well as the remaining of the vegetation. I gave a final touches on the water pool on the base of the small cliff by airbrushing a greener color to depict slime, and pouring "thickened" Future to simulate the water. I decided not to use any kind of resin to simulate the water due to the small volume required, and using resin could be messy and risky. So I left a small cup of Future open during a couple of nights until it had a thicken consistency, and applied it in three layers (the first one tinted with brown acrylic paint), until only the top of the rocks inside the pool were visible. Once the Future was fully dry, I airbrush thinned Future around the perimeter of the pool to give that wet look:
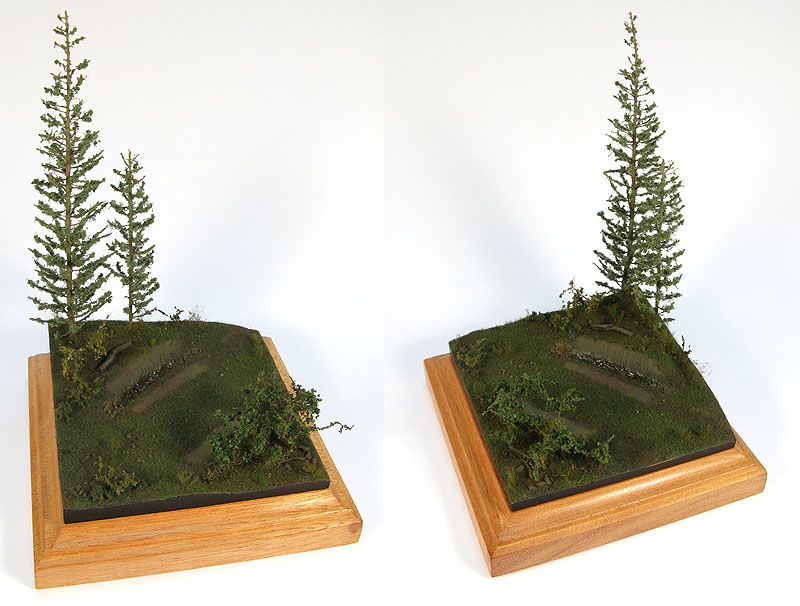
At this point, it is important to set your project aside for a couple of days and return to check it with a fresh mind. It is very easy to loose the perspective of what is overdone and what needs to be emphasized during the process. Finally, dead leaves were scattered under the trees (see the article about my He-170 base) and I declared the base done. The protective masks were removed and the terrain was glued over one of my standard wood bases:
10. Back to the T-34
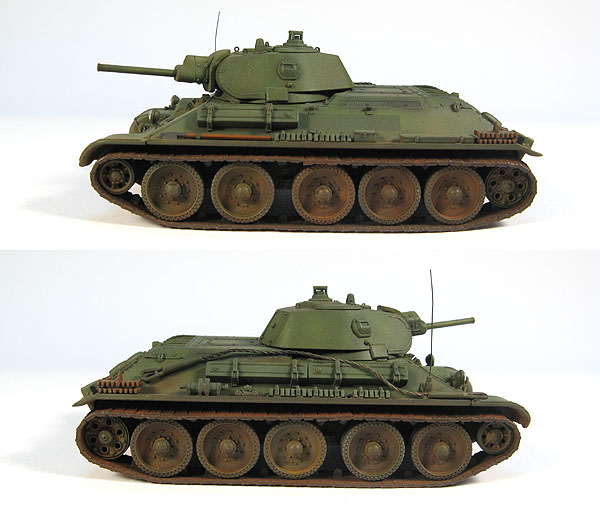
The tracks of the T-34 were checked, and another round of glue/rubber foam was necessary to ensure they had the correct sag (as far as the vinyl allowed). I used a soft pencil to expose the bare metal of the tracks in a few places. The disks protecting the head lights were removed, and I finished them by adding the bulbs and the lenses. I used a different method to scratchbuild the lights, and the result was very satisfactory concerning the characteristic relief of the lenses. This is subject of another article, in preparation. A torn radio antenae was also added from stretched sprue.
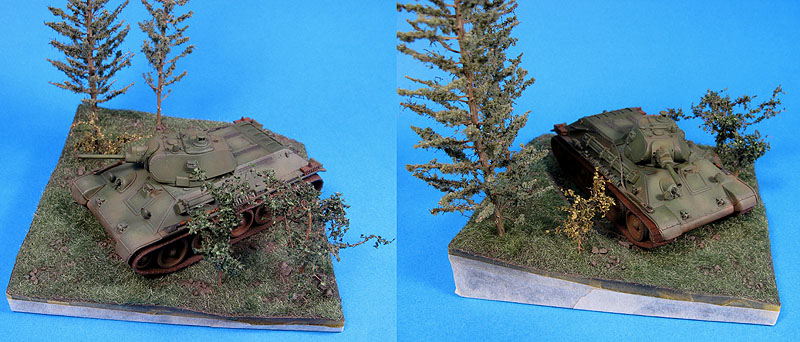
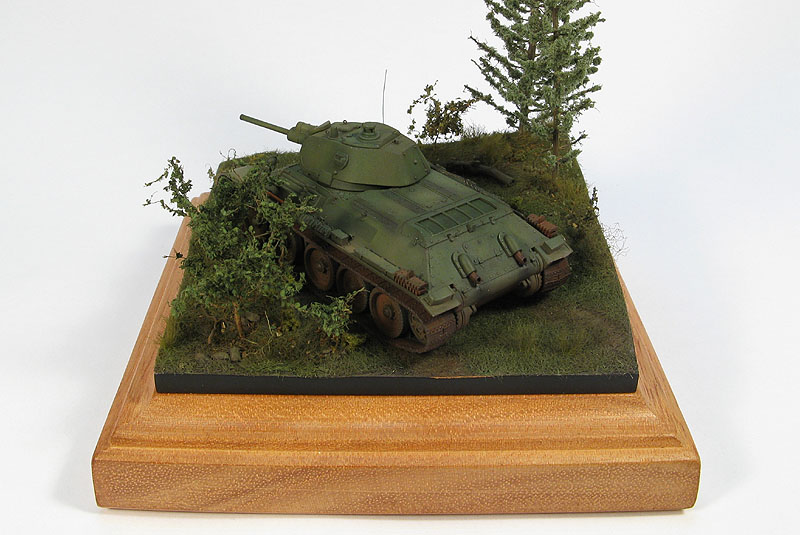
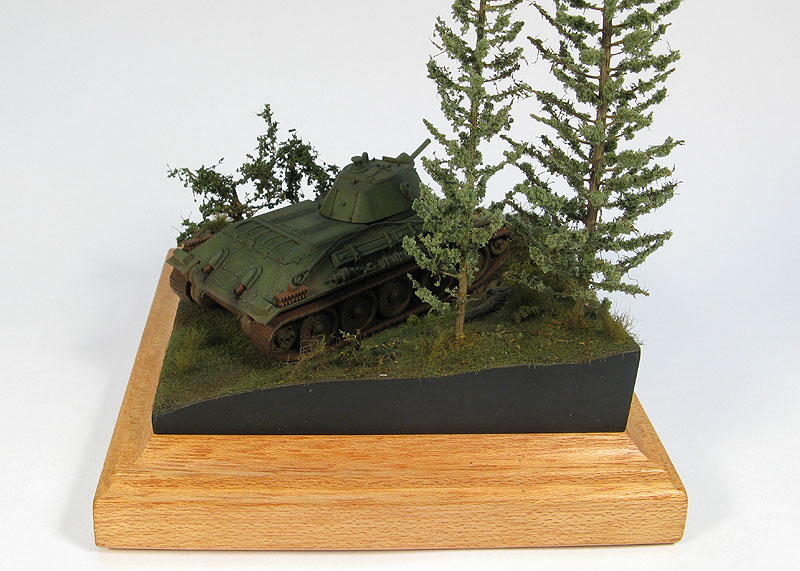
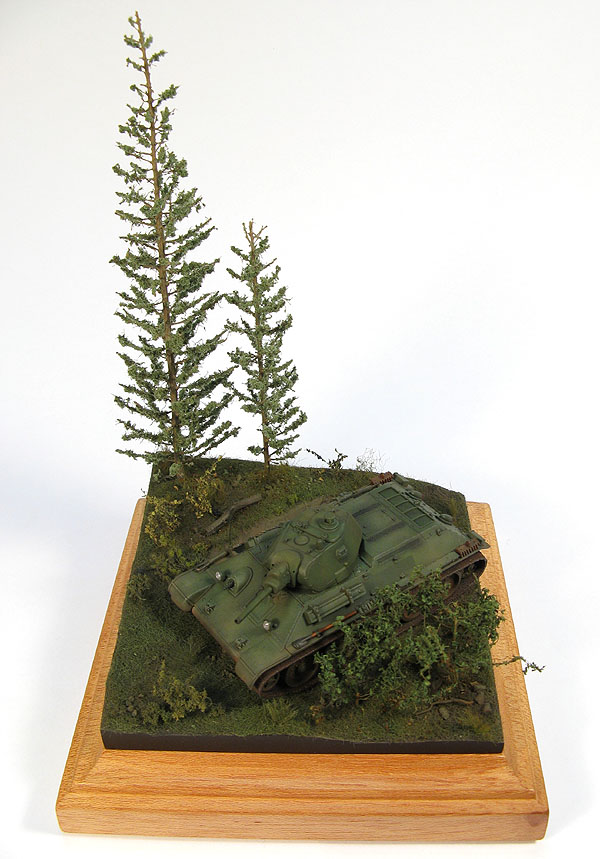
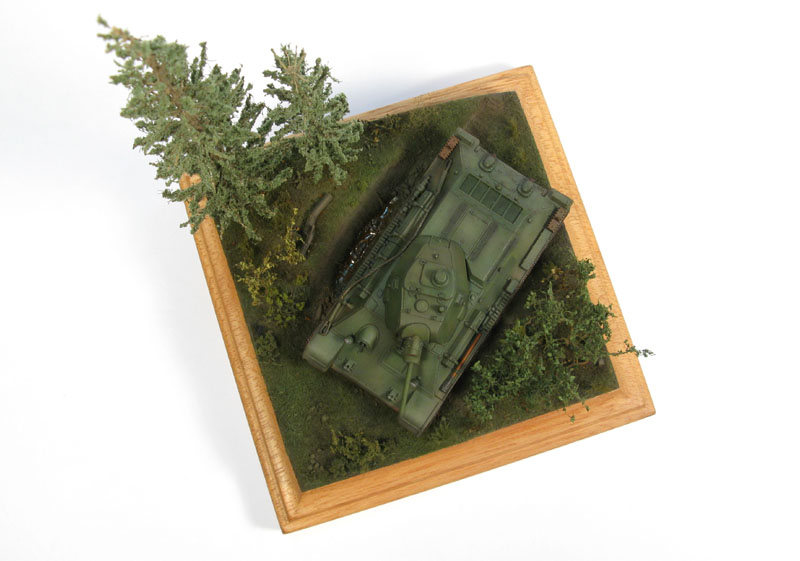
And here is the little fighter:
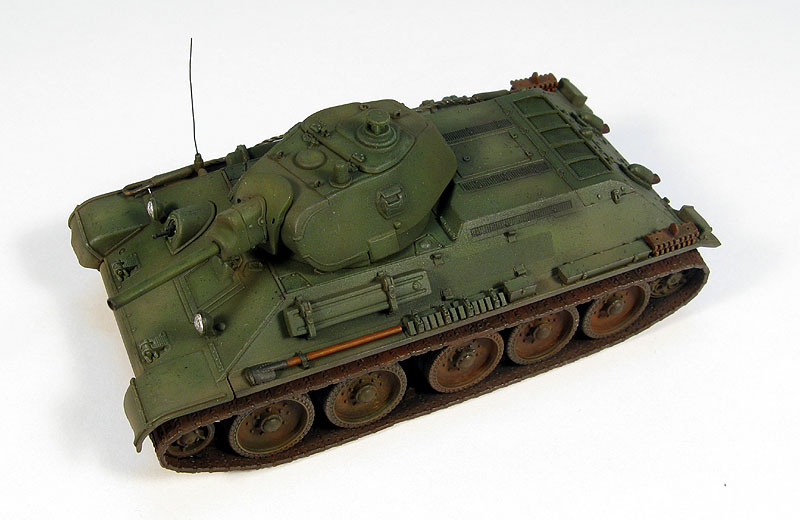

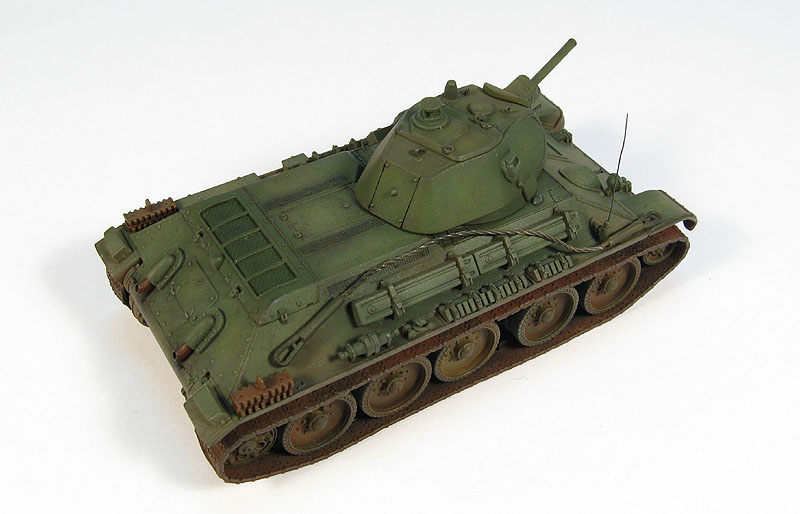
11. Finishing off
The T-34 was just laid over its base. What I have learned with this project? Well, I learned a lot about camouflage color modulation with the airbrush, how to better use pigments, how to keep paint chipping subtle in small scales, a nice method to make head lights, and that vinyl tracks are not worth when compared with their link-and-length/link-by-link counterparts. Except for that, this is an excellent kit. And of course, I improved my skills in making terrain and vegetation, but this is a never ending learning curve, you know that. I hope you enjoyed this project, and that some of the techniques shown here can be useful somehow to you. Here are the final photos:

| Technical file | |
| Kit:
|
- Dragon # |
| Additions:
|
|
| Basic
colors: |
-
Primer: Fast drying automotive acrylic primer - 4BO Olive Green: Mix of Tamiya acrylics (XF-5 + XF-13 + XF-59) - Flat Black: Tamiya XF-1 - Gloss finish: Model Master Metalizer Sealer - Flat finish: Humbrol Matt Cote - ... and lots of Easy Colors pigments |
| Notes: |
- If you can, avoid using the kit's
vinyl tracks. |
Rato Marczak © 2009
