| Hasegawa Toyota GB starter truck in 1/72 scale |
| Finished: June / 2021 |
During the construction of my Nakajima Ki-27 Nate from the ICM kit,
I came across some photos of those little Imperial Japanese Army
starter trucks starting up the engines of military aircraft. Before
going further into some research on the subject, I thought it would be
cool to put one in front of my Nate.
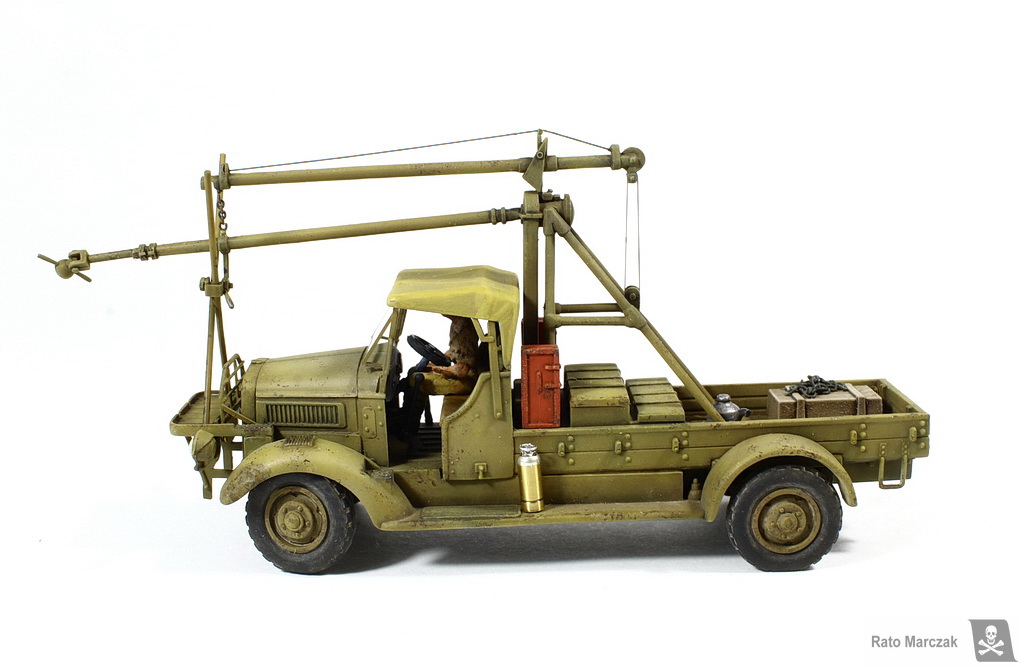
I found what I believe is the only injection kit of this equipment in 1/72 scale in my stash. It is the Hasegawa kit MB017 Starter Truck GB. This is an old model from 1974, and it was re-issued for the last time during the 1990s (kit #31117). My sample was the original issue, with the familiar brittle plastic of old Hasegawa models. It is a nice kit, with well-molded parts, but missing most of the fine details that such piece of equipment generally has. A few scratchbuilt refinements here and there could easily bring this model to a better standard.
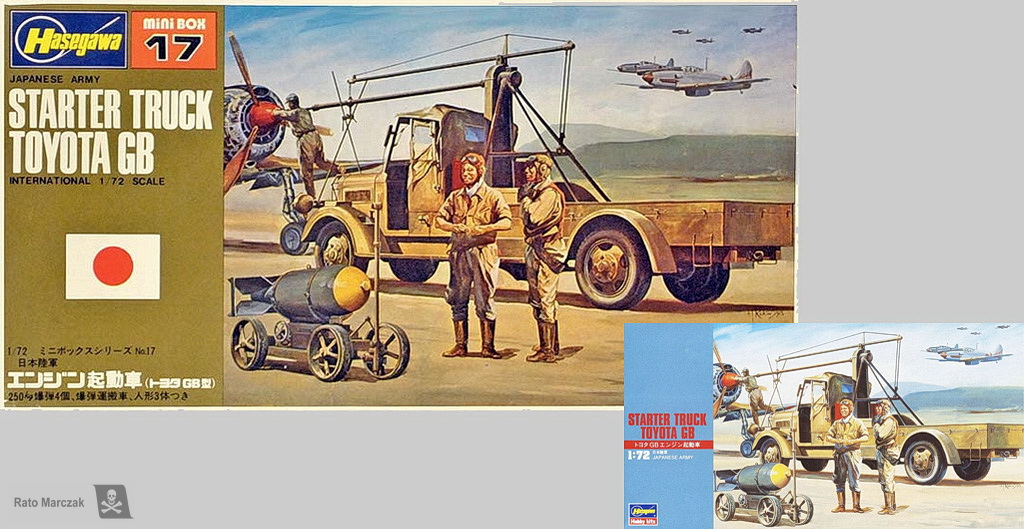
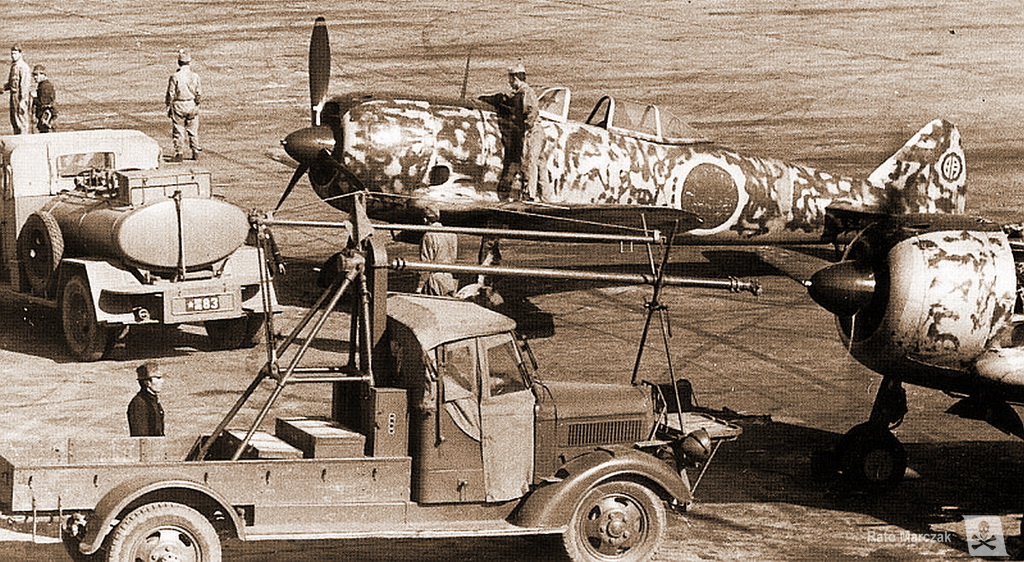
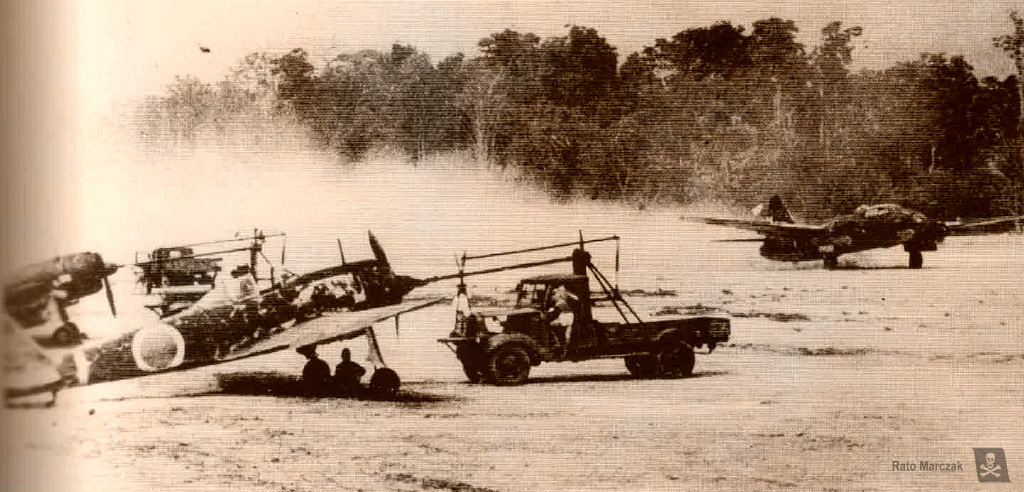
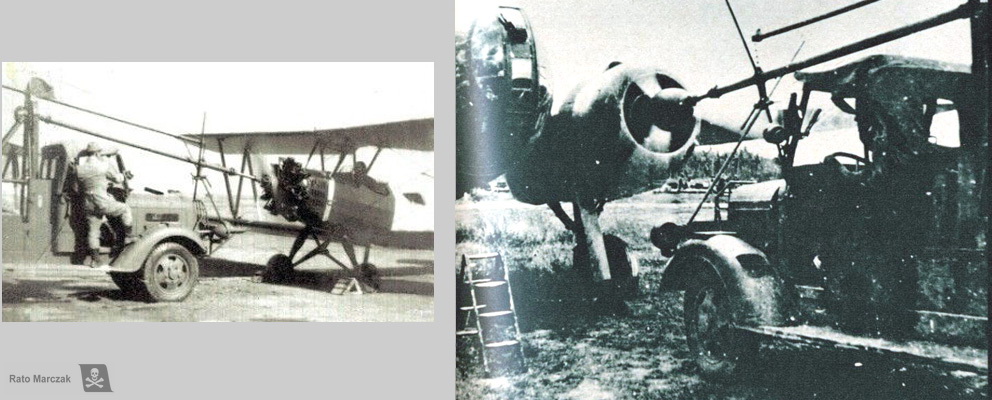
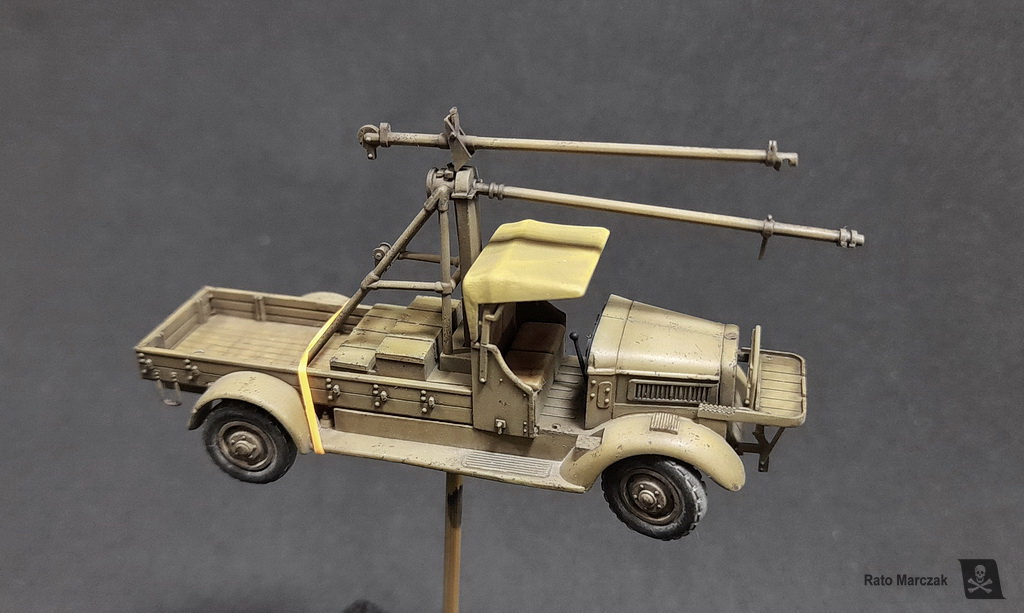
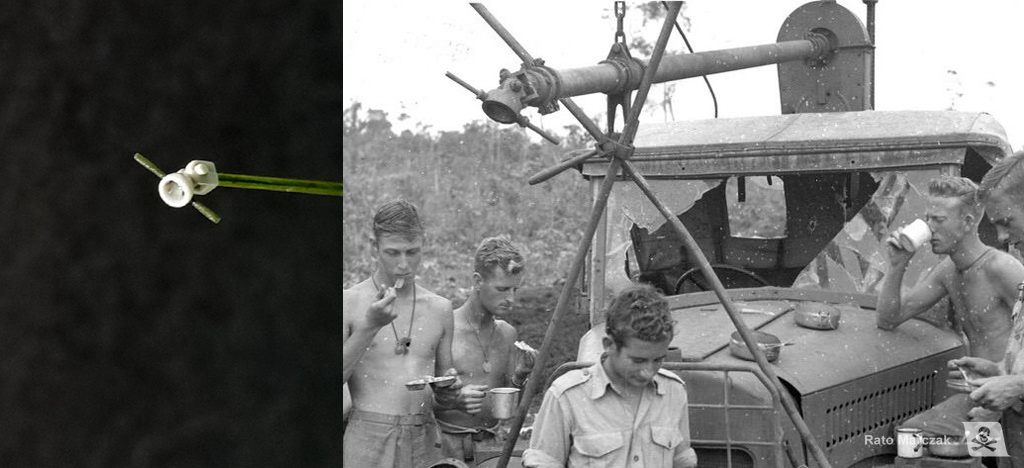
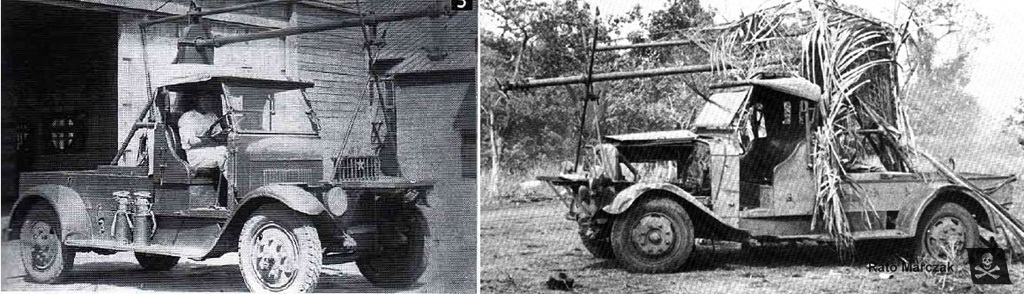
The Toyota GB shared the same basic design of starter trucks used in other air forces since World War I: the driver had to approach the aircraft with the truck and hook the end of a spindle to the aircraft's spinner. The spindle would then turn the engine until it starts properly. The system was a consequence of the lack of starting devices in most Japanese aircraft. It could be found in virtually any IJA air base throughout the war.
Trying to study the subject a bit deeper, I discovered that the Toyota GB is not very well documented. For a start, I found out that its official name was Toyota KC, not GB, and it started to be manufactured in the mid-1920s by the Tokyo Gas & Electric Company (predecessor of the more modern Hino Truck company). The versions used before WWII had a dedicated engine on the back of the truck to feed power to the drive spindle. Later models used a gearbox to take off power directly from the transmission.
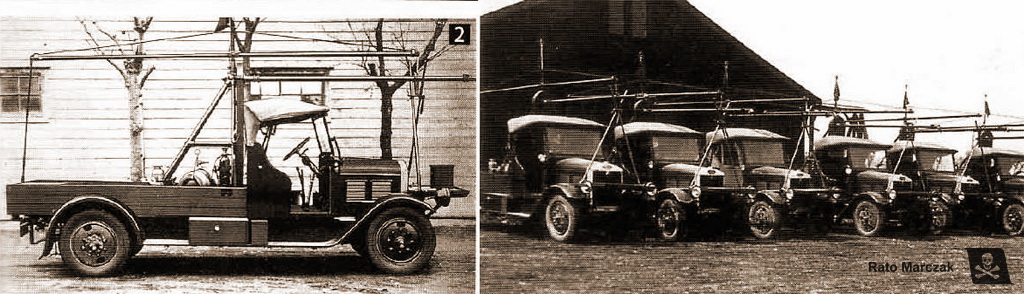
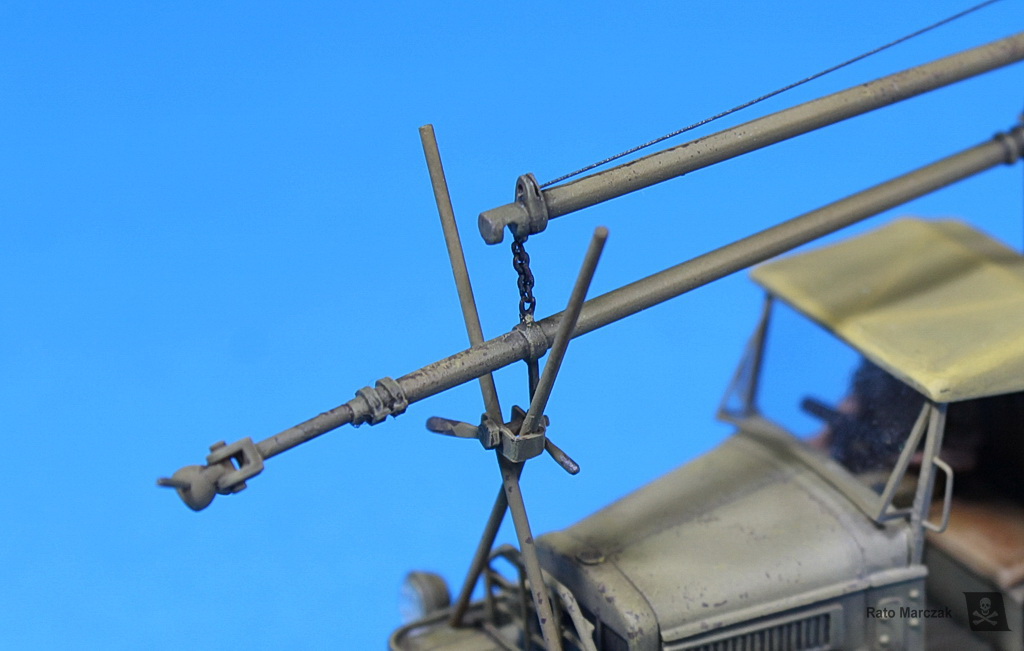
Later models, like the type depicted by the Hasegawa model, had their design defined around the time of the Machurian Incident (1931) and changed very little until the end of production. Of note are the X structure and the base in front of the vehicle, which provided support for the rudimentary height adjustment system for the drive spindle. Usually, a mechanic would stand on the base to lock the support by hand. All this is already present in a Hucks starter truck from WW I.

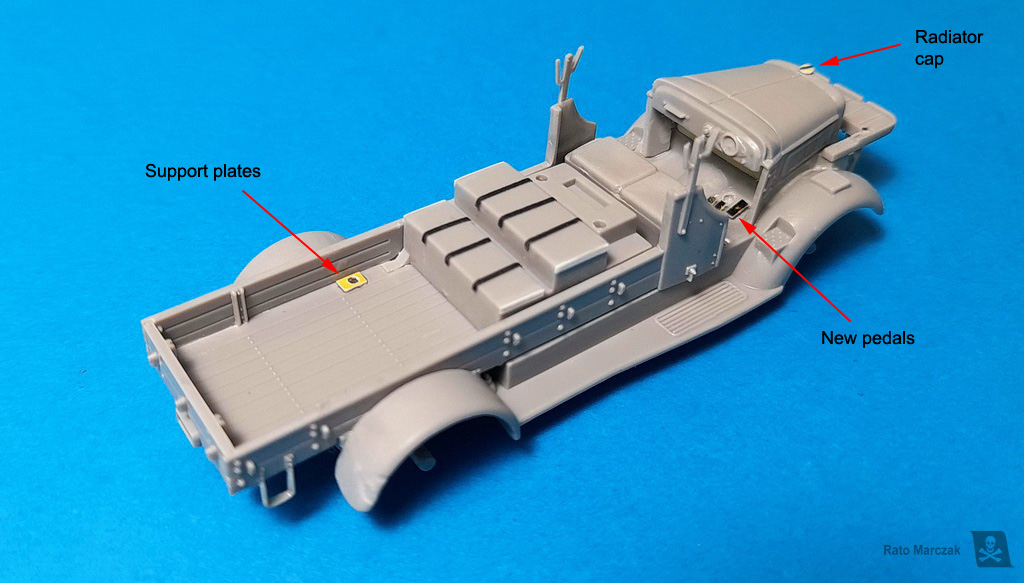
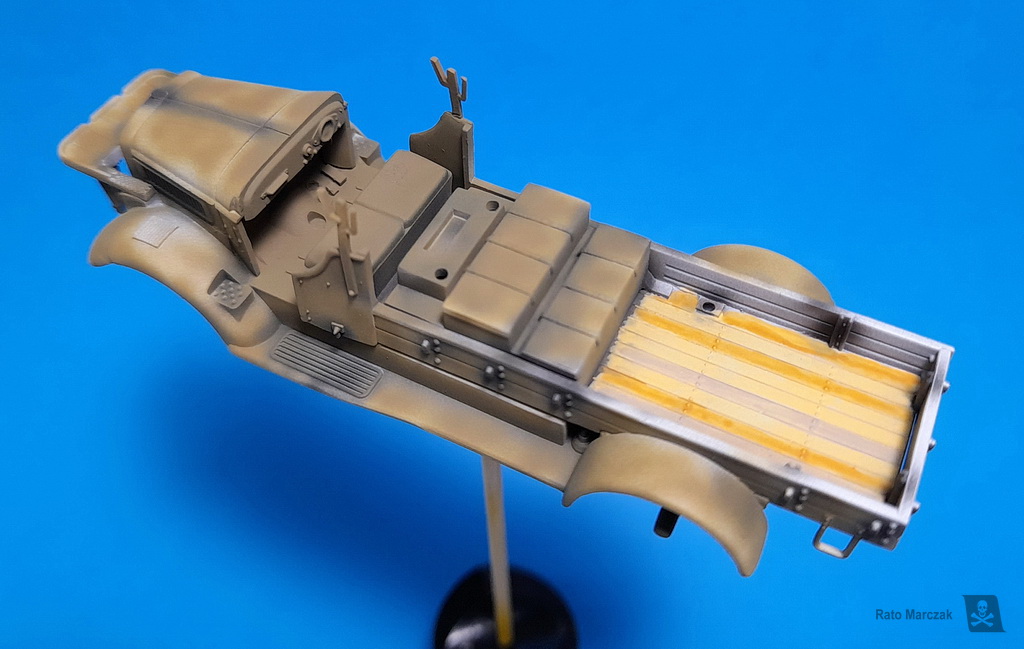
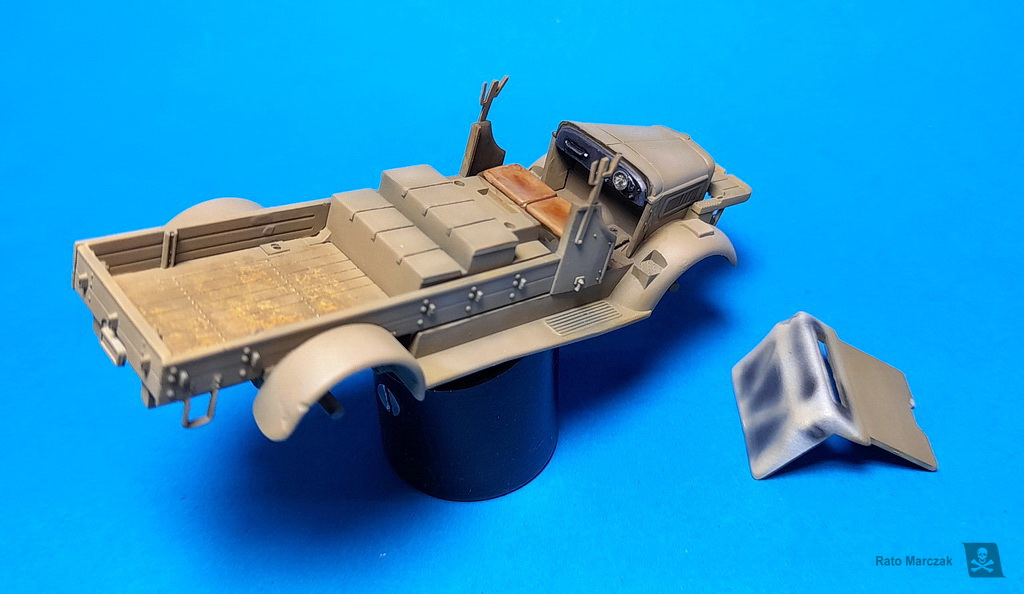
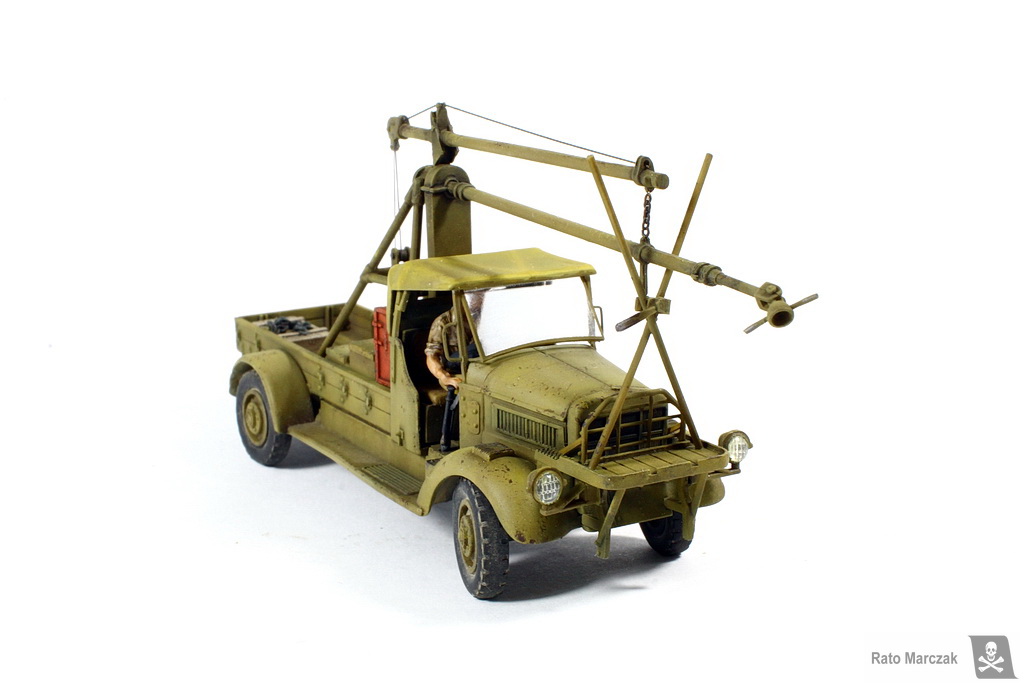
Well, enough research, let's get to the model. The basic assembly was pretty straightforward, with the body mounted on top of the chassis, then adding the the engine enclosure and driver cabin. After the planking is installed around the flatbed, all that remains to finish this model are the wheels, starting system, and smaller details.
I reworked the shifting and parking brake handles using the kit parts, but couldn't do the same for the radiator grille. I ended up making a new one using soldered brass rods. I also added the small plates which allow bolting of the spindle structure to the flatbed and replaced the pedals for brass ones. The front axle was modified to allow the installation of the wheels in a steered position - this simple modification always results in a more realistic looking model and is so simple to do.

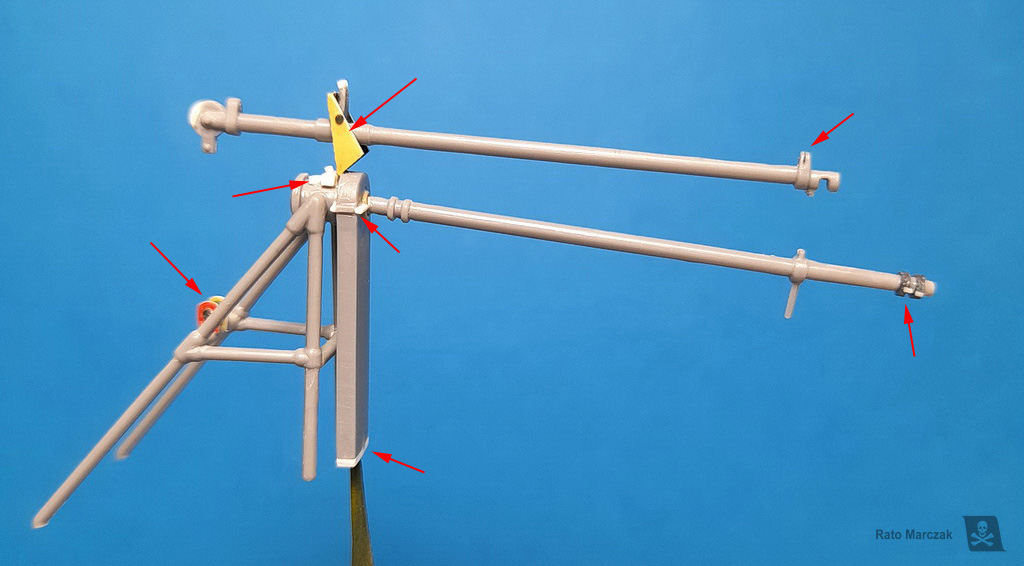
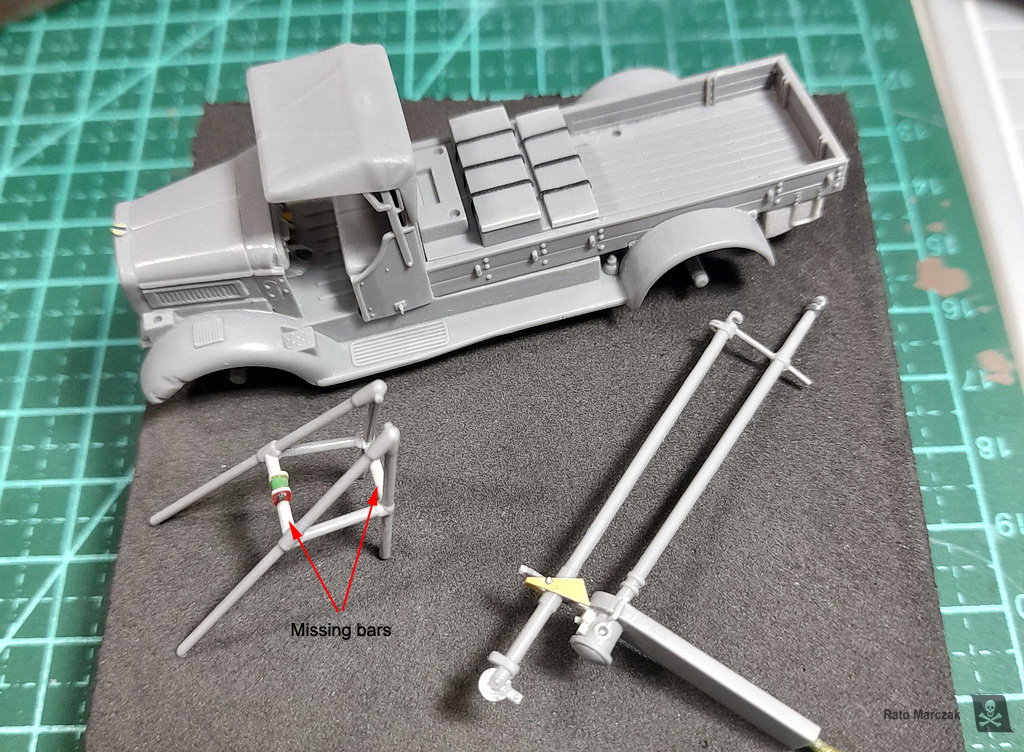
The spindle strut was difficult to clean up. And I found out that two of the bars of the spindle supporting truss was not molded by Hasegawa. Without those bars, the height adjustment mechanism cannot work. So they were added and I could have gone further, but much of it would be guesswork:
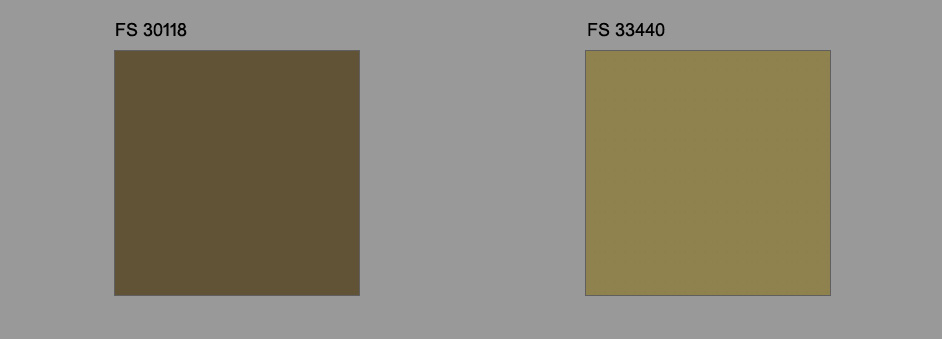
So, painting time. Apparently, all starter trucks of IJA in operation during WWII were painted in IJA khaki drab, a characteristic color of their vehicles. Two basic shades were used in WWII vehicles: khaki brown (close to FS 30118) and khaki yellow (close to FS 33440). I could not determine exactly what color was used by these vehicles, but the kit instructions mention GSI H-81 for the basic camouflage and H-71 for the canvas cover, so I assumed that khaki brown was the color.
After priming the model with Mr. Surfacer, I started the painting phase with a black pre-shading followed by a cloudy application of GSI H-81 Khaki. Next, I hand-painted the cargo floor with three wood colors, in preparation for the hairspray, which was applied soon after. Then a lighter version of the khaki was prepared by adding H-71 Middle Stone to the H-81 and the basic color was completed. I went back once again with an even lighter tone of the color and post-shaded areas that were more exposed to sunlight.
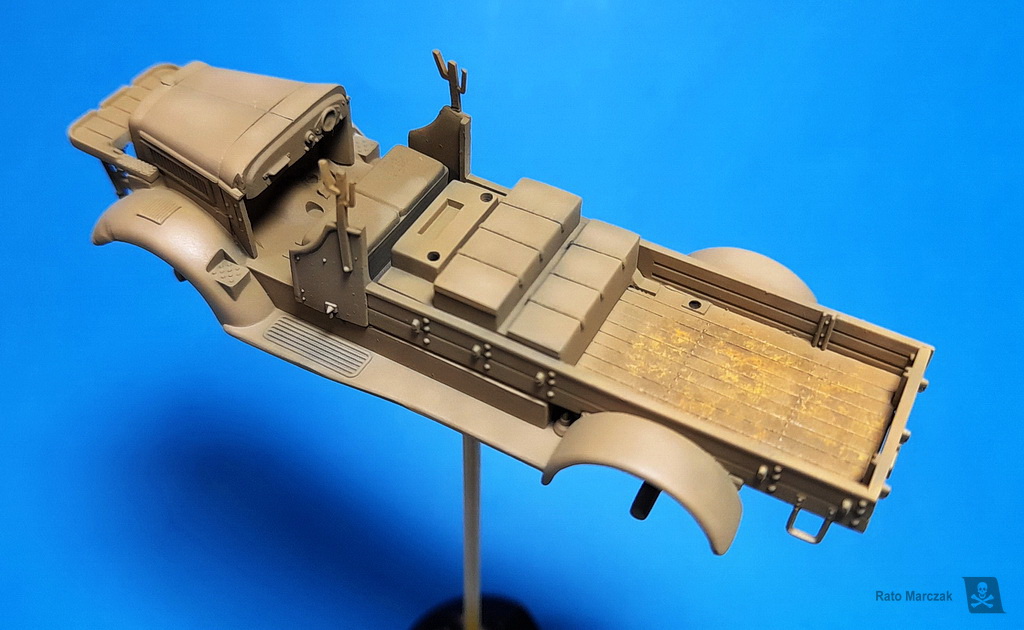
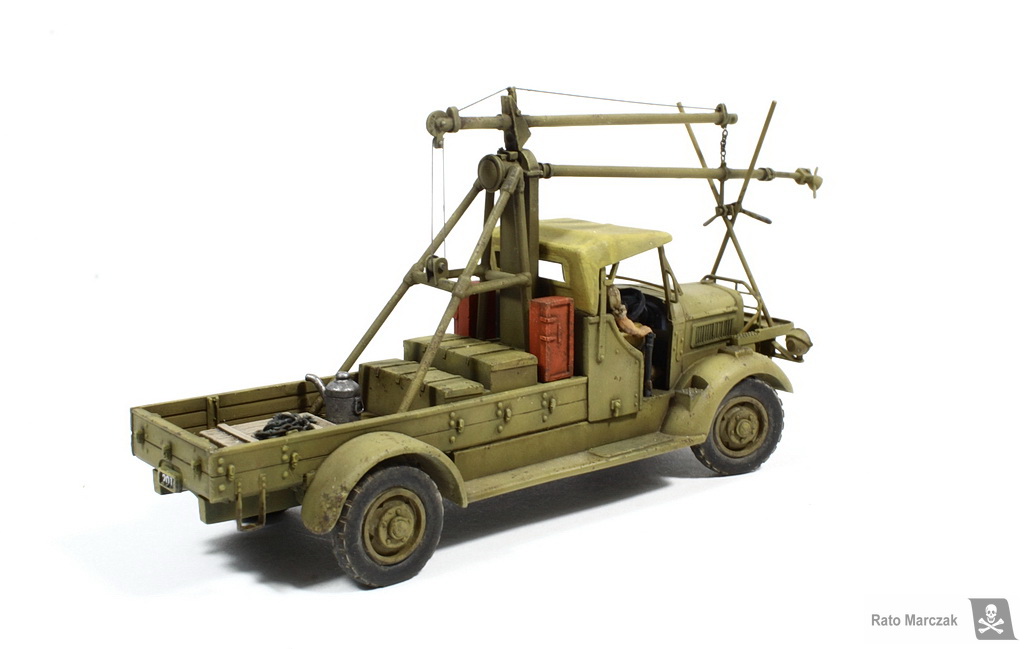
The area prepared with hairspray was scrubbed with a short-hair brush to expose the wood colors, and a black-brown enamel pin wash was applied on recesses and around raised details. The driver's dashboard was hand-painted with semi-gloss black. I used a spare decal to simulate the main dial and picked up the smaller details with white and silver. The seats were painted with Vallejo colors trying to simulate well-worn leather.
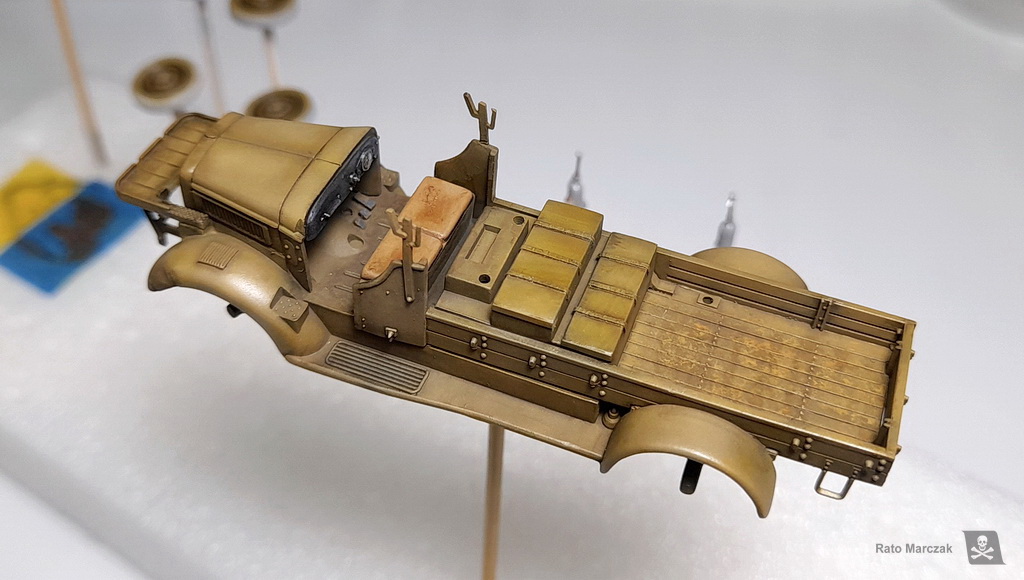
The canvas cover of the cabin seemed considerably lighter than the rest of the vehicle. I wanted to show the struts which support the canvas. So I sprayed the sagged areas with black and the raised ones with radome color. A very thin mix of the camouflage color and yellow was carefully airbrushed to cover the whole part, but preserving the highlights:
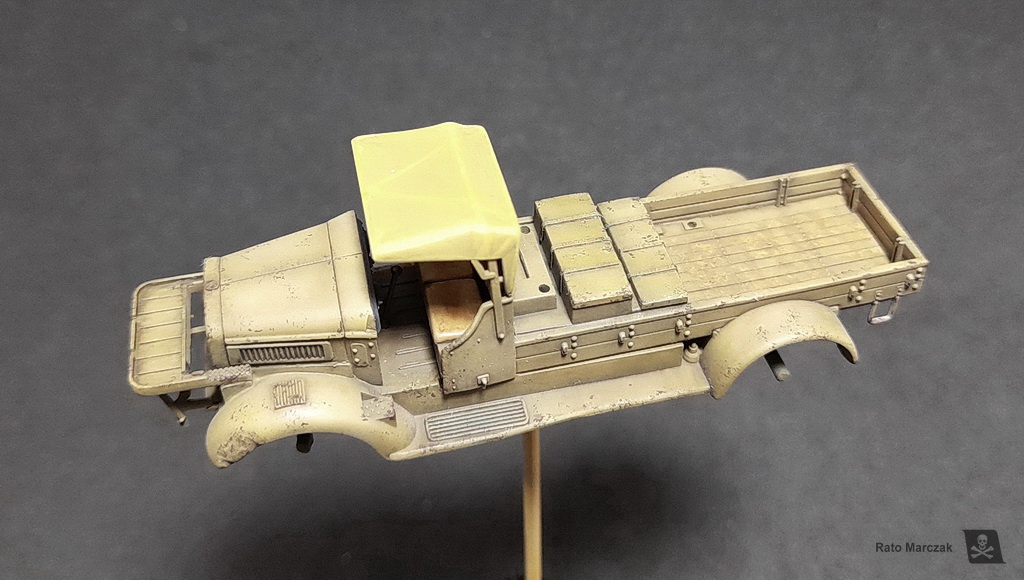
Paint chipping was quickly done with a sponge and dark-brown pencils. I have not bothered to apply the chipping with two colors, but in some places, I used a sand-colored pencil:
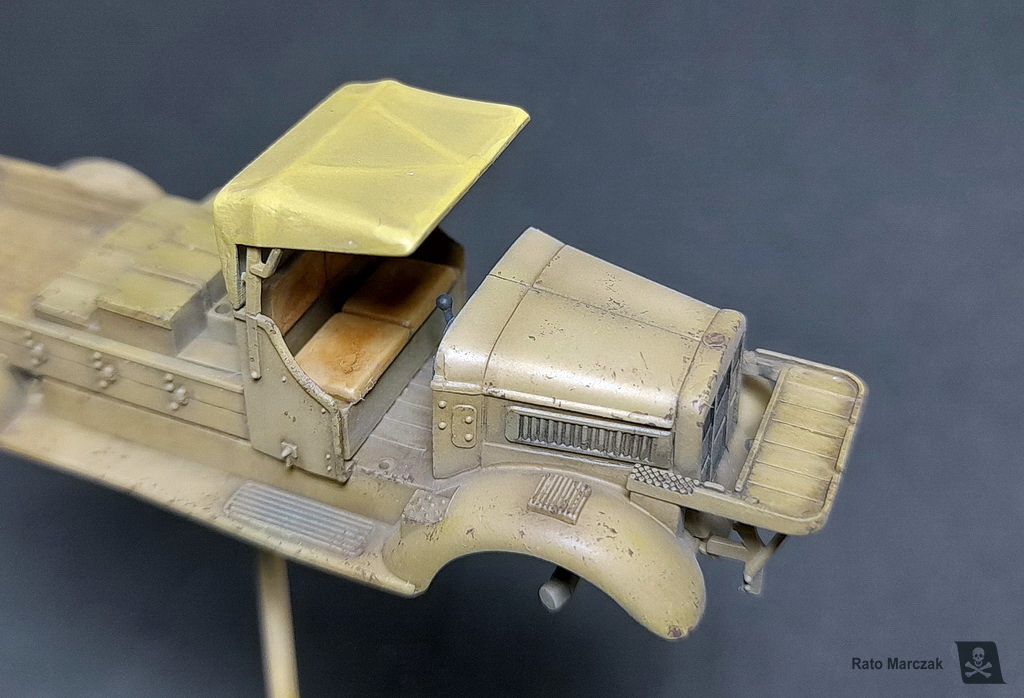
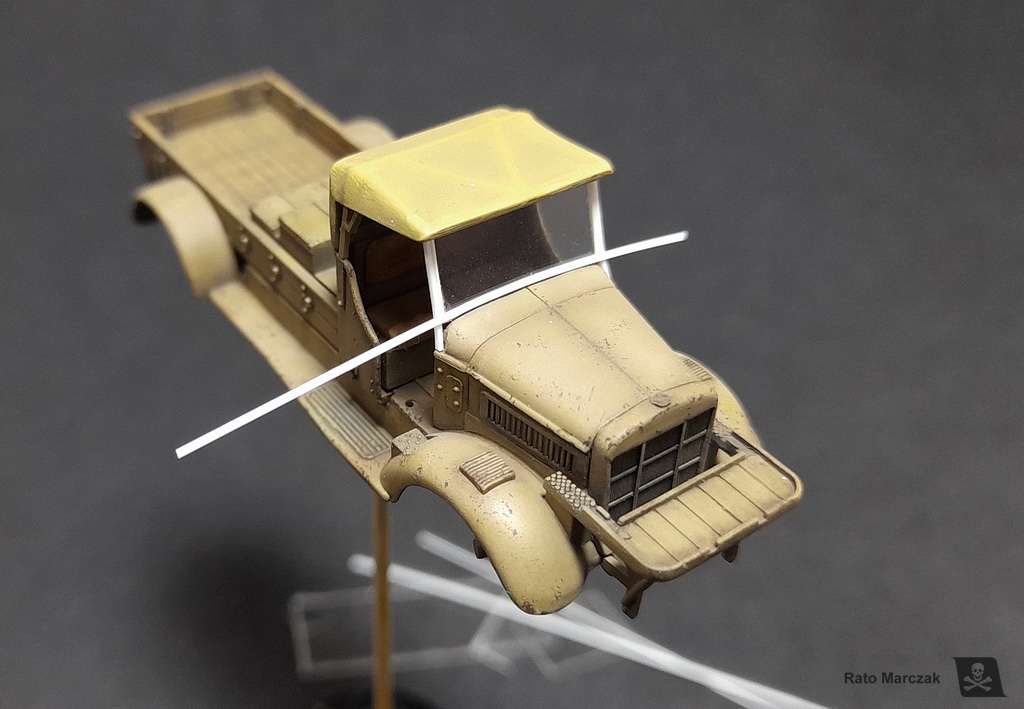
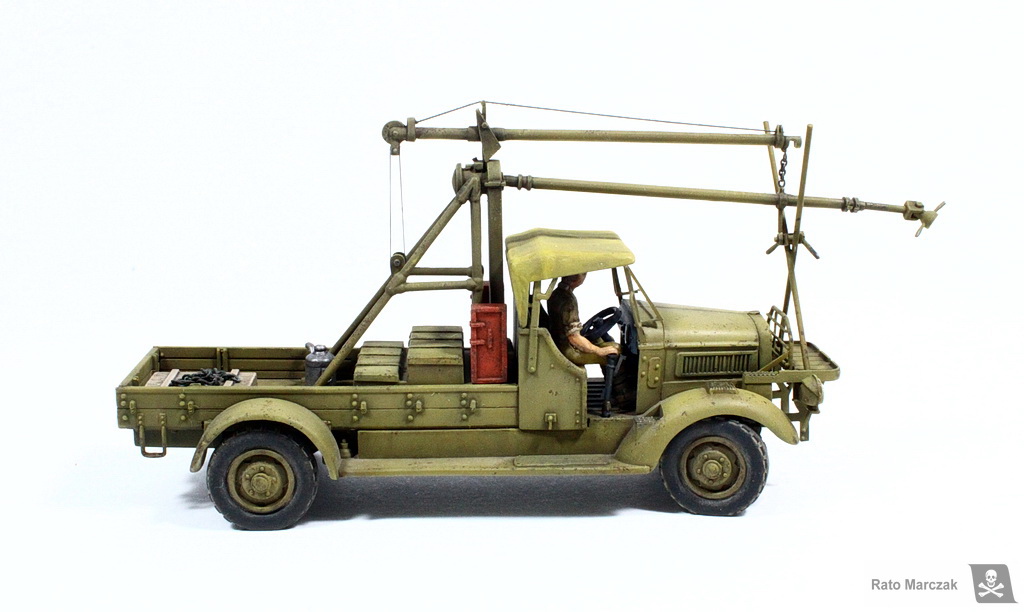
At this point, I noted that the Toyota starter truck had a tilting windscreen. New lateral columns were made from plastic and the kit's clear part was trimmed to accept a frame. The columns would later receive grab handles made of stretched sprue. Starter trucks from the early 1930s sported rear-view mirrors and windscreen wipers, but these conveniences were removed in operational wartime models. Curiously, late-war models would leave the factories without fenders or headlights.
The spindle and the supporting truss sub-assembly was weathered as well, but it was kept separated from the truck until all cables and chains were installed, near the end. But of course, I could not resist test-fitting it to the little truck. the wheels were also glued in place and adjusted to assure that all four were touching the ground:

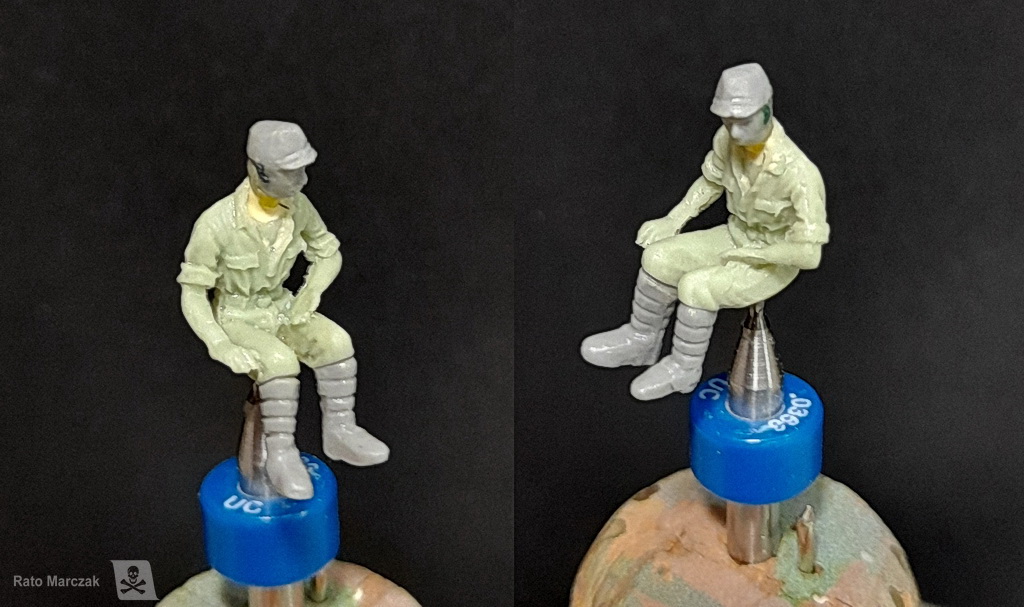
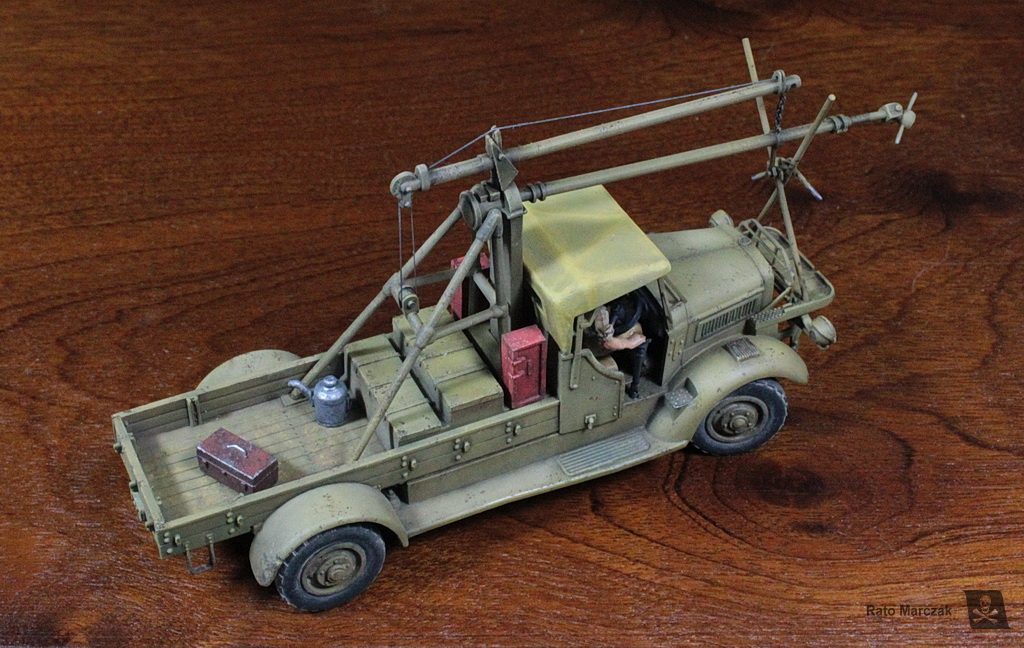
Another part that was not glued until the end of the project was the canvas cover. This is because I had to put a driver in the cabin. The Hasegawa kit comes with a driver figure, but it is awful, to say the least. A resin figure of a British officer was used as a starting point, after checking how it would fit inside the cabin. I used the head and lower legs from the kit part, though. The arms were also repositioned to touch the controls.
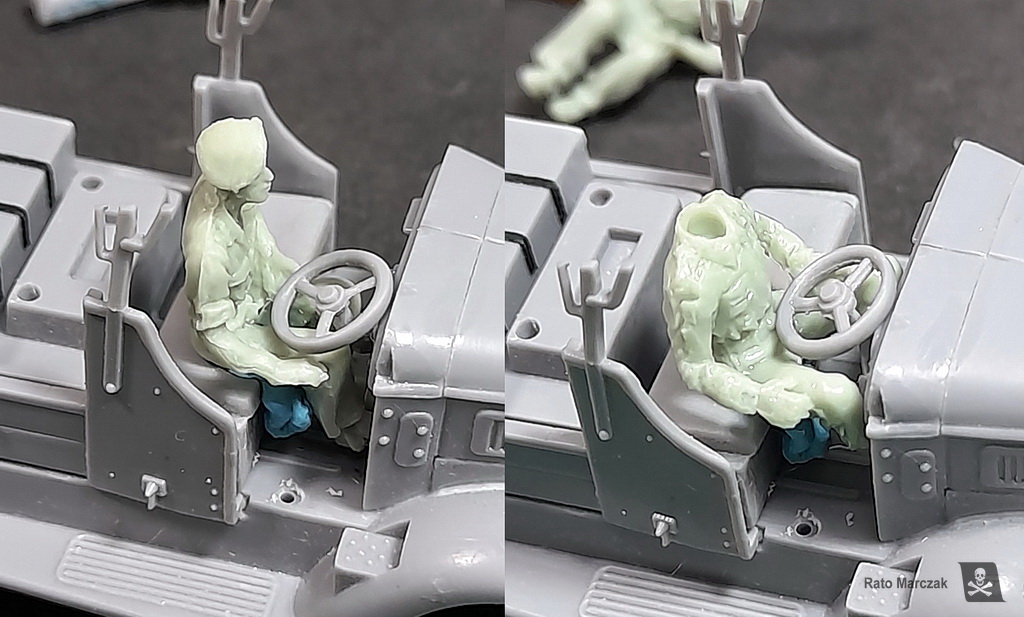
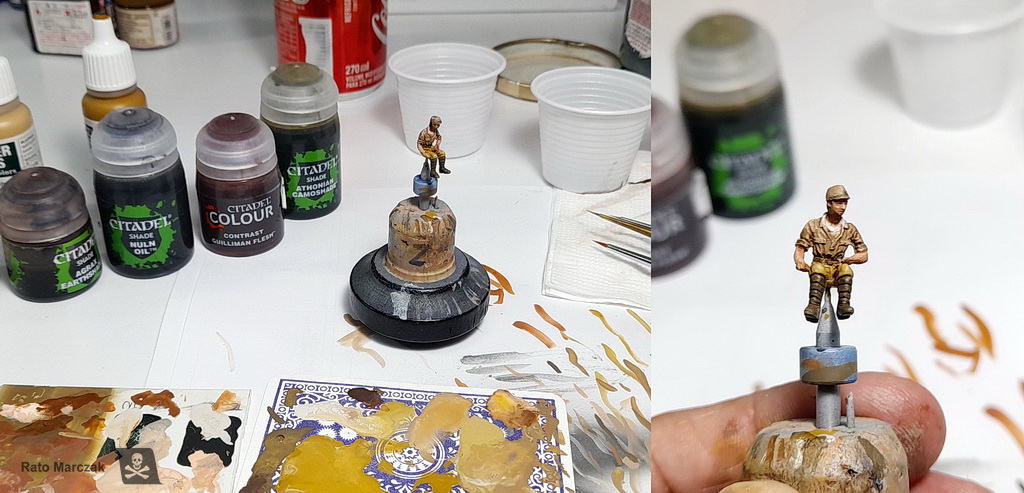
After a miserable figure painting session, I ended up with something acceptable. Not to worry much, as it would not be much visible once the model is finished. My recent motto is: if resulted better than before, it is good enough.
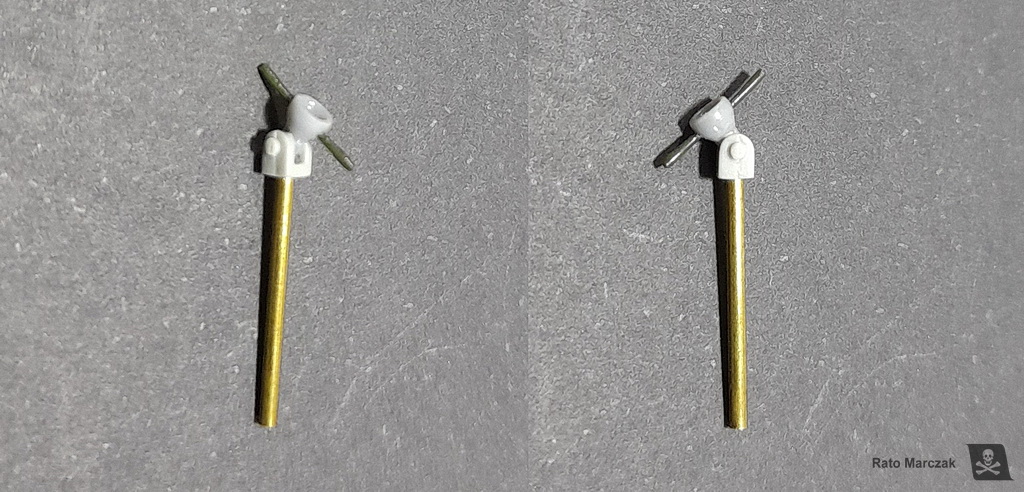
Now, back to the truck, there were several small details that I had to finish. One of them was the telescopic fitting at the end of the boom. This was the part that was adjusted to the propeller hub of the airplane. modified spare parts to make it, and mounted it on a brass rod. This way the boom end would be inserted in a hole that I drilled previously in the spindle part.:
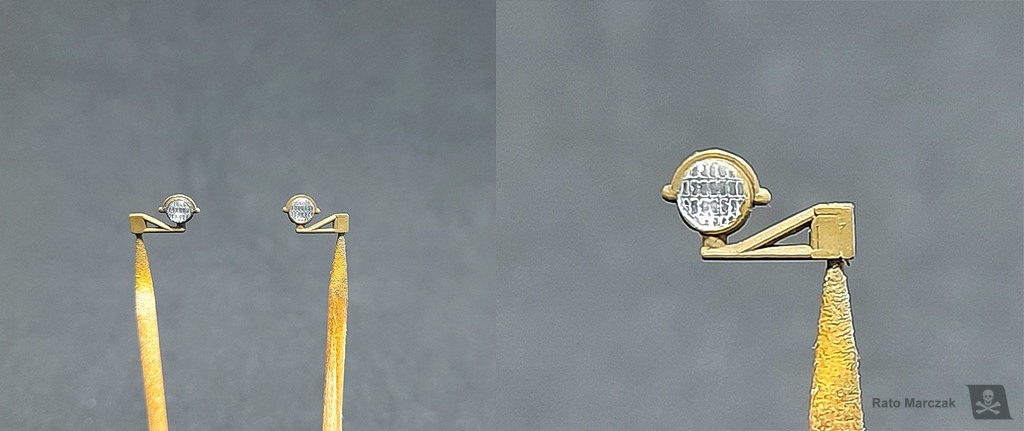
The headlights (parts 32 and 33) were hollowed to accept new lenses. I painted the interior with chrome silver, glued a soldering ball inside to simulate a bulb, and closed them with lenses made with a new and easy method that I will describe in another article:
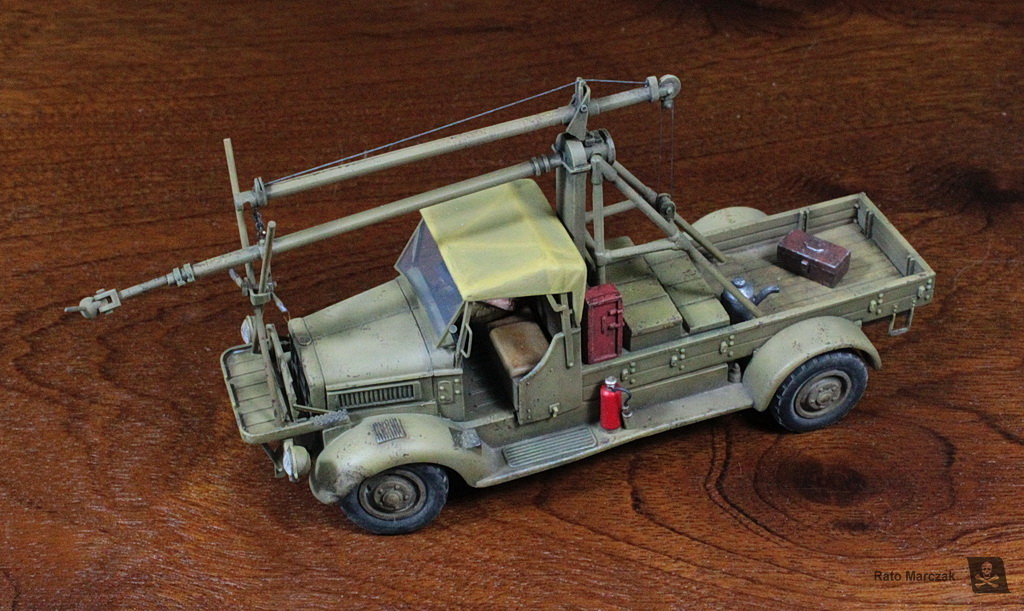
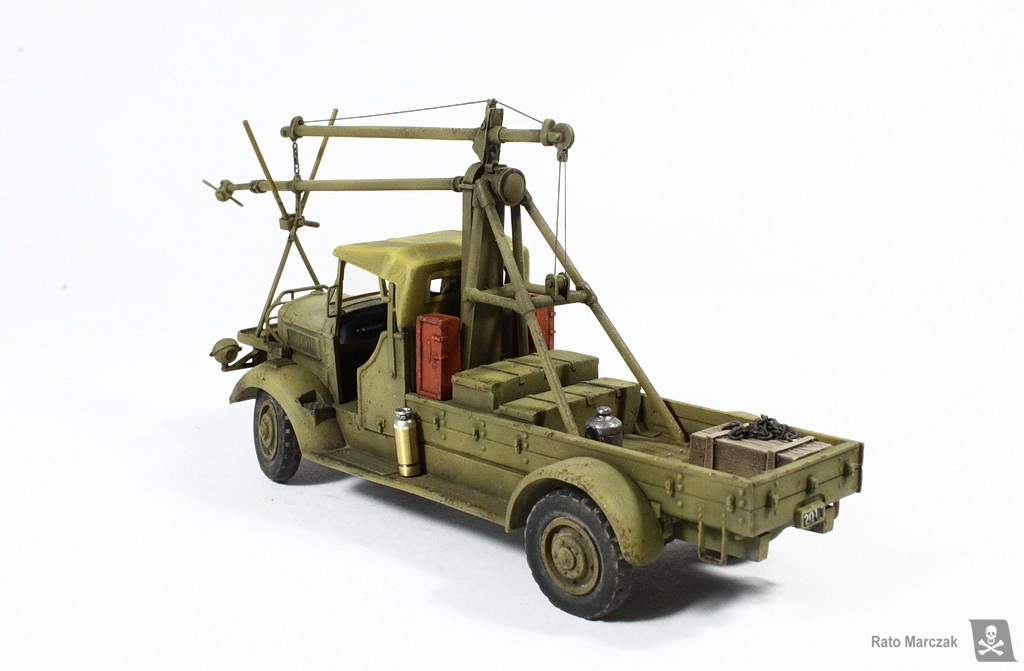
I enjoyed painting and weathering other small details, like the red boxes side-mounted to the spindle truss (parts 9 and 10, I'd love to know what they were), a small toolbox that I have no idea where it came from, a fire extinguisher, and an oil can that I scratchbuilt from a resin milk can. The fire extinguisher seemed too modern, and would be replaced later on:

At this point, I made a last weathering pass in the whole vehicle, mostly of pigments, to simulate sand, dust, and dirt around corners and horizontal surfaces. A pencil was used to simulate exposed metal where the ground crew would rub their boots. The canvas cover received a dose of pigments as well. Then, the various cables and the chain used to position the spindle were installed, and the X structure in front of the truck was also glued in place.

After struggling to cement the windscreen in a slightly angled position (my hands are shaking a bit, you know?), I declared the little Toyota done:
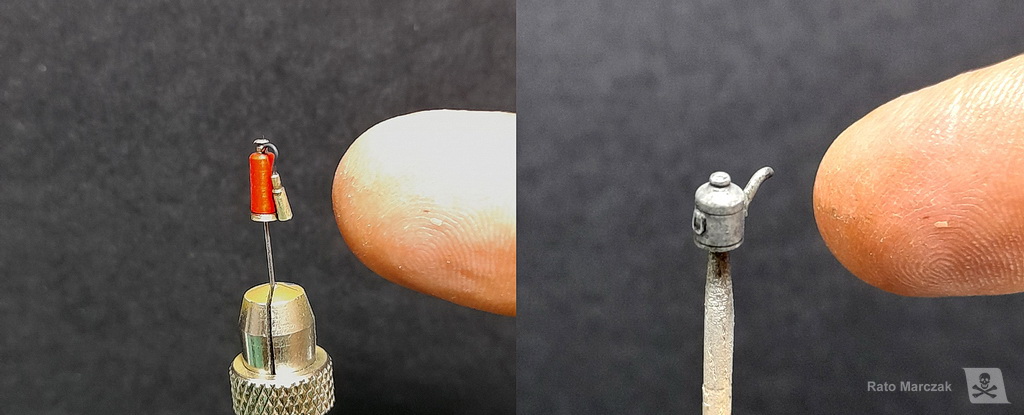
But wait, that fire extinguisher is not nice. I did found photos of red extinguishers like this red one from the 1930s, but I wondered that by then brass extinguishers would probably be way more common. They were hooked to the truck sides. My original plan was to install the canvas doors, but again period photos showed that were rarely used outside Japan.
So I turned a new fire extinguisher in brass, added a hand wheel, a ring handle, and replaced the old one:
This model was used in a diorama along with my ICM Ki-27 Nate recently finished.
I hope you like this model and, if you have any questions or comments, drop me a line by email or through my Facebook page.
I found what I believe is the only injection kit of this equipment in 1/72 scale in my stash. It is the Hasegawa kit MB017 Starter Truck GB. This is an old model from 1974, and it was re-issued for the last time during the 1990s (kit #31117). My sample was the original issue, with the familiar brittle plastic of old Hasegawa models. It is a nice kit, with well-molded parts, but missing most of the fine details that such piece of equipment generally has. A few scratchbuilt refinements here and there could easily bring this model to a better standard.
The Toyota GB shared the same basic design of starter trucks used in other air forces since World War I: the driver had to approach the aircraft with the truck and hook the end of a spindle to the aircraft's spinner. The spindle would then turn the engine until it starts properly. The system was a consequence of the lack of starting devices in most Japanese aircraft. It could be found in virtually any IJA air base throughout the war.
Trying to study the subject a bit deeper, I discovered that the Toyota GB is not very well documented. For a start, I found out that its official name was Toyota KC, not GB, and it started to be manufactured in the mid-1920s by the Tokyo Gas & Electric Company (predecessor of the more modern Hino Truck company). The versions used before WWII had a dedicated engine on the back of the truck to feed power to the drive spindle. Later models used a gearbox to take off power directly from the transmission.
Later models, like the type depicted by the Hasegawa model, had their design defined around the time of the Machurian Incident (1931) and changed very little until the end of production. Of note are the X structure and the base in front of the vehicle, which provided support for the rudimentary height adjustment system for the drive spindle. Usually, a mechanic would stand on the base to lock the support by hand. All this is already present in a Hucks starter truck from WW I.
Well, enough research, let's get to the model. The basic assembly was pretty straightforward, with the body mounted on top of the chassis, then adding the the engine enclosure and driver cabin. After the planking is installed around the flatbed, all that remains to finish this model are the wheels, starting system, and smaller details.
I reworked the shifting and parking brake handles using the kit parts, but couldn't do the same for the radiator grille. I ended up making a new one using soldered brass rods. I also added the small plates which allow bolting of the spindle structure to the flatbed and replaced the pedals for brass ones. The front axle was modified to allow the installation of the wheels in a steered position - this simple modification always results in a more realistic looking model and is so simple to do.
The spindle strut was difficult to clean up. And I found out that two of the bars of the spindle supporting truss was not molded by Hasegawa. Without those bars, the height adjustment mechanism cannot work. So they were added and I could have gone further, but much of it would be guesswork:
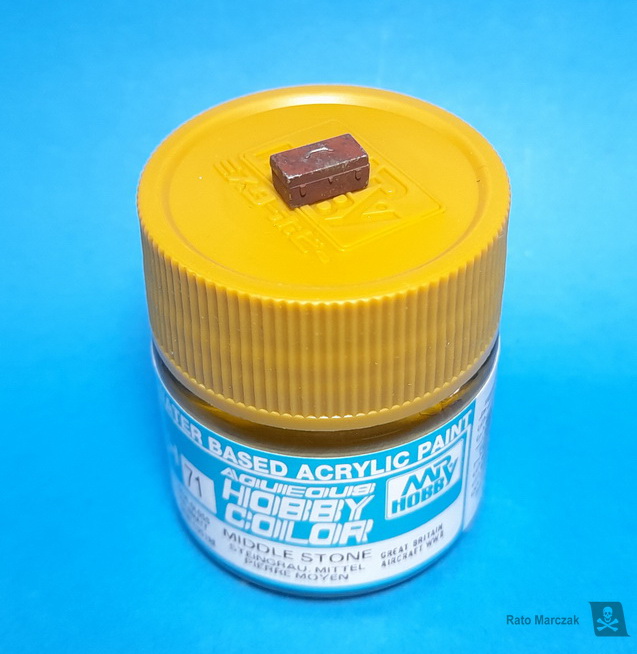
So, painting time. Apparently, all starter trucks of IJA in operation during WWII were painted in IJA khaki drab, a characteristic color of their vehicles. Two basic shades were used in WWII vehicles: khaki brown (close to FS 30118) and khaki yellow (close to FS 33440). I could not determine exactly what color was used by these vehicles, but the kit instructions mention GSI H-81 for the basic camouflage and H-71 for the canvas cover, so I assumed that khaki brown was the color.
After priming the model with Mr. Surfacer, I started the painting phase with a black pre-shading followed by a cloudy application of GSI H-81 Khaki. Next, I hand-painted the cargo floor with three wood colors, in preparation for the hairspray, which was applied soon after. Then a lighter version of the khaki was prepared by adding H-71 Middle Stone to the H-81 and the basic color was completed. I went back once again with an even lighter tone of the color and post-shaded areas that were more exposed to sunlight.
The area prepared with hairspray was scrubbed with a short-hair brush to expose the wood colors, and a black-brown enamel pin wash was applied on recesses and around raised details. The driver's dashboard was hand-painted with semi-gloss black. I used a spare decal to simulate the main dial and picked up the smaller details with white and silver. The seats were painted with Vallejo colors trying to simulate well-worn leather.
The canvas cover of the cabin seemed considerably lighter than the rest of the vehicle. I wanted to show the struts which support the canvas. So I sprayed the sagged areas with black and the raised ones with radome color. A very thin mix of the camouflage color and yellow was carefully airbrushed to cover the whole part, but preserving the highlights:
Paint chipping was quickly done with a sponge and dark-brown pencils. I have not bothered to apply the chipping with two colors, but in some places, I used a sand-colored pencil:
At this point, I noted that the Toyota starter truck had a tilting windscreen. New lateral columns were made from plastic and the kit's clear part was trimmed to accept a frame. The columns would later receive grab handles made of stretched sprue. Starter trucks from the early 1930s sported rear-view mirrors and windscreen wipers, but these conveniences were removed in operational wartime models. Curiously, late-war models would leave the factories without fenders or headlights.
The spindle and the supporting truss sub-assembly was weathered as well, but it was kept separated from the truck until all cables and chains were installed, near the end. But of course, I could not resist test-fitting it to the little truck. the wheels were also glued in place and adjusted to assure that all four were touching the ground:
Another part that was not glued until the end of the project was the canvas cover. This is because I had to put a driver in the cabin. The Hasegawa kit comes with a driver figure, but it is awful, to say the least. A resin figure of a British officer was used as a starting point, after checking how it would fit inside the cabin. I used the head and lower legs from the kit part, though. The arms were also repositioned to touch the controls.
After a miserable figure painting session, I ended up with something acceptable. Not to worry much, as it would not be much visible once the model is finished. My recent motto is: if resulted better than before, it is good enough.
Now, back to the truck, there were several small details that I had to finish. One of them was the telescopic fitting at the end of the boom. This was the part that was adjusted to the propeller hub of the airplane. modified spare parts to make it, and mounted it on a brass rod. This way the boom end would be inserted in a hole that I drilled previously in the spindle part.:
The headlights (parts 32 and 33) were hollowed to accept new lenses. I painted the interior with chrome silver, glued a soldering ball inside to simulate a bulb, and closed them with lenses made with a new and easy method that I will describe in another article:
I enjoyed painting and weathering other small details, like the red boxes side-mounted to the spindle truss (parts 9 and 10, I'd love to know what they were), a small toolbox that I have no idea where it came from, a fire extinguisher, and an oil can that I scratchbuilt from a resin milk can. The fire extinguisher seemed too modern, and would be replaced later on:
At this point, I made a last weathering pass in the whole vehicle, mostly of pigments, to simulate sand, dust, and dirt around corners and horizontal surfaces. A pencil was used to simulate exposed metal where the ground crew would rub their boots. The canvas cover received a dose of pigments as well. Then, the various cables and the chain used to position the spindle were installed, and the X structure in front of the truck was also glued in place.
After struggling to cement the windscreen in a slightly angled position (my hands are shaking a bit, you know?), I declared the little Toyota done:
But wait, that fire extinguisher is not nice. I did found photos of red extinguishers like this red one from the 1930s, but I wondered that by then brass extinguishers would probably be way more common. They were hooked to the truck sides. My original plan was to install the canvas doors, but again period photos showed that were rarely used outside Japan.
So I turned a new fire extinguisher in brass, added a hand wheel, a ring handle, and replaced the old one:
This model was used in a diorama along with my ICM Ki-27 Nate recently finished.
I hope you like this model and, if you have any questions or comments, drop me a line by email or through my Facebook page.
| Technical file | |
| Kit:
|
-
Hasegawa MB017 |
| Additions:
|
- Some spare parts |
| Basic
colors: |
-
Mr. Surfacer - Camouflage colors: mixes of GSI H-81 Khaki, H-71 Middle Stone, and H-402 Green Brown - Flat finish: Testor Dullcote |
| Notes: |
-
Several scratchbuilt details (see text). |
Rato Marczak © 2021
