| Tips on making
aircraft and vehicle lights - Part IV |
The
devil is in the details, claims the old saying. This is particularly
true in scale modeling, and representing well lenses/headlights in
plastic models have been challenging me for a long time. I wrote a
series of articles (Part I, Part II, and Part III)
in the past with good and not-so-good tips for simulating the different
types of lenses used on aircraft and vehicles. With new materials
appearing all the time, new ideas come to light. Therefore, here is my
last tip on how to make headlights with textured lenses.
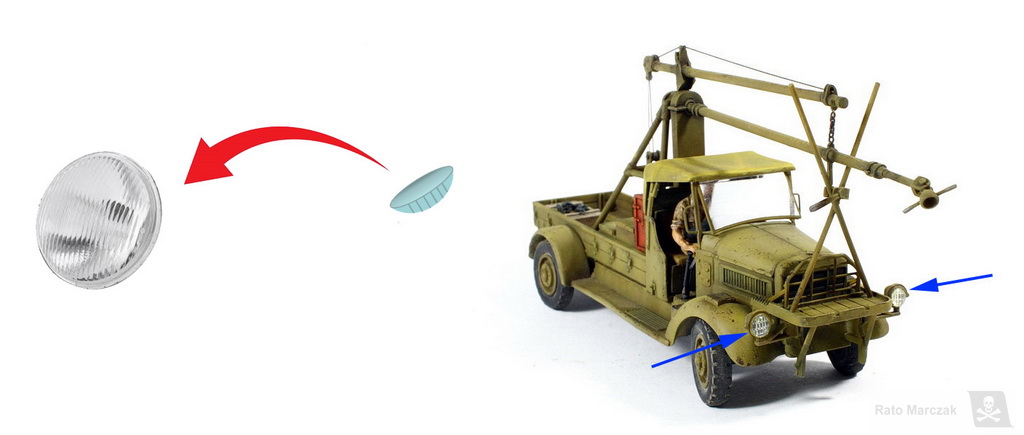
The key ingredient of this tip is UV curing resin or glue. As you will read in a moment, the cool thing about this particular method is its simplicity. It literally takes a couple of minutes to make several textured lenses ready for you on your model. I effectively used this method on my Hasegawa Toyota GB starter truck in 1/72 scale, and some friends asked me how I did them, so here it goes. Like I always say, if it works in 1/72 scale, it will work in any scale...
As I said, you will need a fast curing resin or glue or acrylic or whatever... and a mold (more on that later). With these two things you have a lens factory in hand:

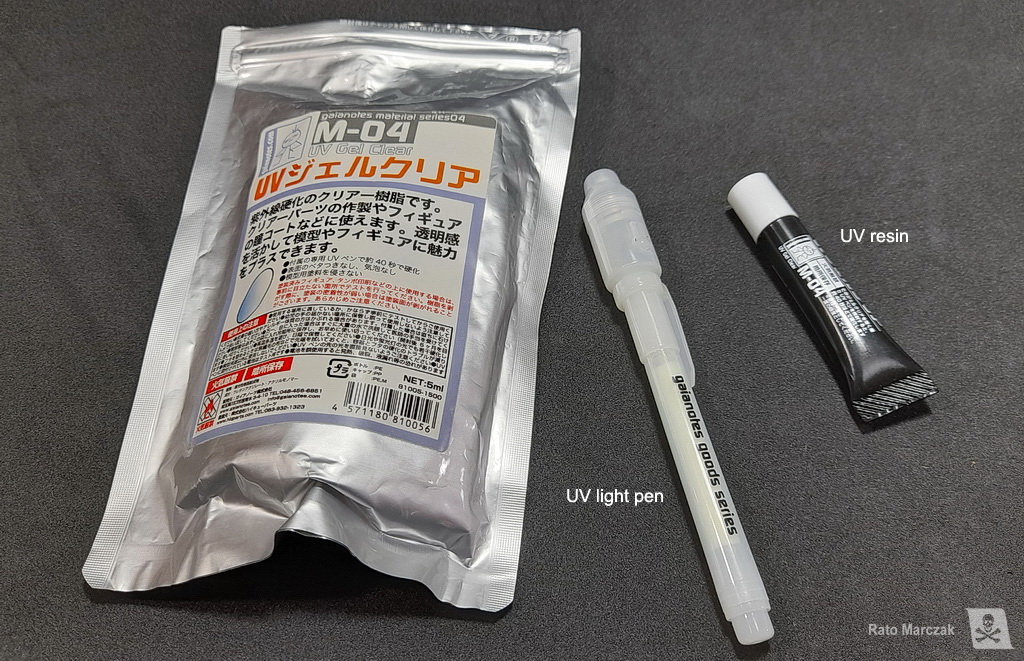
There are several brands of UV resin and glues. I've been using Gaianotes UV Gel Clear. It comes with a tube of UV gel resin and a UV light pen to cure the first. You may find the packaging overkill, but remember that these products are UV sensitive. Try to minimize their exposure to light, even natural, because most lights may have some UV frequency content or be close to it. That will reduce the shelf life of your resin, or even harden it beyond further use.
Non-textured lenses
First, the cheap whisky.
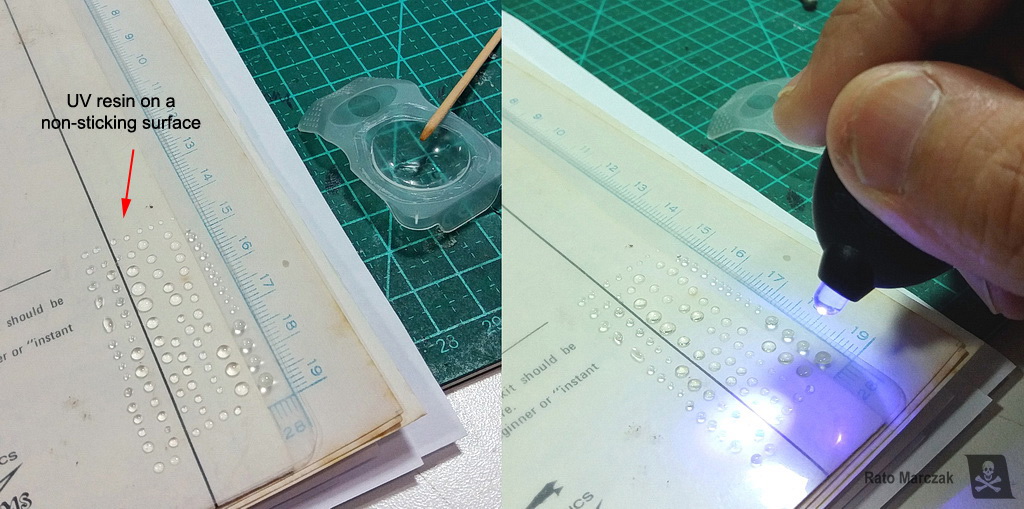
The easiest way to use UV curing polymers is also a nice method to make perfectly clear, non-textured lenses. All you have to do is to deposit the UV resin on a non-sticking surface using a round-tipped toothpick or rod. The amount of resin you deposit will determine its size/diameter. You have some control over it, thanks to capillary action: you can make them thicker or thinner by depositing more resin, and also non-circular shapes by dragging the toothpick. I like to make several of them to increase the chance to have two or three of the same size, in case you need them in pairs or tripes. A word of caution, though: it is important to reduce the exposition of the resin to UV light. I suggest you do pour a small amount on a cap, close the tube and store it properly, and work with the material reserved.
Once you are satisfied with the selection of lenses you prepared, hit them with UV light - 30 seconds is more than enough for a good quality UV resin. If you don't have a dedicated UV light-pen, you can use LED flashlights, but you have to determine the exposure time by trial and error.
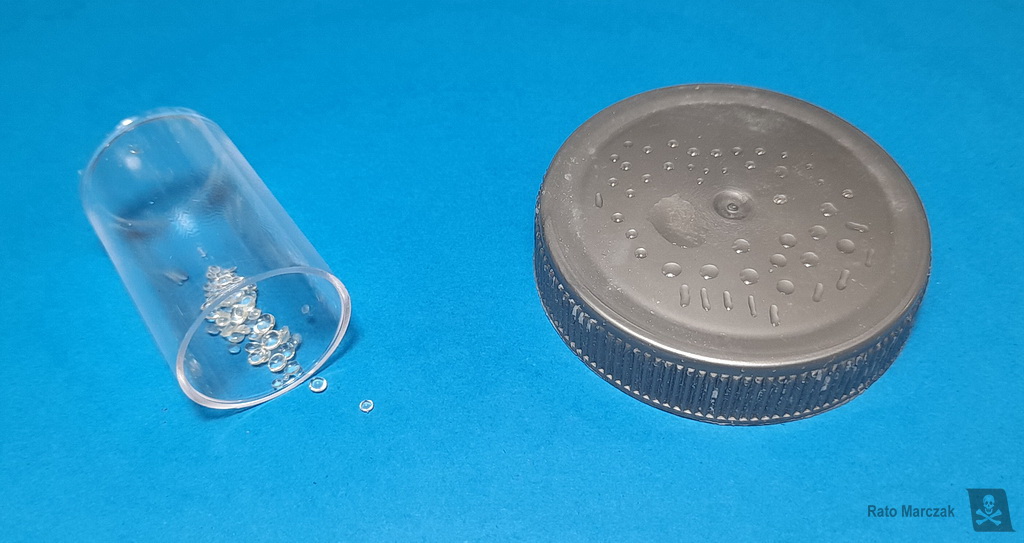
Playing with this method on a plastic bottle cap for five minutes rendered me a good stock of clear lenses. These are particularly useful for landing lights and small windows in aircraft models. And with a coat of transparent clear paint you can give them several other usages:
Textured lenses
Now, the good bourbon.
Now if you are interested in lenses with that characteristic texture, you have to (i) make a master or (ii) copy the texture pattern from somewhere. In the case of vehicle lenses, I found a pair of clear lenses in a 1/32 scale toy car, and the texture was crisply molded. I removed the clear parts from the toy and prepared a rubber mold of them. I opted for a very rigid mold, I mean, I used hard rubber (the type used to copy white metal parts) for reasons that will be clear in a minute.

The reason why I opted for hard rubber mold is to allow an alternative usage of the method, in case you don't want to use UV resin to make your lenses. When the mold is hard enough, you can use melted clear sprues to make the parts.
Here is how: take a length of clear sprue, like the ones carrying the clear parts of your models. Then heat one end enough to make it soft, but not to the point that it starts to burn. You just wanted it softened. Next, press the soft end against the rubber mold and try to hold it in place while it cools down a bit. It probably will take you a few seconds. The pressure is necessary to make the soft plastic fill in all the details of the mold. The size of the lens will be determined by the diameter of the clear rod, how hot you made it, and how much pressure you apply. You certainly will learn as you go. It is a gentle process, though, you don't have to push it hard against the mold. Finally, cut off the excess plastic and start over if you need more:
This method is interesting if you need a styrene part. It may be especially advantageous if you have colored clear sprues, as then you can make colored lenses like a breeze.
The variation of the method is the one that uses the UV resin. All you have to do is to pour small drops of the resin inside the mold. You don't have to fill the mold completely. Instead, adjust the resin amount accordingly to the diameter of the lens you want. Letting the drop fall directly over the mold will generally produce a perfectly round lens, but you may 'brush' the resin with a toothpick to make really thin parts. Hit it with the UV flashlight and there you have it - perfectly textured lenses:
You can make molds for two or three different texture patterns, and if time is not a problem, epoxy resin or PVA glue can be used as alternatives. Just do not use CA glue as the lens material, as it will stick irreversibly to the mold.
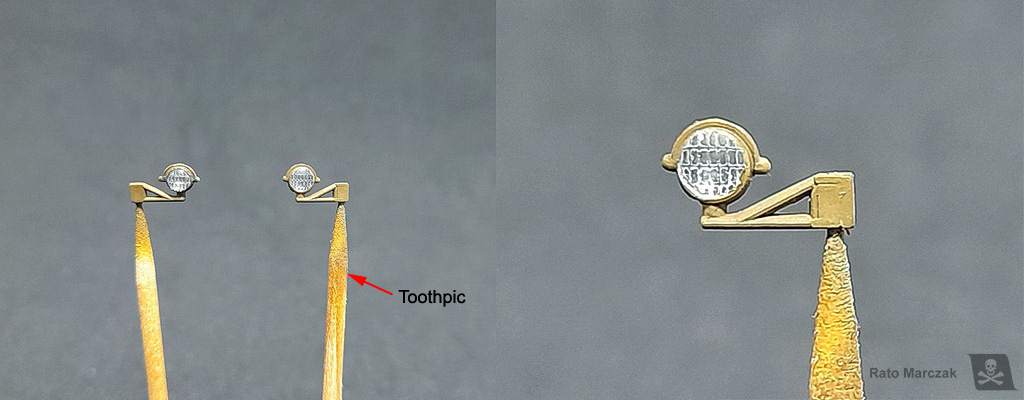
In one of my models, I hollowed the headlight, inserted a small ball simulating the bulb, and then cemented the lens. Looking from the right angle, you can even see the bulb inside. Cool!
Here is the case of my little Toyota GB. I for one would not be able to scribe such fine texture in such a small part. And best of all, it took me just minutes to make these headlights, literally:
And there you have it. Simple and fast, and it can be adapted to other applications, as well.
I hope you find this article useful for your next project. Let me know what you think.
Rato
Marczak
© 2021The key ingredient of this tip is UV curing resin or glue. As you will read in a moment, the cool thing about this particular method is its simplicity. It literally takes a couple of minutes to make several textured lenses ready for you on your model. I effectively used this method on my Hasegawa Toyota GB starter truck in 1/72 scale, and some friends asked me how I did them, so here it goes. Like I always say, if it works in 1/72 scale, it will work in any scale...
As I said, you will need a fast curing resin or glue or acrylic or whatever... and a mold (more on that later). With these two things you have a lens factory in hand:
There are several brands of UV resin and glues. I've been using Gaianotes UV Gel Clear. It comes with a tube of UV gel resin and a UV light pen to cure the first. You may find the packaging overkill, but remember that these products are UV sensitive. Try to minimize their exposure to light, even natural, because most lights may have some UV frequency content or be close to it. That will reduce the shelf life of your resin, or even harden it beyond further use.
Non-textured lenses
First, the cheap whisky.
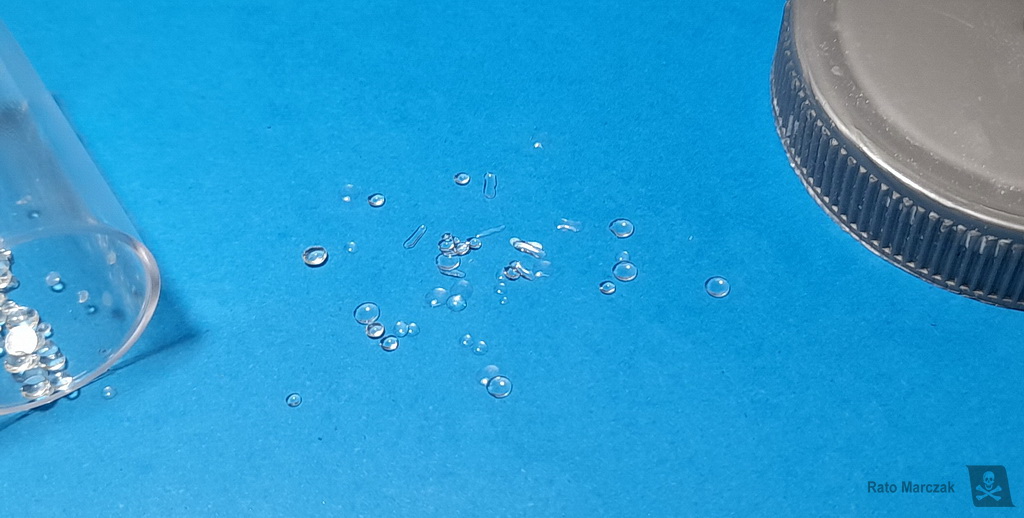
The easiest way to use UV curing polymers is also a nice method to make perfectly clear, non-textured lenses. All you have to do is to deposit the UV resin on a non-sticking surface using a round-tipped toothpick or rod. The amount of resin you deposit will determine its size/diameter. You have some control over it, thanks to capillary action: you can make them thicker or thinner by depositing more resin, and also non-circular shapes by dragging the toothpick. I like to make several of them to increase the chance to have two or three of the same size, in case you need them in pairs or tripes. A word of caution, though: it is important to reduce the exposition of the resin to UV light. I suggest you do pour a small amount on a cap, close the tube and store it properly, and work with the material reserved.
Once you are satisfied with the selection of lenses you prepared, hit them with UV light - 30 seconds is more than enough for a good quality UV resin. If you don't have a dedicated UV light-pen, you can use LED flashlights, but you have to determine the exposure time by trial and error.
Playing with this method on a plastic bottle cap for five minutes rendered me a good stock of clear lenses. These are particularly useful for landing lights and small windows in aircraft models. And with a coat of transparent clear paint you can give them several other usages:
Textured lenses
Now, the good bourbon.
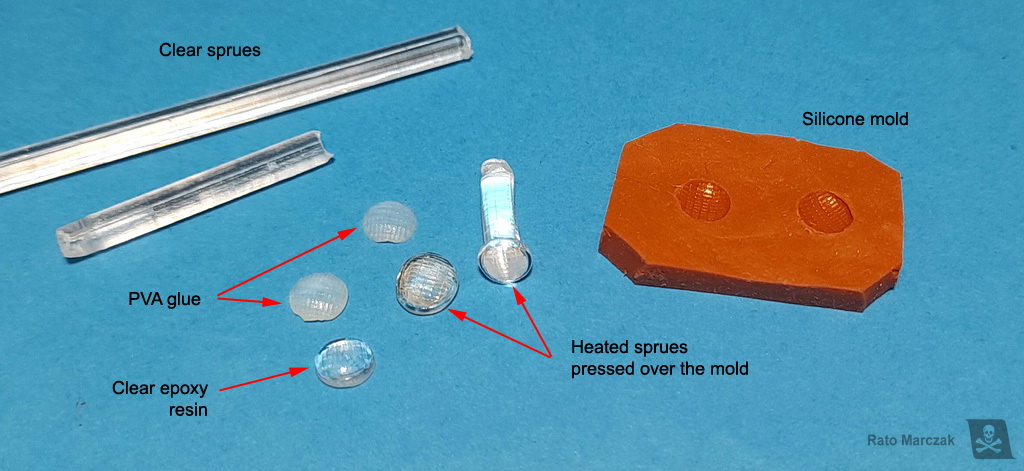
Now if you are interested in lenses with that characteristic texture, you have to (i) make a master or (ii) copy the texture pattern from somewhere. In the case of vehicle lenses, I found a pair of clear lenses in a 1/32 scale toy car, and the texture was crisply molded. I removed the clear parts from the toy and prepared a rubber mold of them. I opted for a very rigid mold, I mean, I used hard rubber (the type used to copy white metal parts) for reasons that will be clear in a minute.
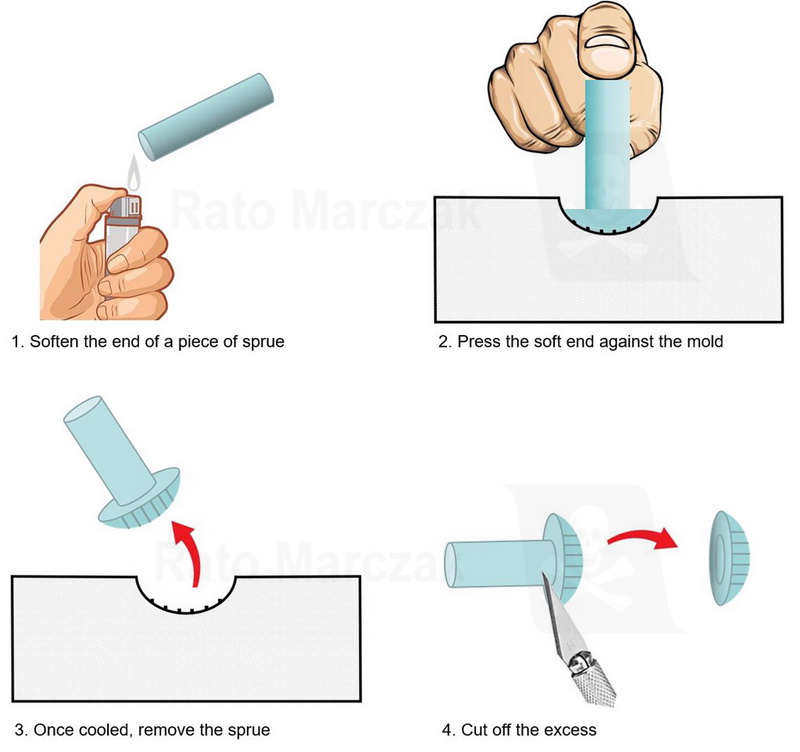
The reason why I opted for hard rubber mold is to allow an alternative usage of the method, in case you don't want to use UV resin to make your lenses. When the mold is hard enough, you can use melted clear sprues to make the parts.
Here is how: take a length of clear sprue, like the ones carrying the clear parts of your models. Then heat one end enough to make it soft, but not to the point that it starts to burn. You just wanted it softened. Next, press the soft end against the rubber mold and try to hold it in place while it cools down a bit. It probably will take you a few seconds. The pressure is necessary to make the soft plastic fill in all the details of the mold. The size of the lens will be determined by the diameter of the clear rod, how hot you made it, and how much pressure you apply. You certainly will learn as you go. It is a gentle process, though, you don't have to push it hard against the mold. Finally, cut off the excess plastic and start over if you need more:
This method is interesting if you need a styrene part. It may be especially advantageous if you have colored clear sprues, as then you can make colored lenses like a breeze.
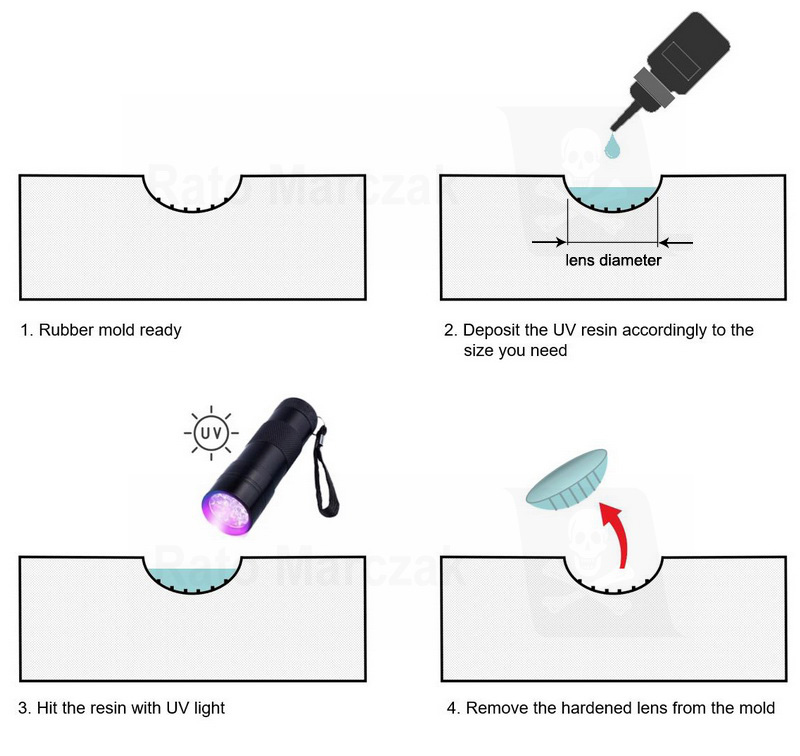
The variation of the method is the one that uses the UV resin. All you have to do is to pour small drops of the resin inside the mold. You don't have to fill the mold completely. Instead, adjust the resin amount accordingly to the diameter of the lens you want. Letting the drop fall directly over the mold will generally produce a perfectly round lens, but you may 'brush' the resin with a toothpick to make really thin parts. Hit it with the UV flashlight and there you have it - perfectly textured lenses:
You can make molds for two or three different texture patterns, and if time is not a problem, epoxy resin or PVA glue can be used as alternatives. Just do not use CA glue as the lens material, as it will stick irreversibly to the mold.
In one of my models, I hollowed the headlight, inserted a small ball simulating the bulb, and then cemented the lens. Looking from the right angle, you can even see the bulb inside. Cool!
Here is the case of my little Toyota GB. I for one would not be able to scribe such fine texture in such a small part. And best of all, it took me just minutes to make these headlights, literally:
And there you have it. Simple and fast, and it can be adapted to other applications, as well.
I hope you find this article useful for your next project. Let me know what you think.
